Rotki Usage Guide
Introduction
In this section we are going to see how to use various parts of the rotki application.
First time sign-up
When you start rotki you are greeted with a sign-in/signup prompt. Rotki is a local app and the user will exist only in your local system. The account used in rotki.com doesn’t exist locally and is used only to manage your payments for the premium subscription.
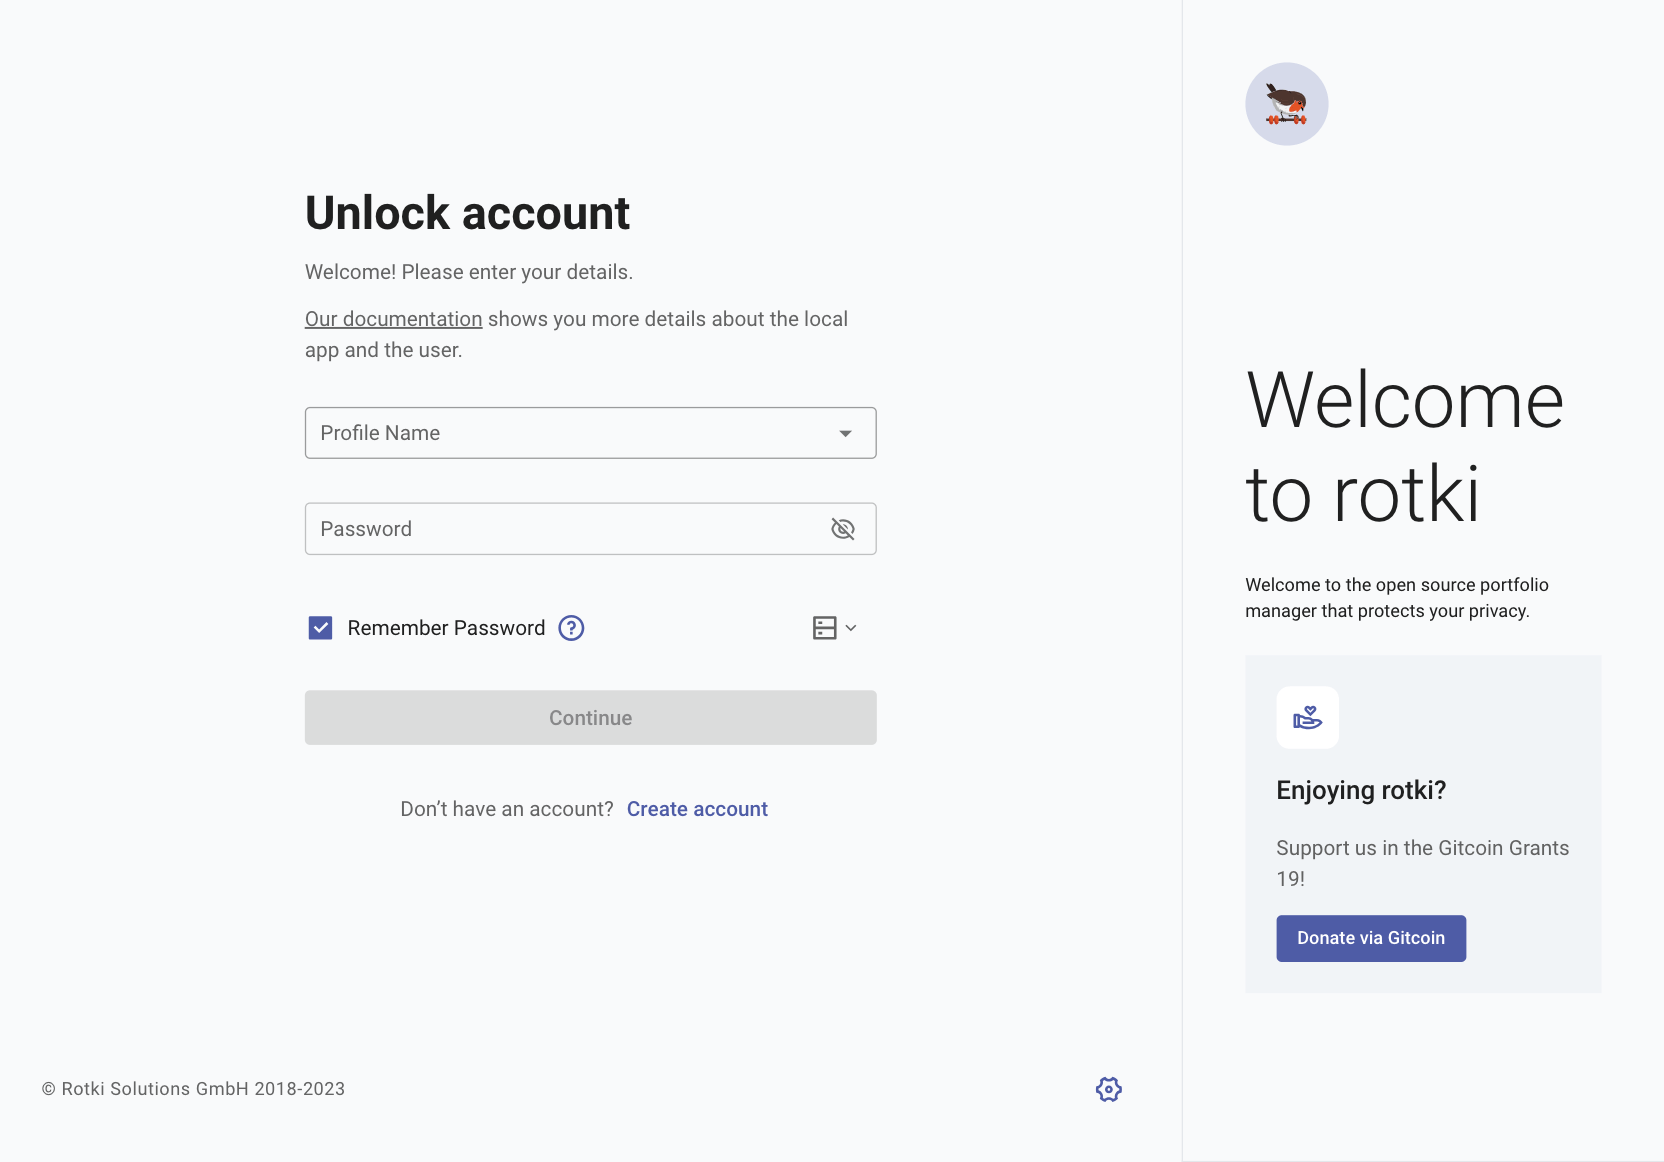
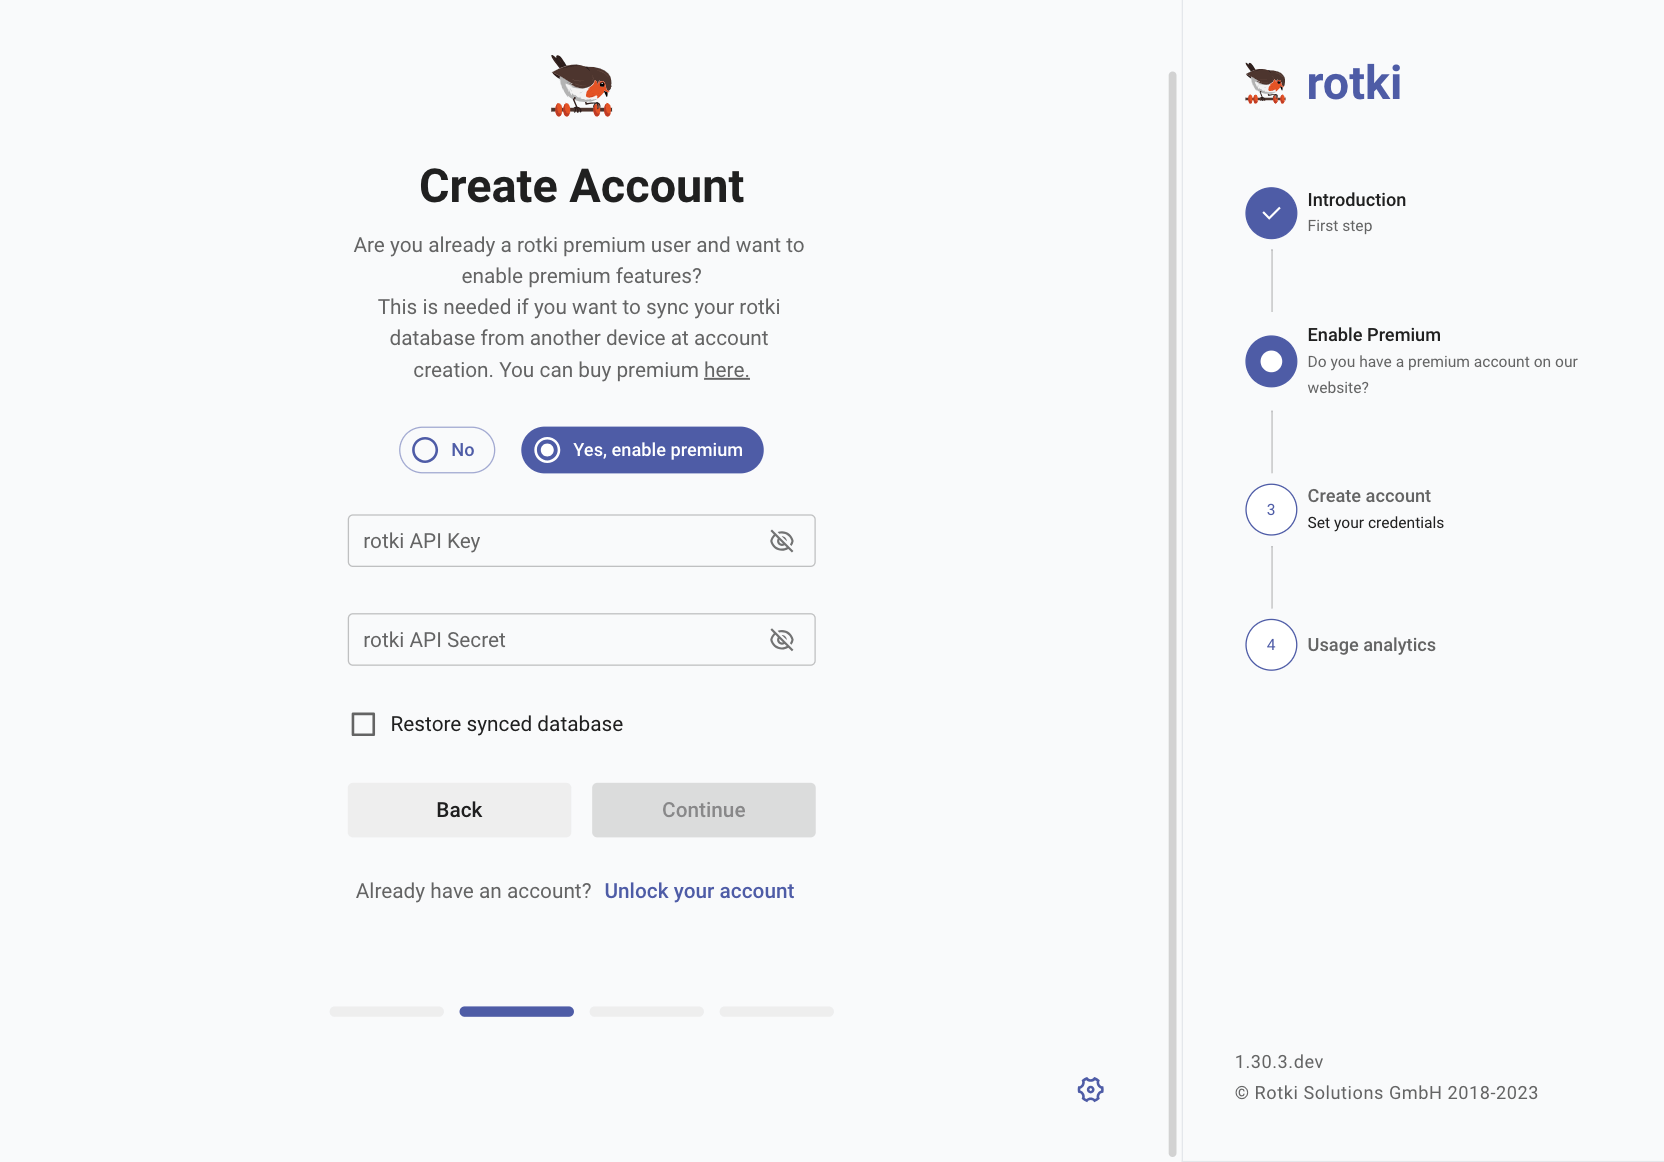
For creating a local account press Create Account. If you already have a premium subscription, you can choose to associate this local account with your premium subscription via the use of api keys.
If you want to restore an account using premium sync during the account creation, then you can Enable premium, and enable Restore synced database (Create a new account that restores a backed up database (premium user only)), insert your API Key and the secret here. Api key and secret can be found in your account page at rotki.com .
Then you can click Continue button.
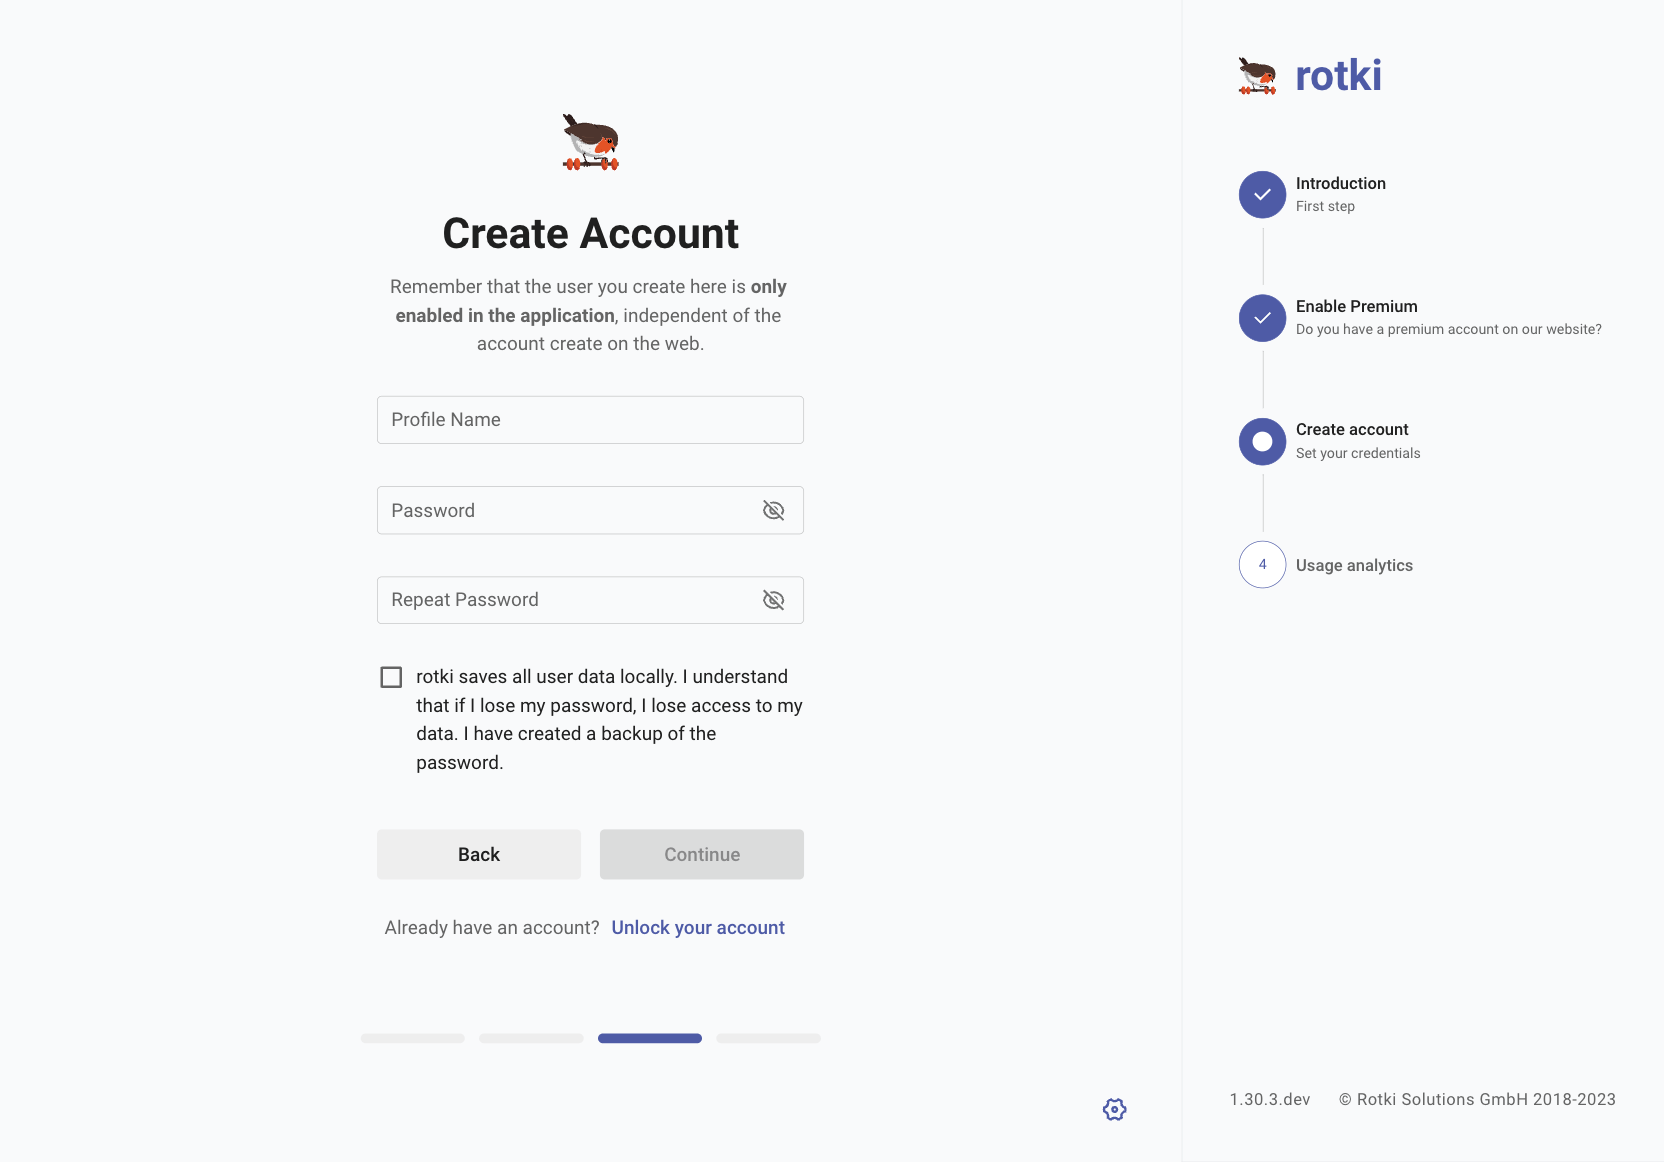
You have to provide a username and a password:
Username: it is just an identifier for your database. This is the local user. It doesn’t need to match any previous username or the username of your premium subscription at rotki.com .
Password: Do not forget this password. It is used to encrypt all your local files.
For a completely new account, premium API key and secret can be added either using the prompt provided or using Set up rotki Premium after logging in with the new account.
All accounts are created in the rotki directory, see the section Rotki data directory to know where it is located.
Create a new account that restores a backed up database (premium user only)
You may need to move the rotki database to a new device, for example after your old one was destroyed and left no backups. Normally you can do that manually, so long as you keep backups (which is something you should always do!). But as a premium user, you can restore the encrypted database that is backed up at the rotki.com server. To do that you must follow the instructions described in the previous section, add the API key/secret and use the same password that you were using for the local user of that database. If the password is not the same, opening the database will fail. Do not use the password of your rotki.com account here.

See the section Sync data with rotki Server to know more about how the premium subscription will behave with multiple accounts/devices and how to sync your data with rotki Server (this option is disabled by default).
Keep in mind that syncing only involves the user database, and not the global database. The global database keeps all assets data, global addressook for names and historical prices. It is highly recommended to also manually move it. It is located in the Rotki data directory.
Another alternative instead of moving the entire global DB is to use the Exporting and importing user assets function.
Use an account from a different installation
If you want to move your data to another system or want to restore it then you will need to do some manual steps. First identify the Rotki data directory in both the source and the destination system. Then move the entire data directory from the source system to the destination system and make sure that the same rotki version is used in both systems.
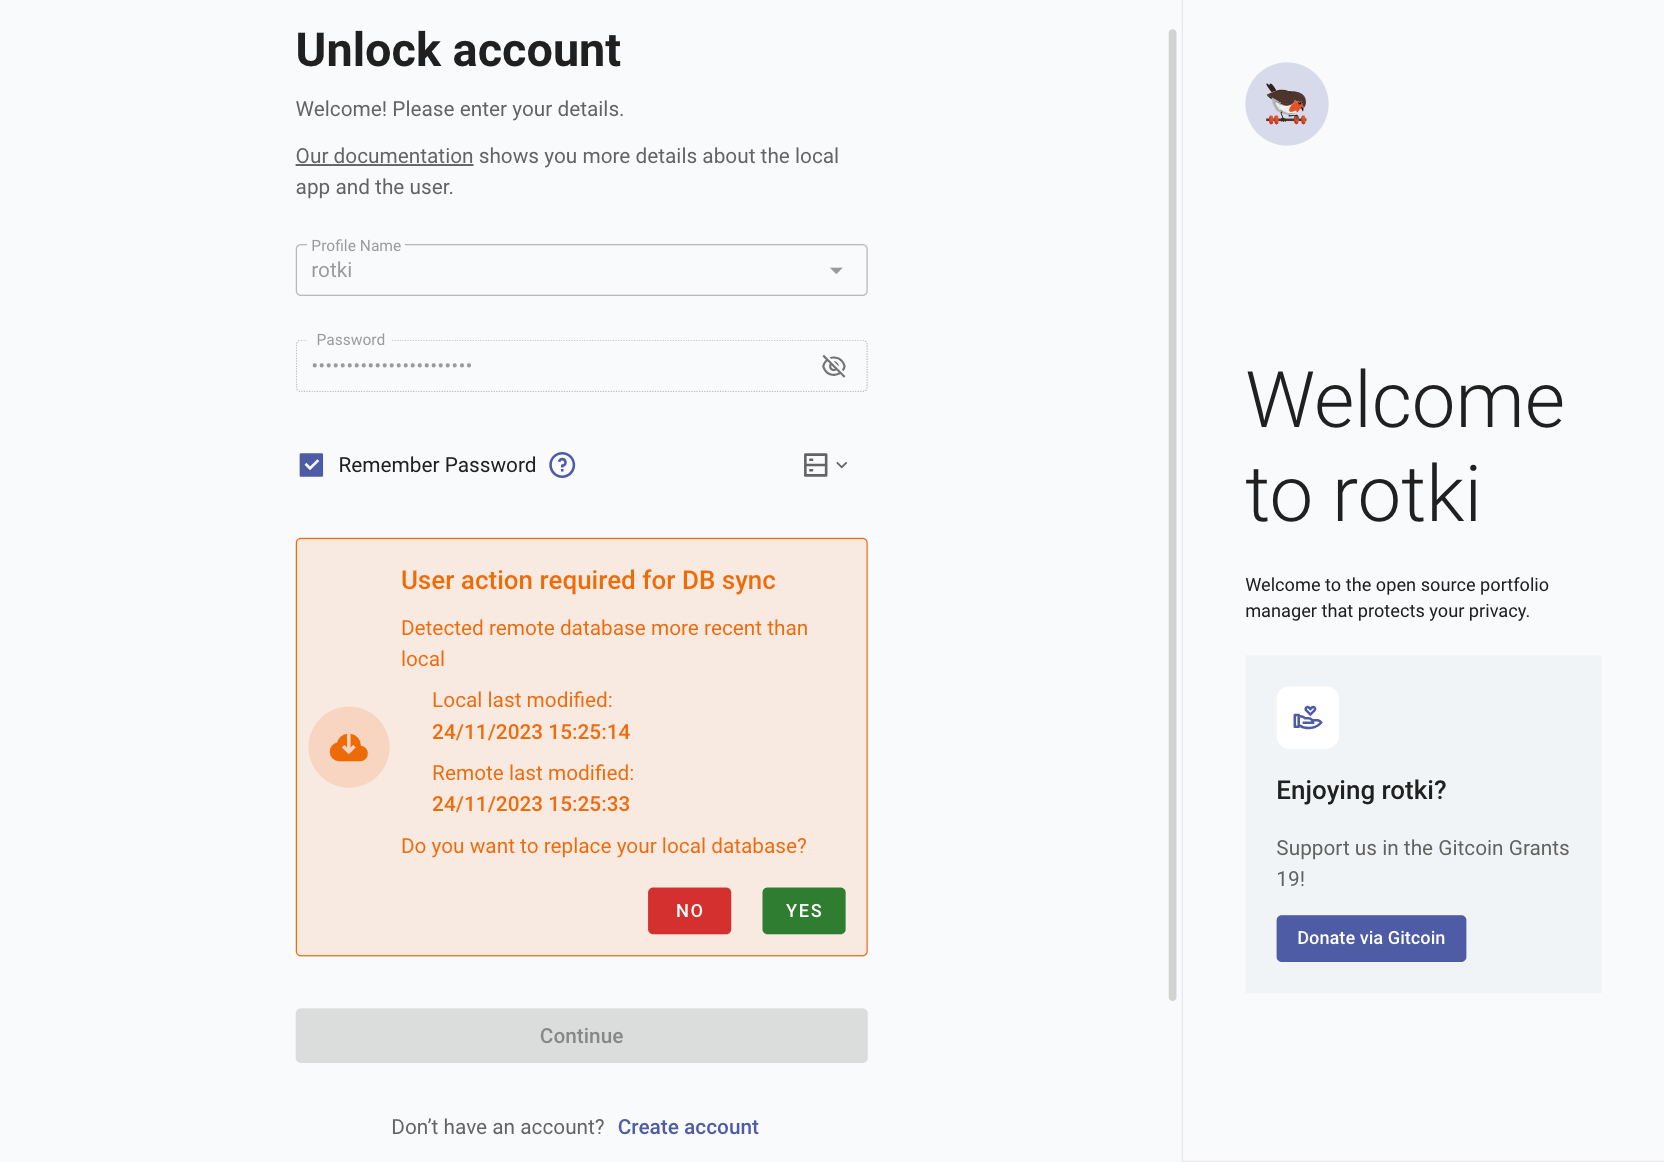
Sign-in
If you already have a local rotki account just write the name and the password at the sign in prompt. Note that this is not the online account you create at rotki.com to buy a premium subscription.
Set up rotki Premium
If you decide to purchase rotki Premium at a later time, you can set it up via .
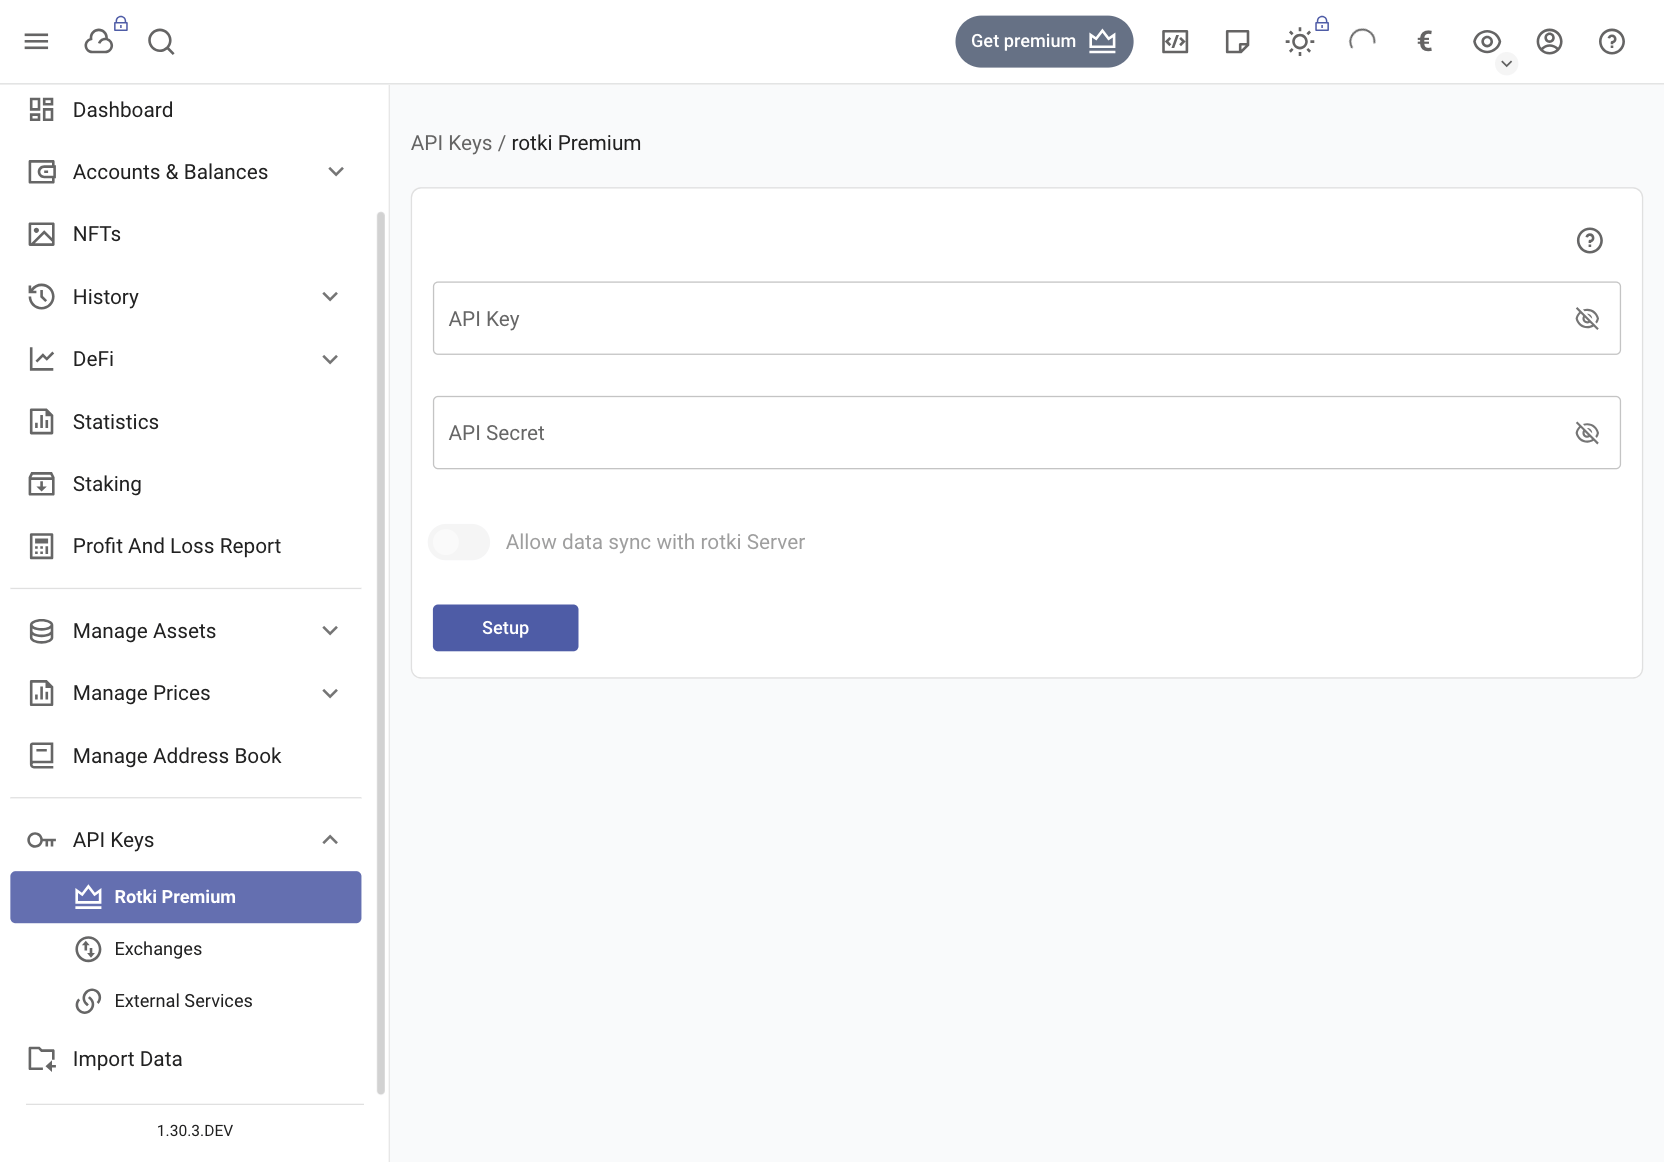
If after you have set up premium you wish to replace or disassociate keys with the currently logged-in account, you can do so via the same page.
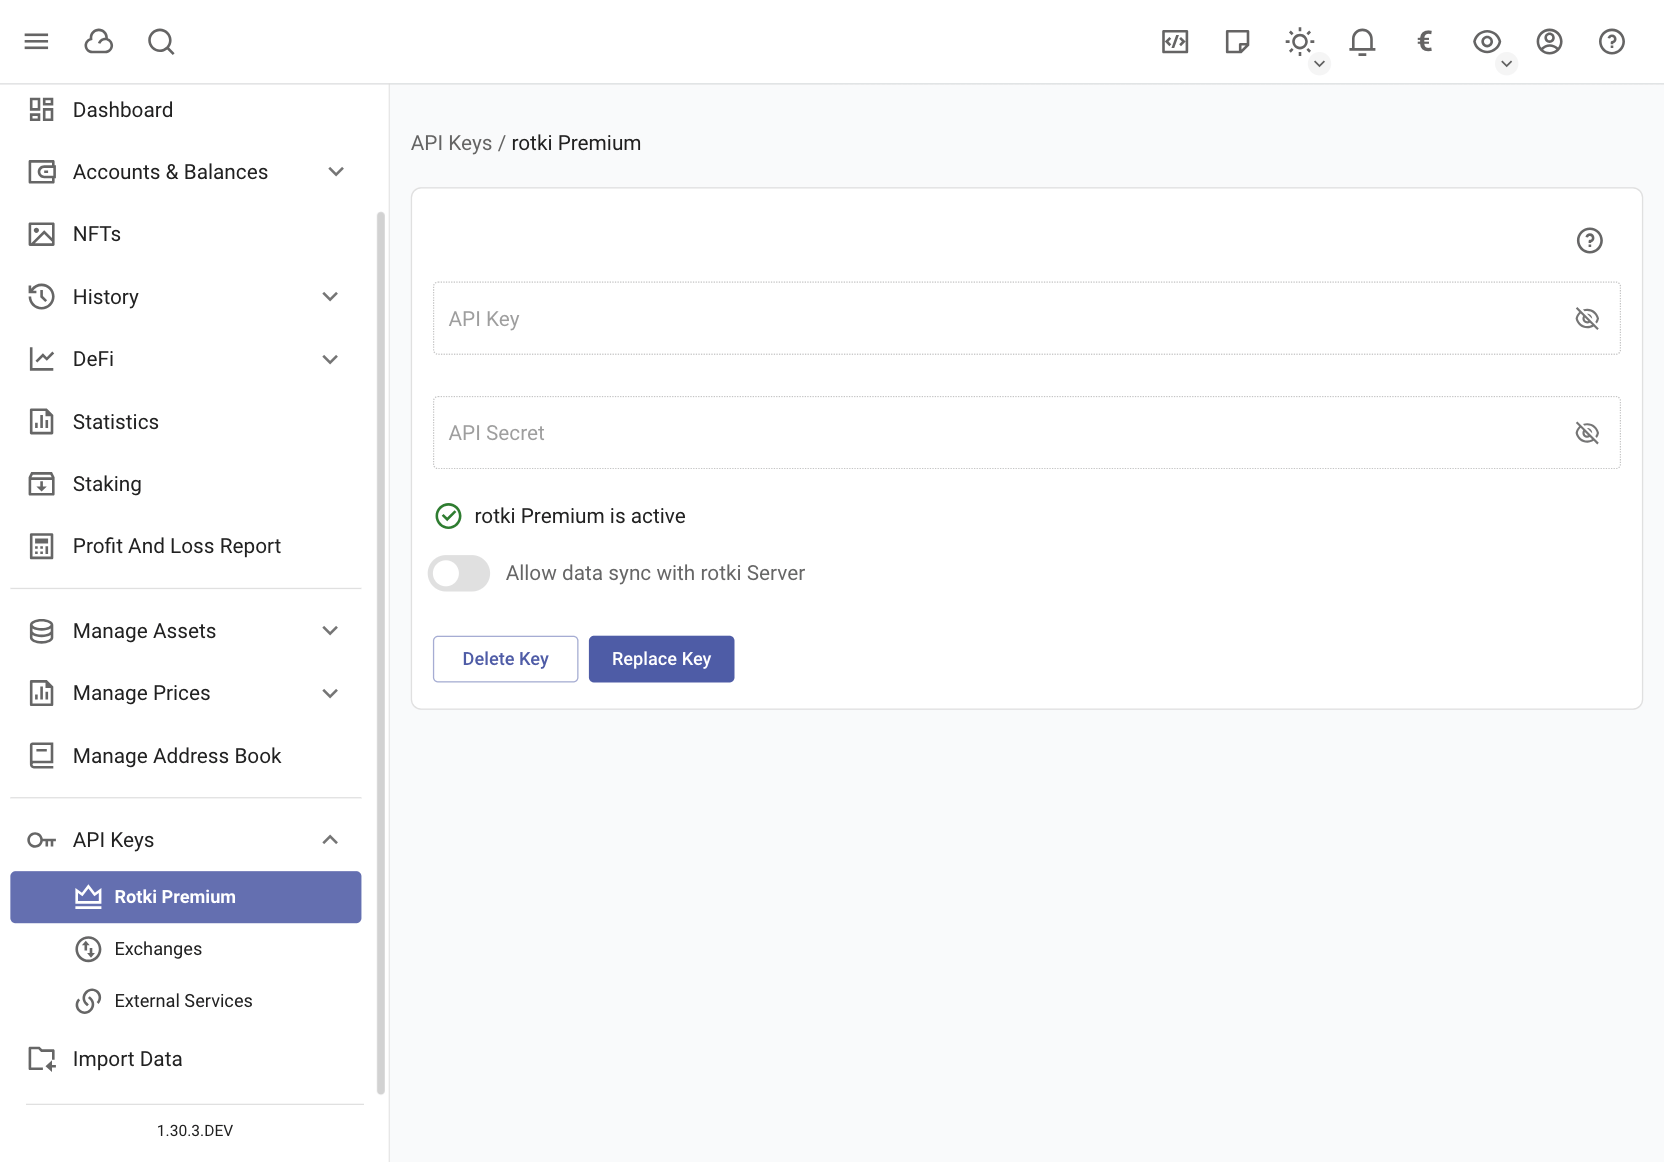
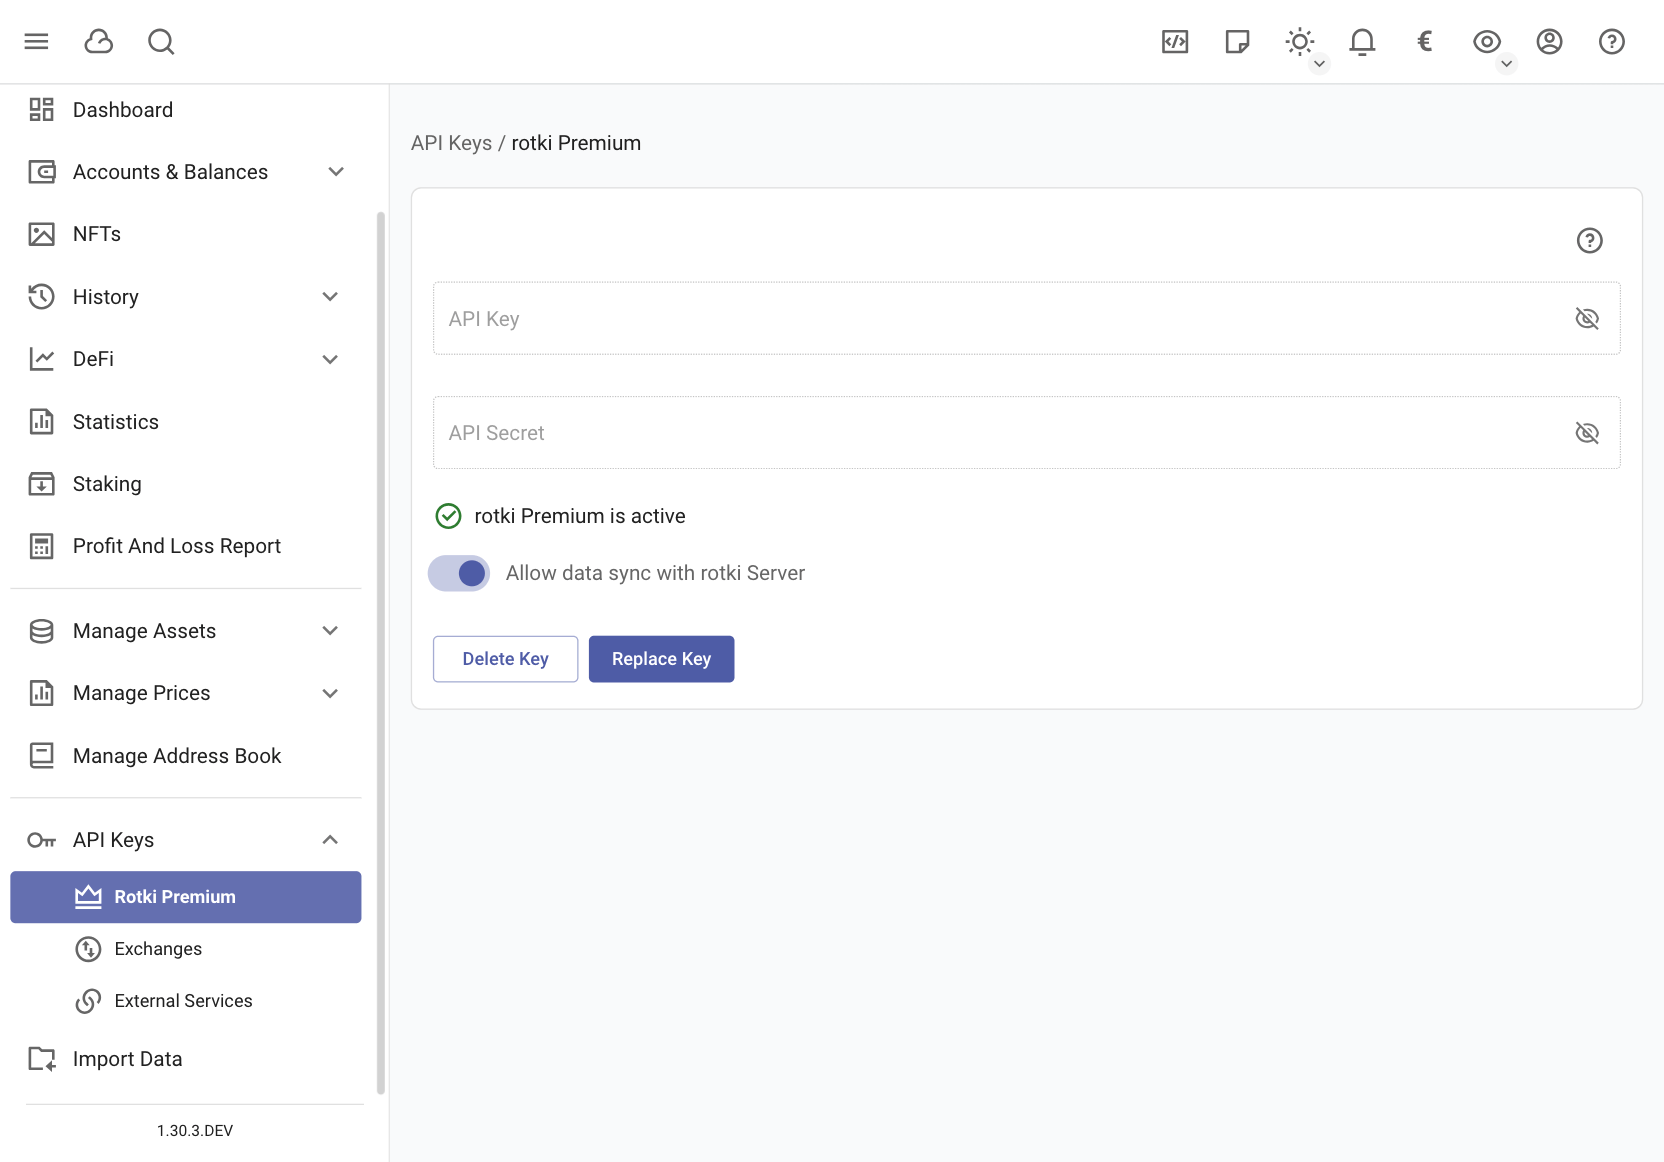
Sync data with rotki Server
To back up your data in the rotki Server switch on “Allow data sync with rotki Server”. This allows you to restore it later on in any account/device as long as the same API Key/secret and account password are used.
Bear in mind that in case of using multiple accounts/devices with the data sync enabled, the one with the most recent login will upload the most up-to-date data to rotki Server. After that, using the same account from another device may ask you whether you want to replace your local database with the remote one.
You can manually move the global DB that contains the assets from one system to the other too. Find the Rotki data directory in the source system. Assuming it’s linux it will be ~/.local/share/rotki/data. The global db is then ~/.local/share/rotki/data/global/global.db. Manually move it to the equivalent location in the new system.
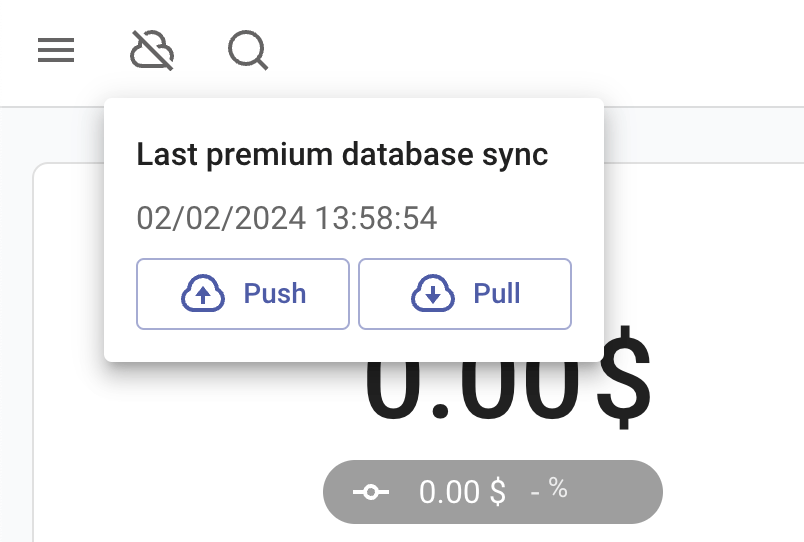
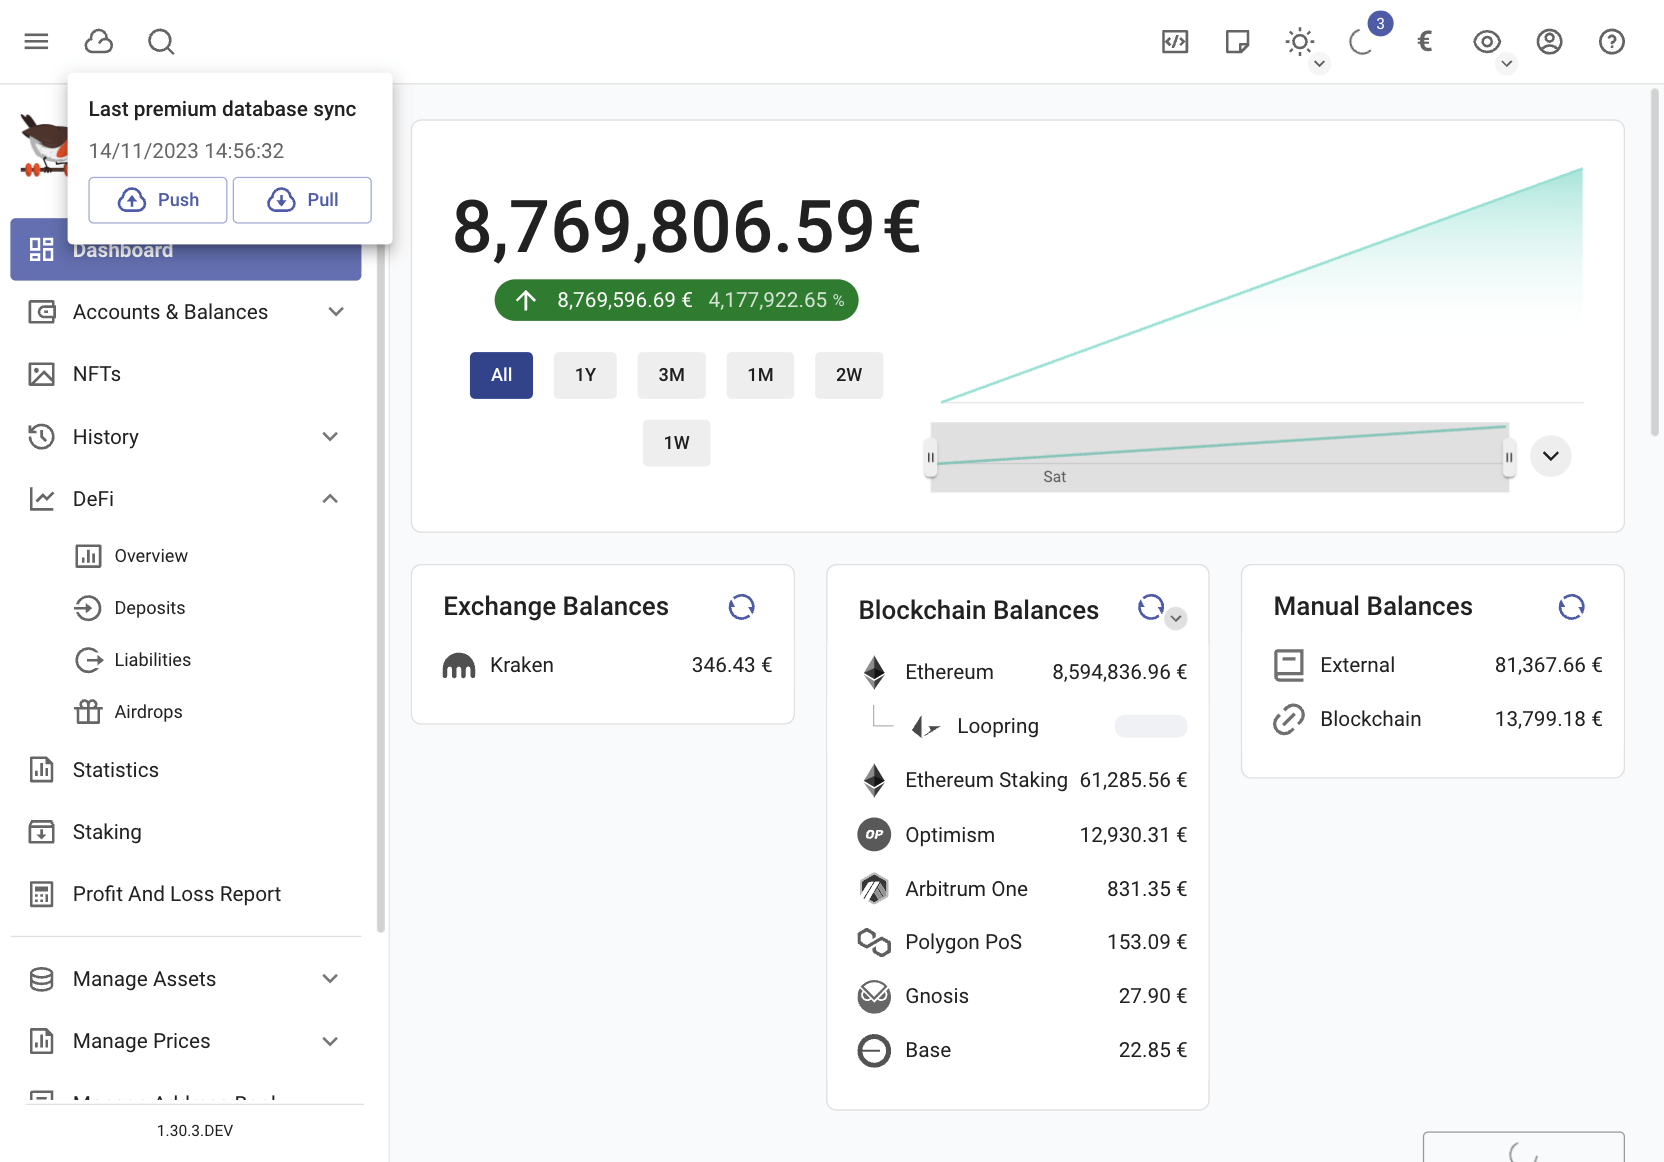
You can also manually sync your database by clicking the “cloud” icon in the toolbar.
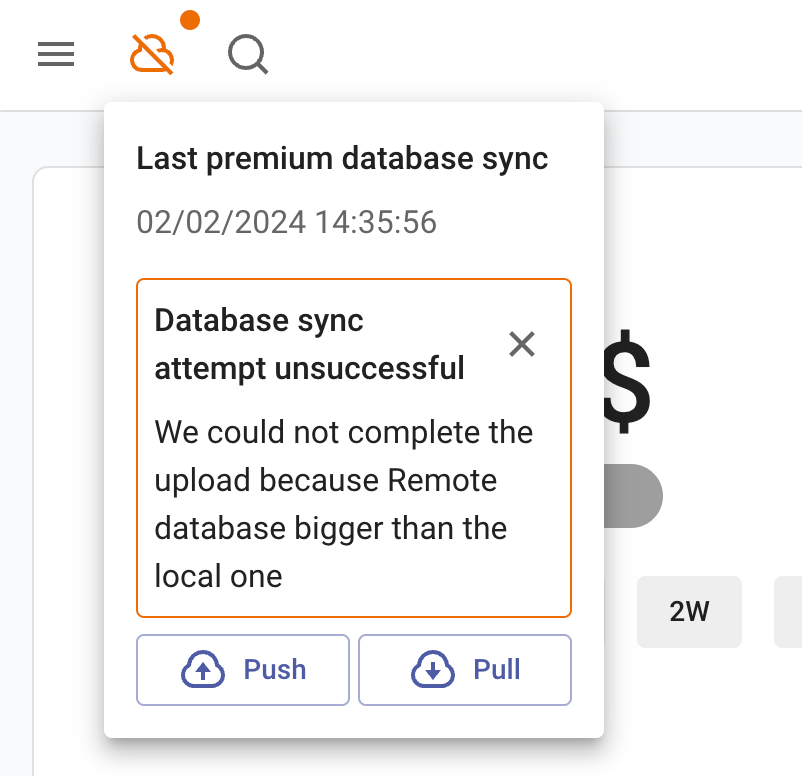
If the automatic database sync fails, a message will appear here. For certain types of messages, such as Remote database larger than the local one, the message merely serves as a warning, and you can still perform a “force push” by clicking the button.
Upgrading rotki after a very long time
If you have not opened rotki for more than a year and a half and you have data you want to keep in your account then you will need to upgrade it with intermediate versions before being able to use the latest one. If this is the case you will see a notification when you try to start rotki. For now this will happen if the last version that you used with your database was 1.17.x.
The steps to update your database if you get this error are the following:
Download version 1.25.2 of rotki from the release page and install it.
Log into your account with rotki 1.25.2. The upgrade process should happen and your account’s database should be updated. If the upgrade was successful in the settings Database Info & User Database Backups you will see that the
Database versionis now34. You can now close rotki.Download the latest version of rotki and install it.
Open your database with the latest version.
After completing these steps you should be good to go.
The supported database versions per rotki version are:
rotki <= 1.25.2: Version 1 to 34 of the database.rotki >= 1.26.x: Version >= 26 of the database.
Customizing
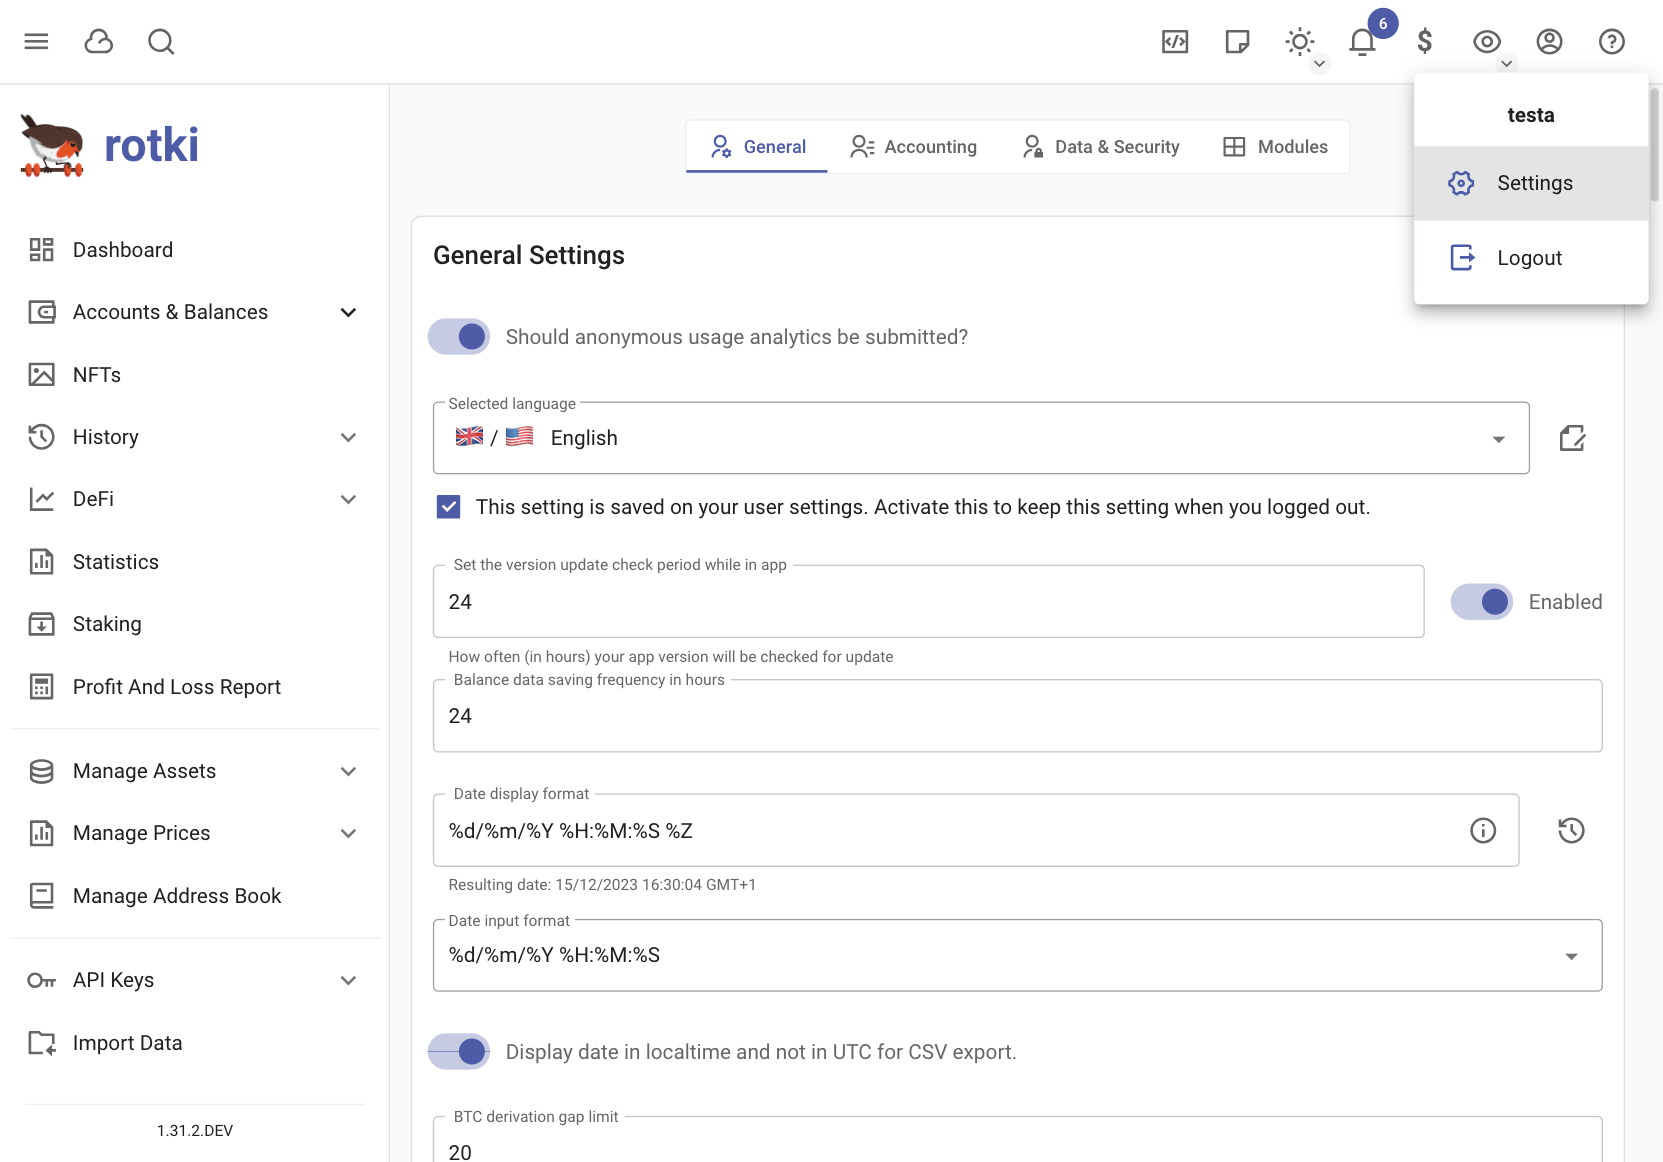
This section contains information about how to customize the application through the settings. By clicking on the user icon on the top right and choosing settings you can customize some basic settings for the application.
Changing the Profit Currency
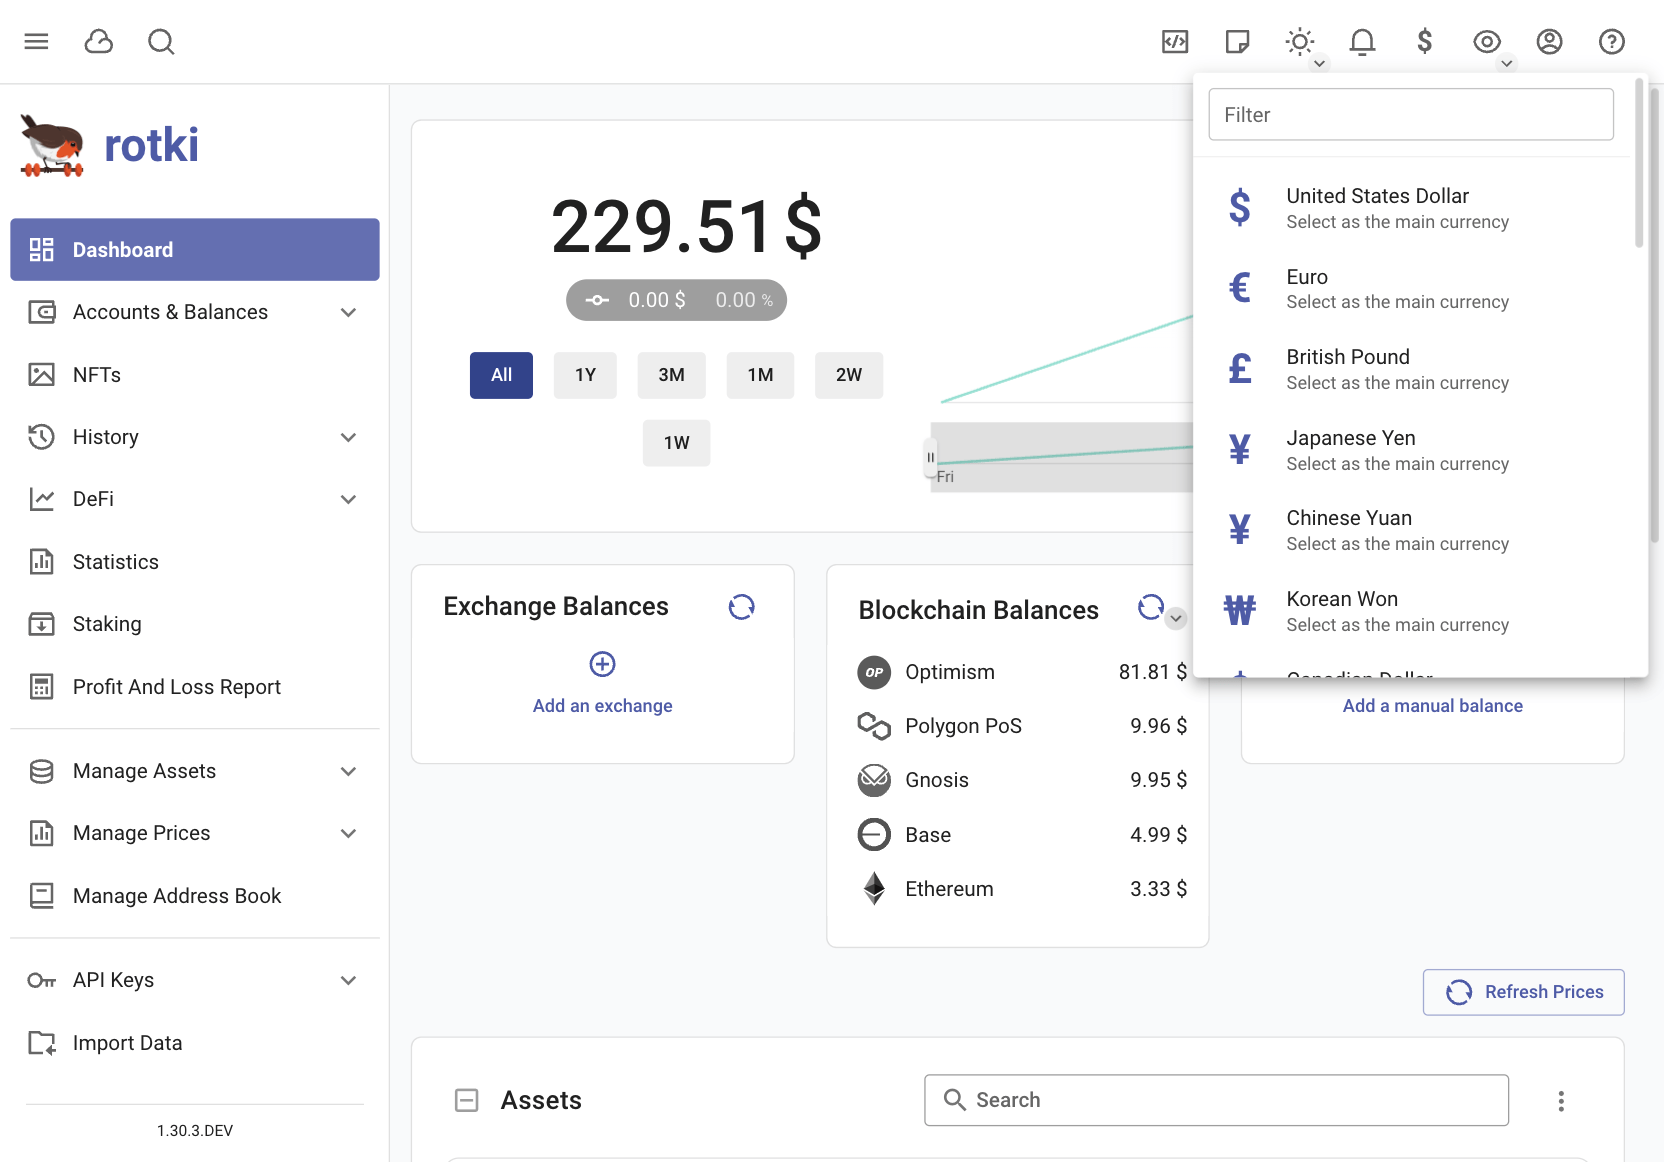
Rotki calculates everything, including your total profit/loss during the PnL report into a given fiat currency. This is what we call the profit_currency. By default this is USD. You can easily change this setting by clicking on the currency icon in the top right menu and changing it to the currency you are using.
Customizing the application settings
You can go to setting menu via .
By choosing the “General” settings button you can customize some general application settings.
General Settings
Language
Set the language used on the app. This feature is experimental and may not work as expected for some languages. This is because all static sentences in the app have to be manually translated and that is a long and ongoing process. Therefore, we need your contribution to speed it up. You can contribute to the translation here.
Anonymous usage analytics
Specify whether the application is allowed to submit anonymous usage analytics. As a local application rotki has no other way to measure how many active users it has other than submitting some form of analytics. The data that are submitted are completely anonymized and contain no sensitive information.
Balance data saving frequency
Set how often (in hours) the data of all balances will be saved. This data is used to calculate statistics and other historical data to show to the user.
Date display format
Set the display format of the dates in the rotki user interface. One such format is %m/%d/%Y %H:%M:%S. That means month/day/year hour:minutes:seconds. For possible valid formats check here.
Display in local time
Choose whether local time or UTC should be shown in the CSV exports, user logs in the backend and other locations.
BTC Derivation gap limit
This is the derivation gap limit that will be used when trying to derive addresses from a bitcoin xpub. For more information check here.
Treat staked ETH as ETH
If this setting is set then ETH2 (staked ETH) will appear as ETH in the UI and all the tables and charts will use ETH combining the values of both ETH and ETH2.
EVM Chains for which to skip automatic detection
Configure which EVM chains should not automatically detect tokens. By default, EVM chains detect activities of all registered EVM accounts in other EVM chains.
Amount Settings
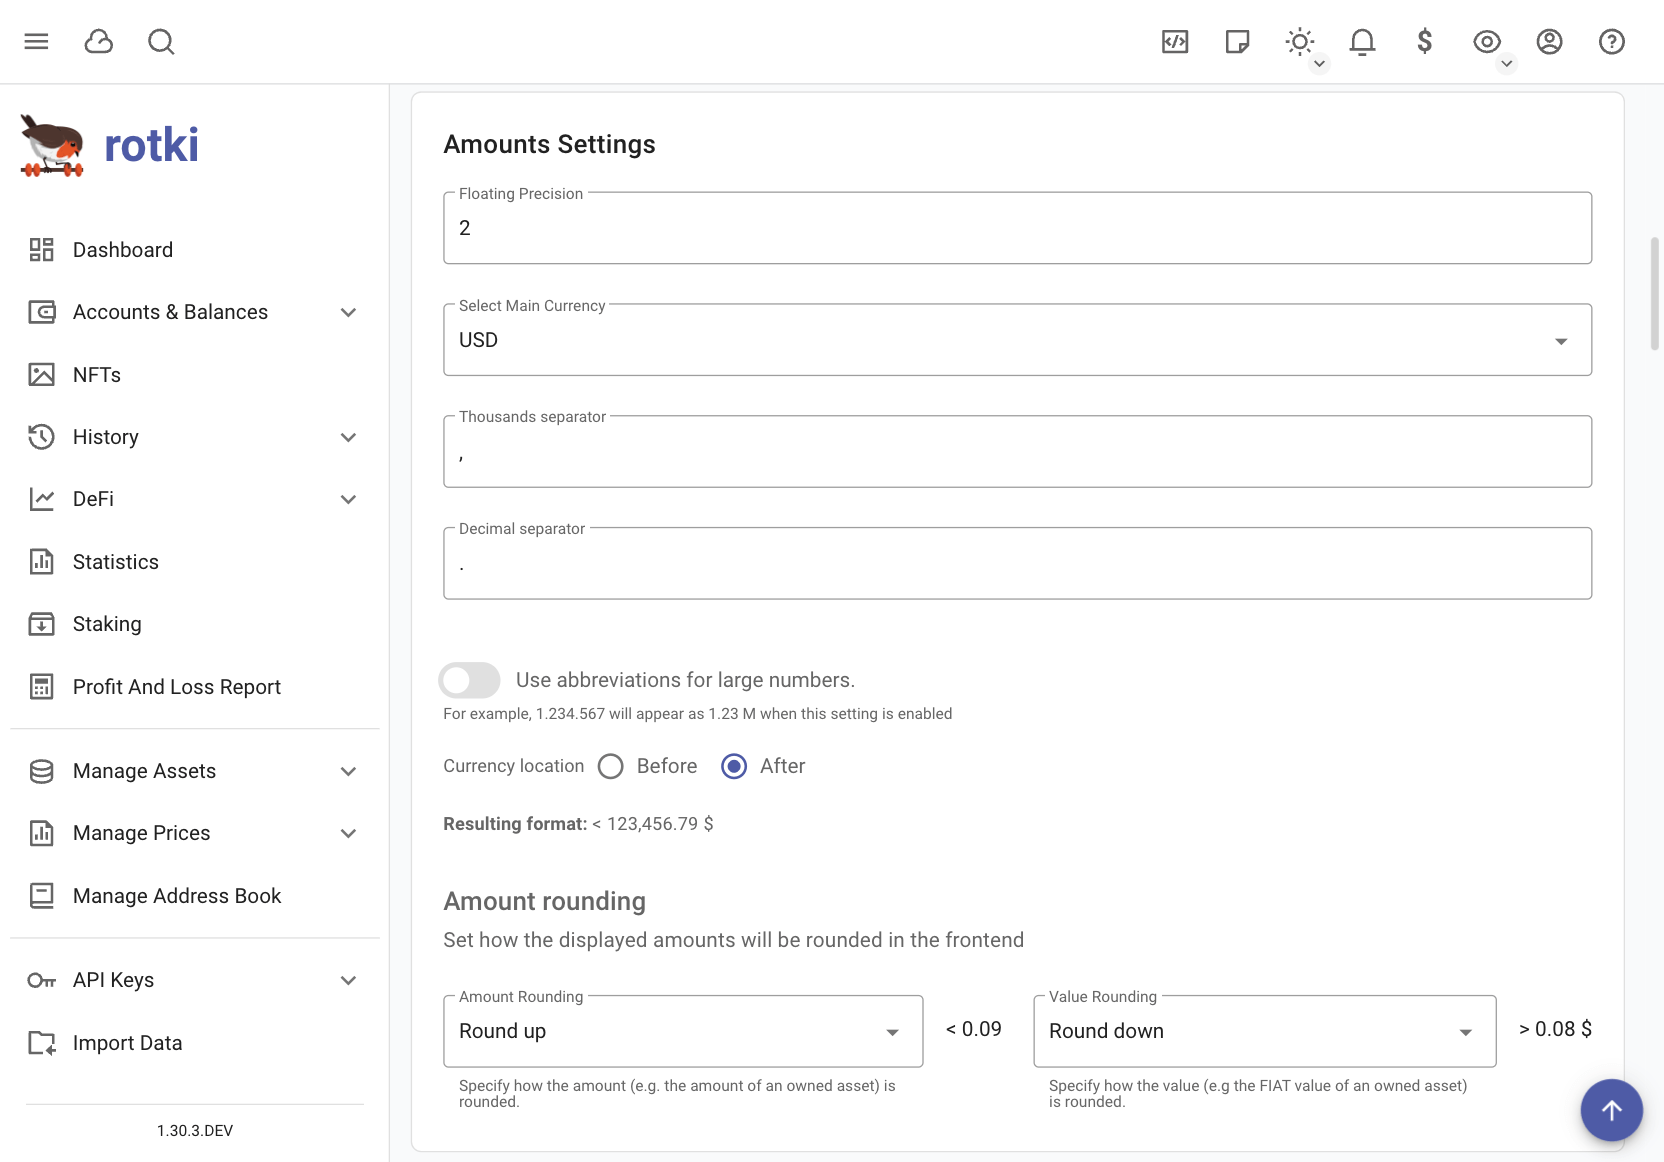
Floating precision
Set how many decimal points should be shown in the UI for floating point numbers.
Main currency
Same as changing the profit currency.
Thousands separator
This is the symbol that will be separating the numbers every 3 digits for big numbers. For example in 1,000,000, the symbol is ,.
Decimal separator
This is the symbol that will be separating the floating part of the number. For example in 5.42 the symbol is ..
Use abbreviations for large numbers.
If this setting is enabled, large numbers will be abbreviated. For example, “1,234,567” will be displayed as “1.23 M”. You can also set the minimum value to be abbreviated; for instance, you might choose to abbreviate numbers above 1 million but not those below it.
Currency location
This setting chooses if the currency symbol will be shown before ($1,000) or after(1,000$) the number.
Amount Rounding
This setting modifies the rounding mechanism choosing from Round up, Round down and Half even (rounds to the nearest value). It can be individually modified how amounts and values are rounded.
RPC node setting
This setting allows you to modify the nodes that will be queried to interact with the blockchains. We provide a list of public nodes but sometimes they are not available or are overloaded. You can see either a green or a red icon near each node that shows its connection status. This is why it is a good idea to have more nodes just in case and to have the possibility to customize the priority with which they are queried. When making queries we always give preference to your own nodes if you have any and then add a small list of randomly selected open nodes in case they are needed. If you don’t have your own node then the open nodes are always selected. The weight of the node sets the probability of picking it and is represented by a percentage. From that list it is also possible to mark them as active or inactive by using the toggle button.
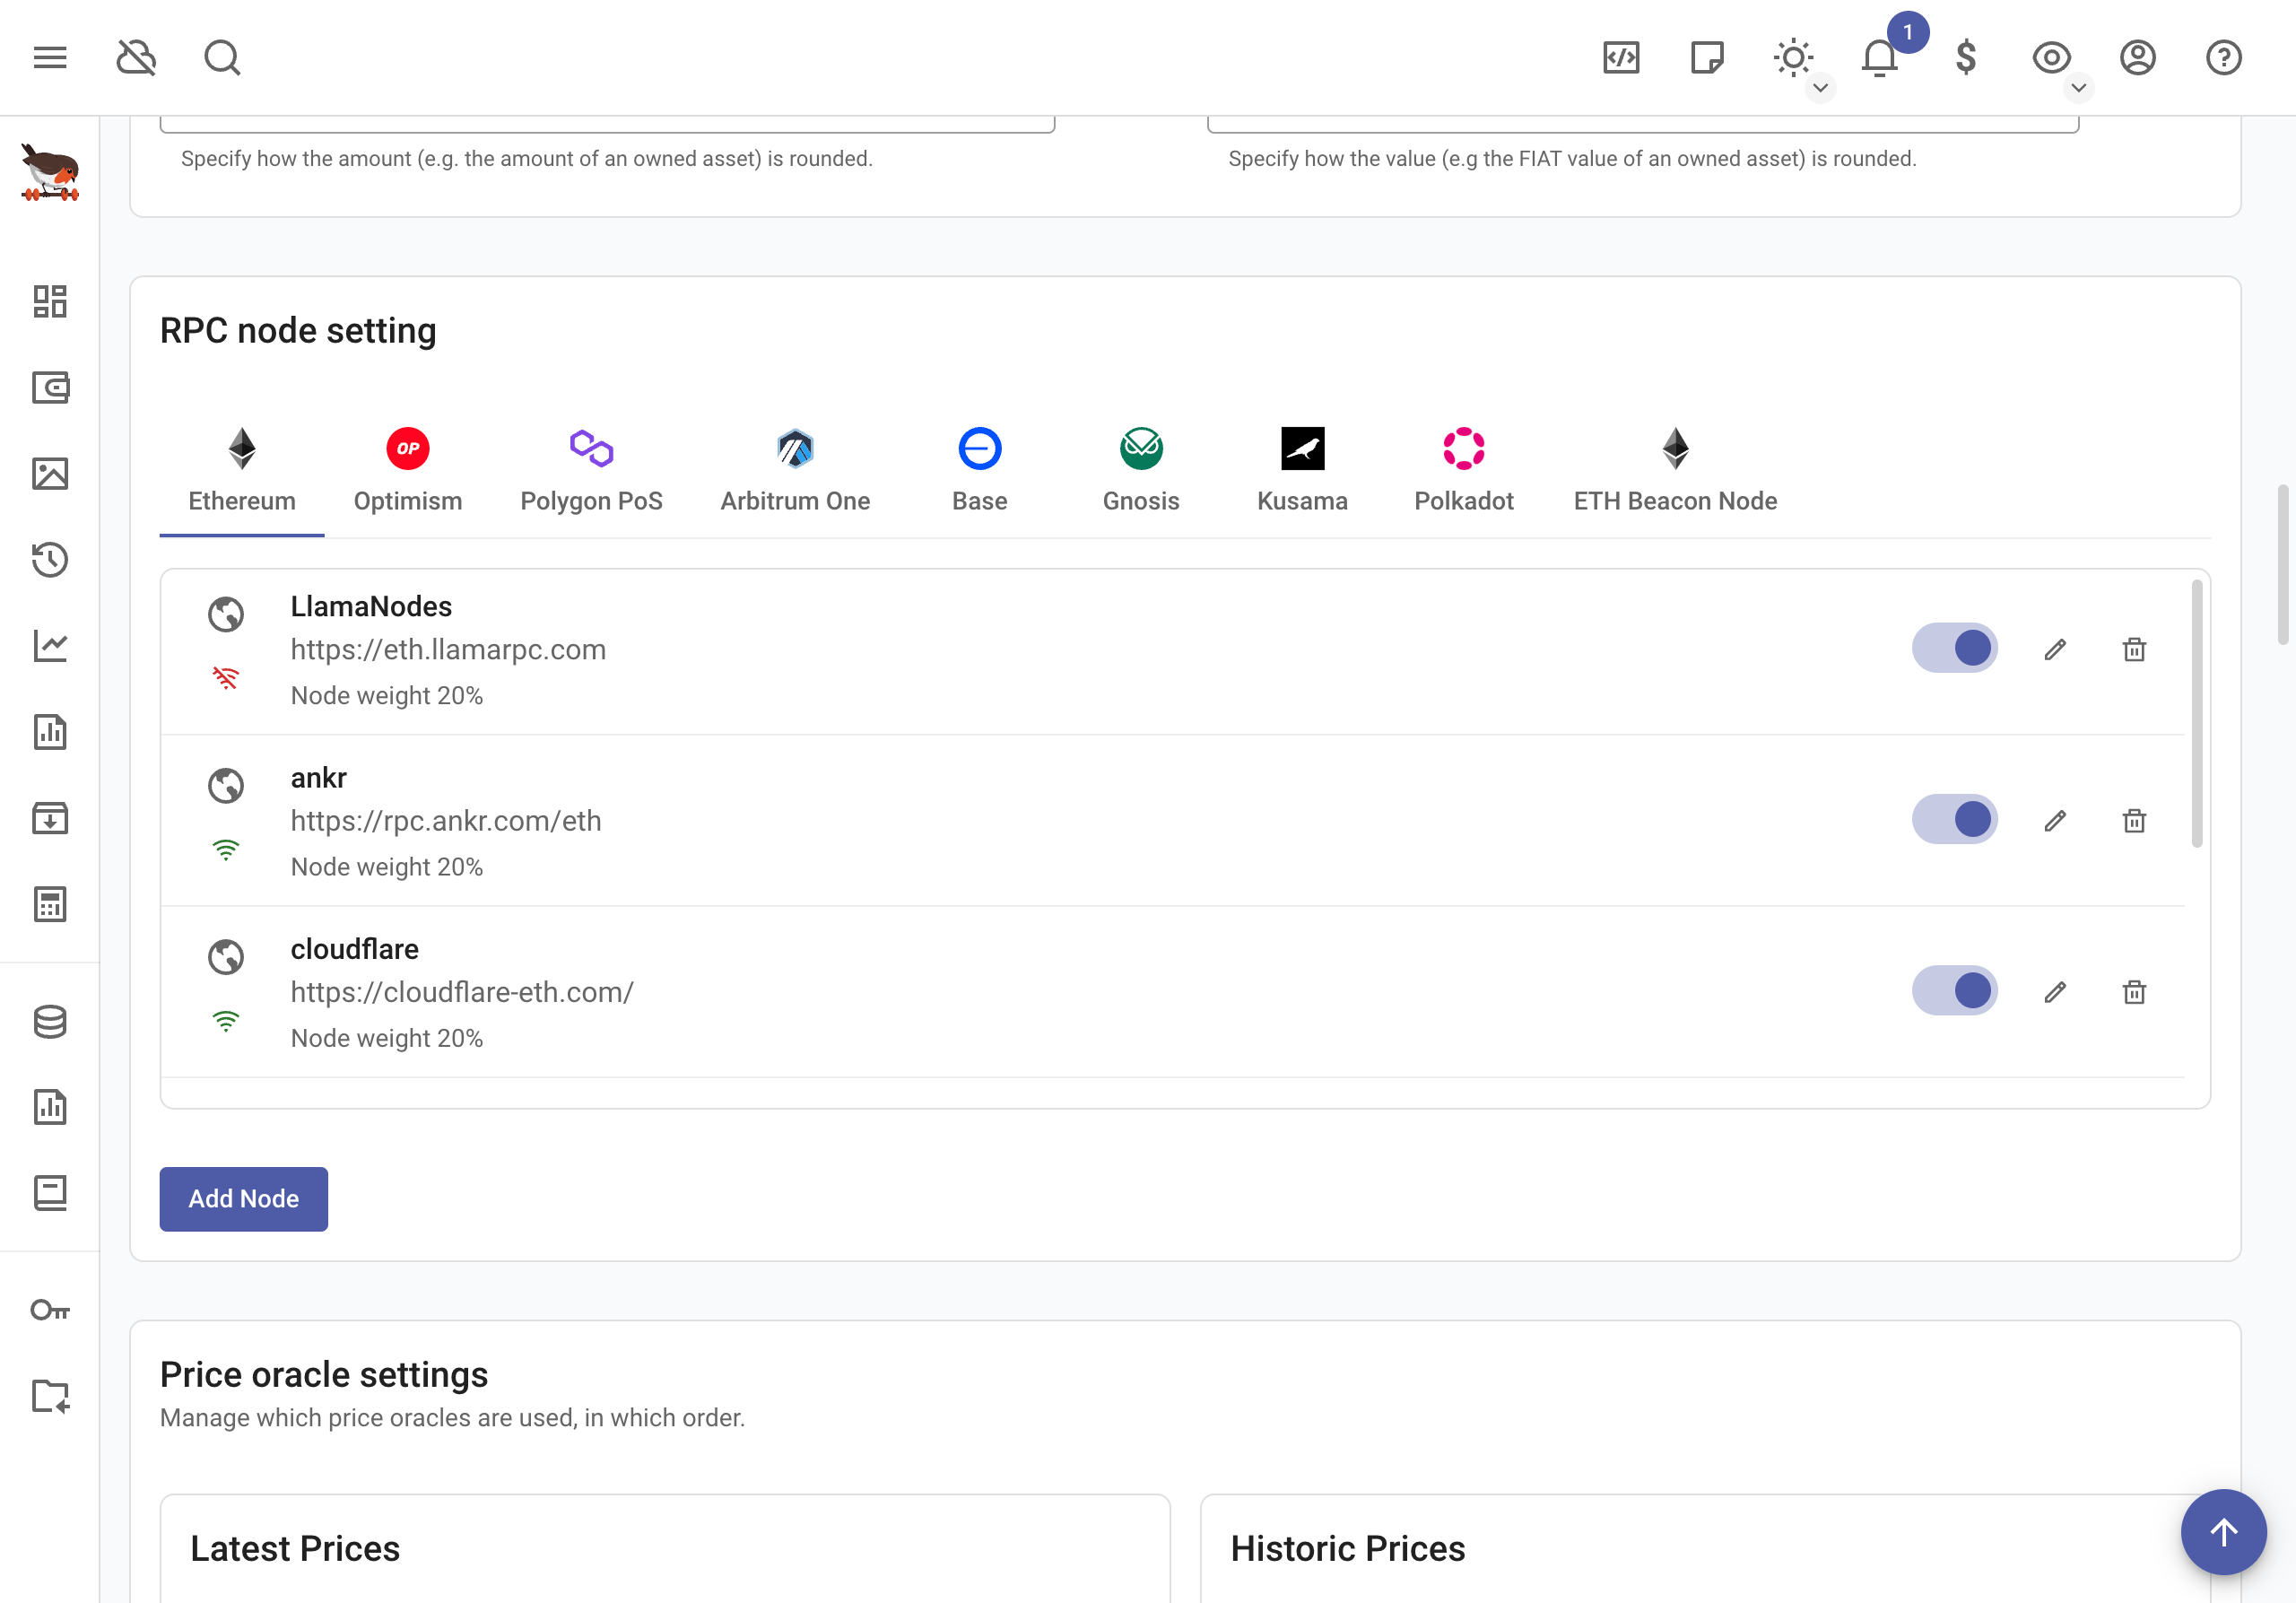
In this menu you can also edit, delete or add more nodes.
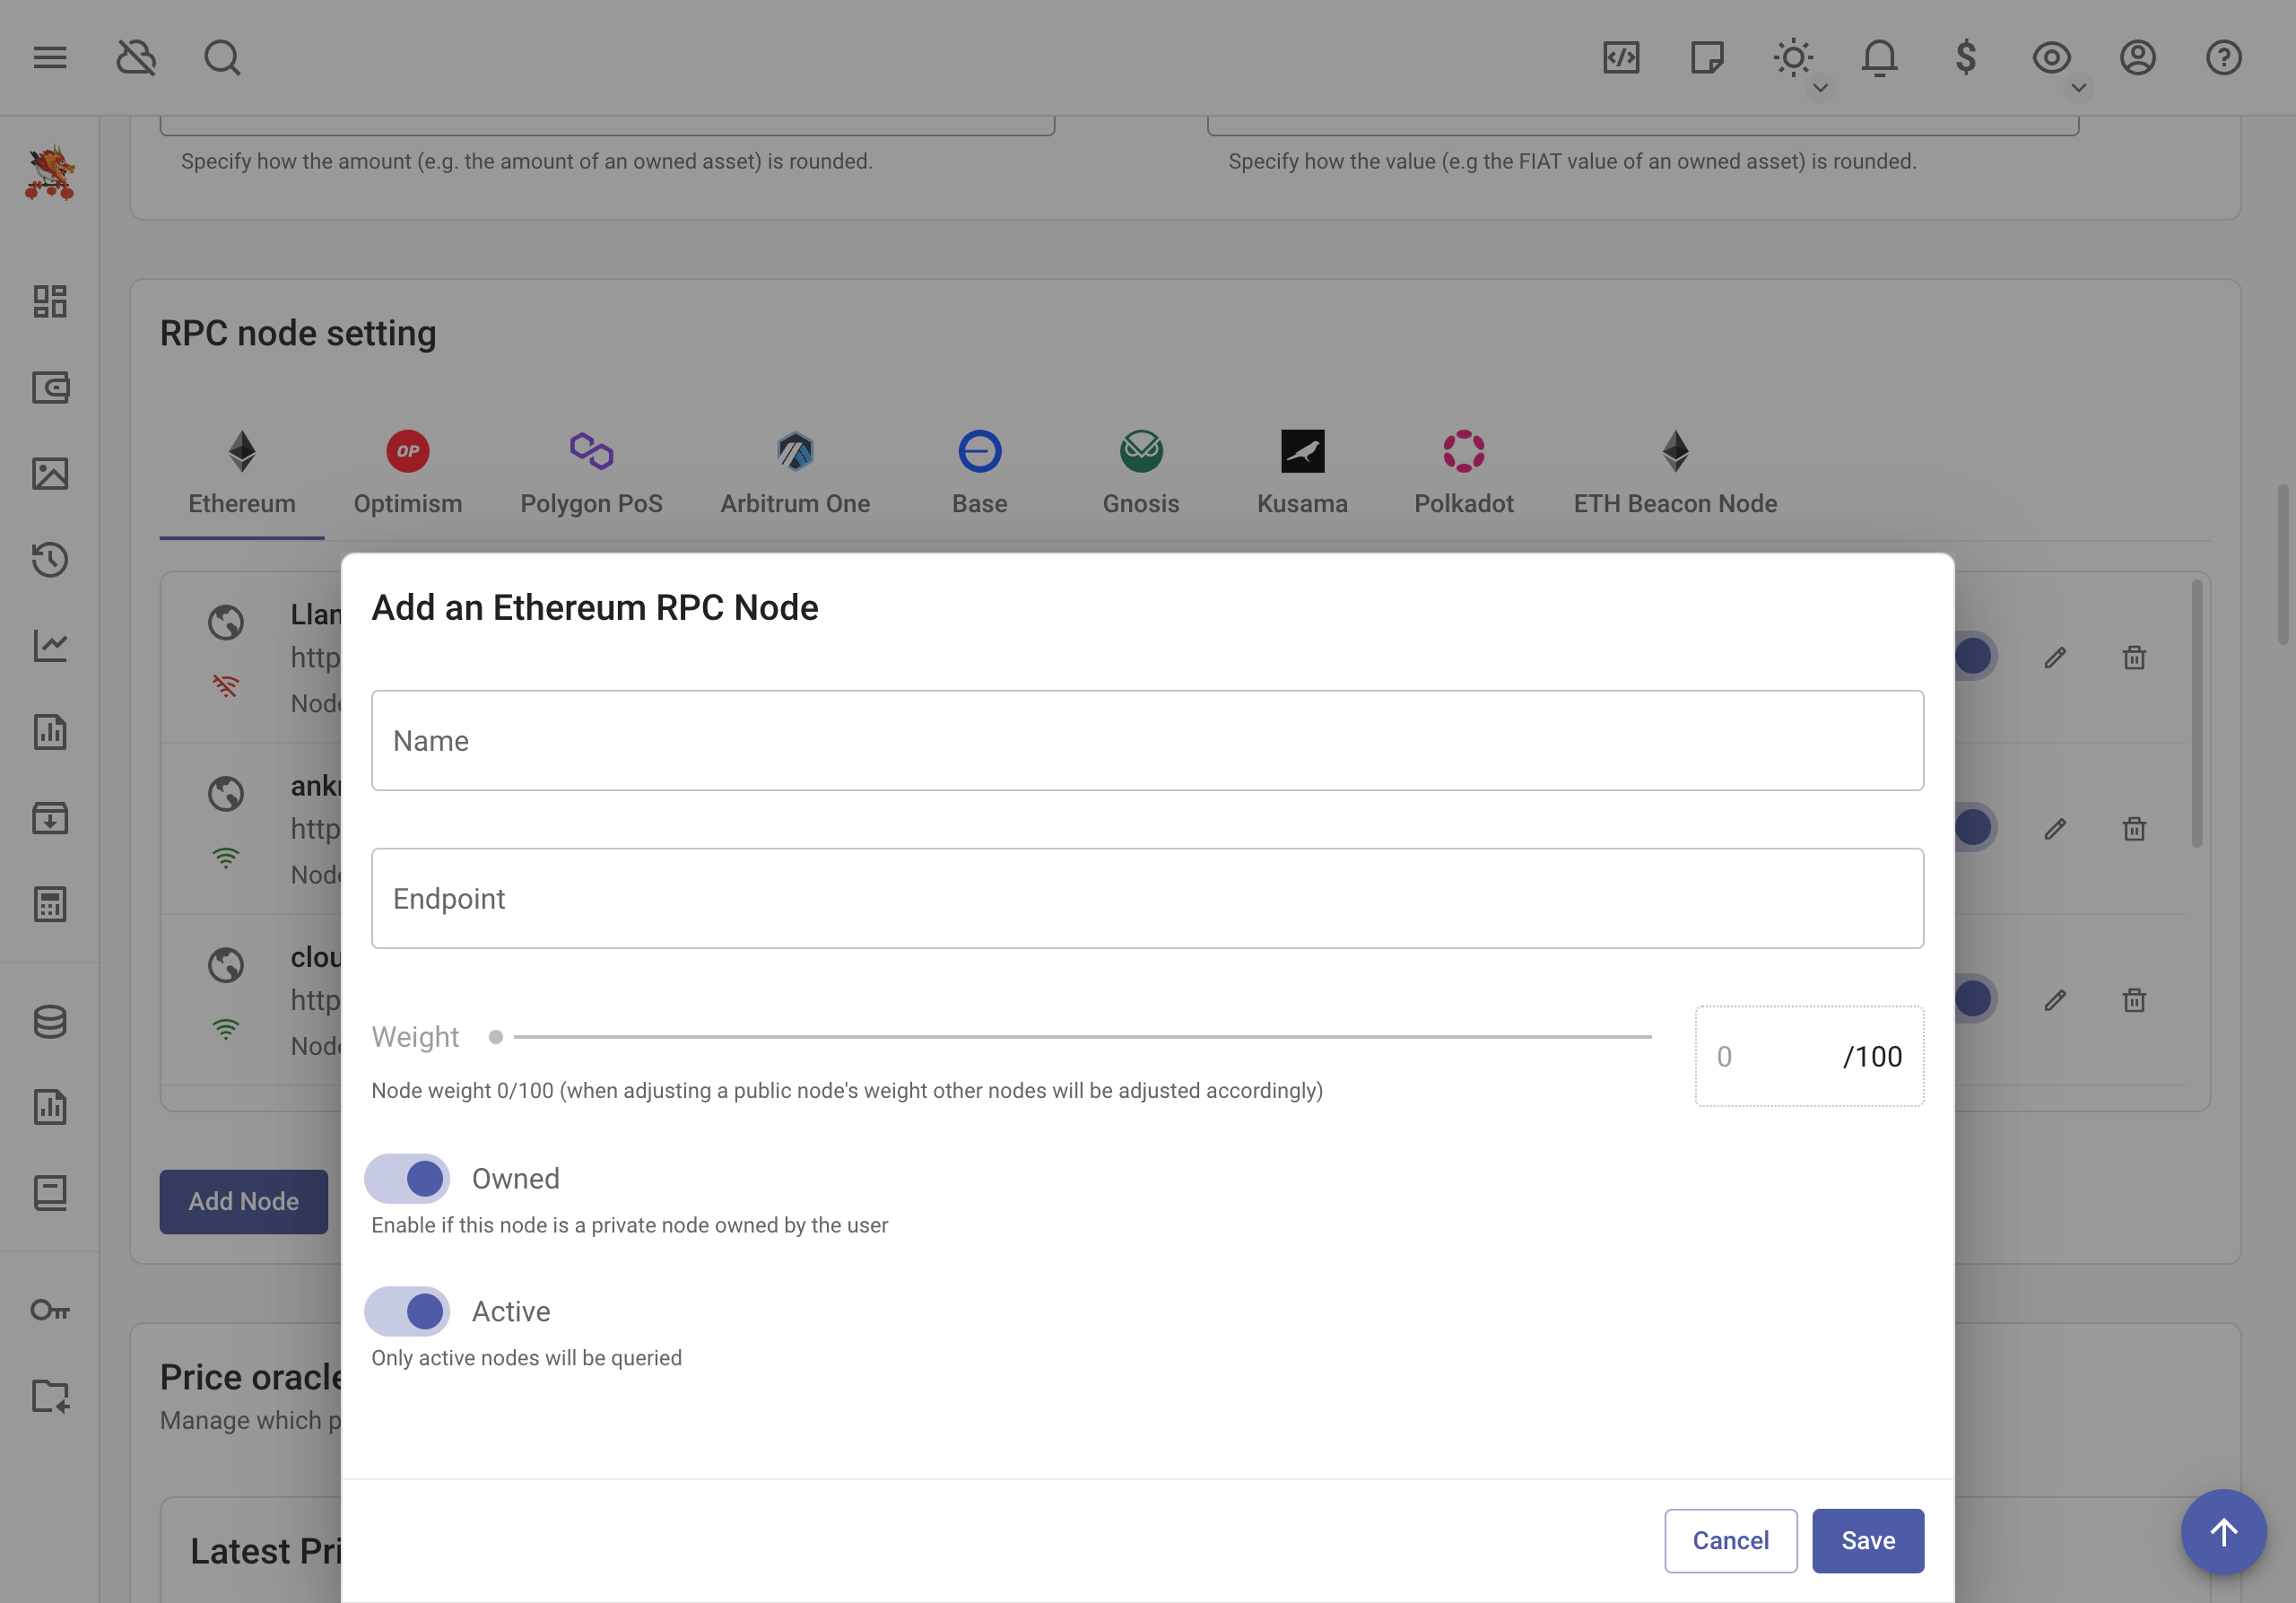
The slider lets you modify the weight of the node and you can also manually input a value. The owned parameter gives priority to the selected node over the rest of not owned nodes. You can also mark the node as not active in this screen to completely ignore it in the selection process. Similarly you can add more nodes.
Local nodes
Connecting to a Kusama Client
When rotki begins it tries to connect to a local kusama node running with an rpc port set at the default port 9933. If no client is running then all blockchain queries will use an external service that can be slower or not available at the moment.
Connecting to a Polkadot Client
Just like with kusama you can set the RPC endpoint of a Polkadot node you would like to connect to here.
Connecting to a ETH consensus layer beacon node
You can set the RPC endpoint for the ethereum consensus layer beacon node to use when contacting the consensus layer. If it cannot be reached or if it is invalid, beaconcha.in will be used.
If you are running a DAppNode Ethereum validator, you will find the RPC node setting that Rotki needs in the DAppNode Package for the Execution Client, where it is called the “Querying API”.
Price Oracle settings
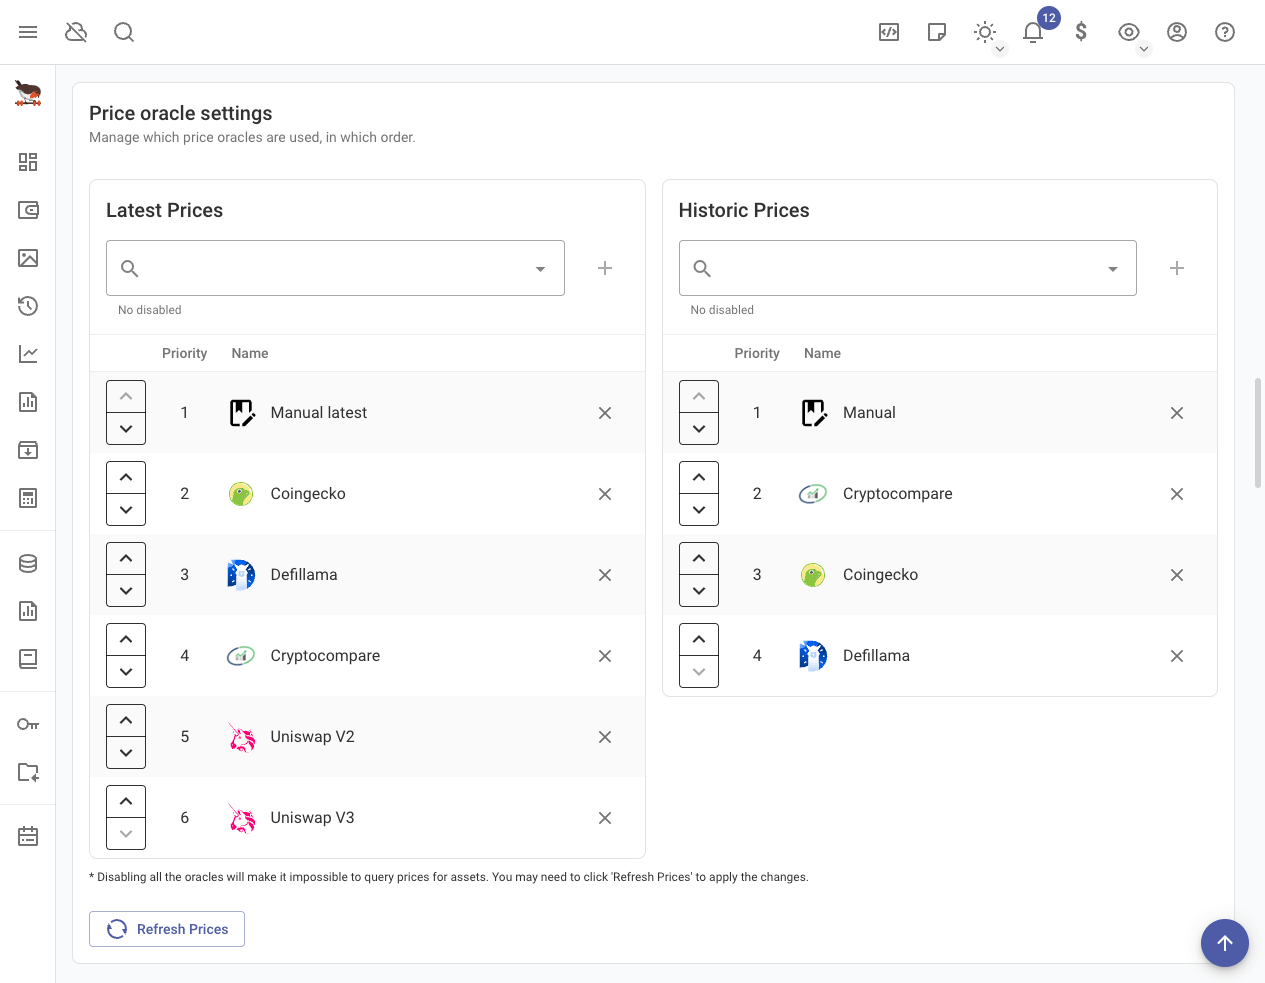
Here you can customize the precedence of querying that price oracles will have. That means which price source to check first, which second and so on and so forth both for current but also for historical prices.
DeFi oracles like Uniswap V2 and Uniswap V3 use only on chain information to get current prices, this means that it is a bit slower to query information from them but you depend only on the ethereum chain to query the prices. Also prices for some assets may differ from Coingecko or CryptoCompare depending on the conditions of the pools at the moment of making the query.
NFT settings
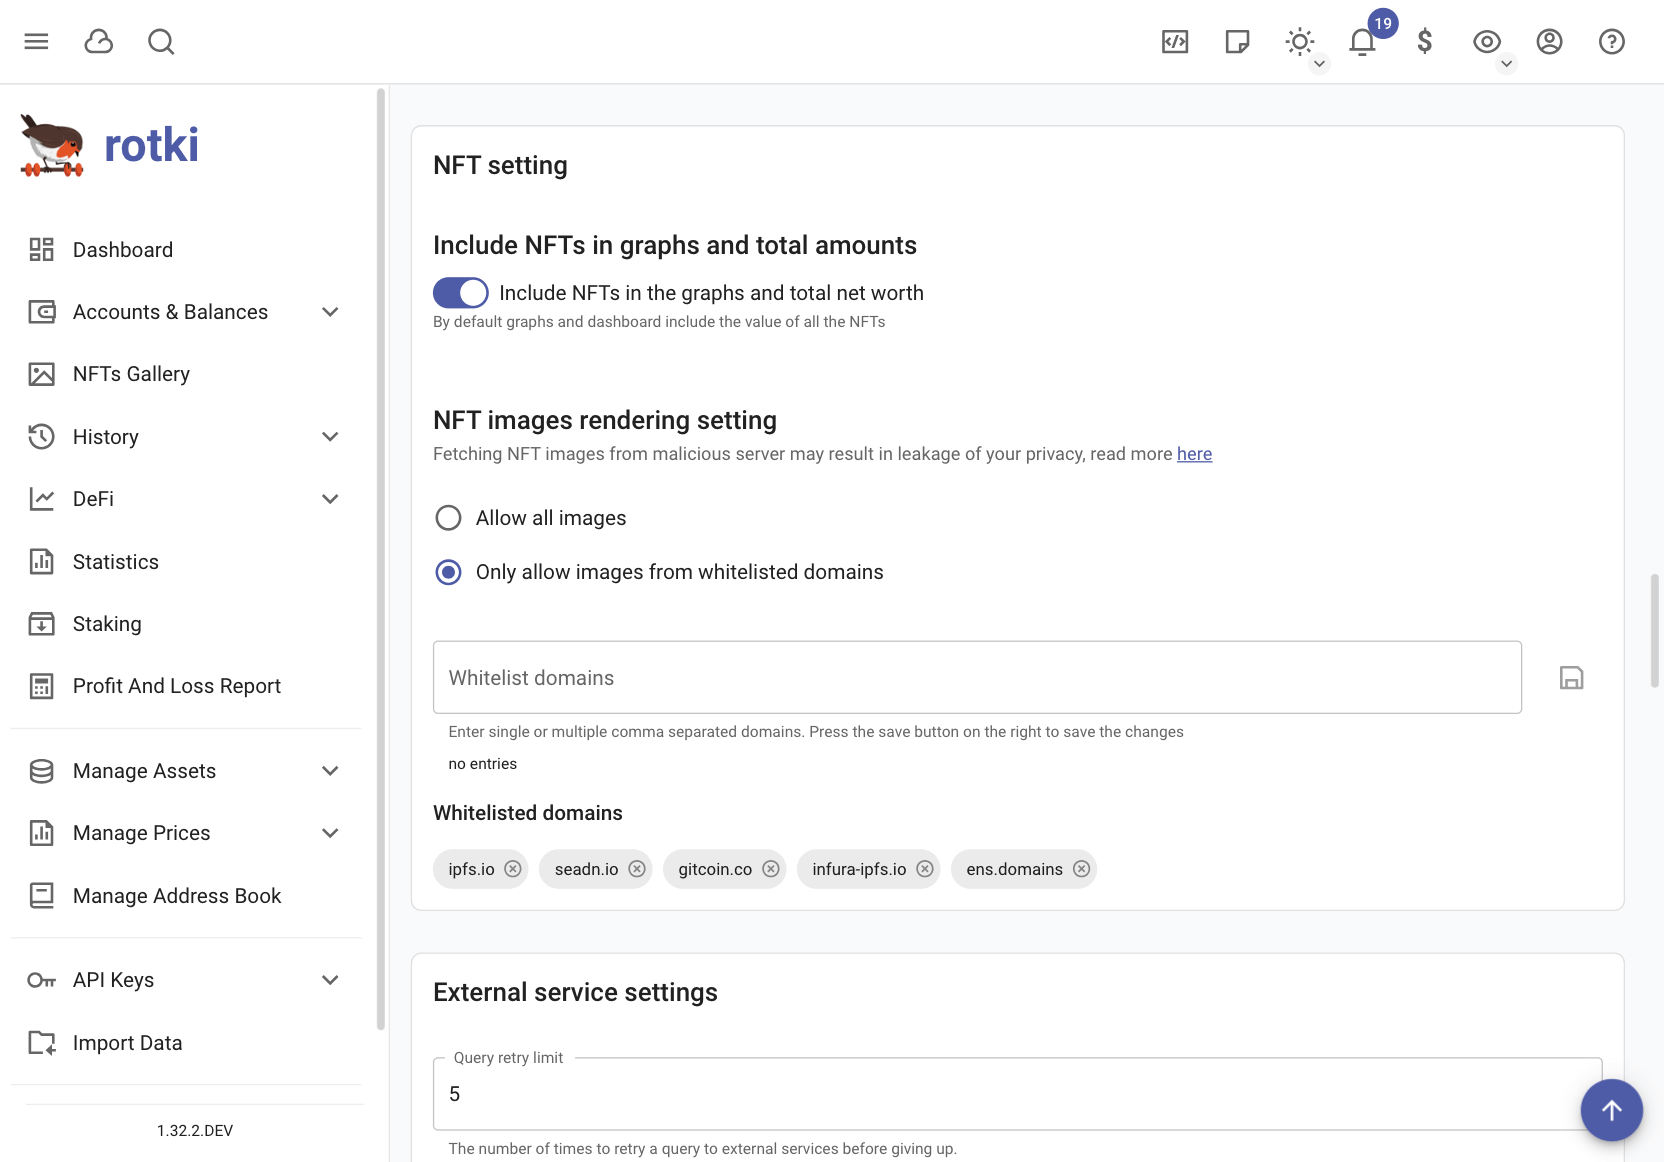
Include NFTs in graphs and total amounts
Configure whether to include NFTs in the calculation for the total net worth and the graphs displayed in the dashboard and statistic section.
NFT images rendering setting
For privacy concerns, it is possible to allow all or only a certain list of domains for images rendered.
More details here https://medium.com/@alxlpsc/critical-privacy-vulnerability-getting-exposed-by-metamask-693c63c2ce94
External Service Settings
You can define rules for retry and timeout for external service calls made by rotki.
Frontend only settings
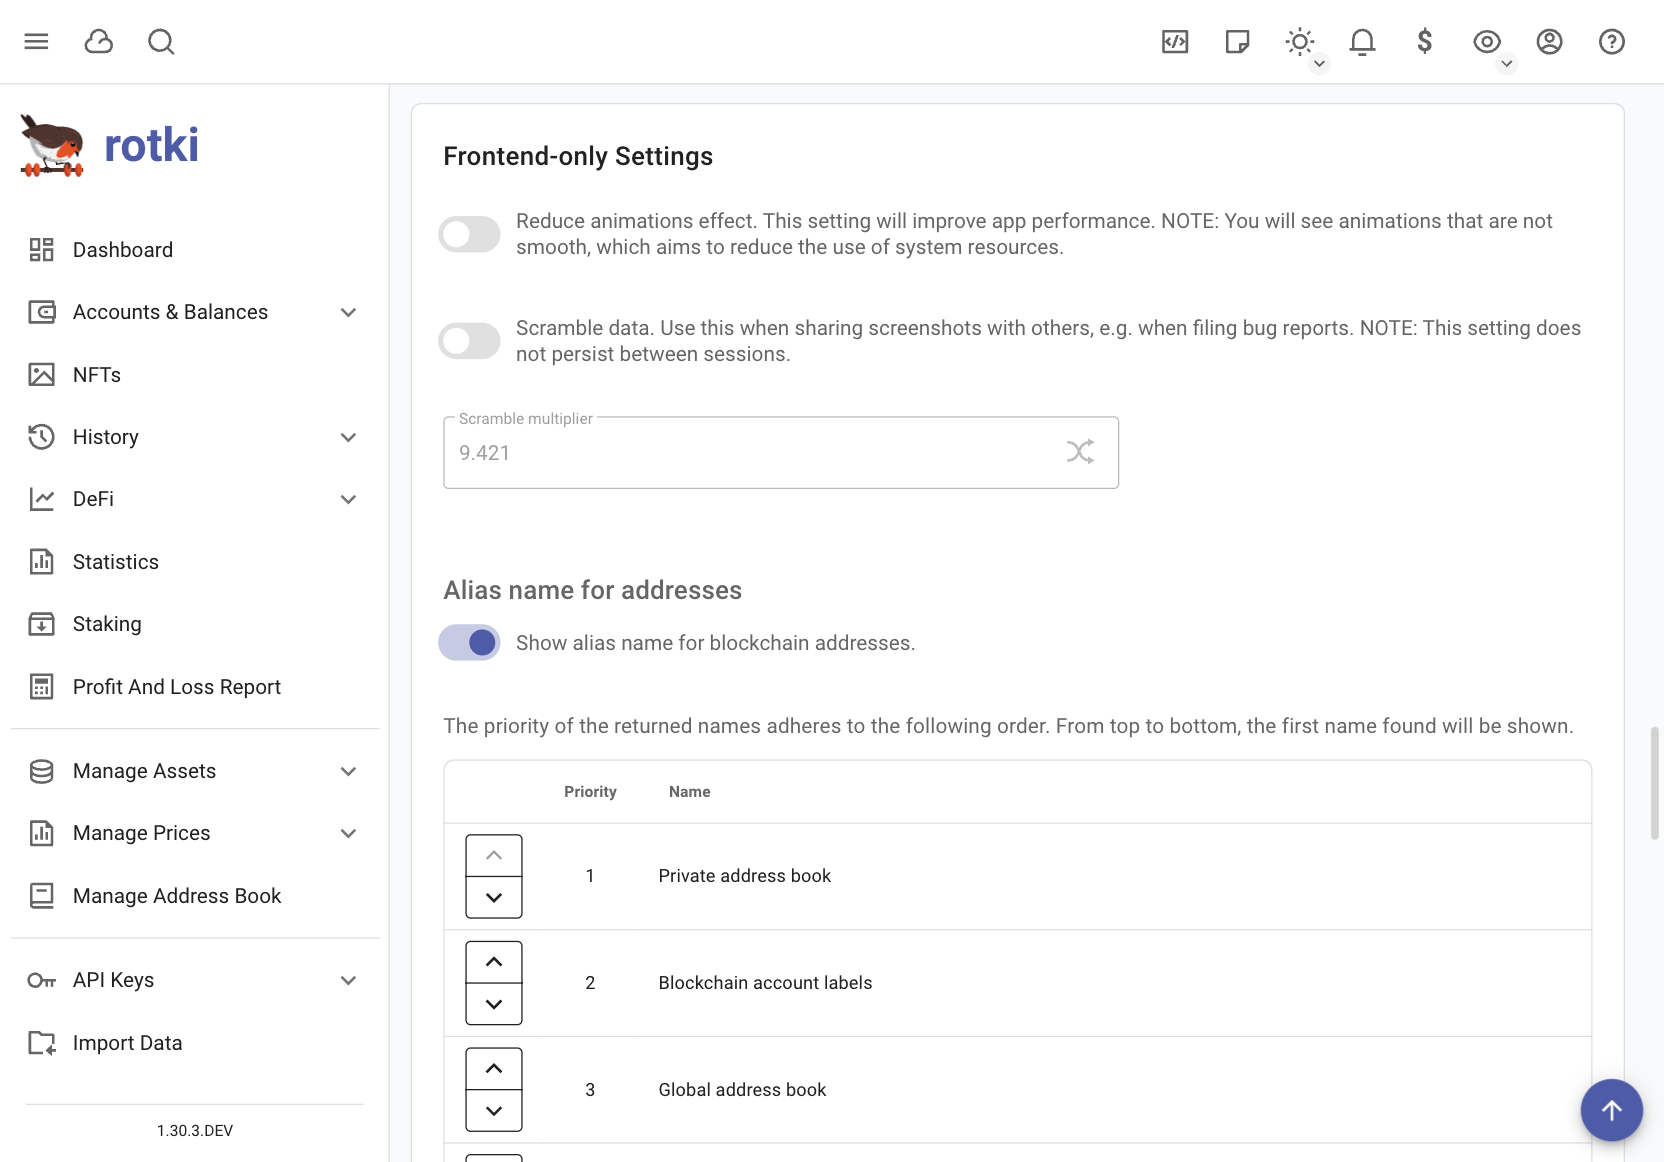
Animations effect
It is possible to reduce the animation effect in different parts of the app to improve the performance if needed. This will affect the quality of the animations but the user will get a better usage of the resources.
Alias name for addresses
By default, rotki will use an alias name for blockchain addresses if one can be found. You can choose to disable this feature. The alias name is obtained from ENS, addressbook, or blockchain account label and you also can change the order of resolution of that name.
Data scrambling
When turned on this setting allows you to randomize a lot of amount numbers, dates and other data in the app so that you can share screenshots without leaking real data. This setting does not persist across sessions!
Dashboard graph default timeframe
Set the default time frame for the dashboard graph. This timeframe will be pre-selected upon login. By default it will remember the previous session’s selection.
Graph basis
Configure whether the graph y-axis will start at 0 or the minimum amount for the period.
Automatic balance refresh
This enables/disables automatic refresh of balances. Also sets the distance in time between each refresh. Automatic balance refresh is disabled by default because balance querying can get really slow and also get you rate limited.
Periodic status query
The rotki frontend continuously queries the backend for various data and updates. This is an inexpensive operation that is set by default to 5 seconds. You can customize the frequency of that query here.
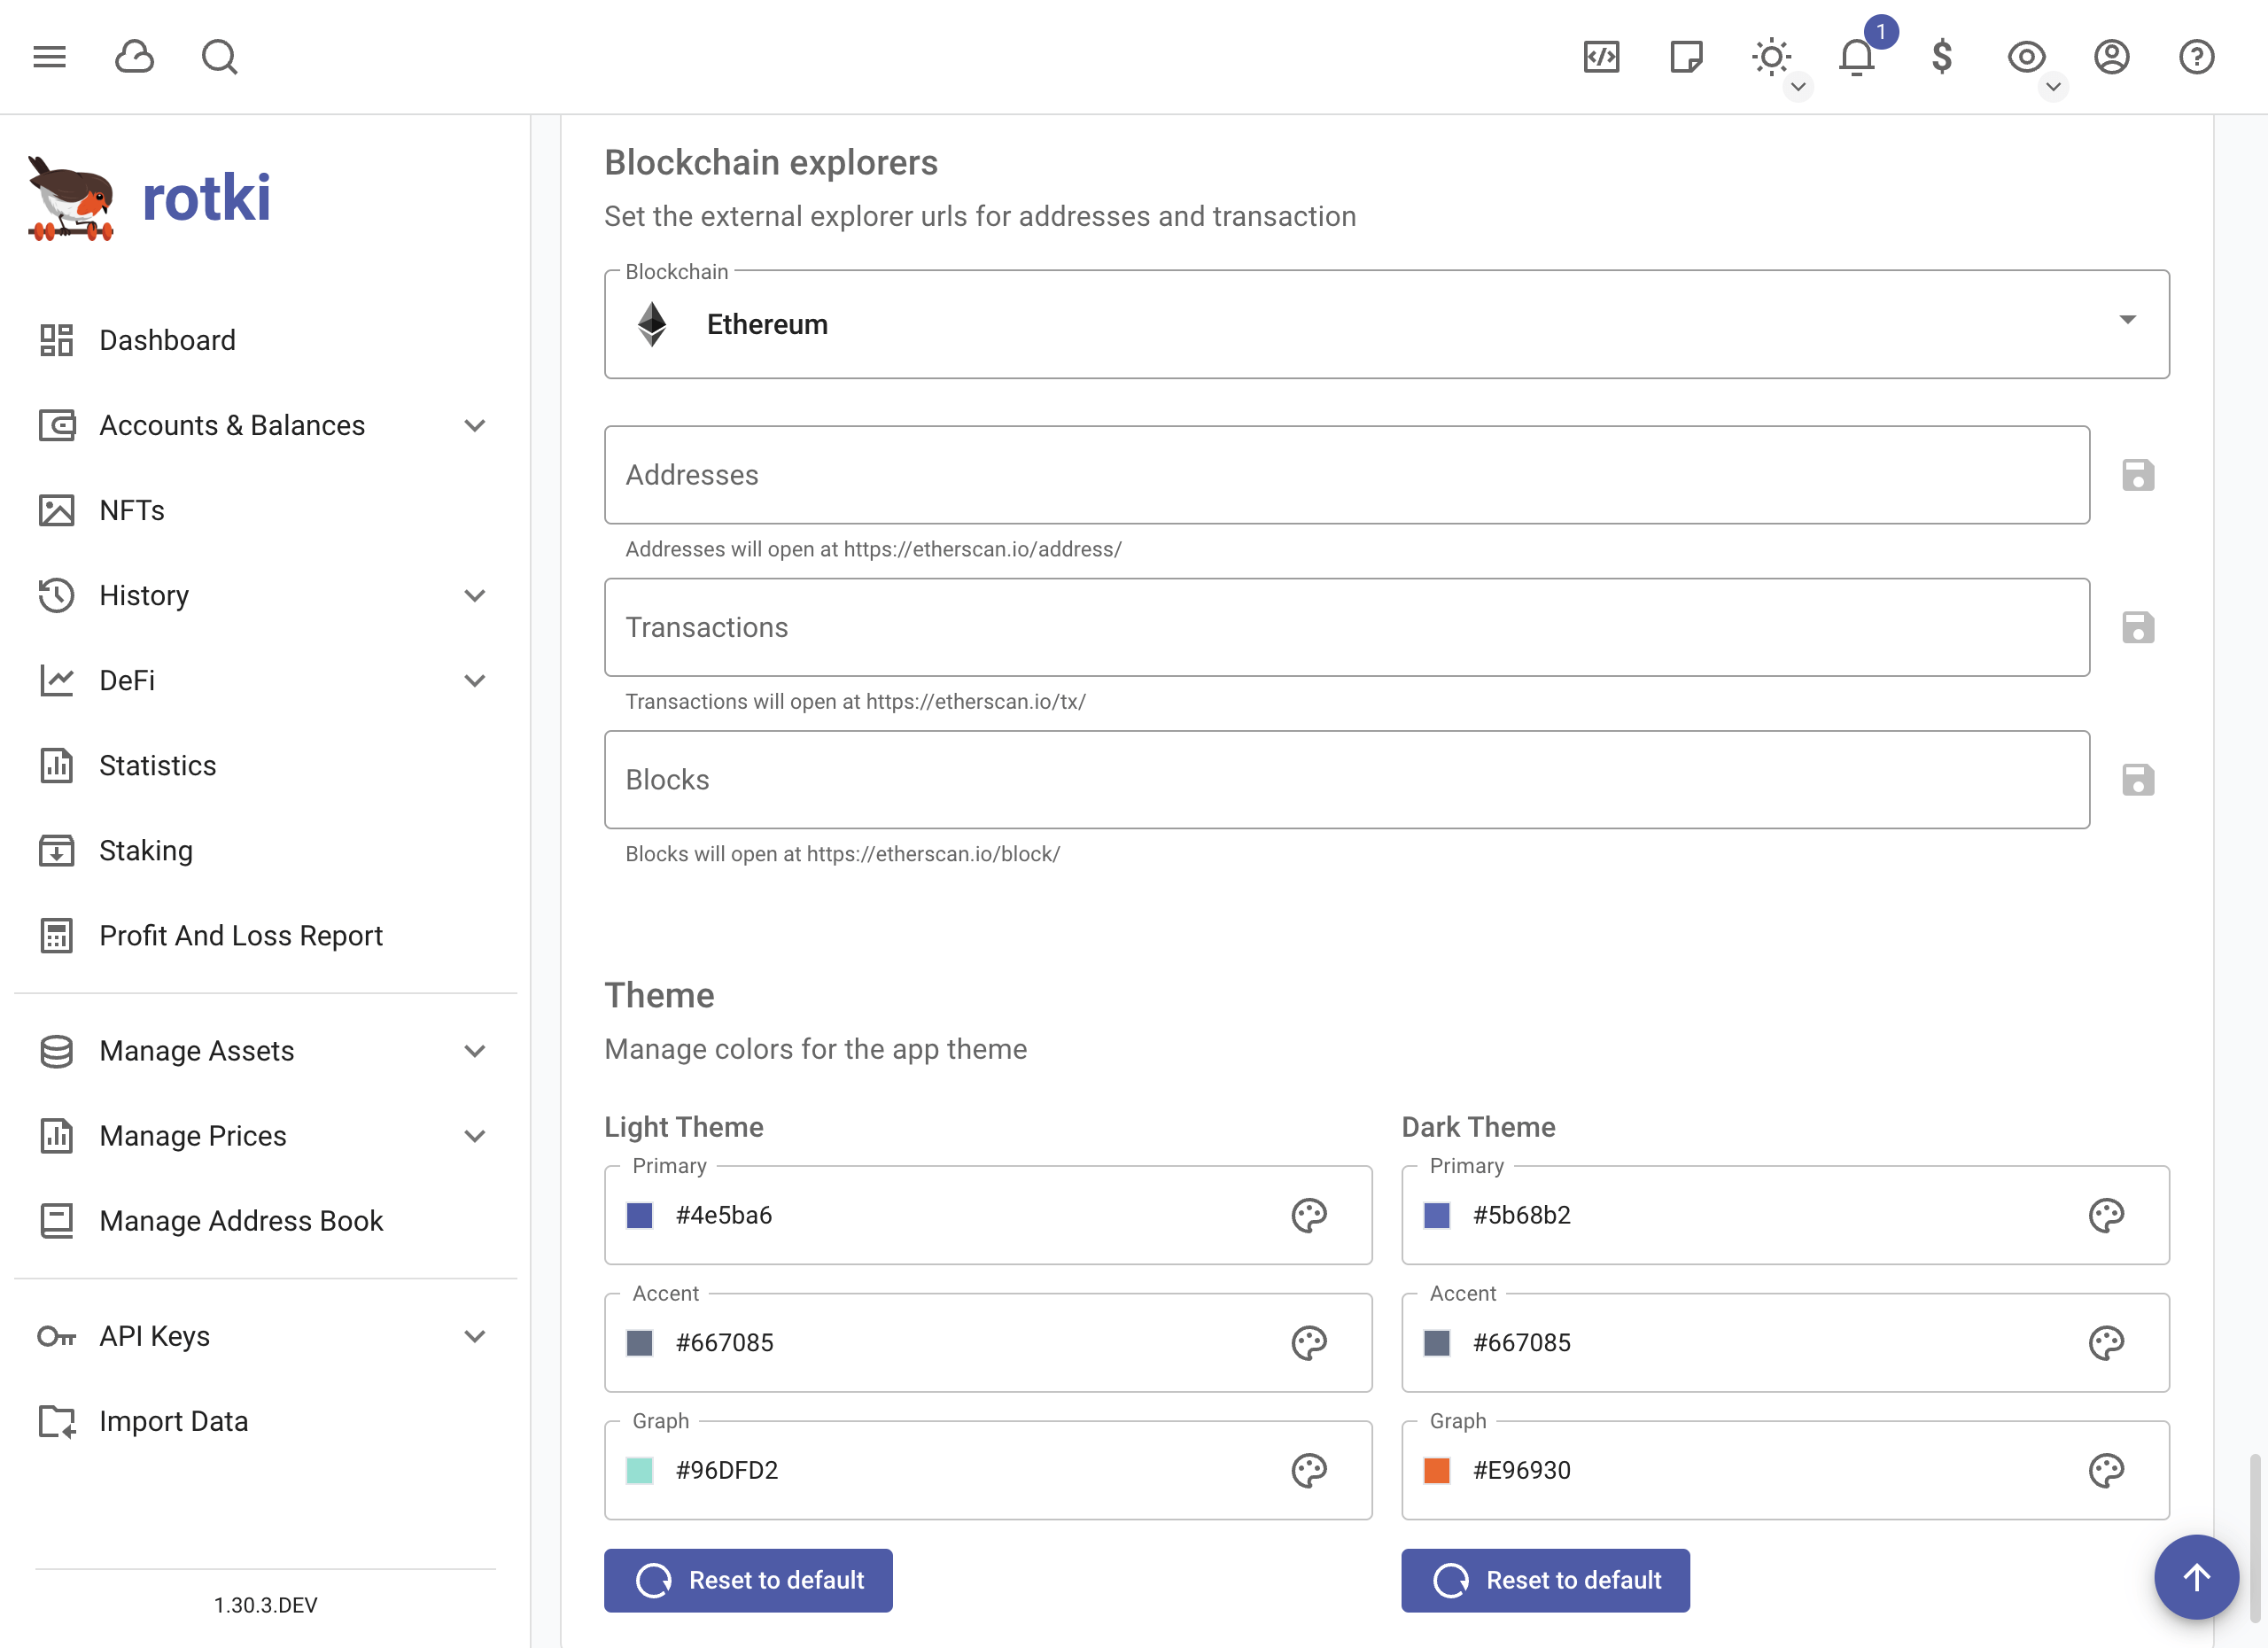
Blockchain explorer customization
You can customize in which explorer the transaction and addresses links open.
Customizing the accounting settings
By choosing the “Accounting” settings button you can customize some application settings that pertain to accounting calculations.
You should understand what each setting does, consult with a tax accountant for your jurisdiction and then set them appropriately.
The default settings are at the moment set for the German tax jurisdiction. For example all profit/loss calculation is done for trades on a first-in/first-out basis and profits from selling crypto assets after 1 year are non taxable. These settings can be adjusted.
Custom accounting rules
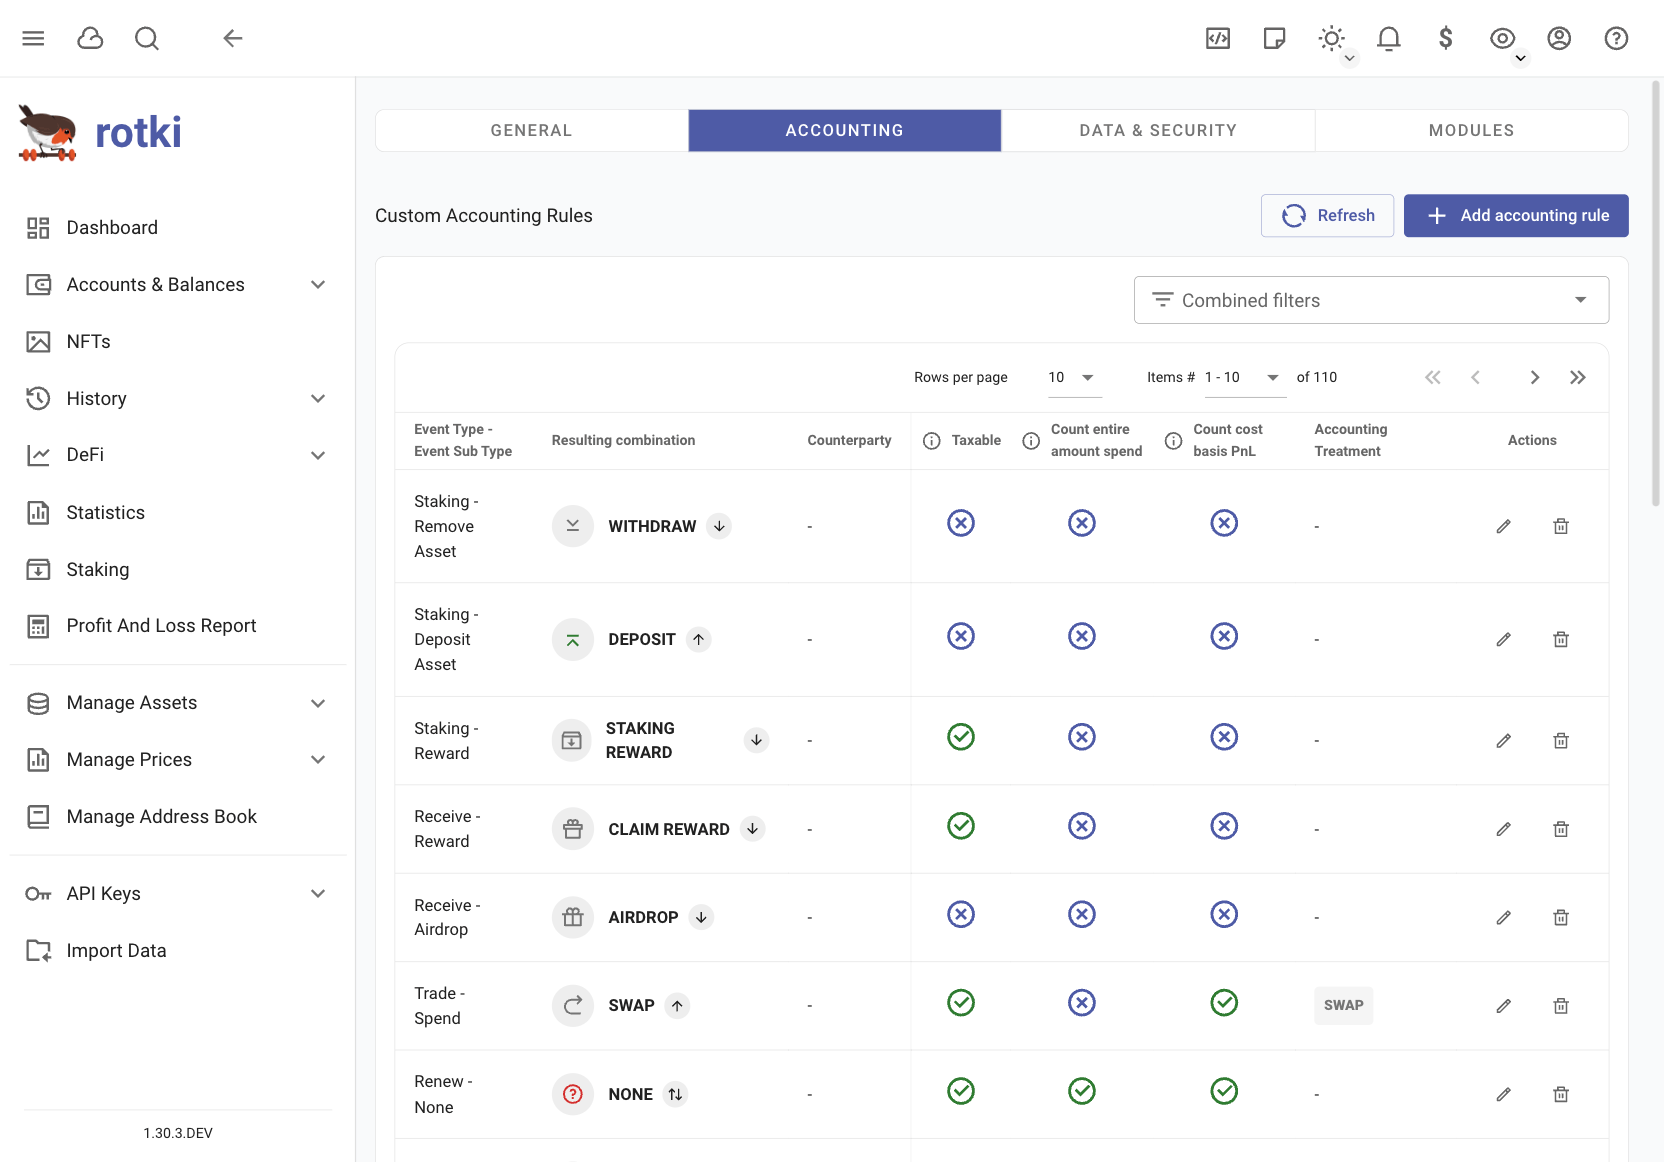
A setting to customize the accounting rule for events based on the Event type, Event sub type, and Counterparty of the events.
Trade settings
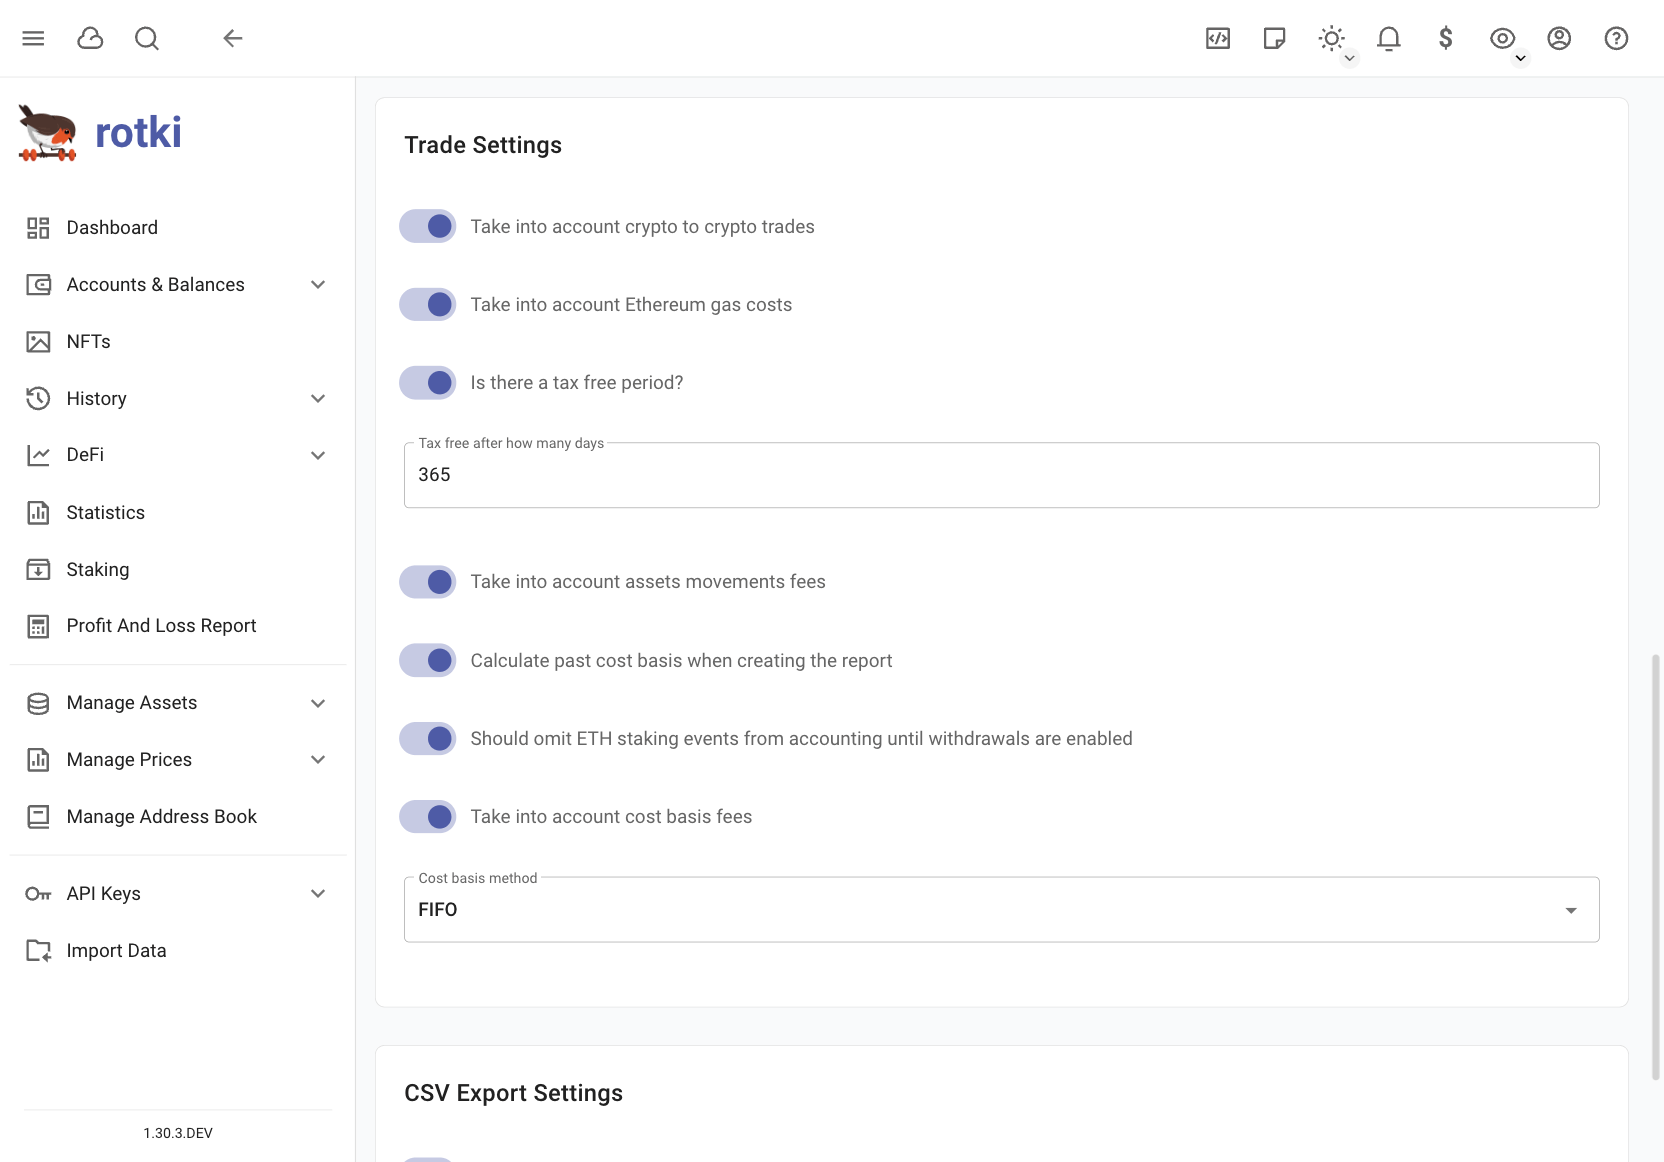
Crypto to crypto trades
A setting to determine whether crypto to crypto trades or any events that spend crypto are taxable and should be taken into account. By default it’s True.
Illustration: You trade your 1 ETH, to get 11 USDT. Current price of ETH is 10 EUR, but you bought it when it was 5 EUR.
True: When you trade crypto to crypto, a “virtual” trade that sells or buys the crypto asset for fiat and then sells or buys the fiat for the other crypto asset is generated. So from this “virtual” trade, there is additional profit or loss from the difference of the price of the asset at the time and the buying price.
By making this trade, we will create two virtual trade, which are:
Sell
1 ETHfor10 EUR. PnL of this virtual trade is calculated asthe value when you sell this ETH (10 EUR)minusthe value when you bought this ETH (5 EUR)=5 EUR.Buy
11 USDTwith10 EUR. PnL of this virtual trade is0 EURbecause it’s a buy. However, later on, when you trade thisUSDTwith another crypto, point (1) will also be applied.So total PnL of this action will be
5 EUR
False: The above does not happen, no virtual sell events are generated.
So total PnL of this action will be
0 EUR
Illustration: You have 1 ETH that you bought with price 50 EUR. Then you spend this 1 ETH for gas fees, and the price at the moment is 100 EUR.
True: When you spend crypto (fees, donations, purchases etc.) in the PnL calculation you see both the loss from the spending event but also an additional profit or loss from the difference of the price of the asset at the time and the buying price.
By spending this ETH, it results in loss of
100 EUR.Because you spend this ETH, you also sell this ETH for
100 EUR. The profit of this sell is calculated asthe value when you sell (100 EUR)minusthe value when you bought (50 EUR)=50 EURSo total PnL of this action is
-100 + 50=-50 EUR
False: The above does not happen.
So total PnL of this action will be calculated as
-100 EURfrom the loss.
EVM gas costs
Specify whether EVM transaction gas costs should be counted as loss. If this is set then all ETH spent on gas will be deducted from your profits and count as an expense.
Tax free period
Specify whether there is a period of time and if yes how many days, after which holding a crypto asset is considered not taxable.
Asset movements fees
Specify whether deposit/withdrawal fees should count as expenses during the profit/loss report.
Calculate past cost basis
When creating a profit/loss report we also need to figure out where and when all of the assets that the user is using were acquired from. Which is why we also go through all past events, even before the start of the period.
This behavior can be disabled by turning this setting off.
Omit ETH staking events
Specify whether the staking of ETH is taxable only after the merge and withdrawals are enabled or if each eth staking event is considered taxable at the point of receiving if you can’t yet withdraw.
Cost basis method
The method that should be used during the profit and loss execution to calculate cost basis. The methods available at the moment are:
FIFO: First In, First Out
LIFO: Last In, First Out
HIFO: Highest In, First Out
ACB: Adjusted Cost Basis
Include fees in cost basis
A setting to determine whether trade fees should be included into the cost basis of the asset sold/bought or not. By default it’s True.
Illustration: You bought 1 ETH for 10 EUR and paid 1 EUR fee
True: The fee event just reduces the amount of the fee asset paid and nothing else. The actual fee is used to determine the cost basis of the asset sold/bought instead.
The cost basis of that ETH is
10 + 1=11 EUR. This is where the fee is taken into account.
False: The above does not happen.
The cost basis of that ETH is
10 EUR. But at the time of the trade you also have a spend event of1 EURas fee.
CSV Export settings
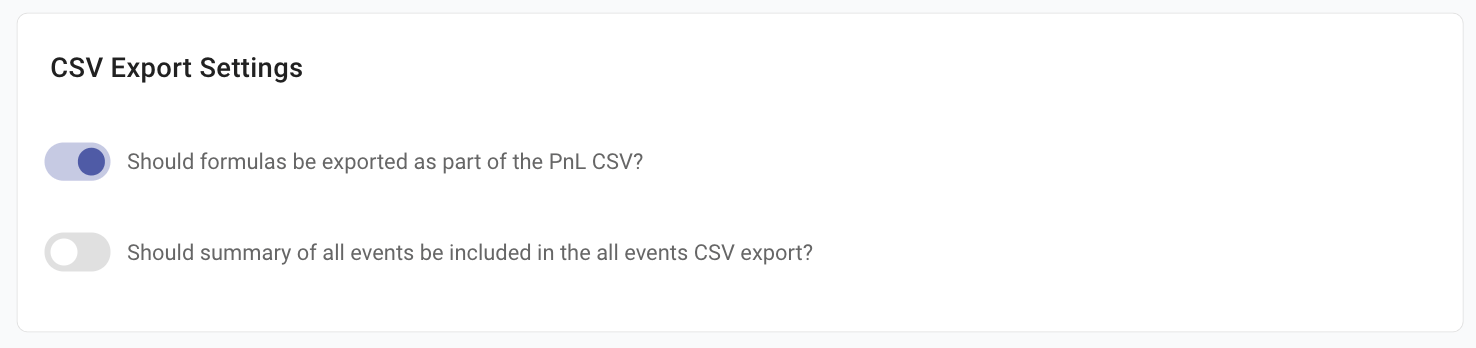
Export formulas
Specify whether formulas should be exported as formulas in the CSV export or if the actual value should be simply exported.
Have summary
Specify whether at the end of the all_events CSV export there should be a summary of all events and the total profit/loss or not. Additionally at this summary there would be the rotki version and the settings used during the PnL report so it’s easy to reproduce a report run.
Customizing data & security settings
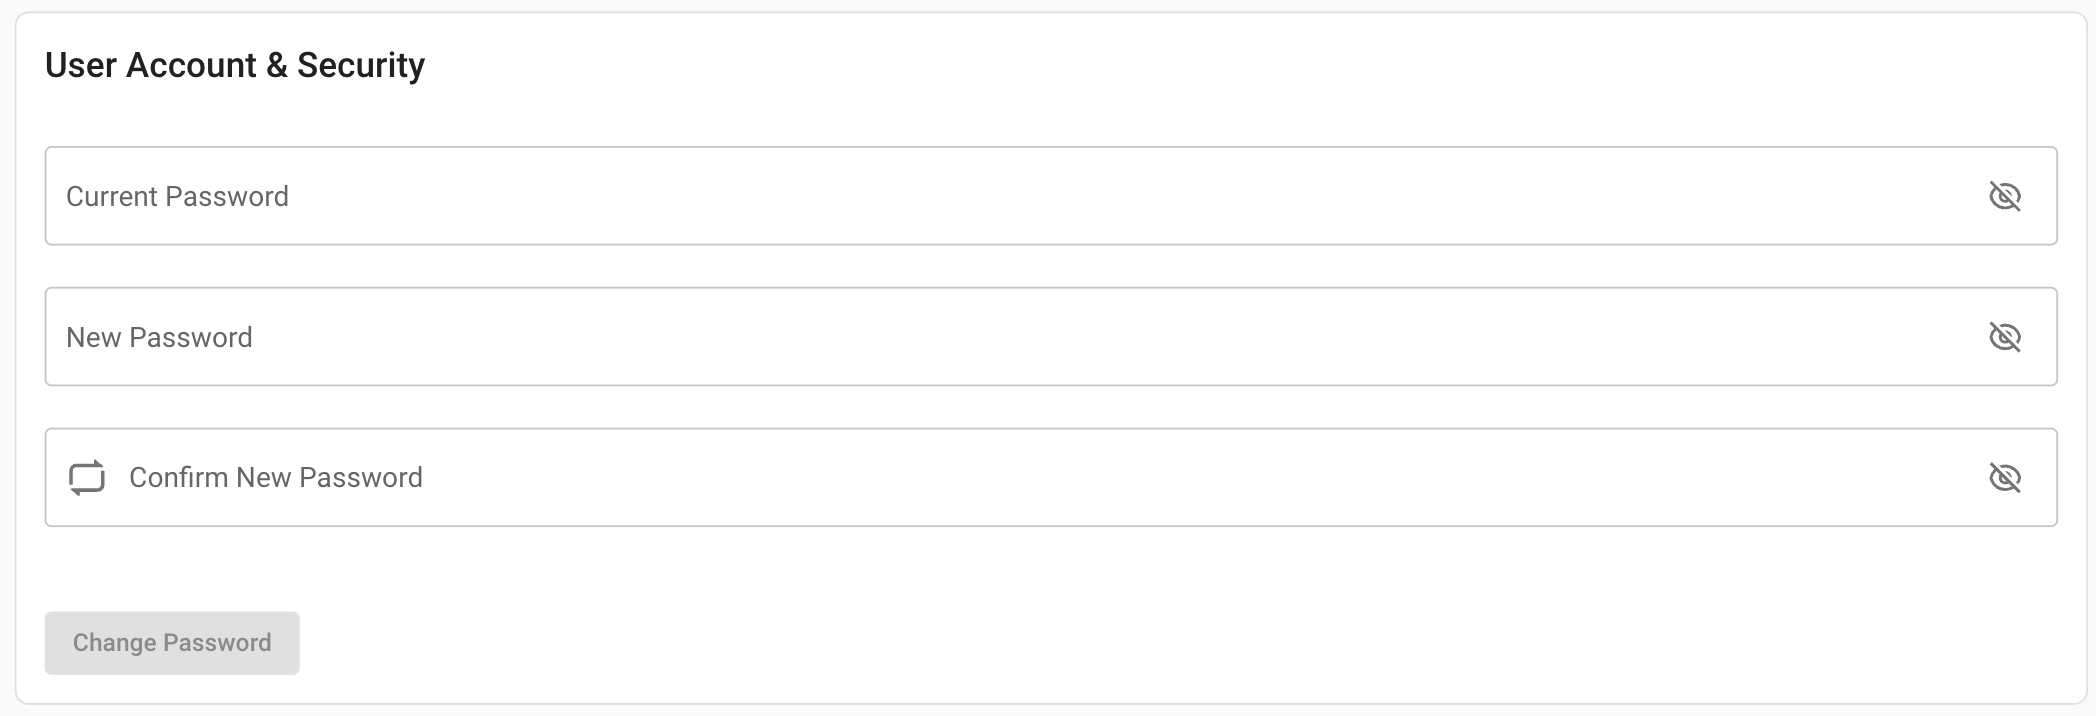
Changing password
By choosing the “user & security” section of the settings you can change the user password.
Database Info & User Database Backups
By visiting the database info section you can see information about your user and global database, such as the user database directory, size and version.

You can create new database backups by pressing the Create new backup button.
To delete a backup you can press the trash can icon on the database row.
The download button provides an easy way to save the backups locally, and it can be especially helpful if you run the docker instance on a remote machine.
Exporting and importing user assets
When migrating from one computer to another you will also need to move your user assets entries. To do this you can use the export/import function provided by rotki.
This function will create a zip archive of all your user assets. You can then use the import function in a different instance of rotki to easily transfer your user asset entries.
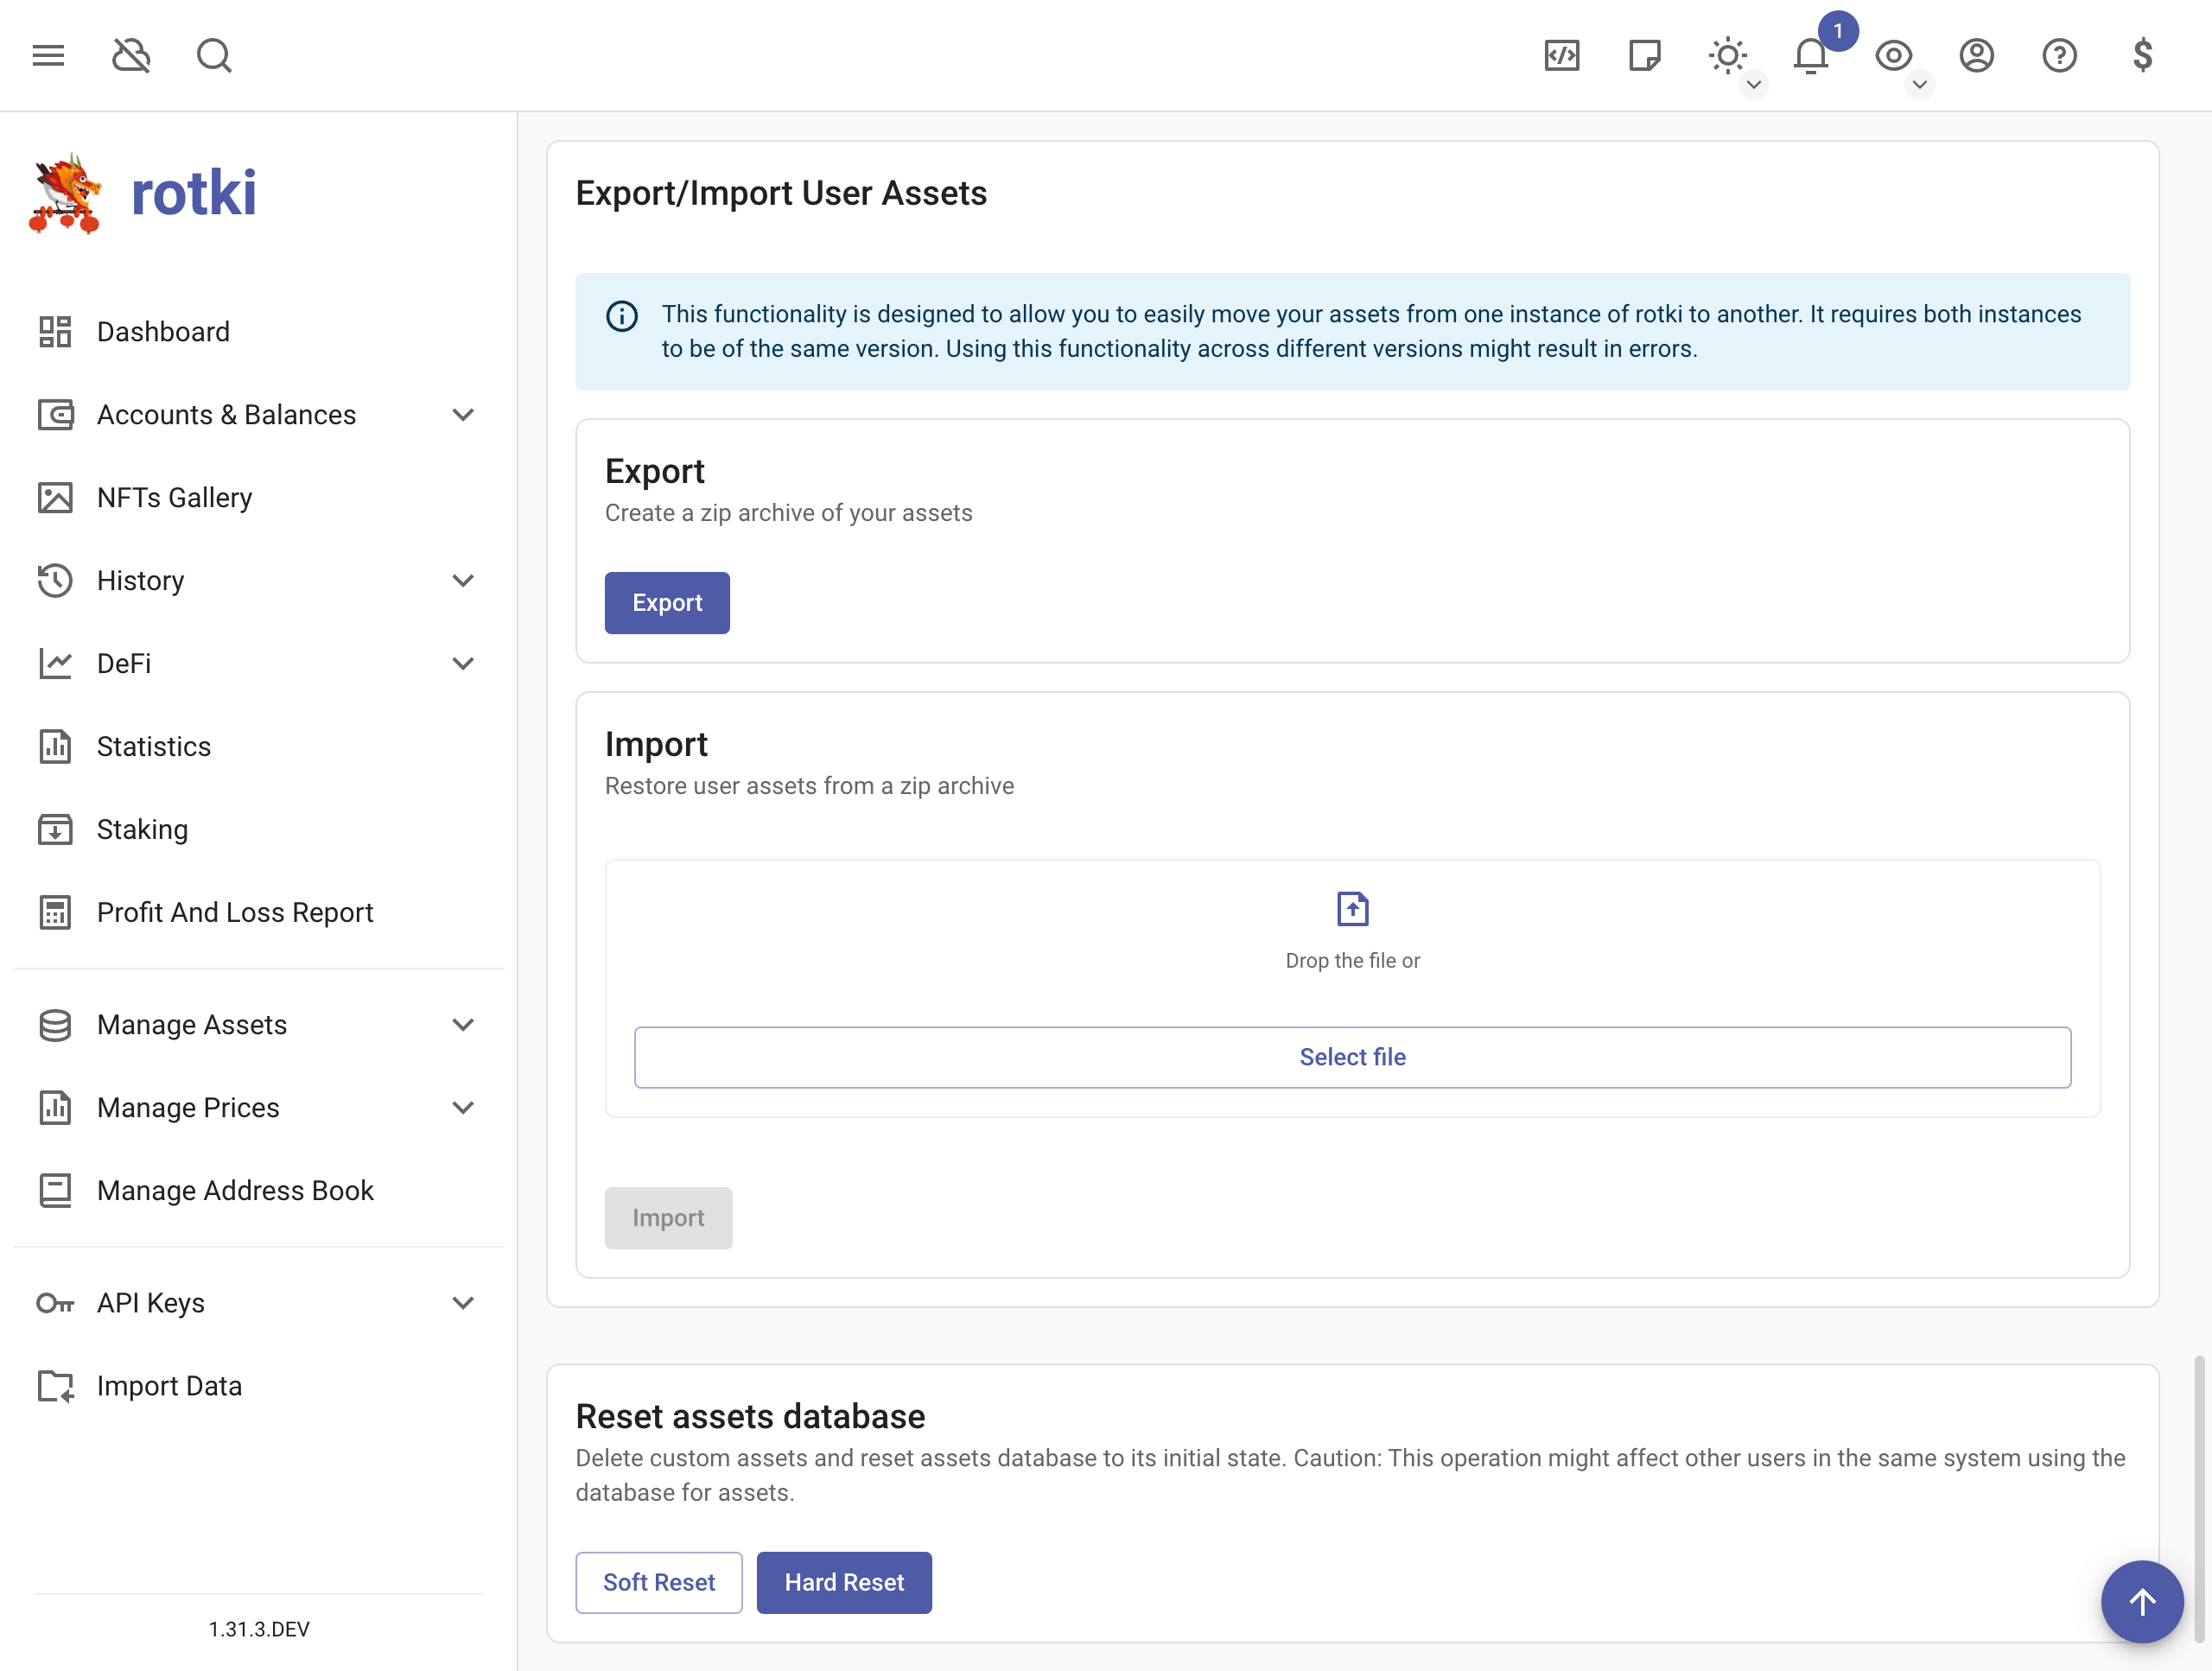
Warning
This archive cannot be used as a backup/restore across different versions of rotki since there is absolutely no guarantee that there will be no breaking format changes across versions.
Reset assets database
There are two options to reset assets database:
Soft ResetThis option will not reset assets that were added by the user.Hard ResetThis option will also reset assets that were added by the user.
Purging data
Rotki keeps a lot of data cached locally in the user’s DB. There may be the need to clean some of these data from time to time. You can do so from the “Manage Data” section of the settings, by clicking on the dropdown list, selecting the type of data you want to delete and then pressing the Trash button.
To remove a specific Exchange, make sure to remove any active API key for that exchange and then purge it.
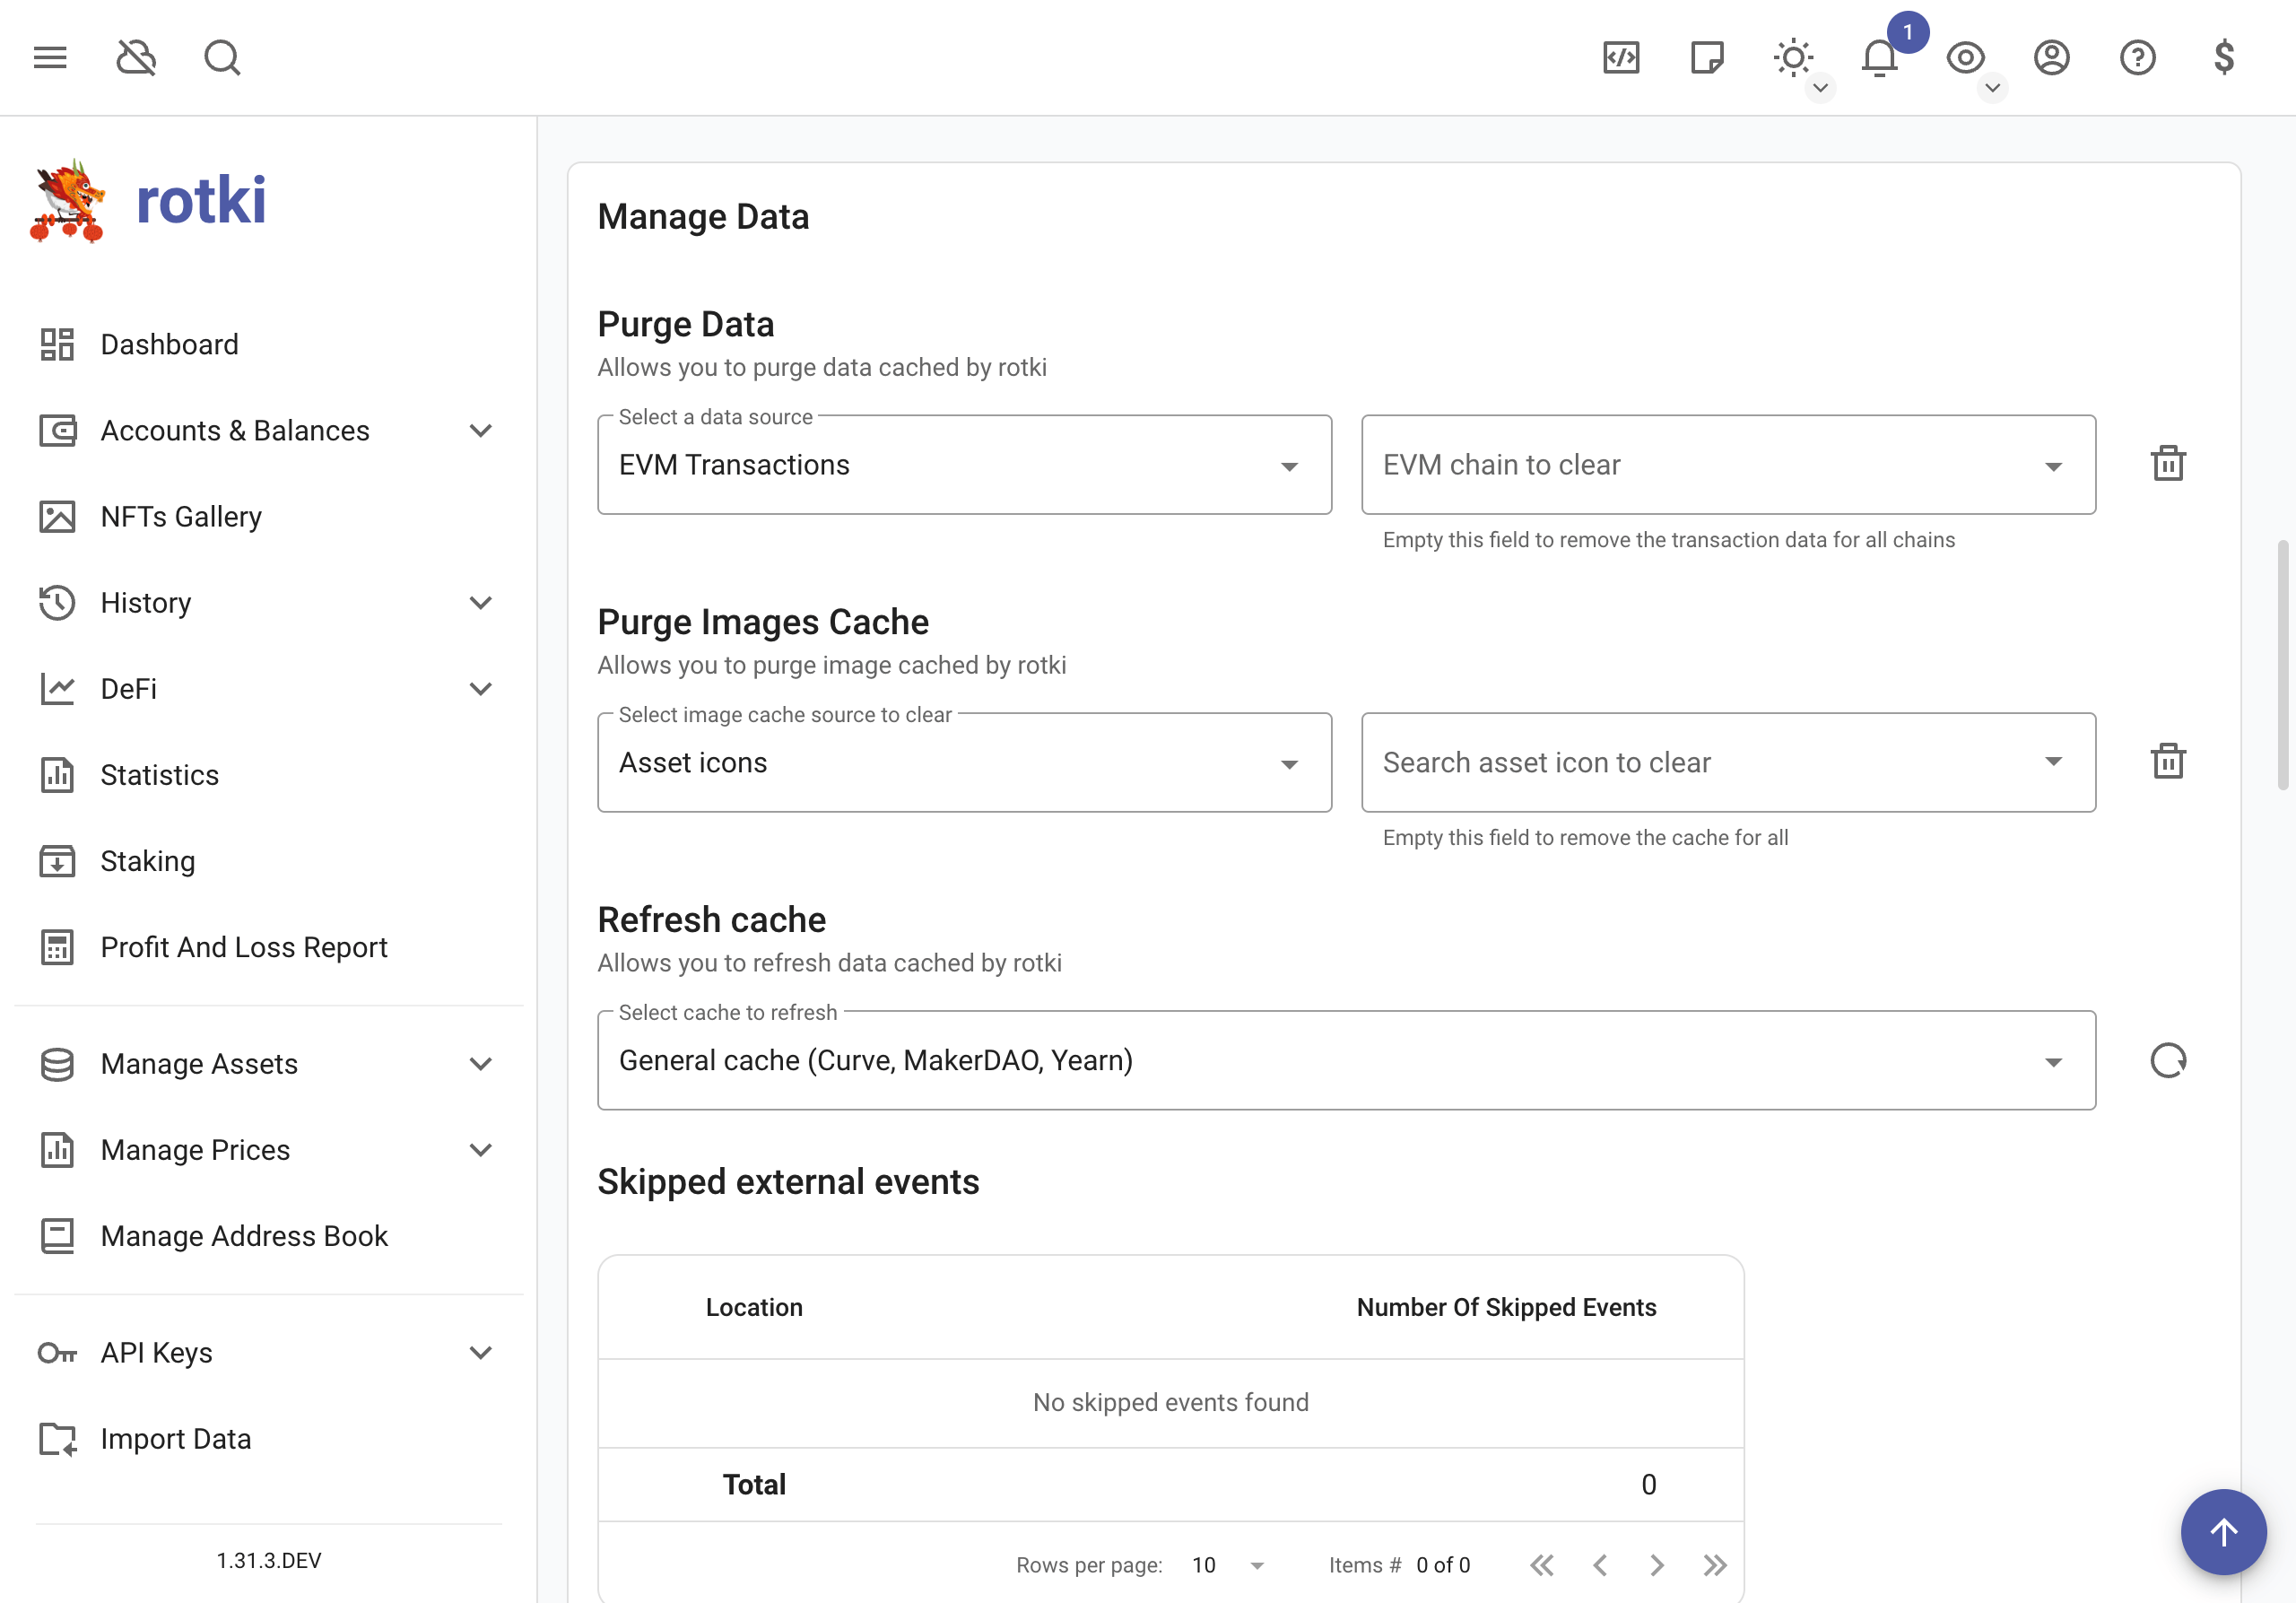
Manage historical price oracle cache
Querying historical prices from oracles such as cryptocompare and coingecko is slow and can get slower as a result of rate limiting. That is why rotki creates historical price caches during idle time of the application.
You can request the creation of such a cache by going to the Oracle cache section, selecting the oracle, the from asset of the pair, the to asset of the pair and then pressing the Cache pair prices.
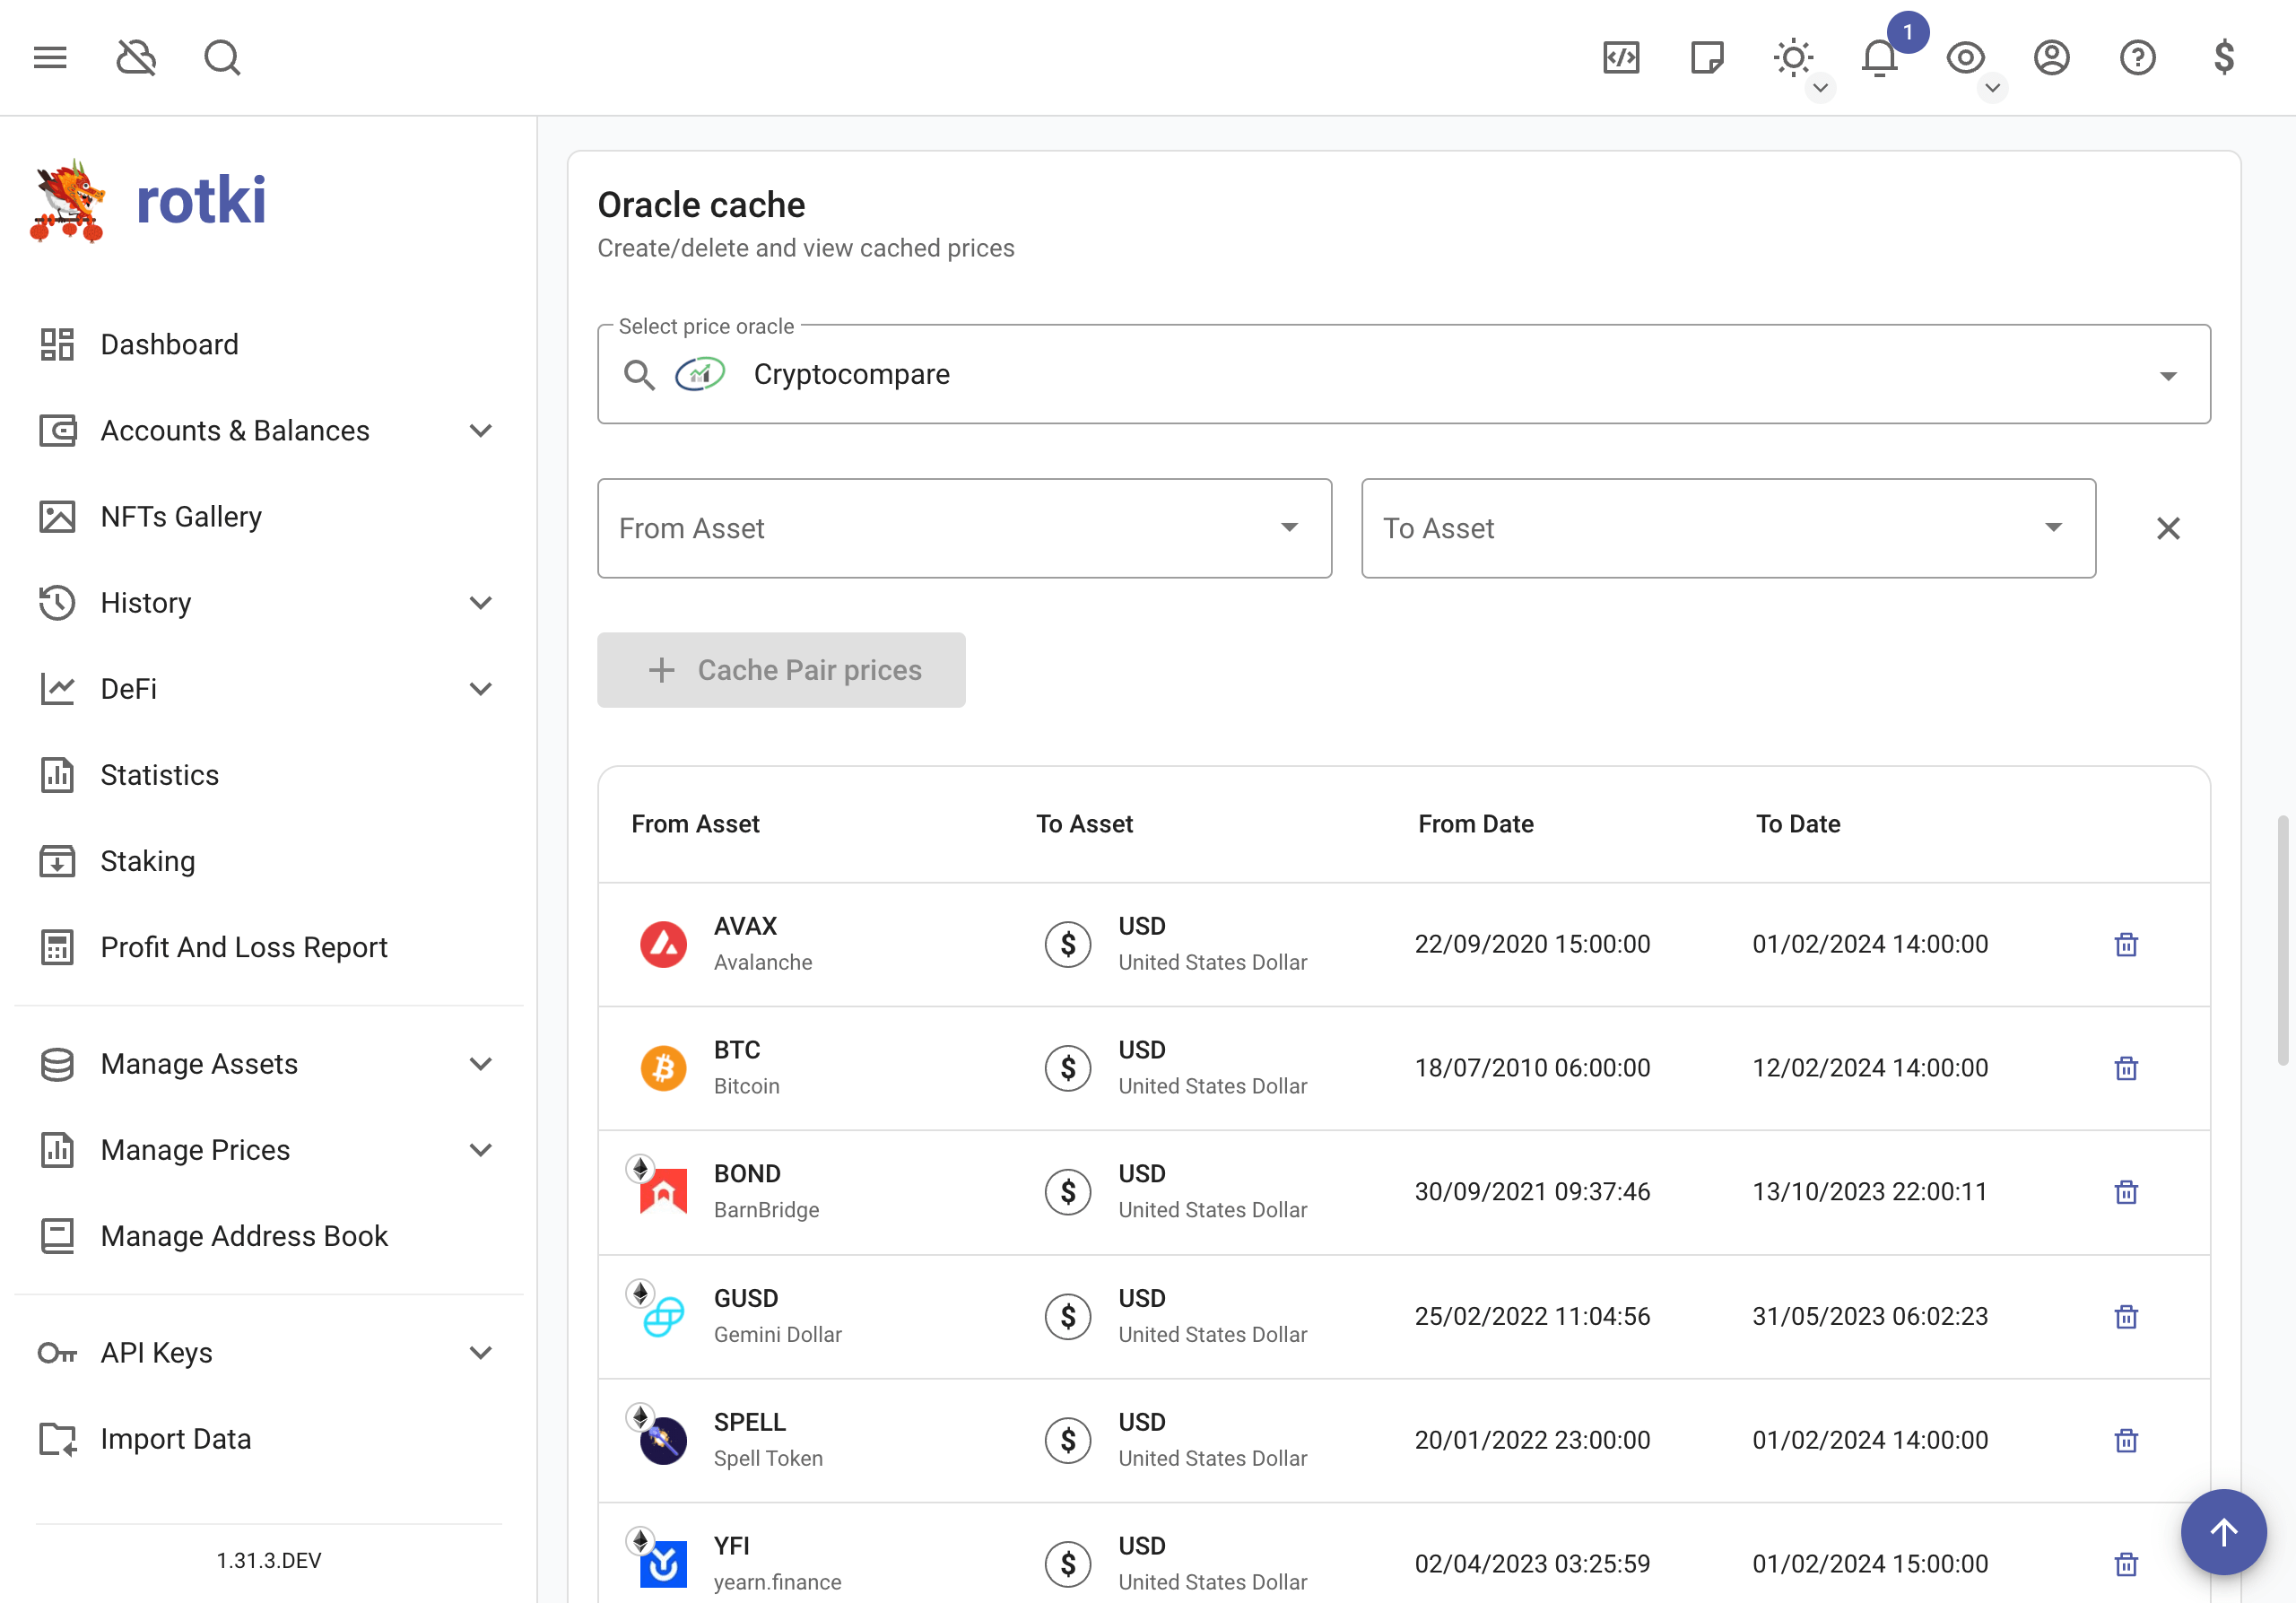
Users can also manage the existing historical price cache entries. They can inspect when does the historical price data start, when does it end and if they want they can delete the cache by pressing the trash button.
Customizing the Module settings
By choosing the “Module” section of the settings you can customize the enabled modules and the queried addresses for each module for the application.
The benefit of enabling only the modules you use, and specifying the addresses, is that rotki will only query the specified addresses for the enabled modules. This can considerably improve the querying speed.
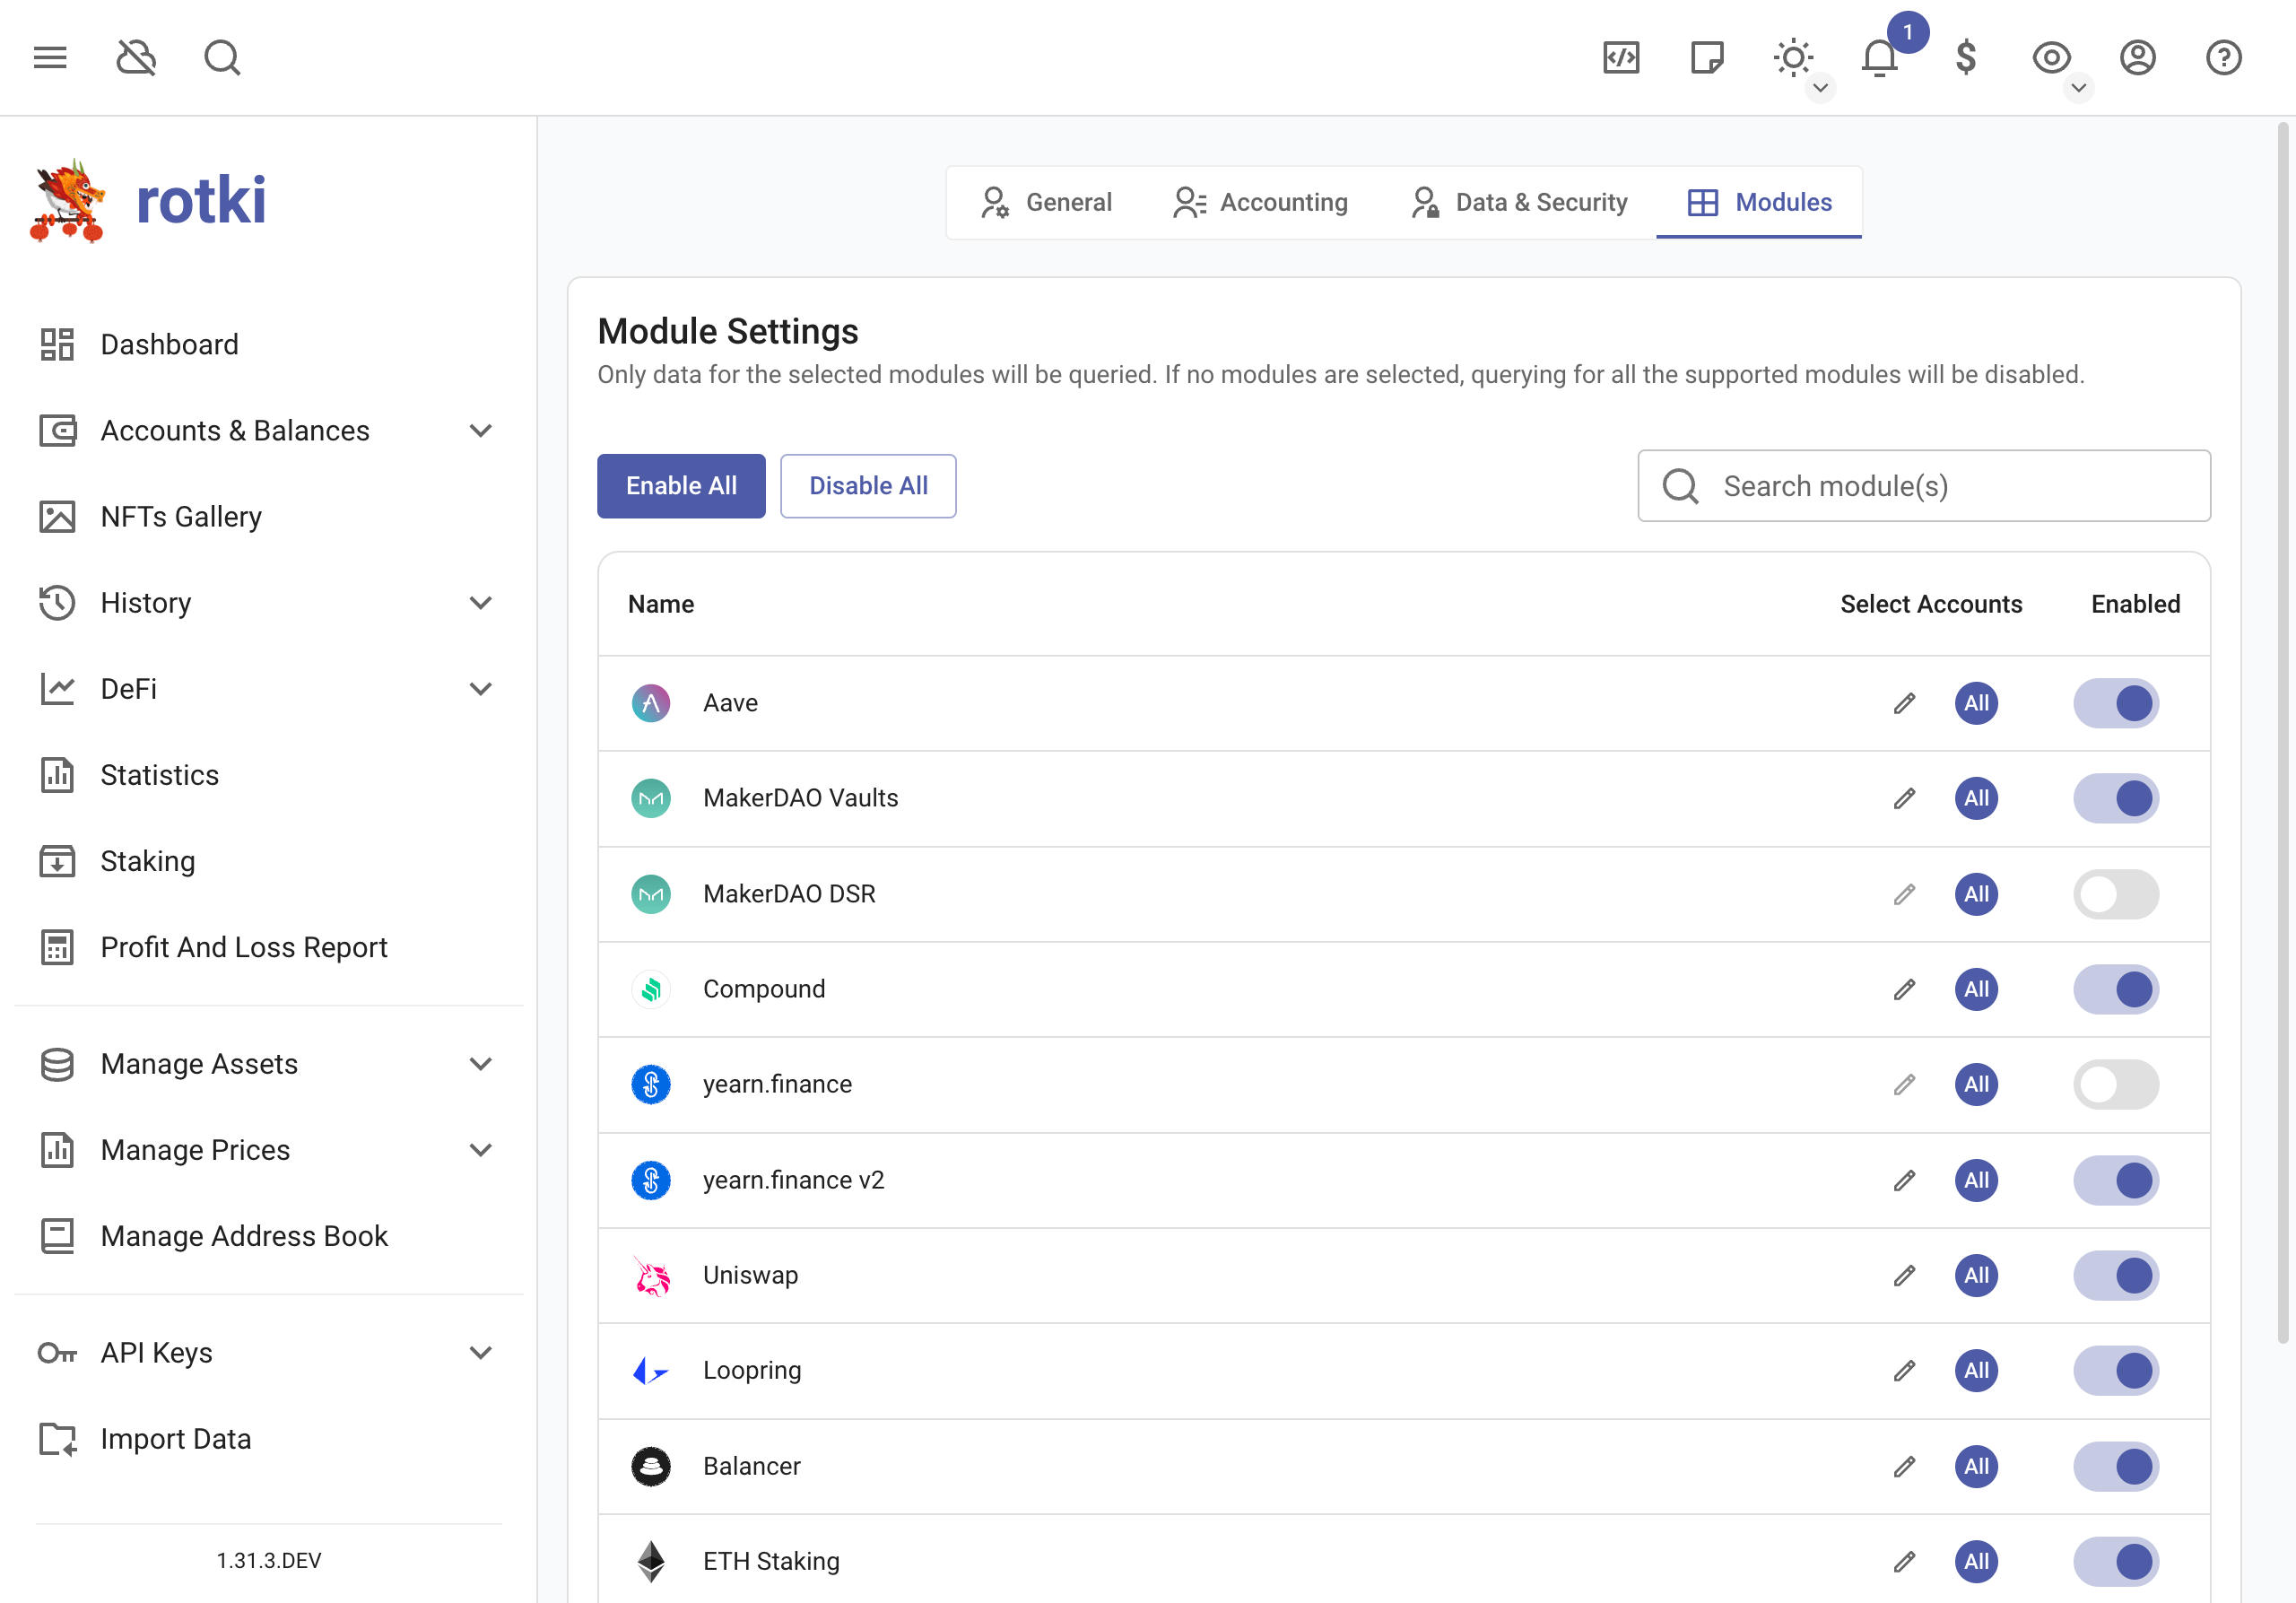
Activating/Deactivating Modules
You can see all modules in the table. Some modules are activated by default. You can enable/disable a module by toggling the switch on the right. After enabling or disabling a module you need to re-login again for the changes to take effect.
Selecting Addresses
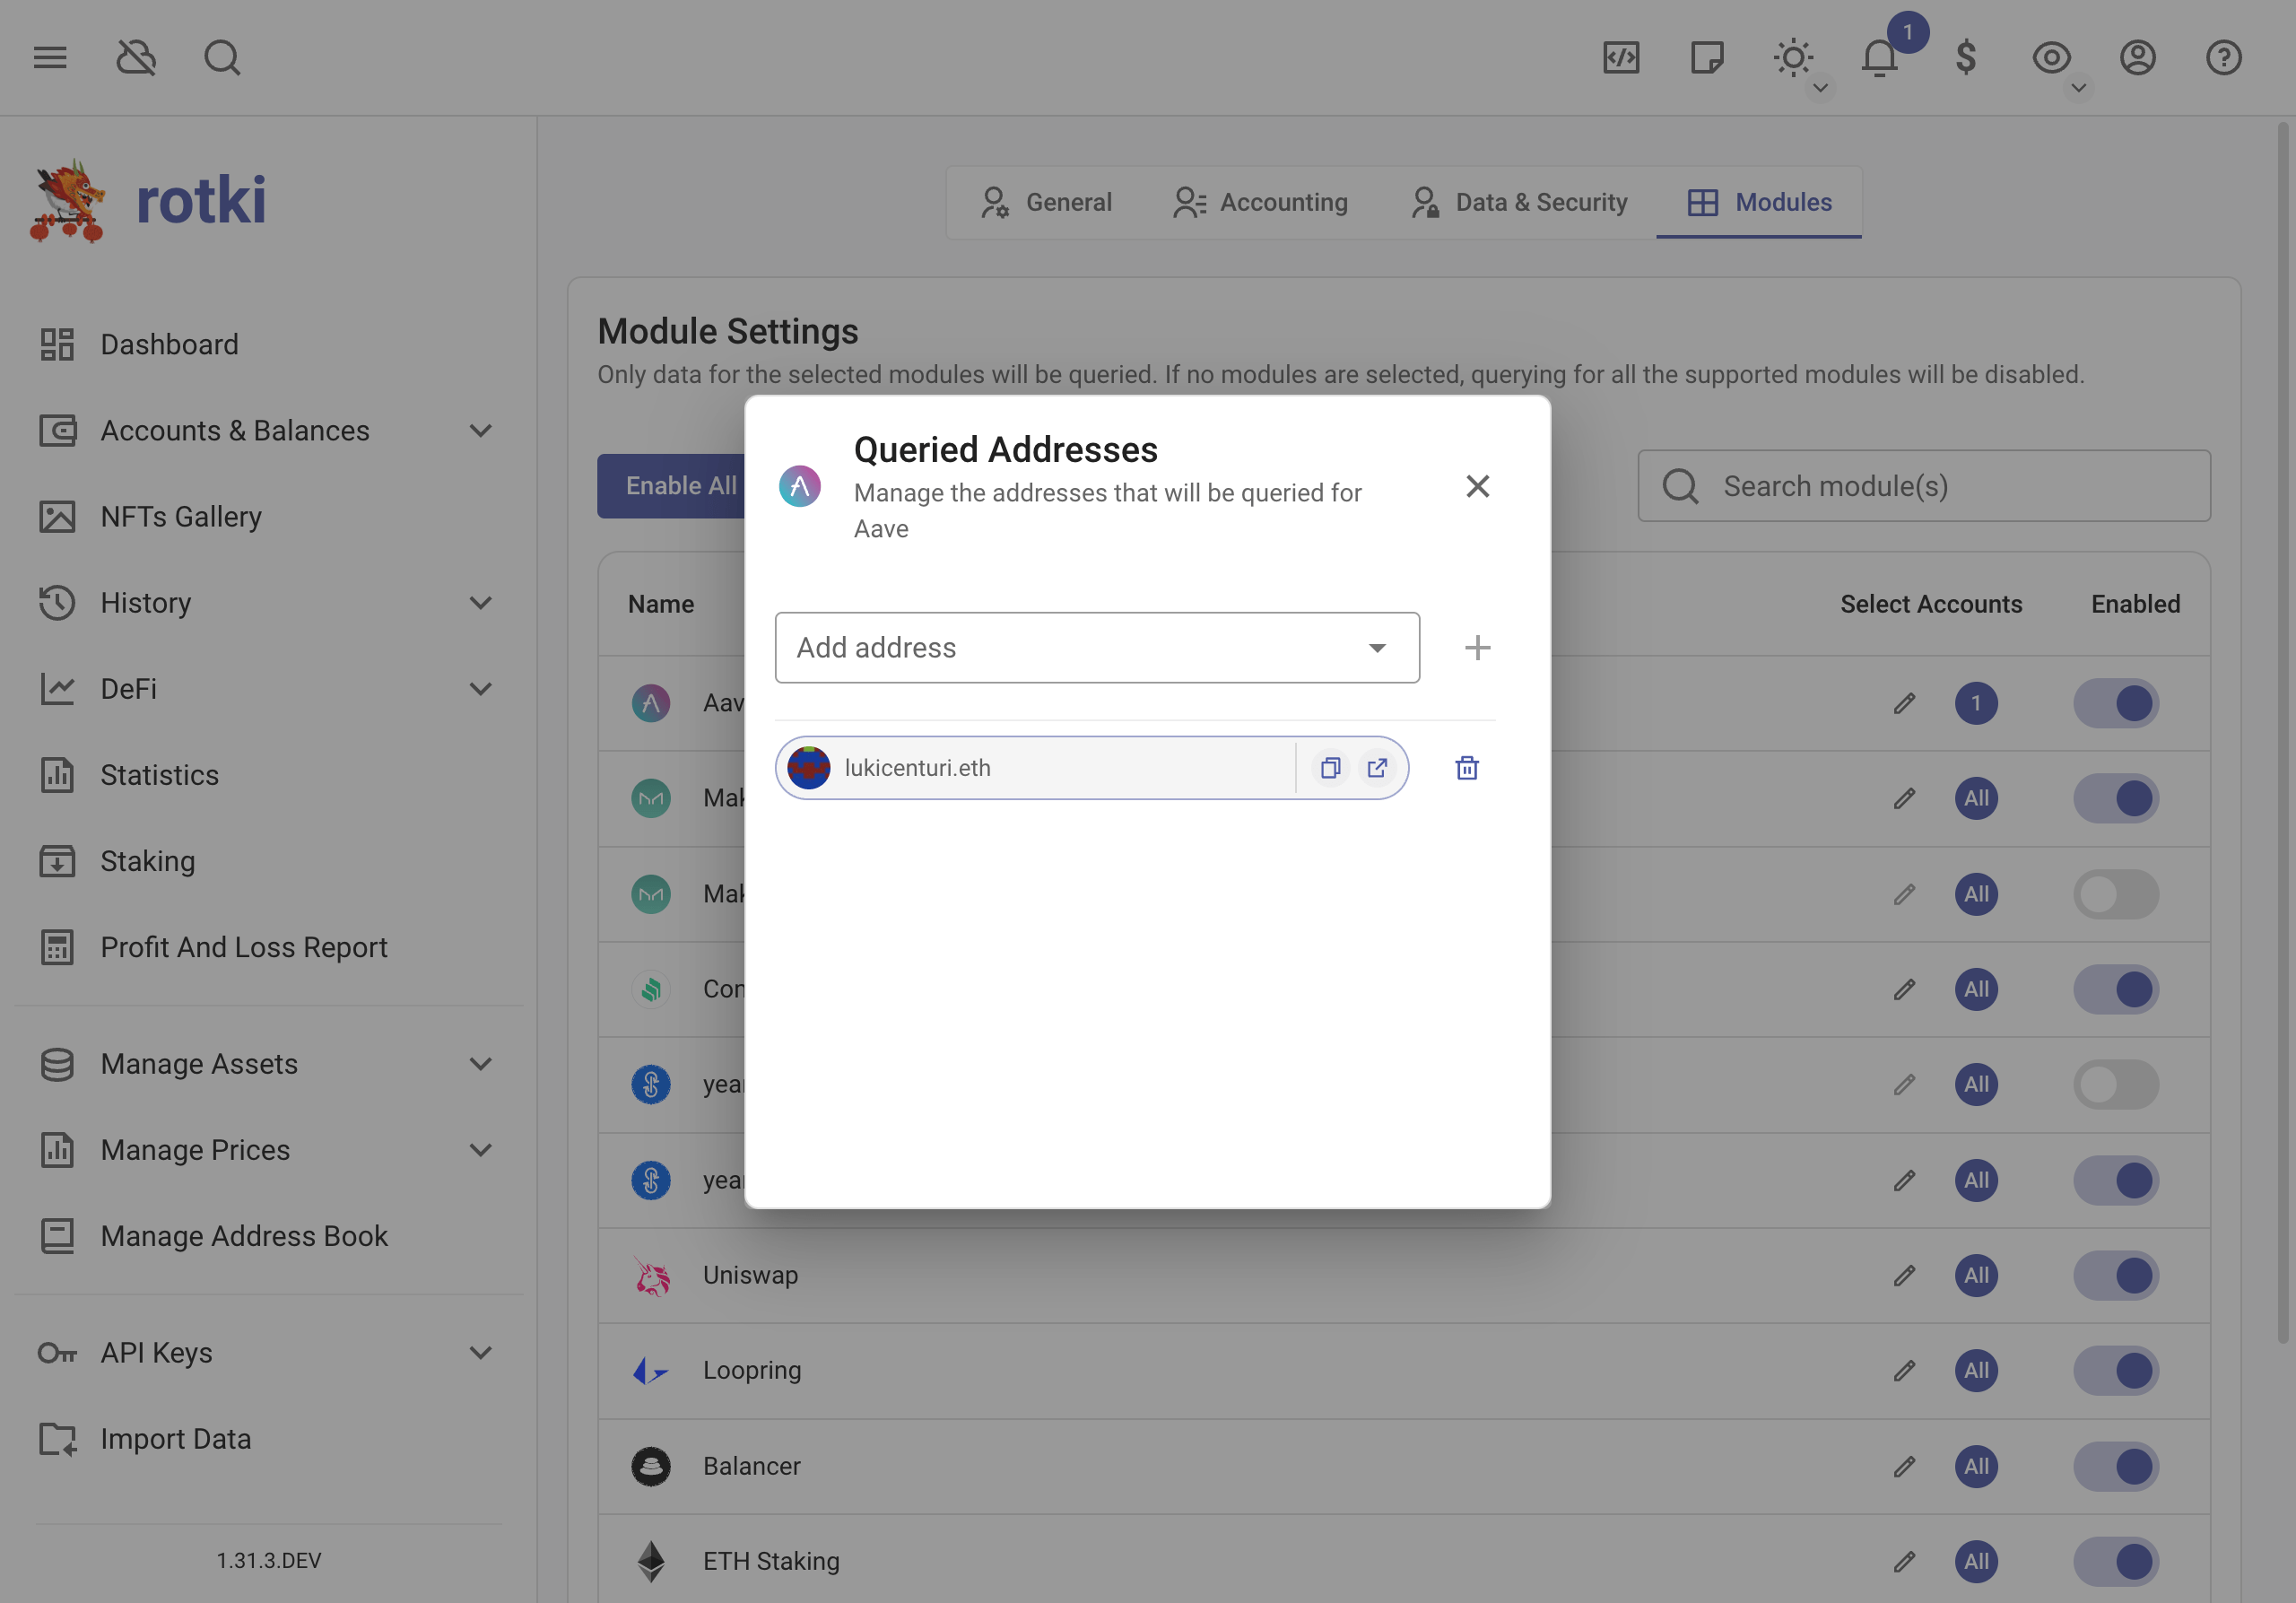
To limit querying to only selected addresses instead of all eligible ones, you can click the “edit/pencil” button on the module. This will display a dialog to select the addresses.
If no addresses are selected for a module, this means that Rotki will check all eligible addresses, which can increase the total query duration and considerably slow down data retrieval from the app.
Changing the backend settings
Users of the desktop app can change the default data directory, and log directory. This can be done via the login screen. You can click the cog wheel at the bottom right corner to view the backend settings dialog.
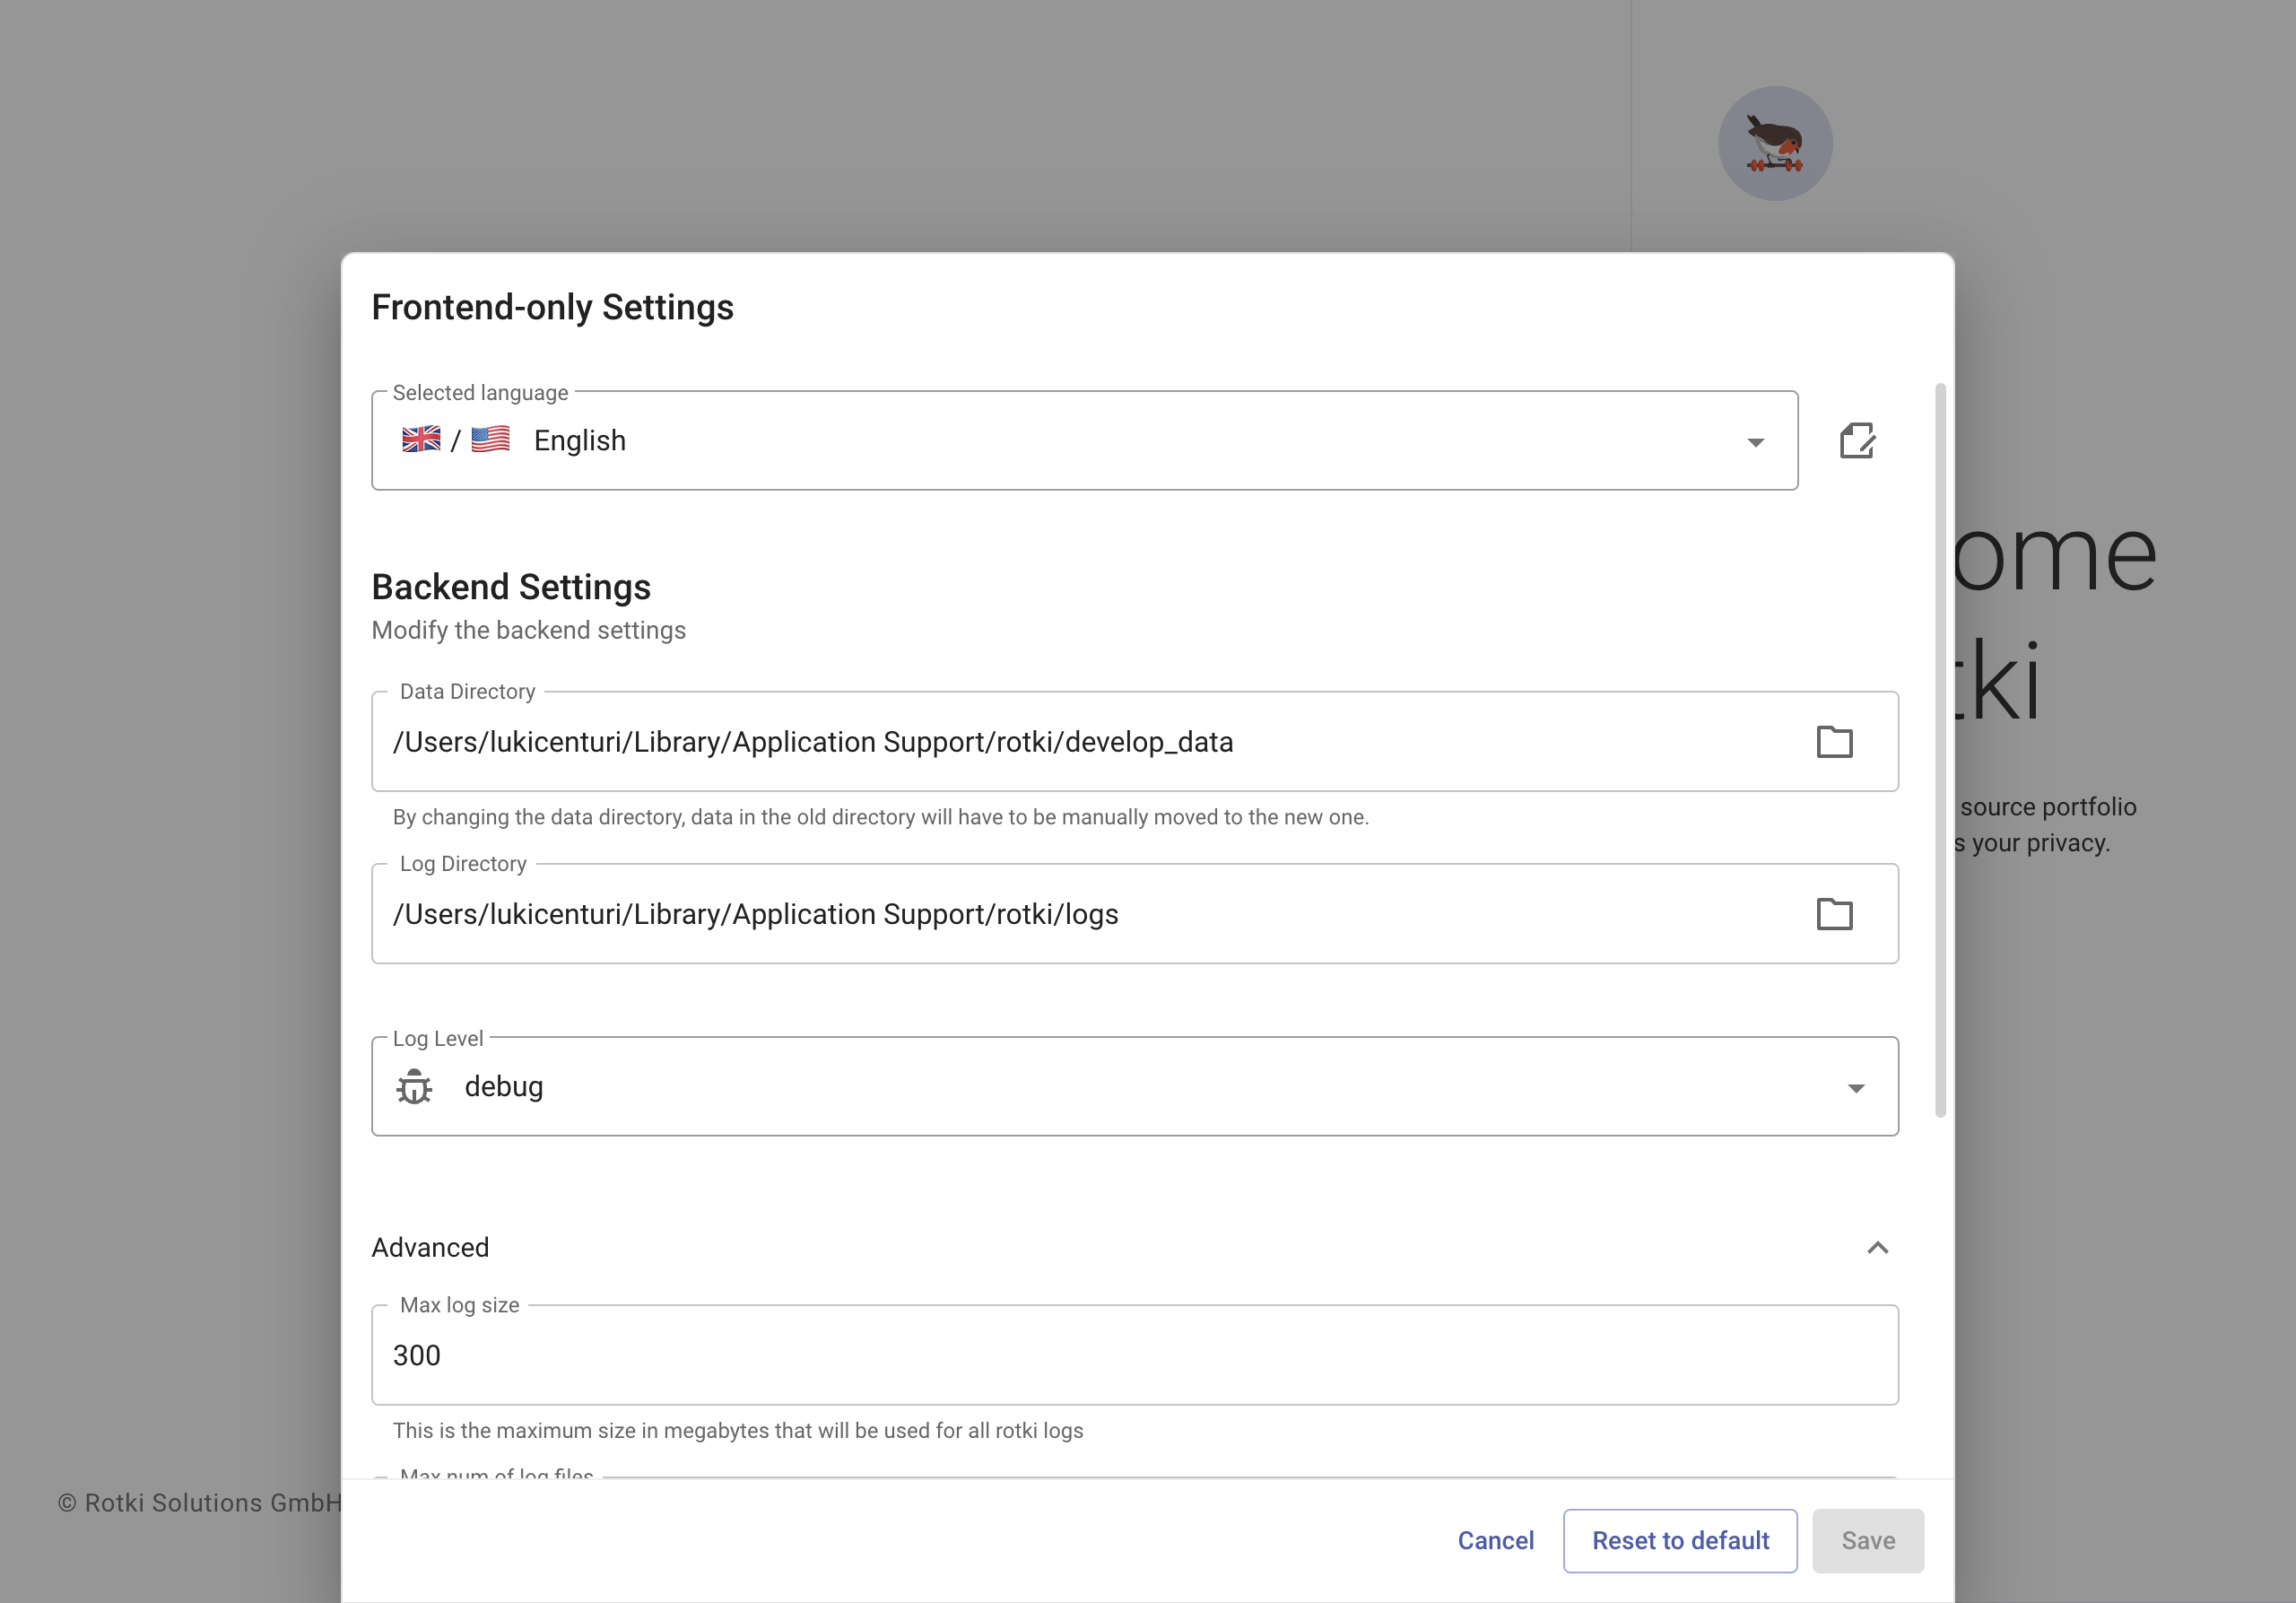
After selecting a new data directory, log directory etc you can press the save button to save your settings.
Keep in mind that any accounts that were created in the previous directory will not be accessible anymore and you will have to manually move them to the new location.
In the advanced section of the backend settings you can also modify the following settings:
Logging from other modules: If enabled then logging will also include log entries from other dependent libraries and not only rotki. It is disabled by default.
Main Loop sleep: This is the amount of seconds that the main loop of rotki sleeps for. It is set to 20 seconds by default.
Max log size: This is the maximum size in megabytes all logs of a single run can have.
Max num of log files: This is the maximum number of backup (rotated) logs a single run can have.
Instructions per SQLite context switch: This is the setting to specify after how many sqlite VM instructions to context switch between cooperative threads. Set to 0 to disable async DB access.
Disabling the tray icon
Users can disable the application tray icon by clicking the View menu entry in the application menu bar.
There you can select Display Tray Icon to enable or disable the application tray icon.
Importing data
In this section we will explain how you can import data by integrating with external services such as crypto exchanges.
Adding an exchange
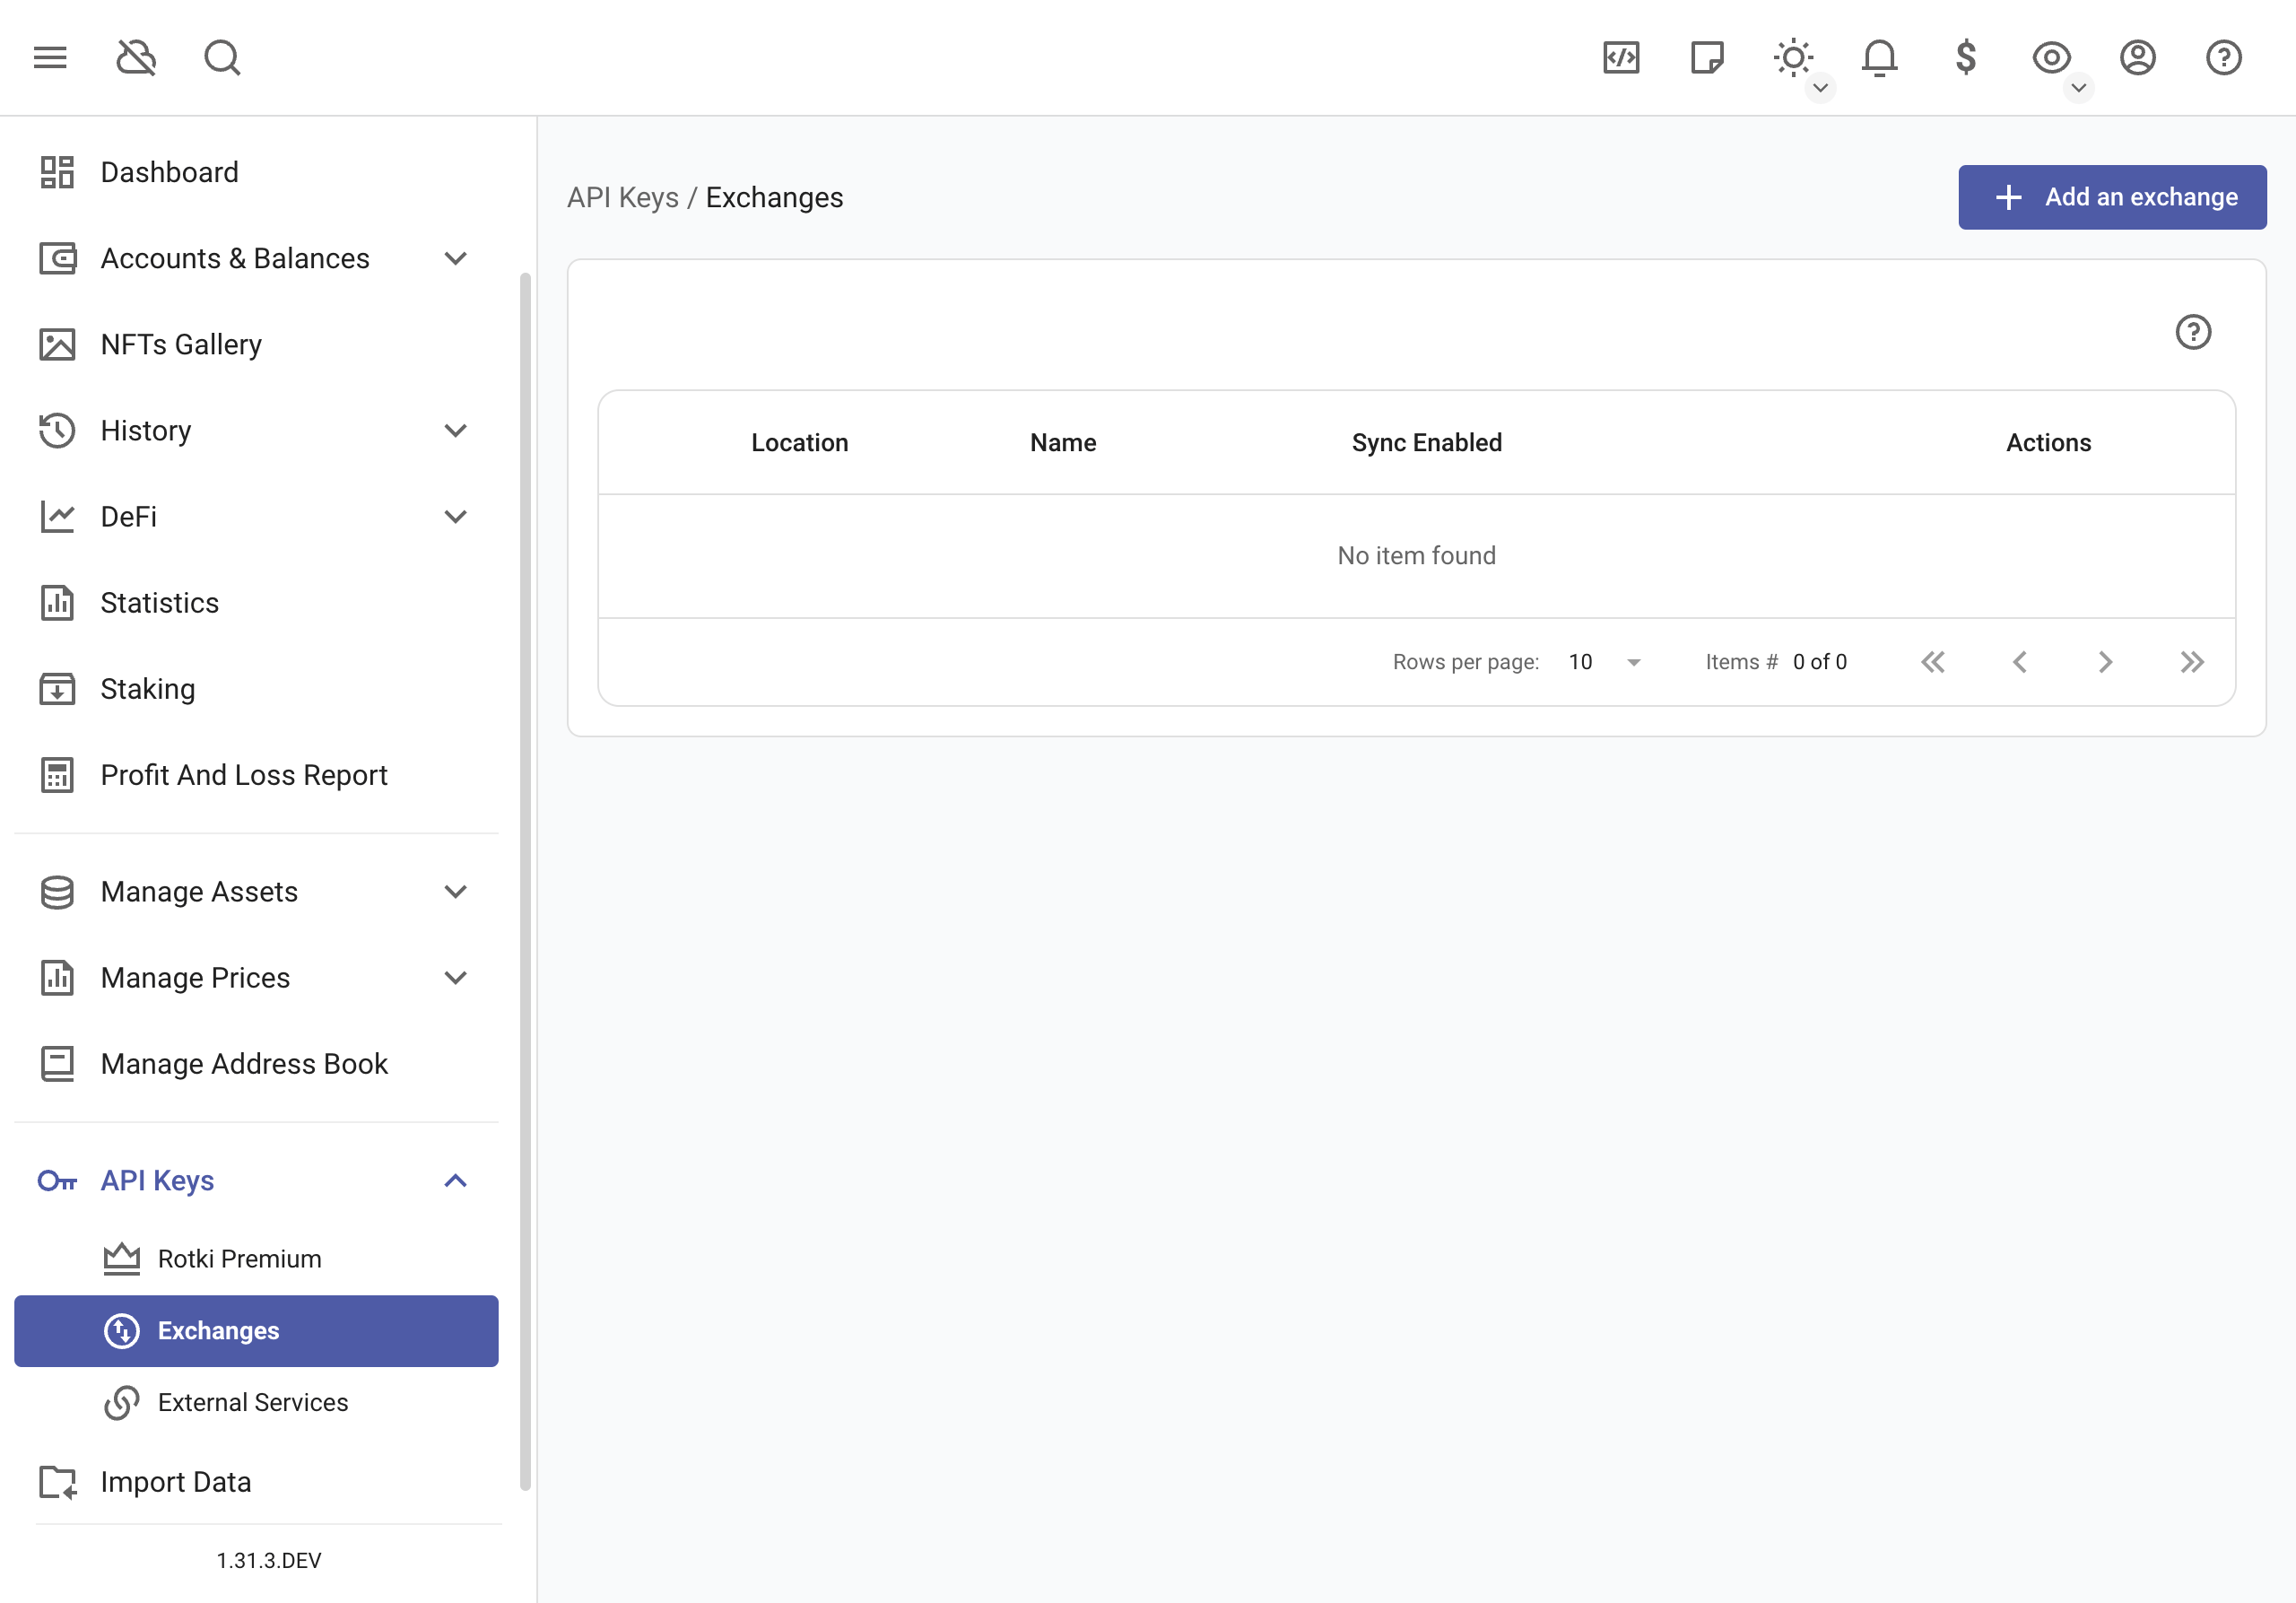
You can integrate many different exchanges with rotki. Currently supported exchanges are: Kraken, Poloniex, Bittrex, Bitmex, Bitfinex, Binance, Binance US, bitcoin.de, Coinbase, Coinbase Pro, Gemini, Iconomi, Bitstamp, KuCoin, Independent Reserve, OKX.
To do so you have to go to your exchange and create an API key (see the section API key permissions).
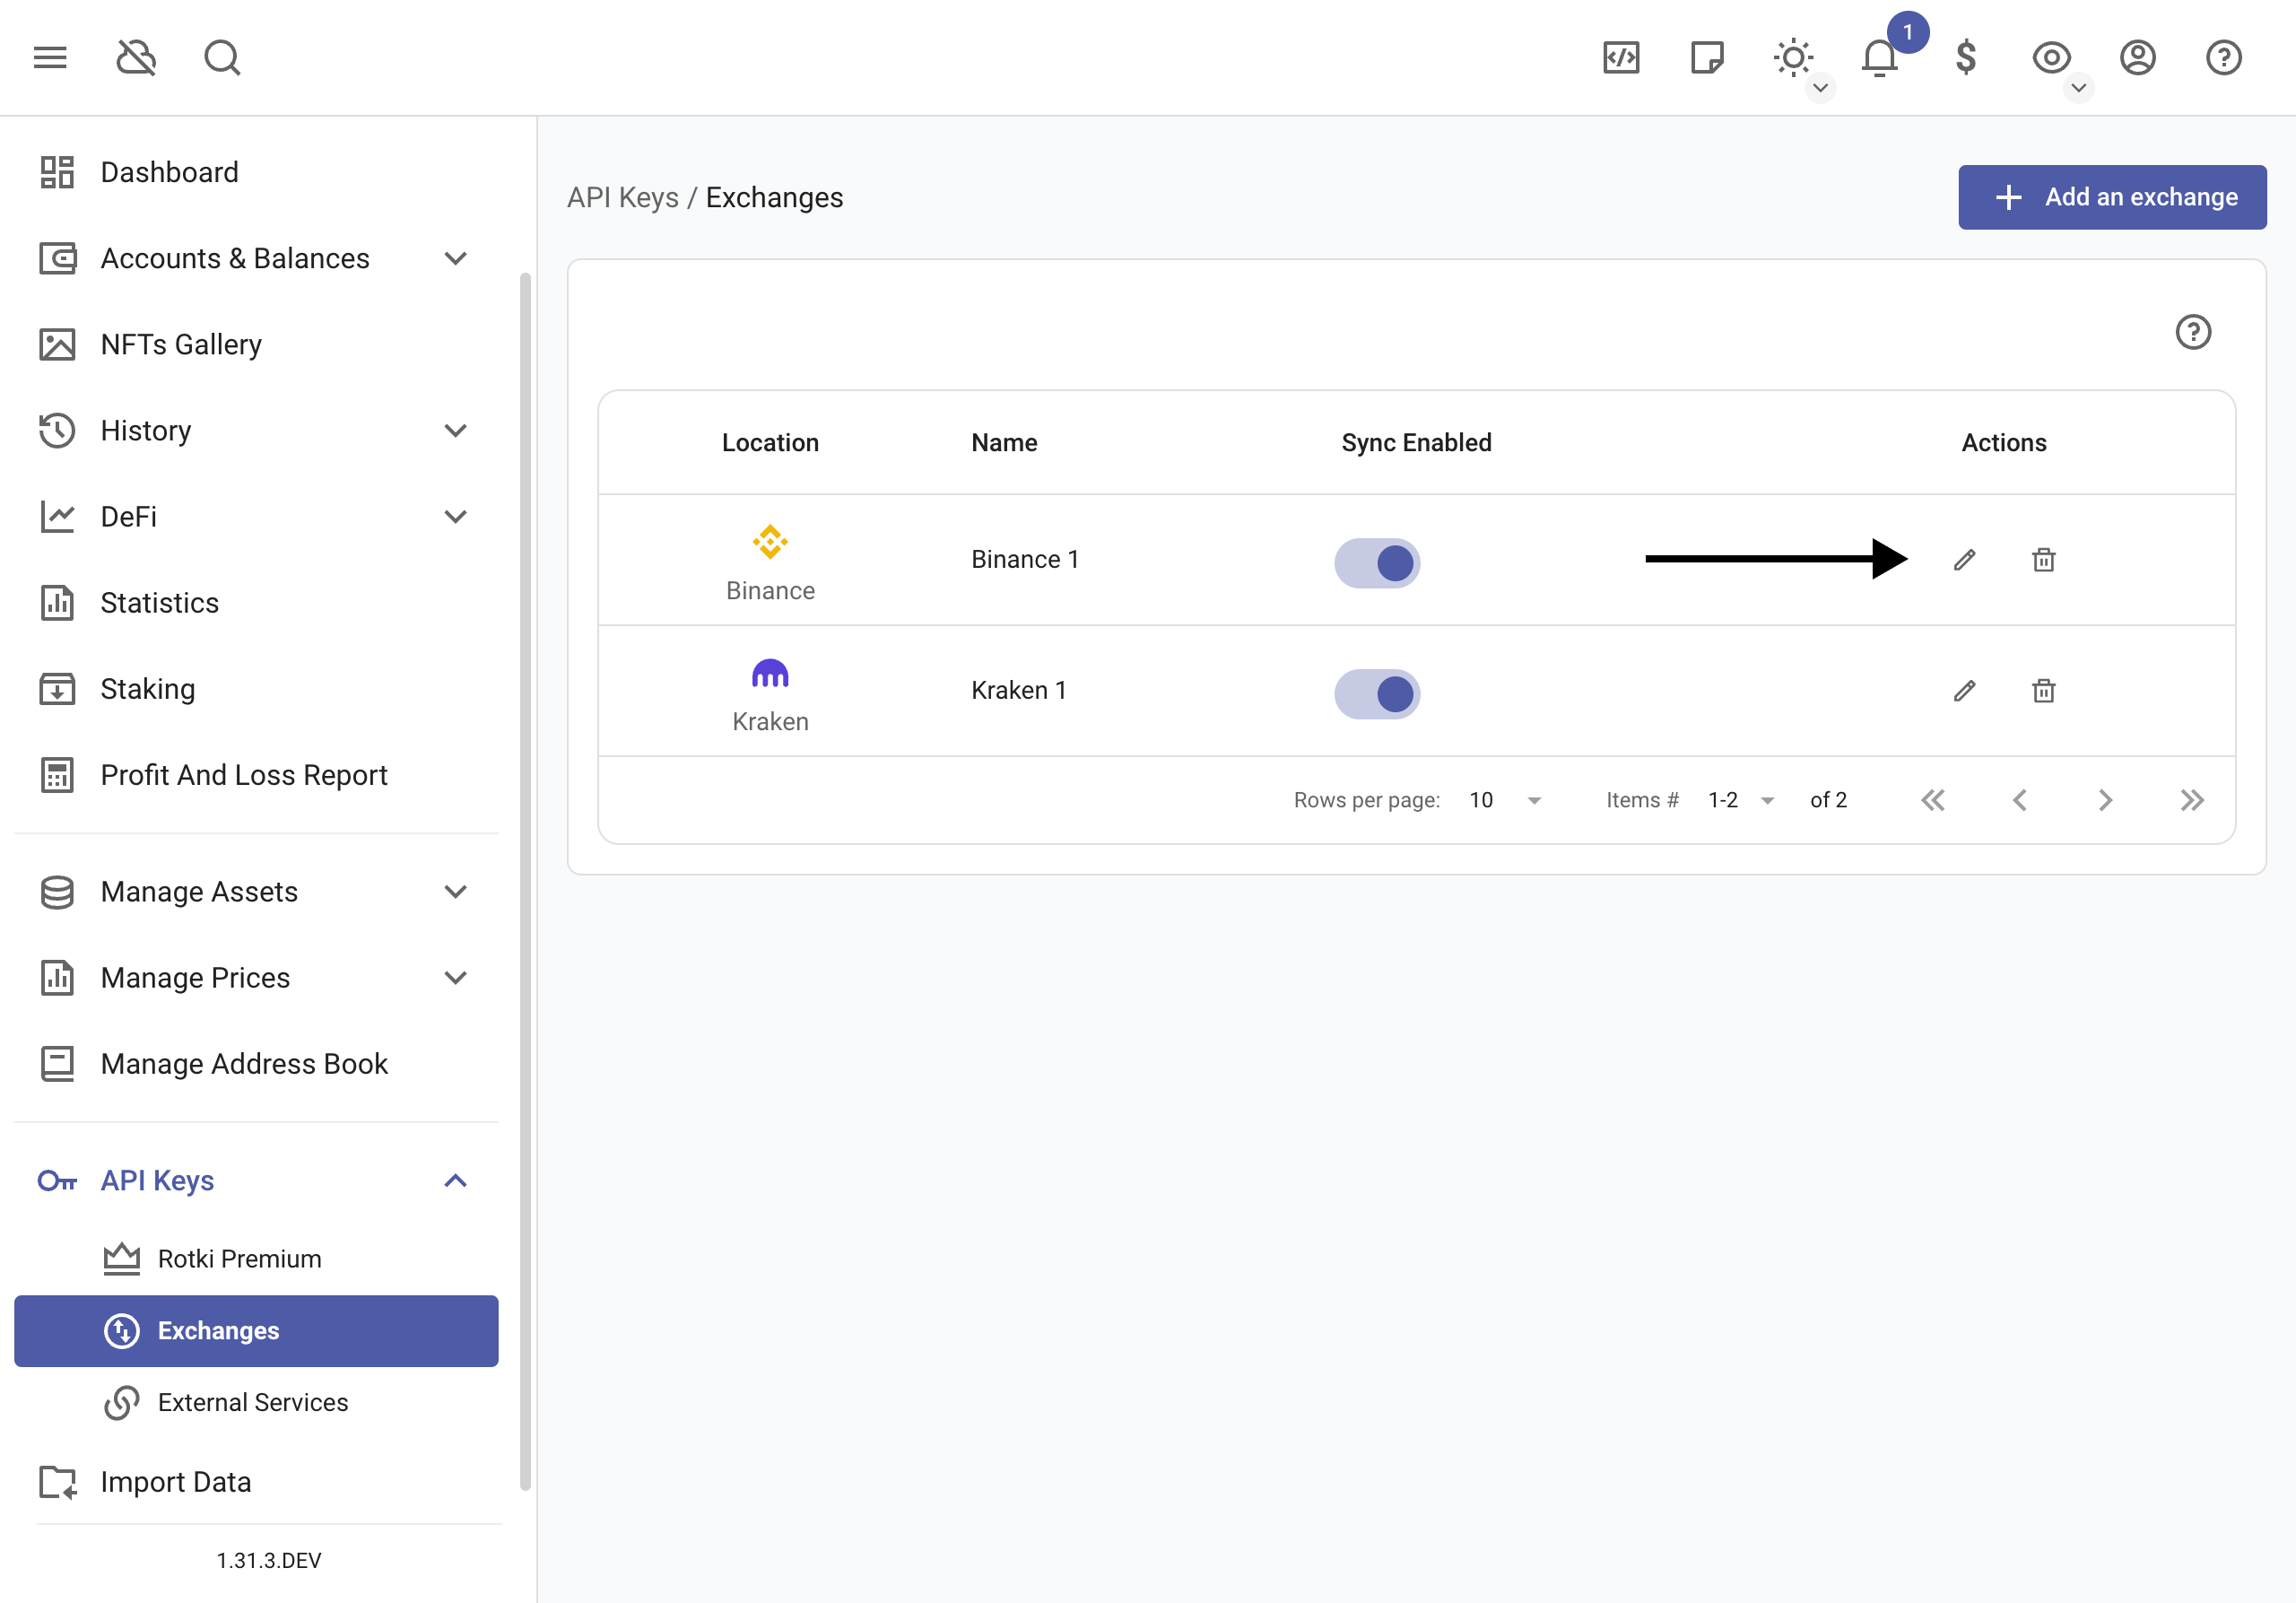
Click on the “API keys” on the left sidebar. This will take you to the place where you can add new exchange API keys. Press the plus button to open the exchange addition menu.
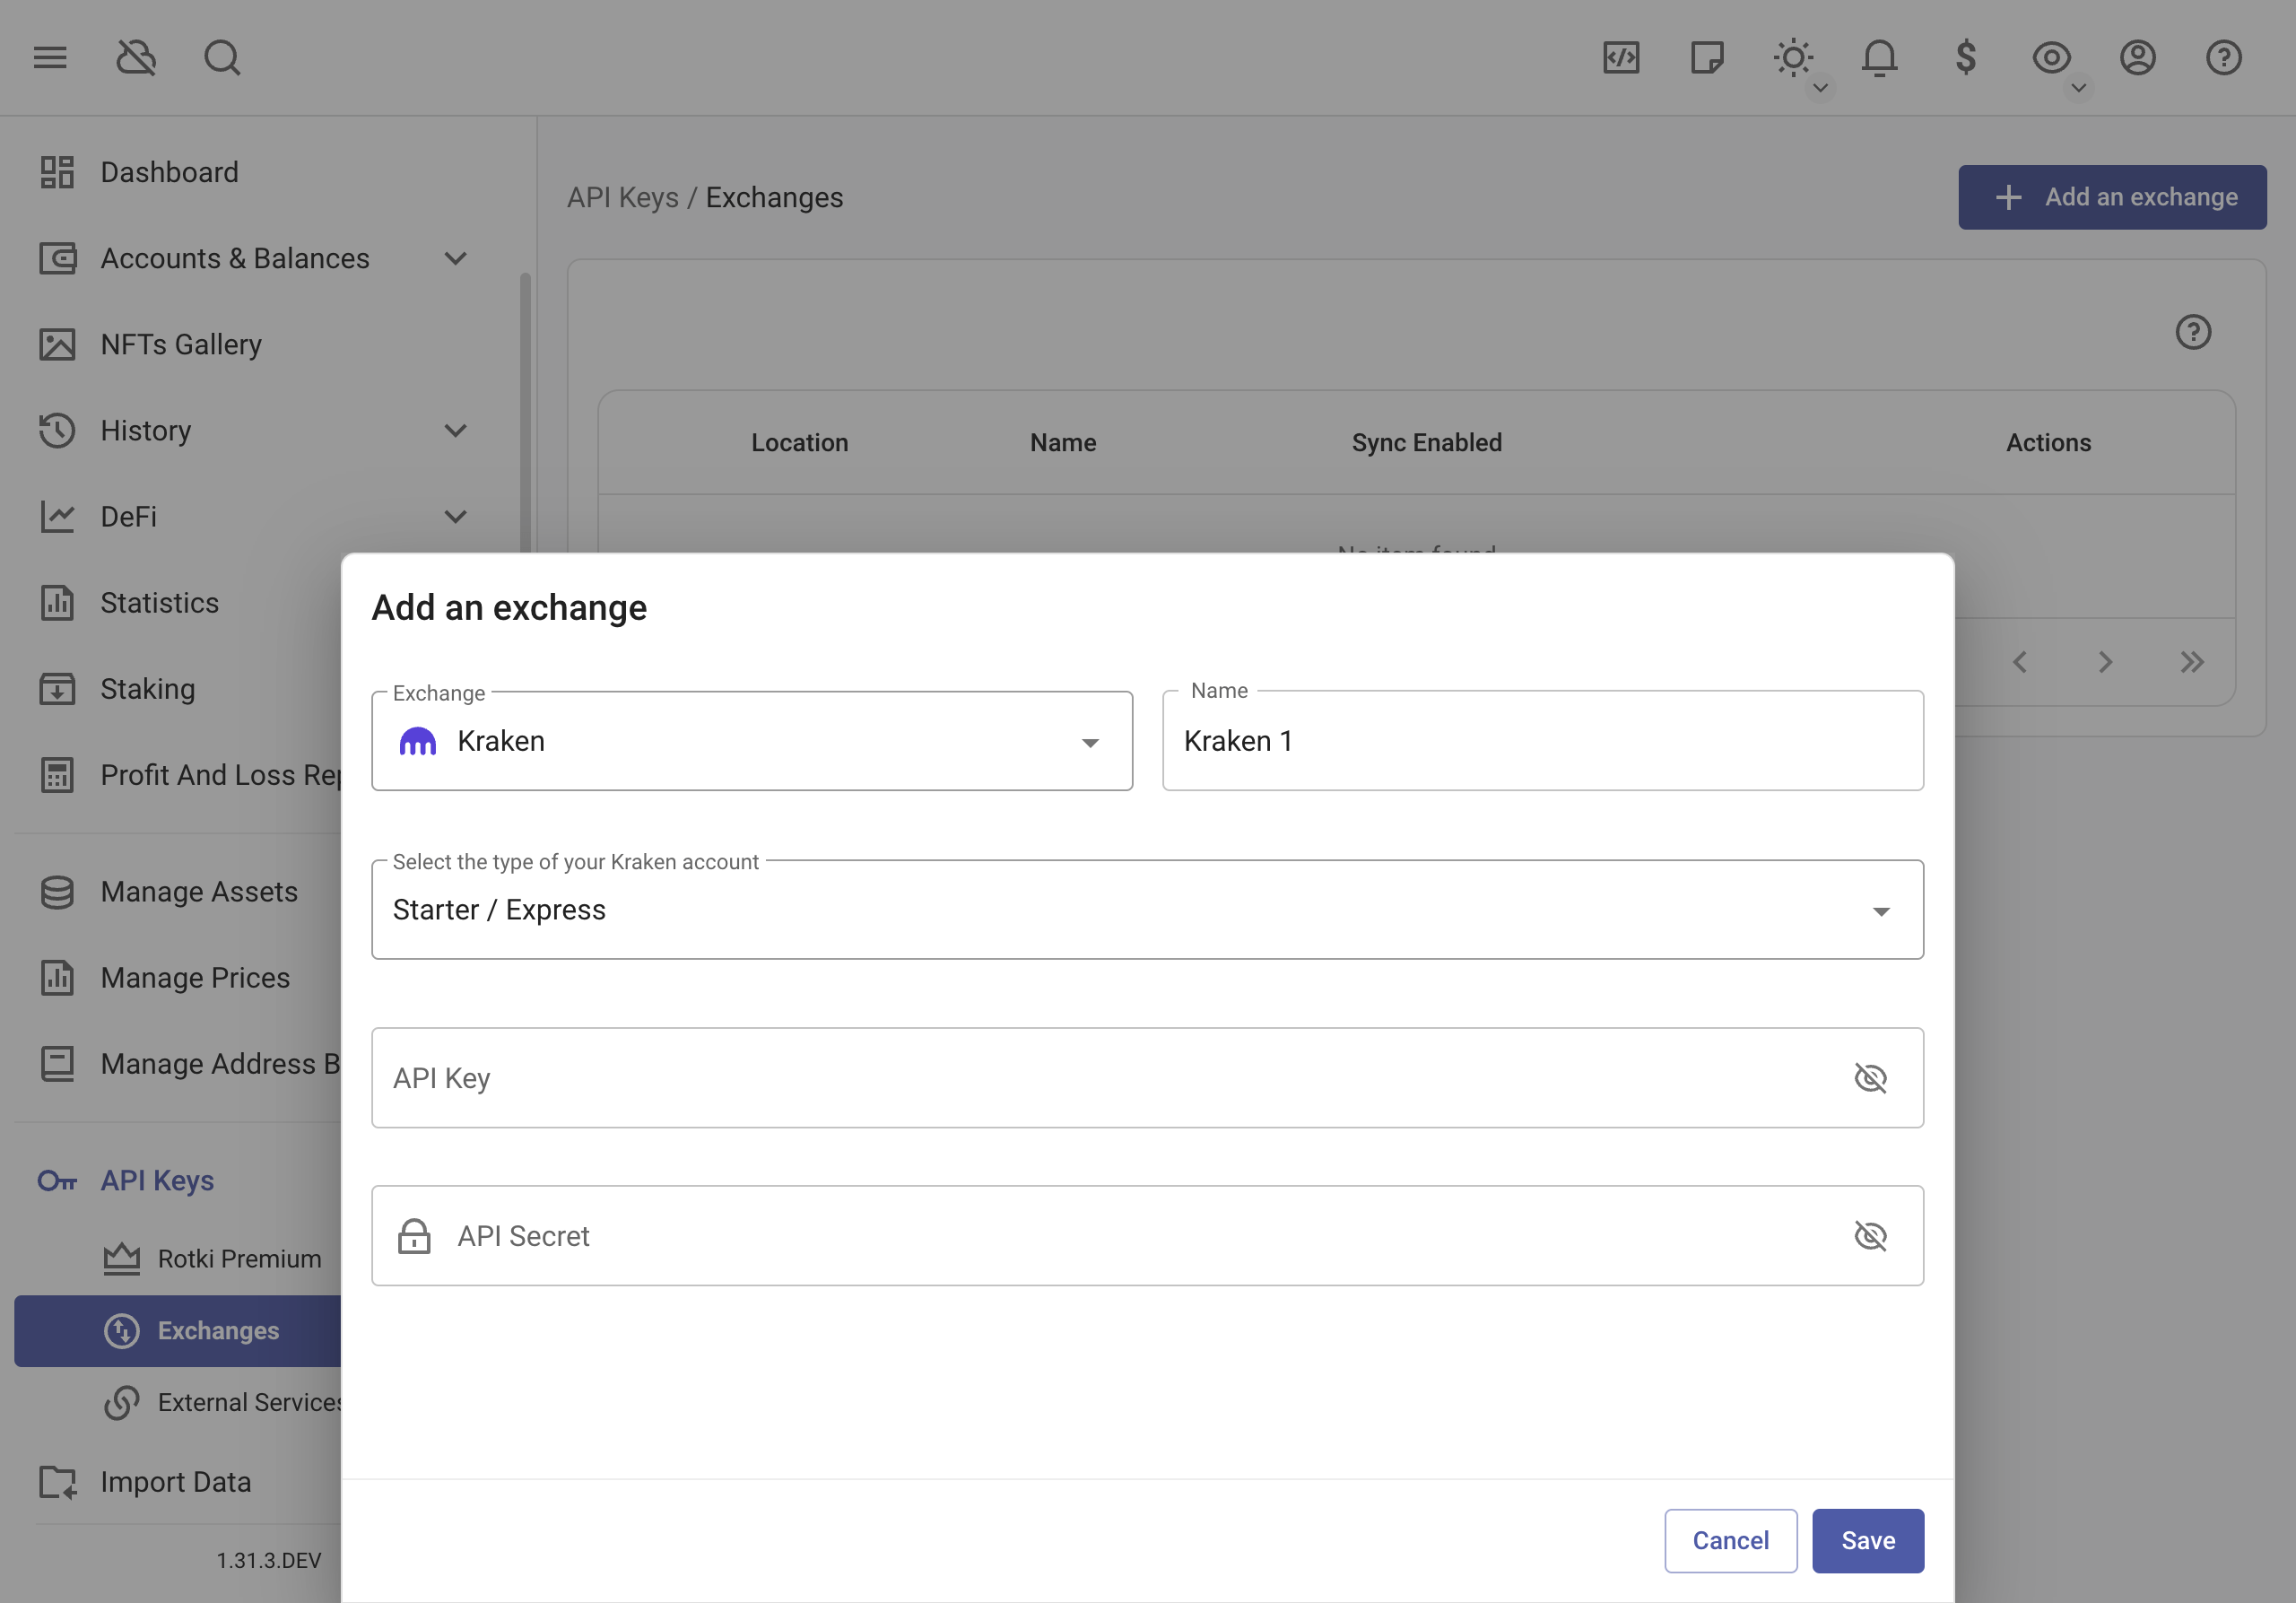
Then copy and paste the API Key and the API Secret in the respective text fields and press Save.
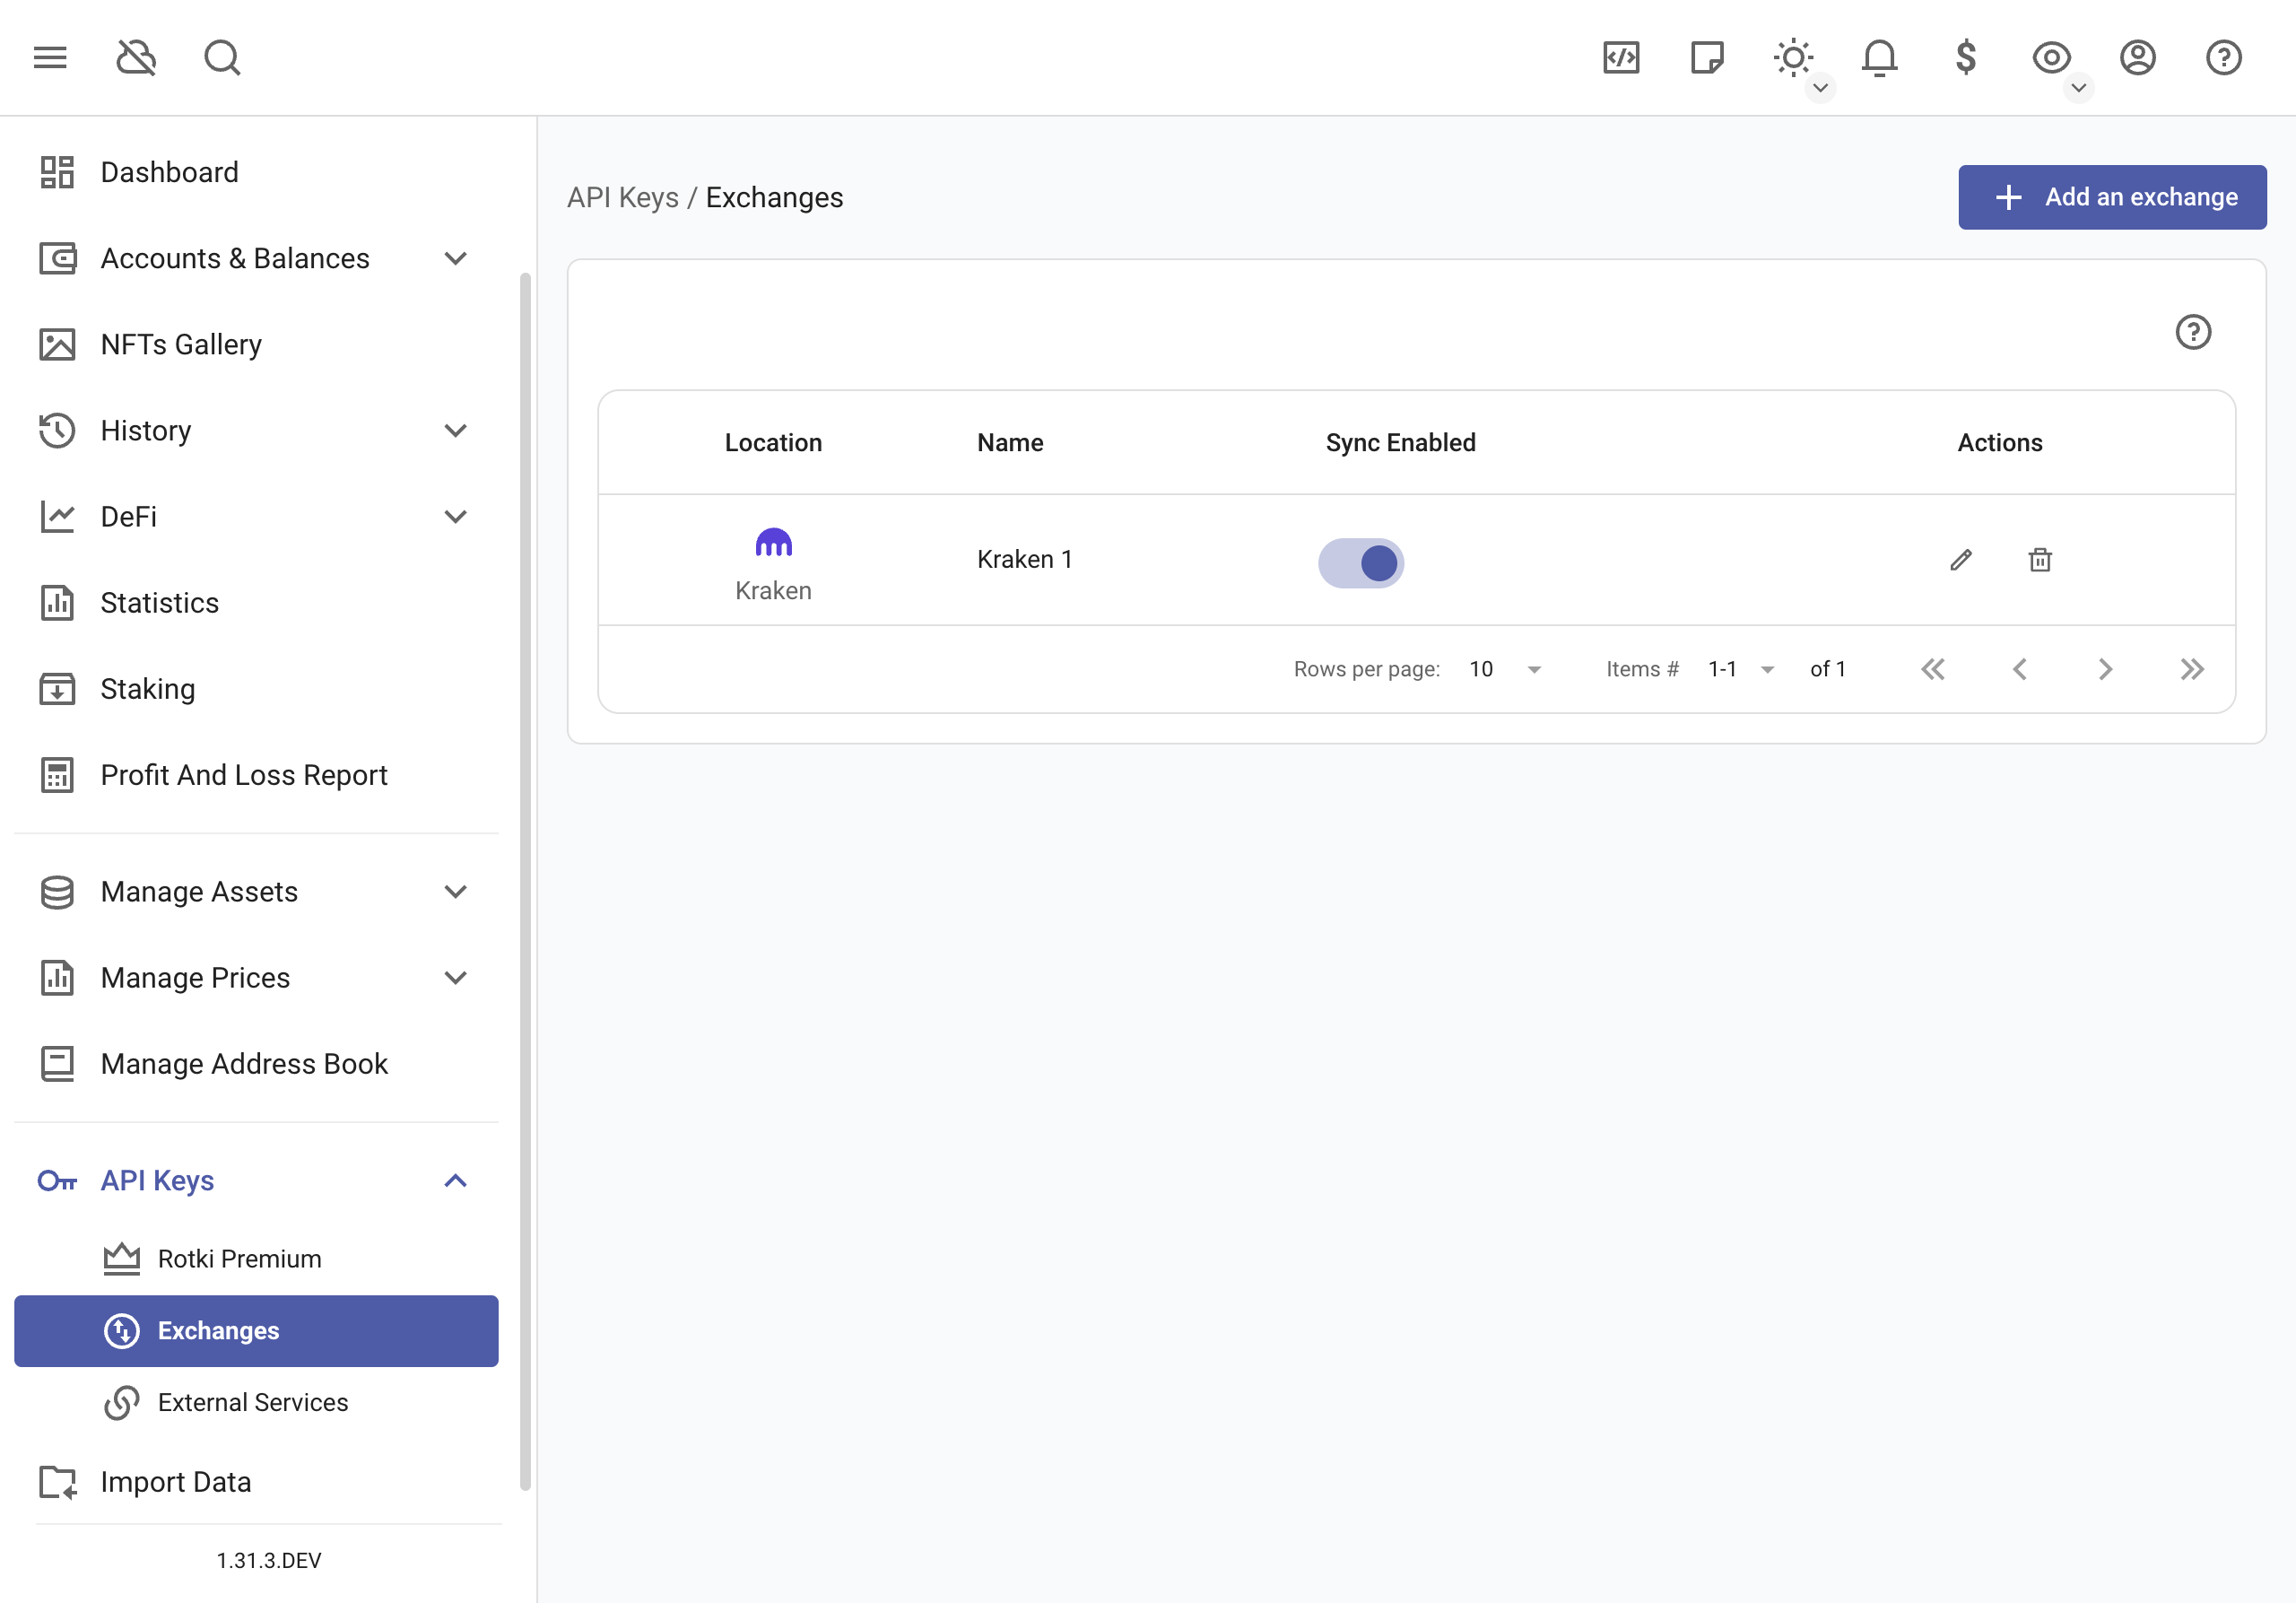
If all went well, you should be able to see your newly added exchange. If not please double check that the key and secret are correct.
You also have the option to enable/disable synchronization for the connected exchanges. Usually, you may want to disable the synchronization to prevent your IP getting banned because of too many syncs.
Note
At the moment, margin trades and future trades are not yet supported in rotki.
API key permissions
Rotki only needs read-only permissions for your accounts. As a general rule, exchanges (e.g. Binance, Coinbase Pro) group all the read-only permissions as “read” or “view”.
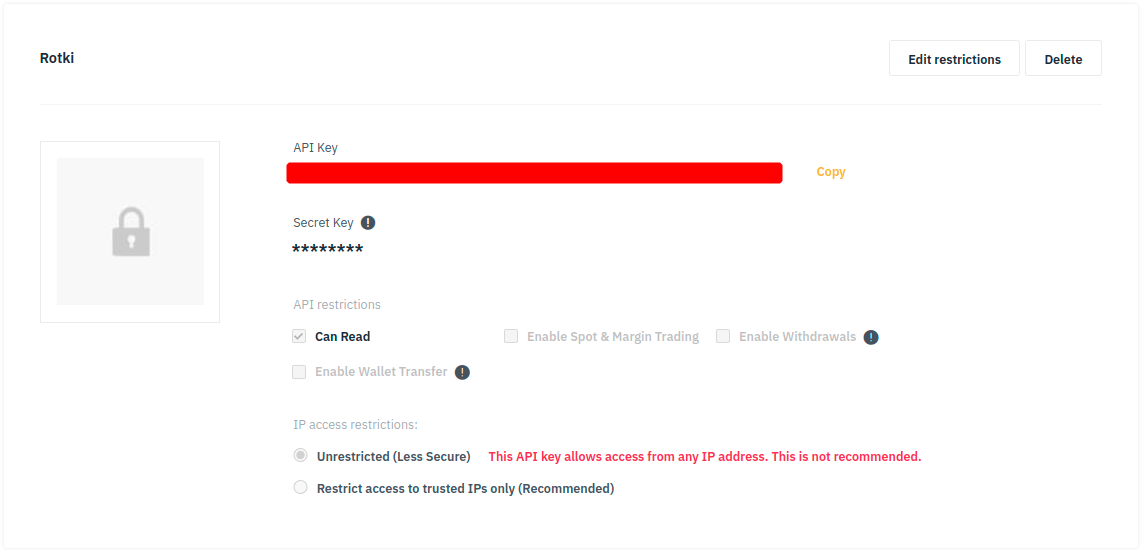
In case of an exchange providing a more granular permissions scheme (e.g. Coinbase, Kraken) or having additional options (e.g query limits, passphrase), refer to the exchange documentation or get in touch via their customer support channel.

You may as well try creating an API key with the minimum read-related permissions, then adding it in rotki and finally checking that the connection was successful and data was loaded as expected. Otherwise, try again adding more read-related permissions.
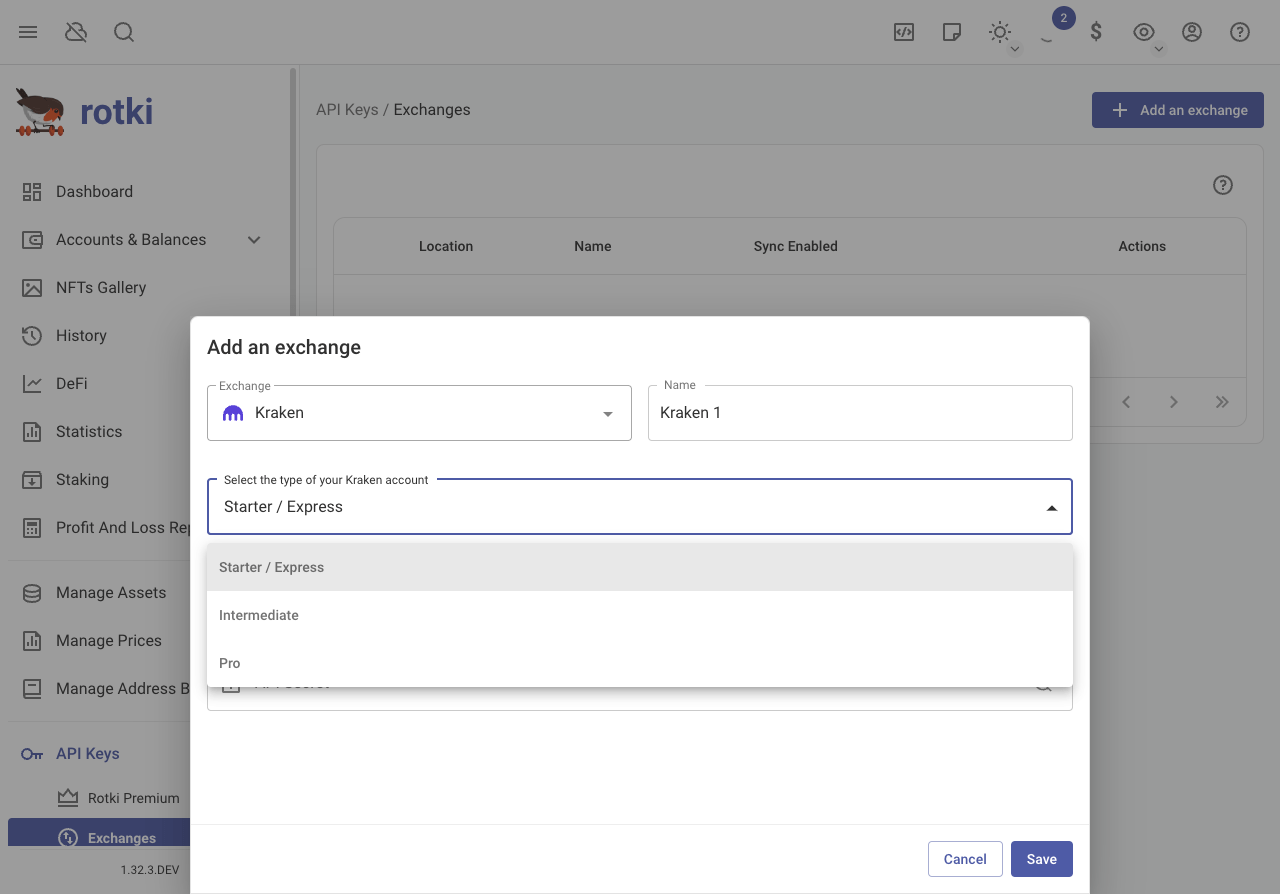
Kraken
When inputting the API key for Kraken, you need to specify the type of your Kraken account, which depends on your Kraken account verification level. Refer to this for more information.
Binance / Binance US
Binance API is engineered in a way that makes it really slow to query information for trades since every possible market pair has to be queried. This process can also fail since many requests have to be made to binance servers and rate limits may apply. To avoid having to query all existing trade pairs, it is possible to select what markets should be queried. This will considerably increase the speed as the amount of queries to binance will be reduced to only the markets you specify. To select which markets you want to query edit your binance exchange instance
And choose the markets in the Filter market pair(s) search.
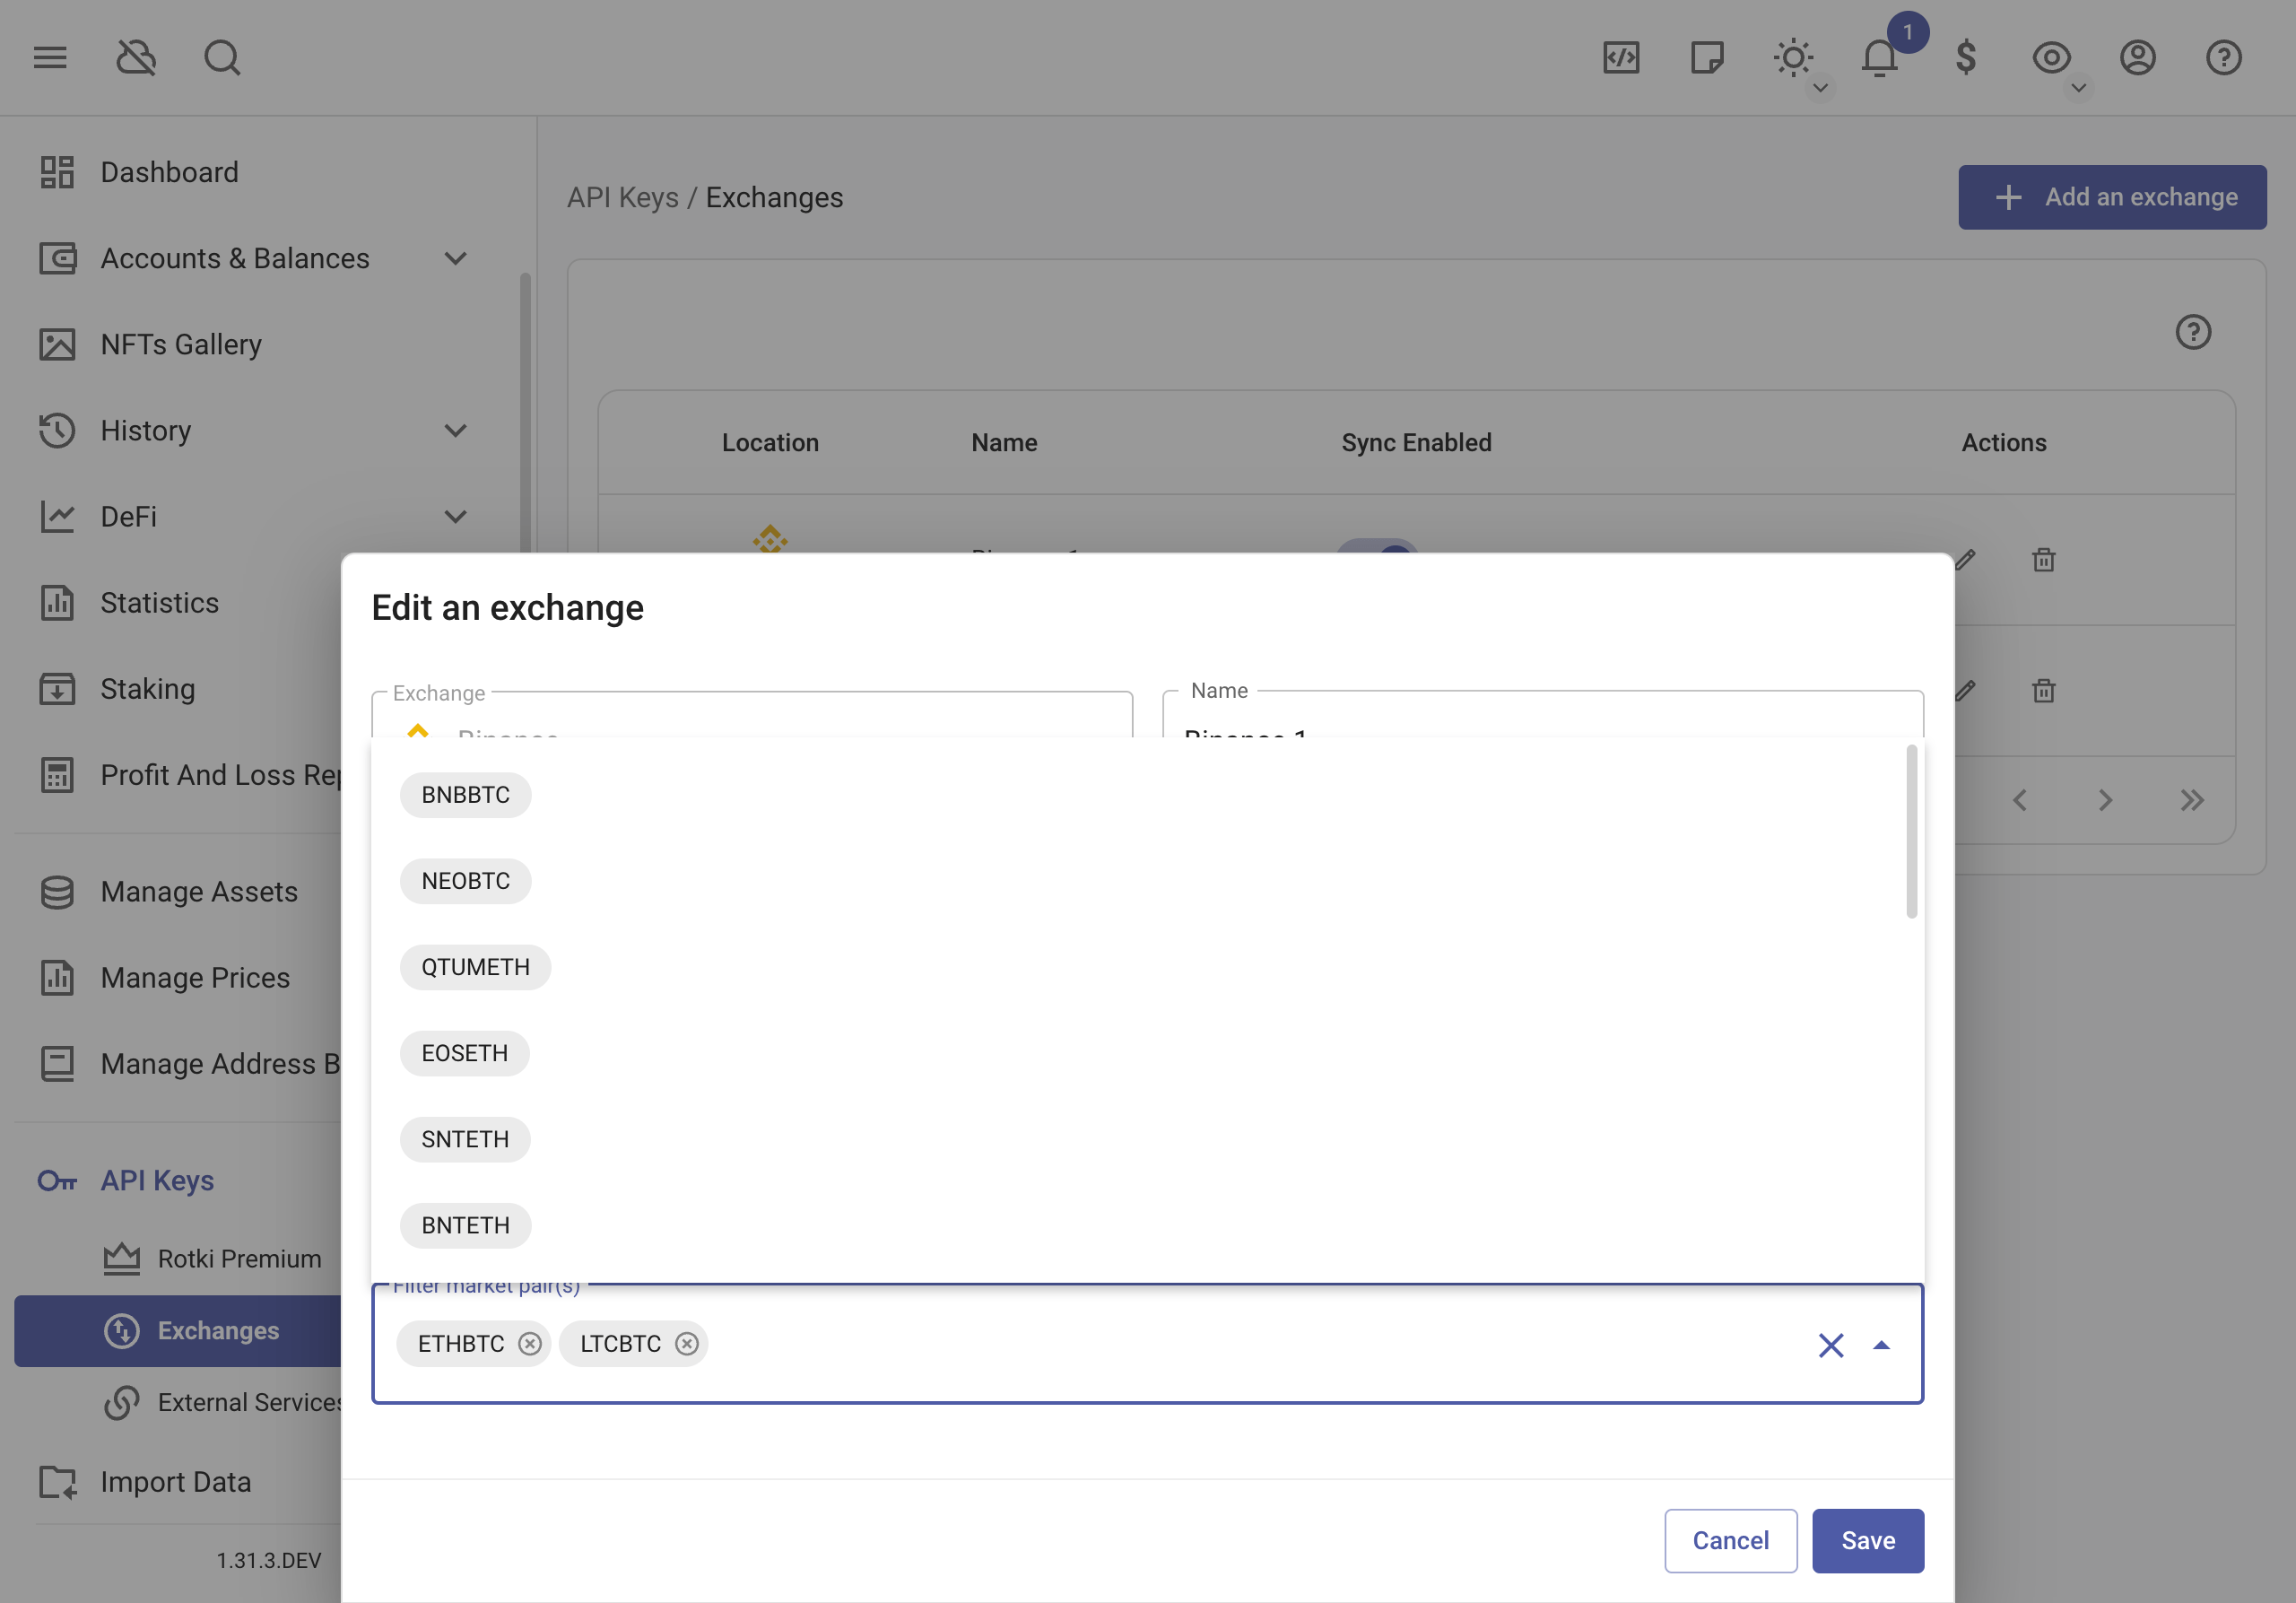
Once finished click on save.
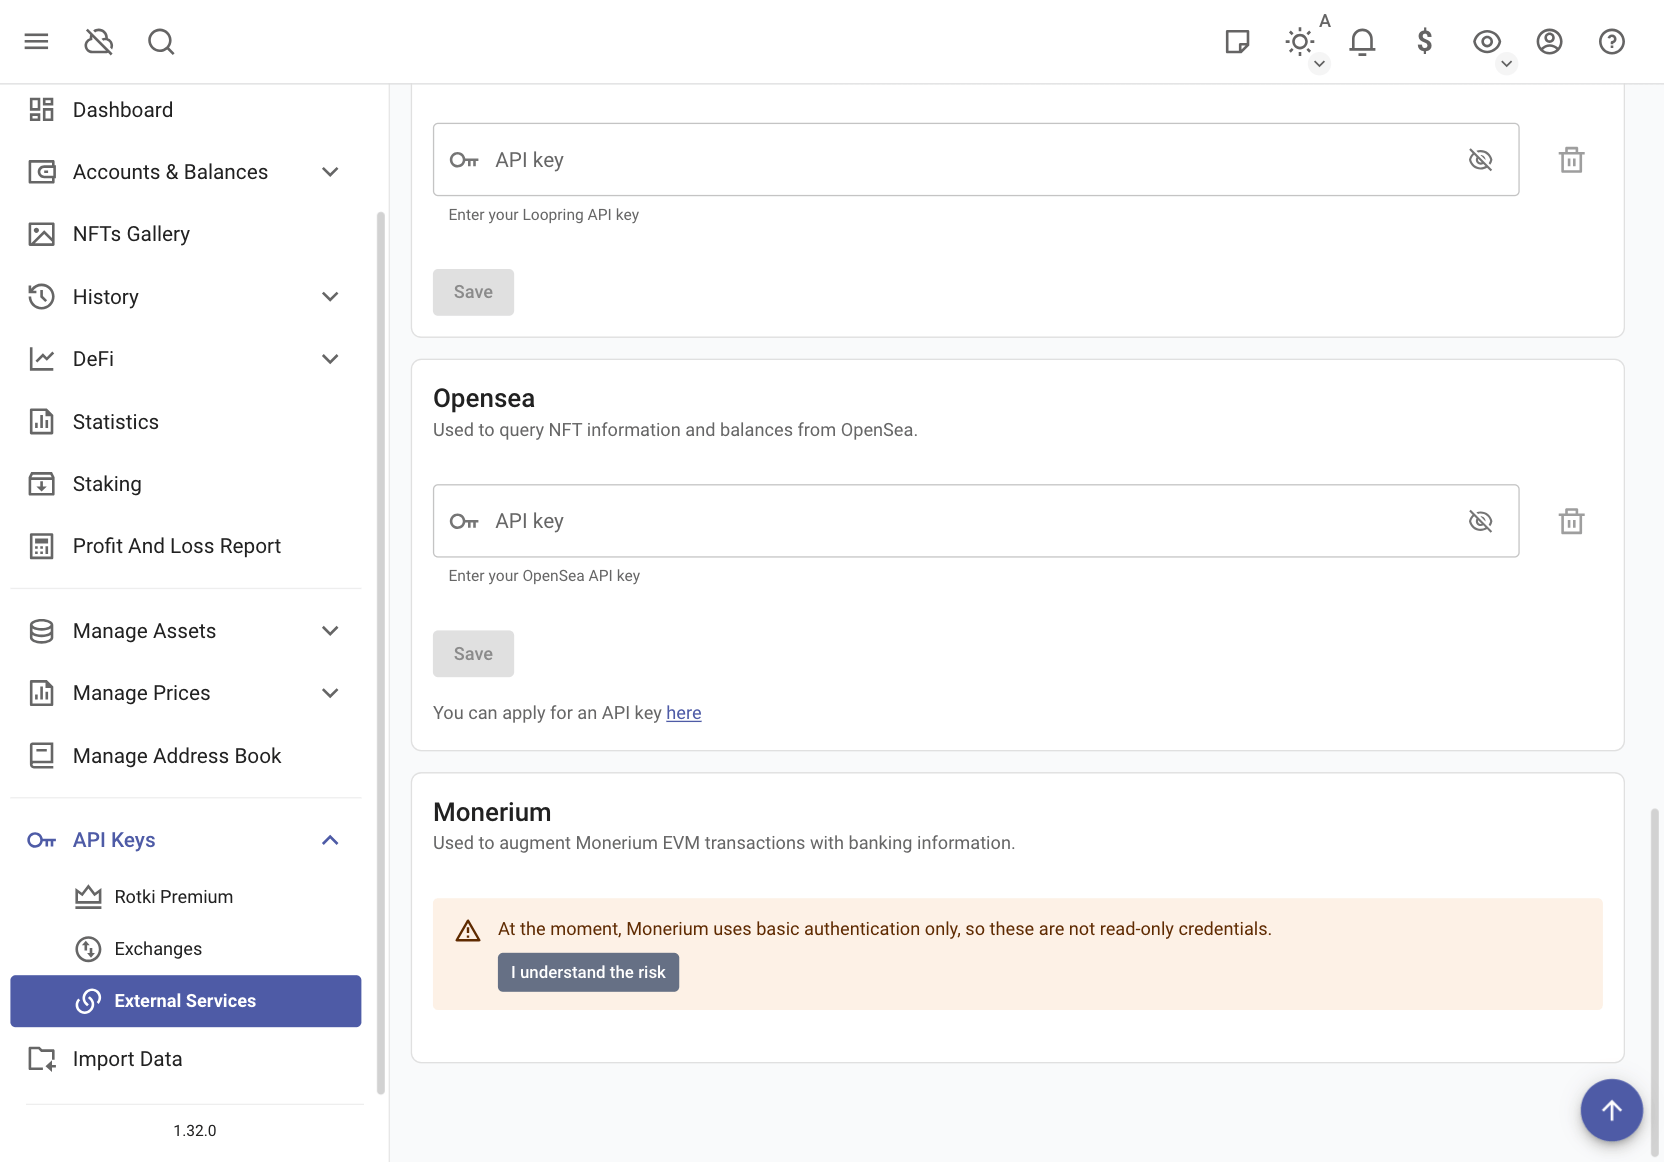
Adding an external service API Key
Rotki relies on various external services for data such as historical crypto prices or EVM transactions. To get that data some of these services require API keys. So you should go to their webpage, create a free account and generate an API key. Once this is done you can enter the API key in the section of the API keys page.
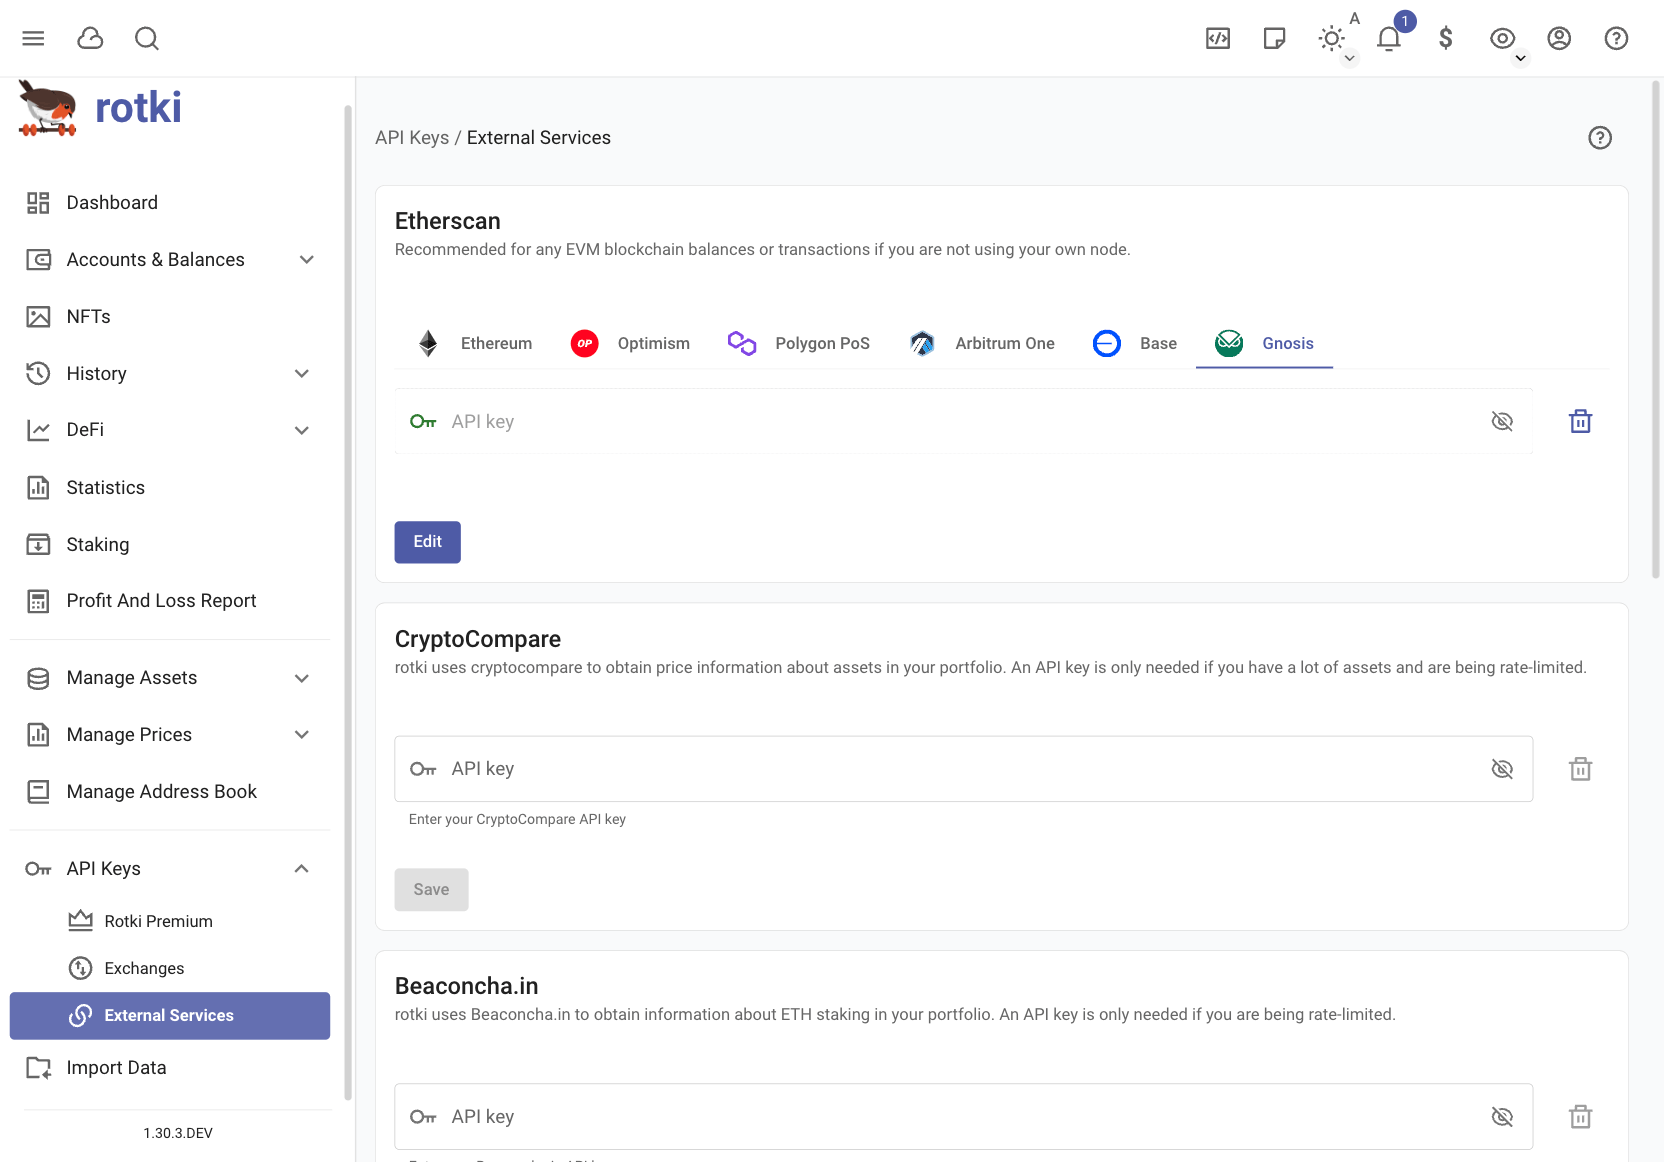
At the moment there is no compulsory API key. But if you don’t use your own node etherscan queries without an API key are really slow. So if you don’t already have an account with them please create one here and then generate a free API key and set it in the app as explained above. It’s free of charge.
Cointracking.info
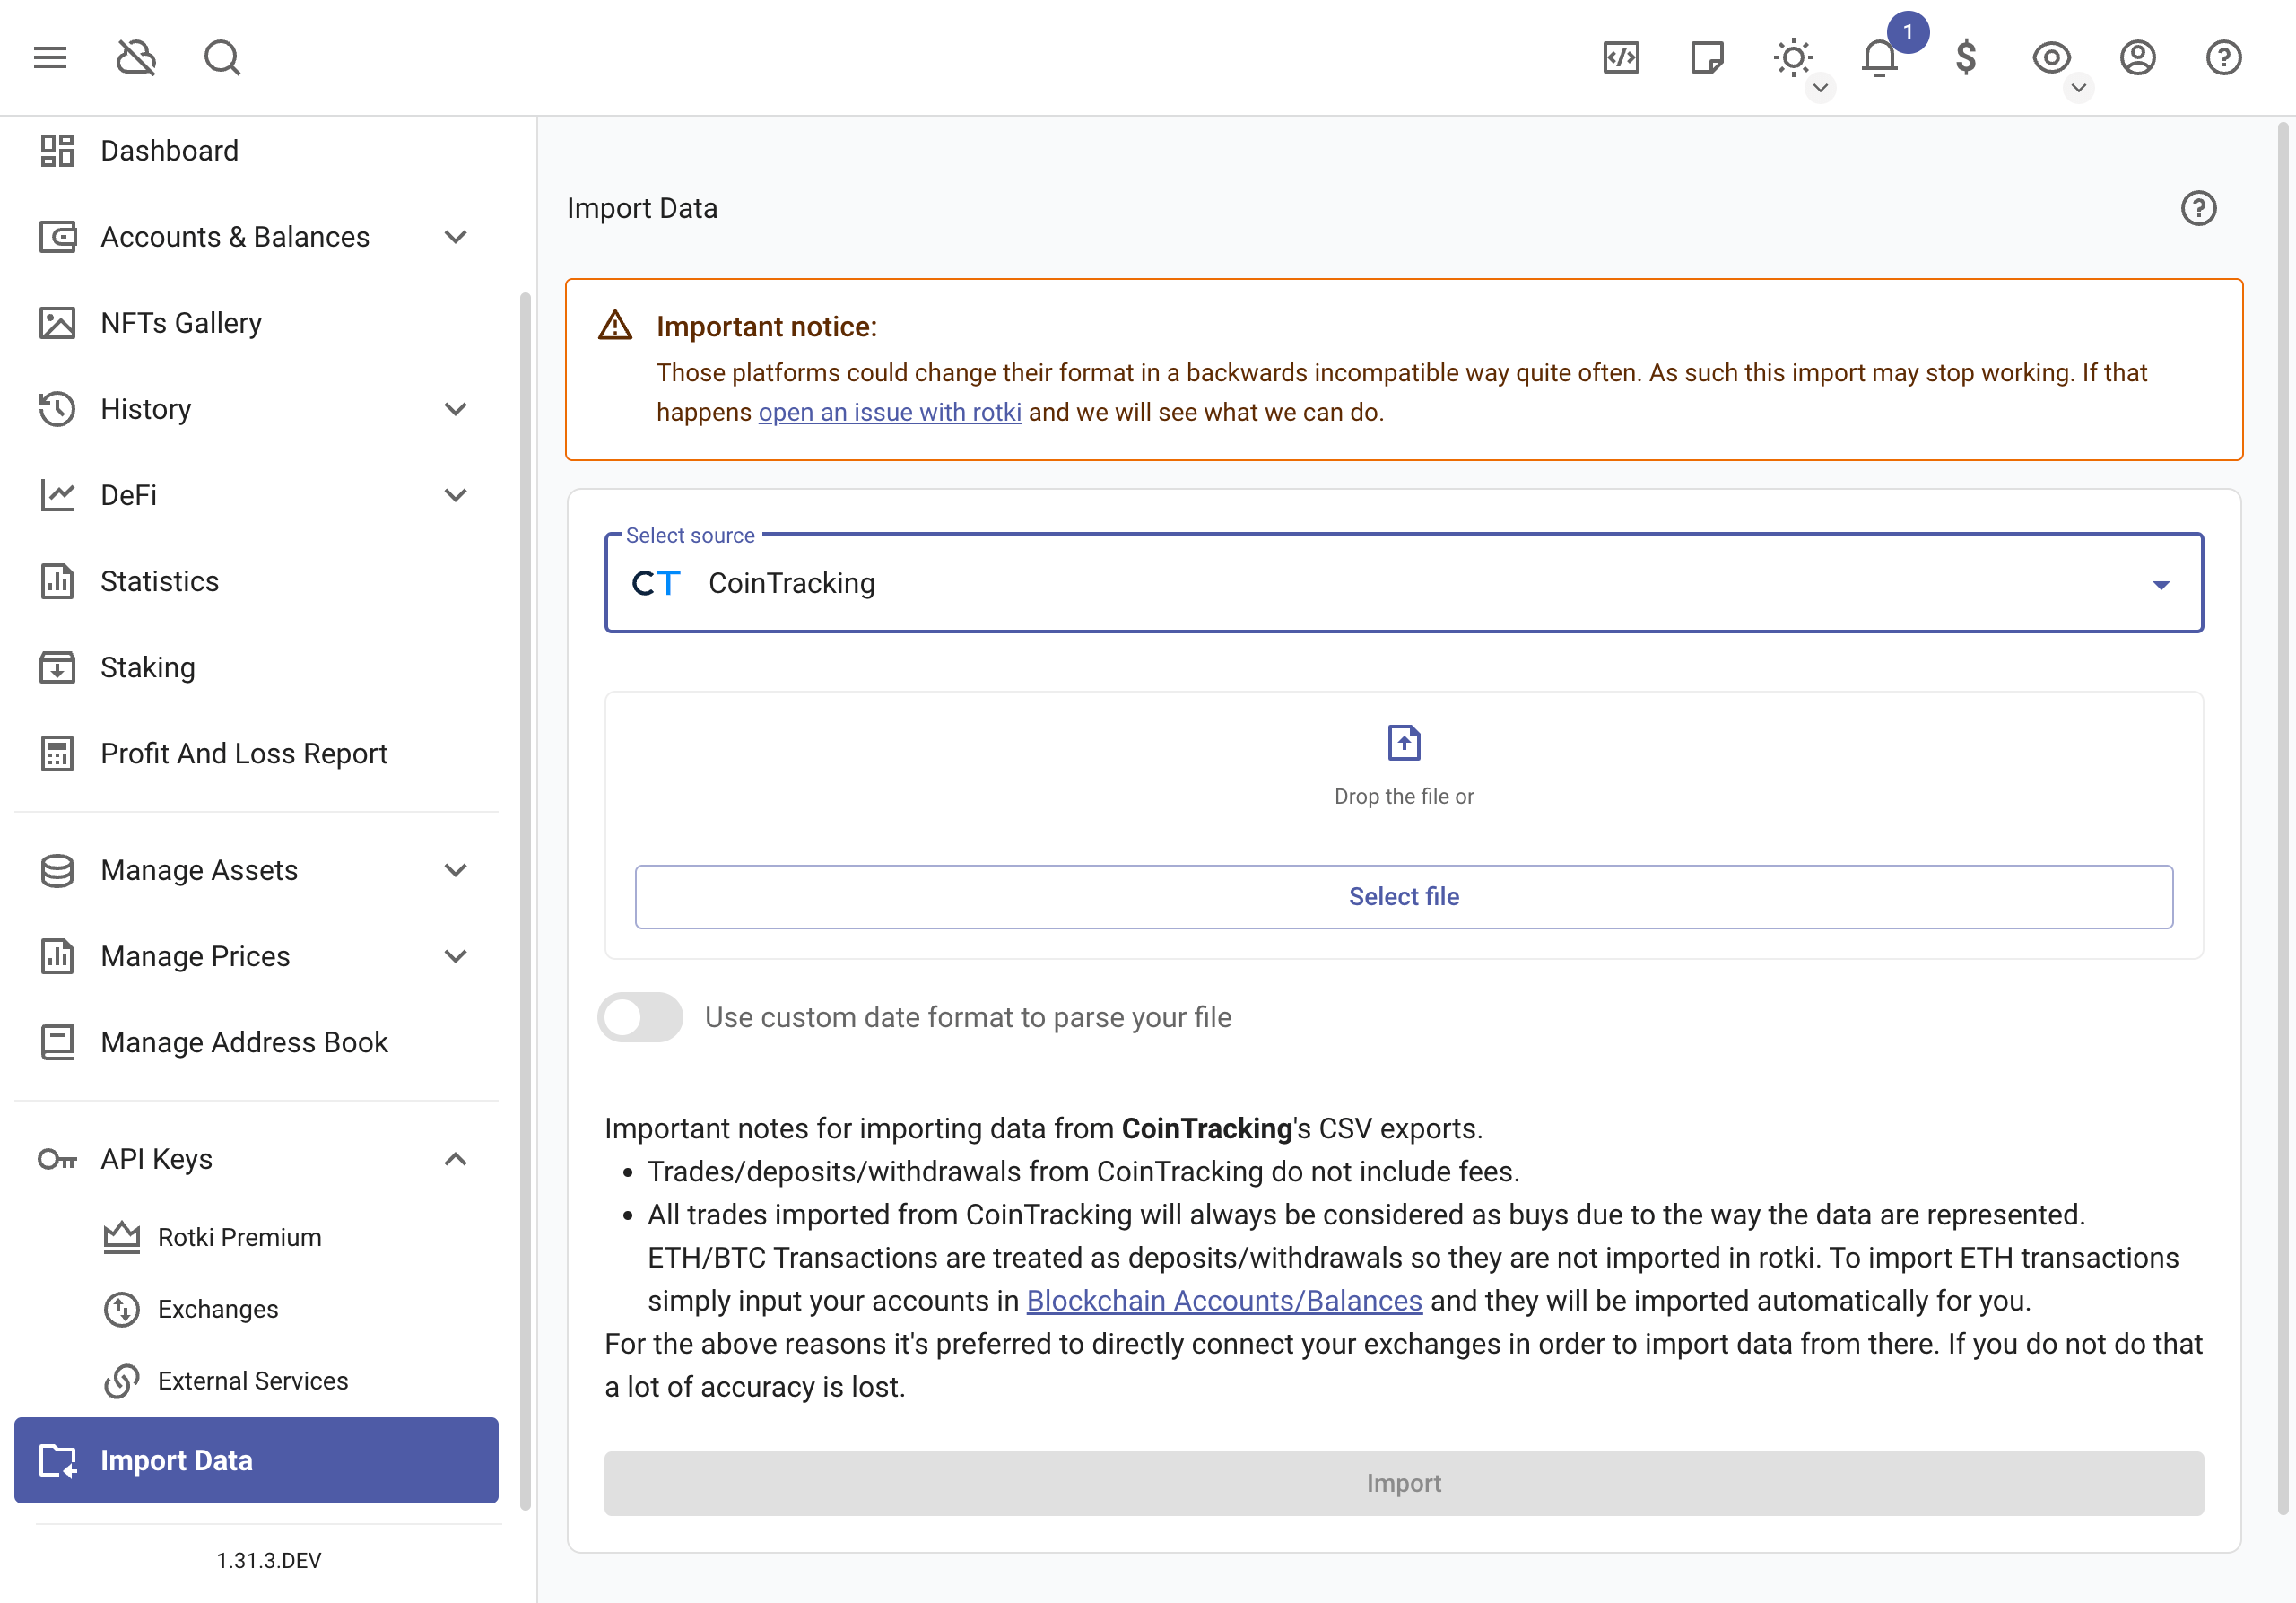
You can also import data from cointracking.info into rotki by clicking on “Import Data” on the left sidebar and then following the instructions.
Rotki can import any trade CSV data exported from cointracking.info. But in general it’s not recommended to utilize cointracking as their exported data are missing a lot of information.
Binance.com
You can import data from binance.com into rotki by clicking on “Import Data” on the left sidebar and then following the instructions.
Rotki can import a CSV data file exported from Binance. But due to Binance’s csv format some data may be not importable. You will see warnings if this happens.
By importing a csv file you are able to import more than with the API. Particularly: Trades, Deposits and Withdrawals, Small assets exchange BNB, ETH 2.0 Staking and ETH 2.0 Staking Rewards, Launchpool Interests, POS savings interest, POS savings purchase, POS savings redemption.
BitMEX.com
You can import data from bitmex.com into rotki by clicking on “Import Data” on the left sidebar and then following the instructions.
Rotki can import a CSV data file exported from BitMEX. You may see warnings if data can’t be imported. If this happens please reach out to us on discord or open an issue on github.
Bitstamp.net
You can import data from bitstamp.net into rotki by clicking on “Import Data” on the left sidebar and then following the instructions.
Rotki can import a CSV data file exported from Bitstamp. You may see warnings if data can’t be imported. If this happens please reach out to us on discord or open an issue on github.
ShapeShift.com
You can import trade CSV data file exported from shapeshift.com. Transactions will come from adding your Blockchain Accounts used with ShapeShift to rotki.
Import data in the same section as the image above in the prior heading. When exporting trades from ShapeShift, the selected wallet may show DEX trades in the user interface. If it is not the Native wallet, DEX trades may not show up in the user interface, but they still export to CSV. This importer ignores DEX trades, as they are covered by premium support for Uniswap and SushiSwap.
uphold.com
You can import transaction history CSV data exported from the uphold.com activity page. Transactions will be created when the row’s origin currency and destination currency are the same. Trades will be created if the currencies differ and a rate will be determined automatically.
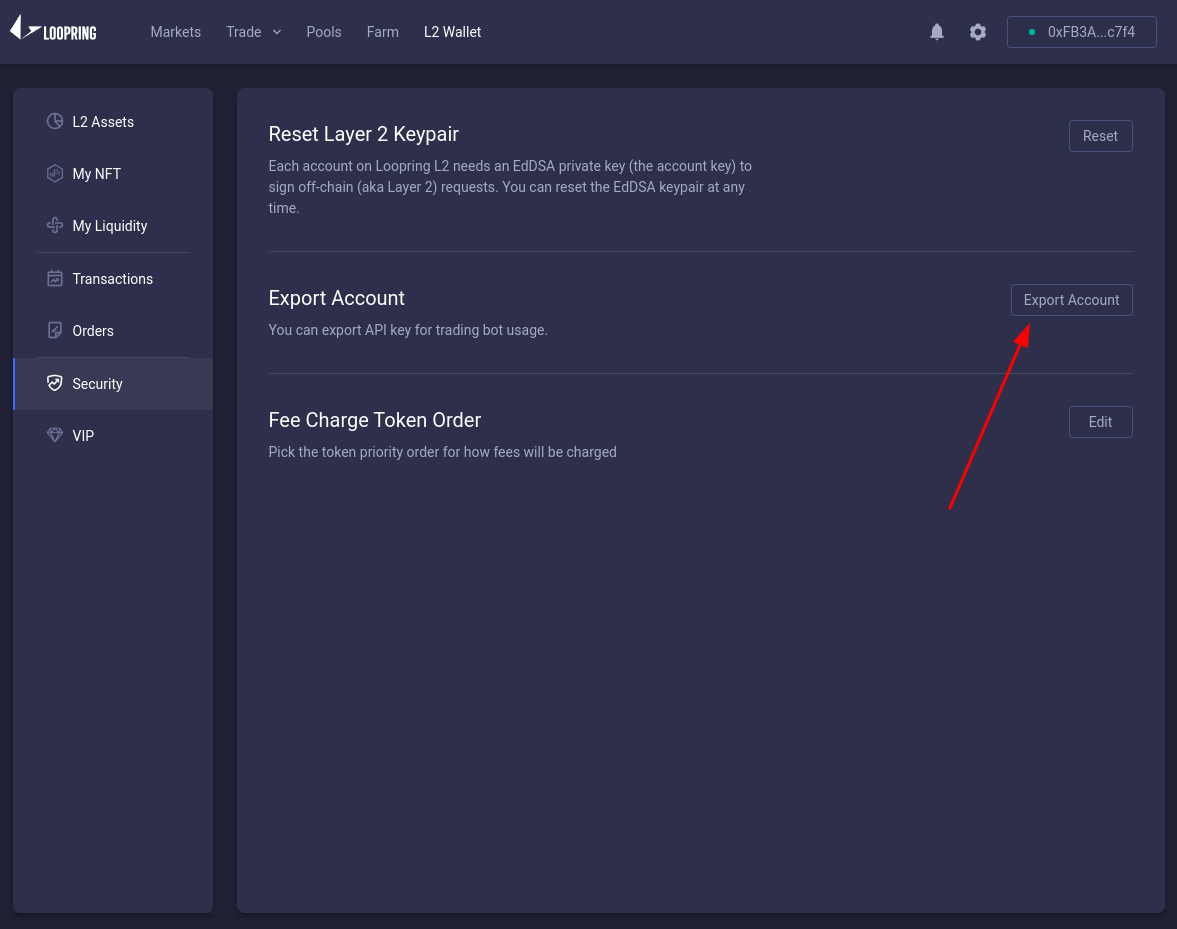
Loopring balances
To have your loopring balances detected you will need an API Key from loopring. To get one visit https://loopring.io/#/layer2/security and unlock your account. In the list of options you need to click in Export Account
Then in rotki you need to add the API key. Go to and paste the key that you obtained in the loopring website.

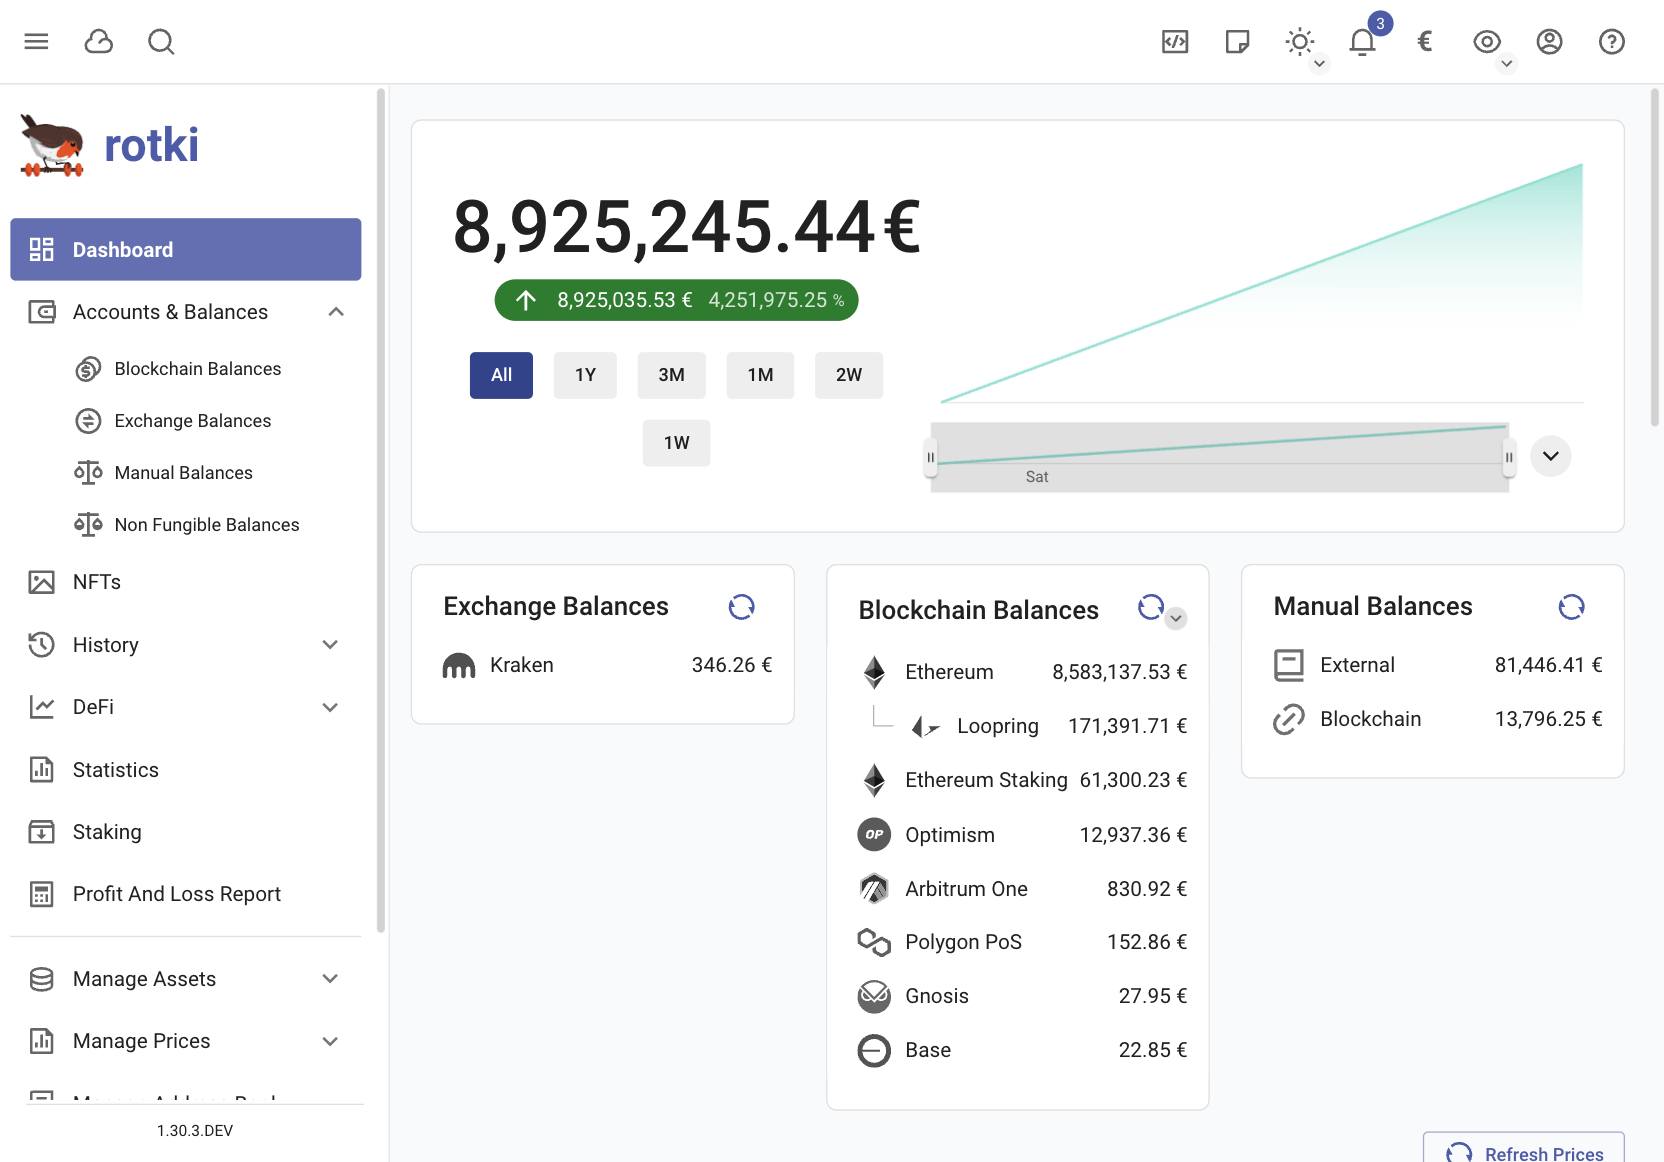
After following these steps your balances in the dashboard will be updated including the loopring information
Monerium
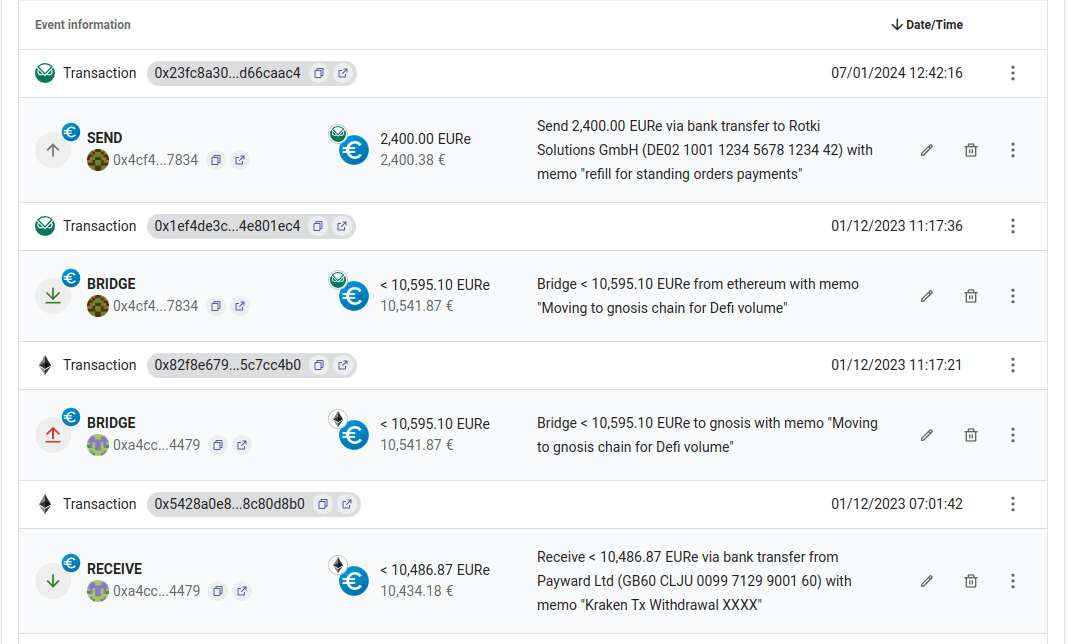
So long as you provide monerium credentials, all monerium transactions in mainnet, polygon and gnosis chain will be decorated with the bank data (or chain bridging), data you can also see in monerium app.
For bank transfers from/to your address you will be able to see the destination/source IBAN along with the memo of the transfer.
For automatic EURe bridging between EVM chains you will see amounts, from/to EVM chains along with from/to address.
Note: Monerium API can only use basic authentication at the moment. We are in contact with their team and they will add api keys eventually. But for now they only have basic authentication which means your username + password are stored in rotki (encrypted). Take necessary security precautions and don’t use unless you understand the potential risks.
Go to and enter your credentials.
Rotki Generic Import
You can import data(trades & events) from exchanges not supported by rotki by clicking “Import Data” on the left sidebar, select “Custom Import” and following the prompt. This involves the user converting the source(a not directly supported exchange, protocol etc.) data to match the import format of rotki.
Note
Keep in mind that all assets that you enter are identified by their asset identifier and not the symol as symbols are not unique. The identifier differs per asset and at the moment for ERC20 tokens follows the CAIP-19 format, and for others it’s just the asset symbol or a random string for manually input tokens.
For the CAIP-19 format it’s essentially calculated by knowing the chain ID and the address of your token. So for mainnet (chain ID 1) and USDT (0xdAC17F958D2ee523a2206206994597C13D831ec7) it’s eip155:1/erc20:0xdAC17F958D2ee523a2206206994597C13D831ec7.
You can easily find the identifier of each asset by going to section and copying the identifier of the asset in question.
The import is split into two types:
Rotki Generic Trades
Rotki Generic Events
Rotki Generic Trades Import
This is solely for importing generic trades. The expected file format is CSV with the following headers and description as a guide:
Location: This is the source of the data. It should be one of rotki’s supported locations. If it is not supported, use
"external".Base Currency: The currency bought in a
"Buy"and sold in a"Sell". e.g BTC/ETH where BTC is the base currency.Quote Currency: The currency sold in a
"Buy"and bought in a"Sell"e.g BTC/ETH where ETH is the quote currency.Type: The type of trade made. It can either be a
"Buy"or a"Sell".Buy Amount: The amount of the currency bought.
Sell Amount: The amount of the currency sold.
Fee: The amount charged for the trade. This is optional.
Fee Currency: The currency in which the fee was charged. This is optional.
Description: A description of the trade if any. This is optional.
Timestamp: The UTC unix timestamp at which the trade took place. This is a milliseconds timestamp.
A sample generic trades template can be found below
rotki Generic Trades Template Location
Base Currency
Quote Currency
Type
Buy Amount
Sell Amount
Fee
Fee Currency
Description
Timestamp
binance
eip155:1/erc20:0xA0b86991c6218b36c1d19D4a2e9Eb0cE3606eB48
ETH
Sell
1.0000
1875.64
Trade USDC for ETH
1659085200000
kraken
BTC
LTC
Buy
4.3241
392.8870
Trade LTC for BTC
1659171600000
kucoin
eip155:1/erc20:0x1f9840a85d5aF5bf1D1762F925BDADdC4201F984
eip155:1/erc20:0x6B175474E89094C44Da98b954EedeAC495271d0F
Sell
880.0000
20.0000
0.1040
USD
Trade UNI for DAI
1659344400000
luno
BCH
ADA
Buy
16.3444
4576.6400
5.1345
USD
Trade ADA for BCH
1659344900000
bisq
eip155:1/erc20:0x6B175474E89094C44Da98b954EedeAC495271d0F
eip155:1/erc20:0xdAC17F958D2ee523a2206206994597C13D831ec7
Buy
0
4576.6400
5.1345
USD
Trade USDT for DAI
1659345600000
Rotki Generic Events Import
This is for importing generic events. Supported events are "Deposit", "Withdrawal", "Income", "Loss", "Spend" and "Staking". The expected file format is CSV with the following headers and description as a guide:
Type: The event type. It can be one of
"Deposit","Withdrawal","Income","Loss","Spend"or"Staking".Location: This is the source of the data. It should be one of rotki’s supported locations. If it is not supported, use
"external".Currency: The currency used during the specified event.
Amount: The amount of the currency used by the event.
Fee: The amount charged for the event. This is optional.
Fee Currency: The currency in which the fee was charged. This is optional.
Description: A description of the event that was carried out if any. This is optional.
Timestamp: The UTC unix timestamp at which the event took place. This is a milliseconds timestamp.
A sample generic events template can be found below
Rotki Generic Events Template Type
Location
Currency
Amount
Fee
Fee Currency
Description
Timestamp
Deposit
kucoin
EUR
1000.00
Deposit EUR to Kucoin
1658912400000
Withdrawal
binance
eip155:1/erc20:0xdAC17F958D2ee523a2206206994597C13D831ec7
99.00
1.00
eip155:1/erc20:0xdAC17F958D2ee523a2206206994597C13D831ec7
1658998800000
Withdrawal
kraken
eip155:1/erc20:0xB8c77482e45F1F44dE1745F52C74426C631bDD52
1.01
1659085200000
Staking
luno
ETH
0.0513
ETH Staking reward from QRS
1659340800000
Loss
coinbase
BTC
0.0910
1659430800000
Income
cex
eip155:1/erc20:0x6B175474E89094C44Da98b954EedeAC495271d0F
1000.00
1659513600000
Invalid
bisq
BCH
0.3456
1659686400000
Supported Locations
A list of supported locations in rotki are "external", "kraken", "poloniex", "bittrex", "binance", "bitmex", "coinbase", "banks", "blockchain", "coinbasepro", "gemini", "equities", "realestate", "commodities", "cryptocom", "uniswap", "bitstamp", "binanceus", "bitfinex", "bitcoinde", "iconomi", "kucoin", "balancer", "loopring", "ftx", "nexo", "blockfi", "independentreserve", "gitcoin", "sushiswap", "shapeshift", "uphold", "bitpanda", "bisq", "ftxus" and "okx".
Note
In the columns where an asset is expected you will need to use the identifier that such asset has in rotki otherwise the row won’t be read.
Note
If at any point, you’re confused as regards to the CSV format, feel free to send us a message on Discord.
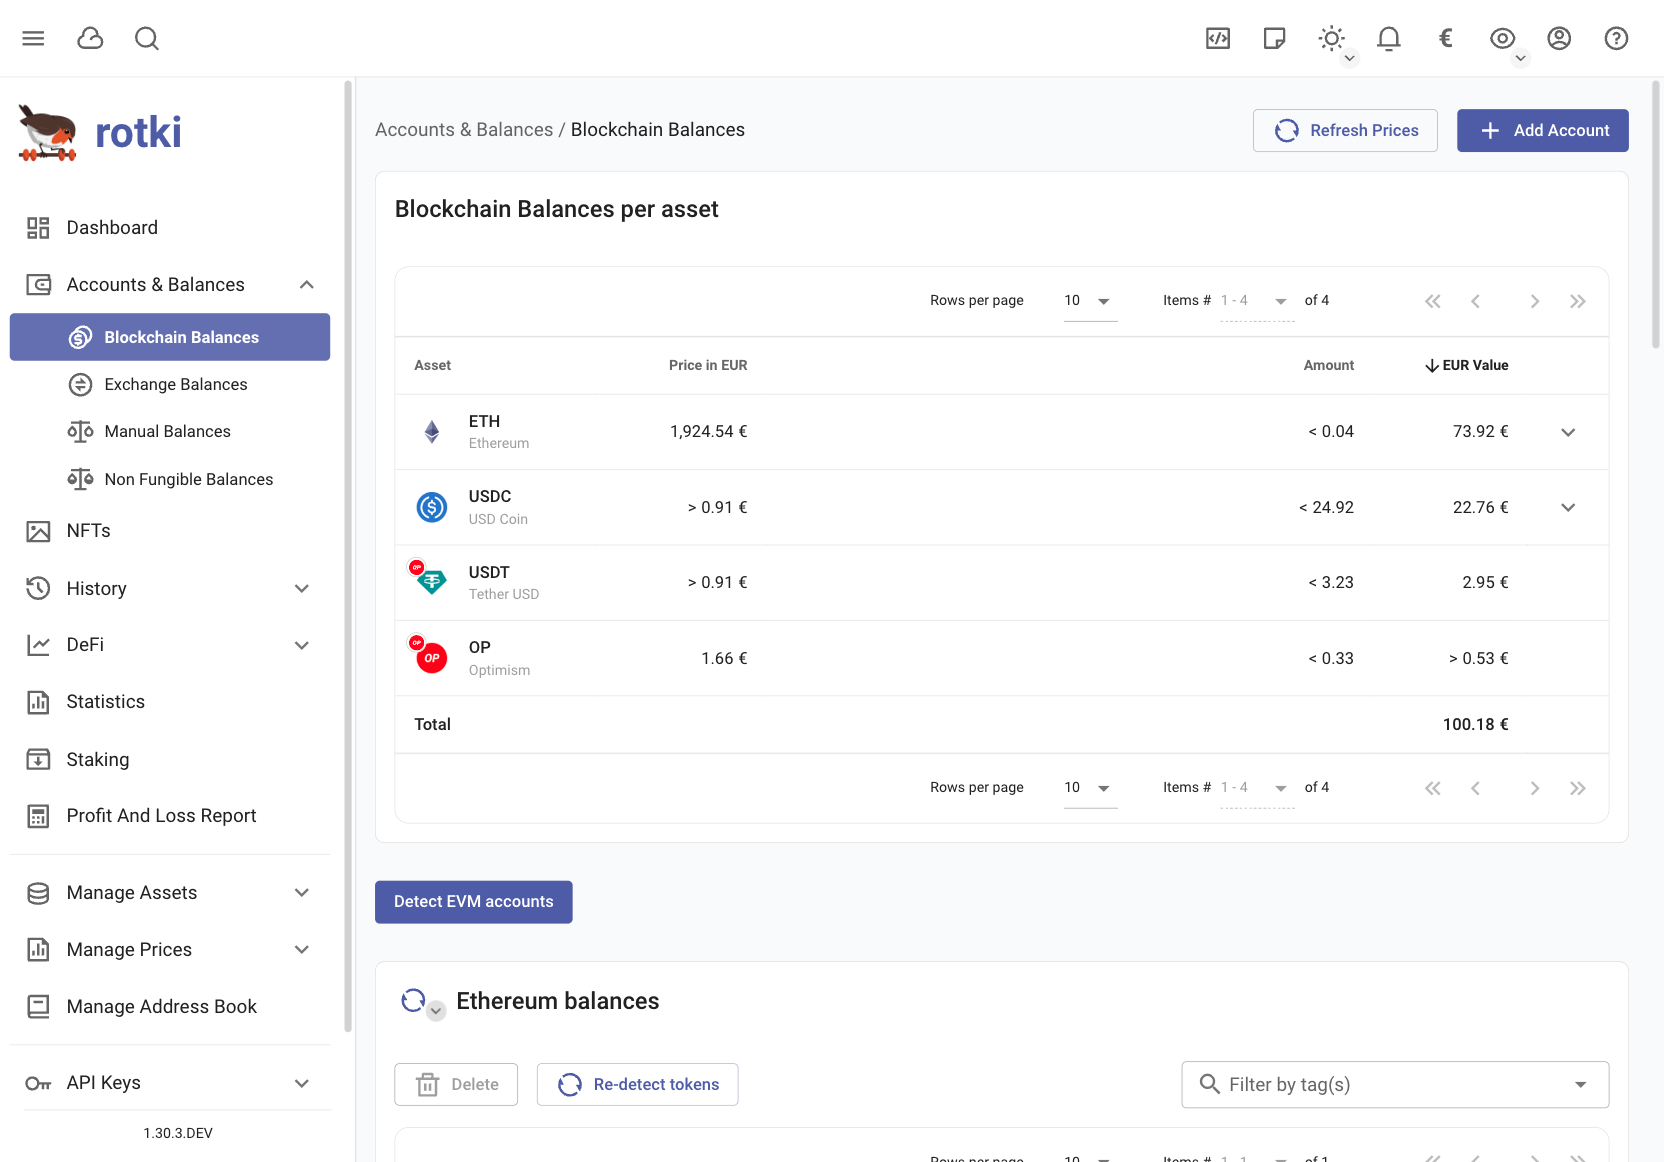
Tracking accounts and balances
To manage Accounts & Balances (Blockchain Balances, Exchange Balances, and Manual Balances including fiat) you need to visit the section from the left sidebar.
Adding Manual Balances
With rotki you can also add balances/accounts for any type of asset and location that may not be supported at the moment. For example real estate, equity holdings or holdings in a not yet supported blockchain or exchange.
To add or modify a manually tracked balance navigate to the sub-page and click the “Add Manual Balance” button on the top right. There choose the asset from the dropdown menu, input a unique label for the account, decorate it with any number of tags and choose an amount and location.

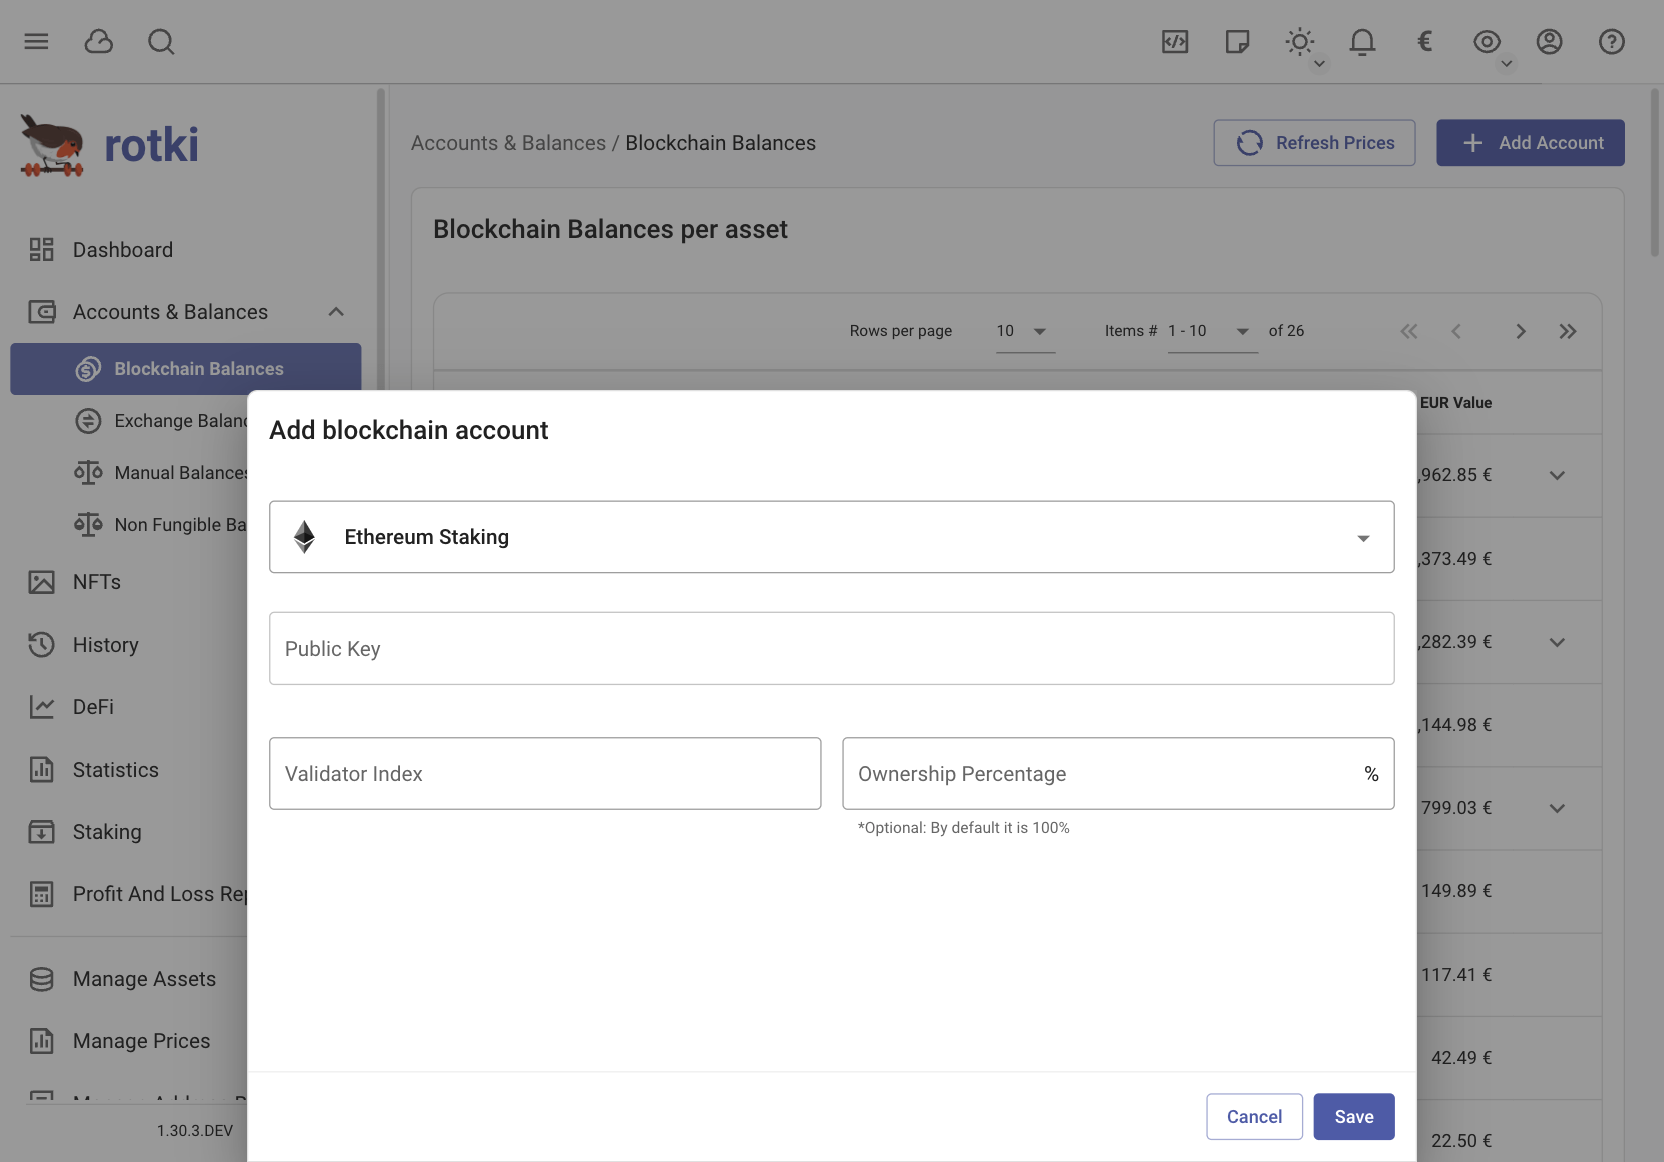
Adding and Removing Blockchain Accounts
Rotki allows to track balances of blockchain accounts.
For now, the following chains are supported in Rotki (and the list will be growing as we add more chains in the future):
Ethereum
Bitcoin
Bitcoin Cash
Kusuma
Avalanche
Polkadot
Optimism
Polygon PoS
Arbitrum One
Base
Gnosis
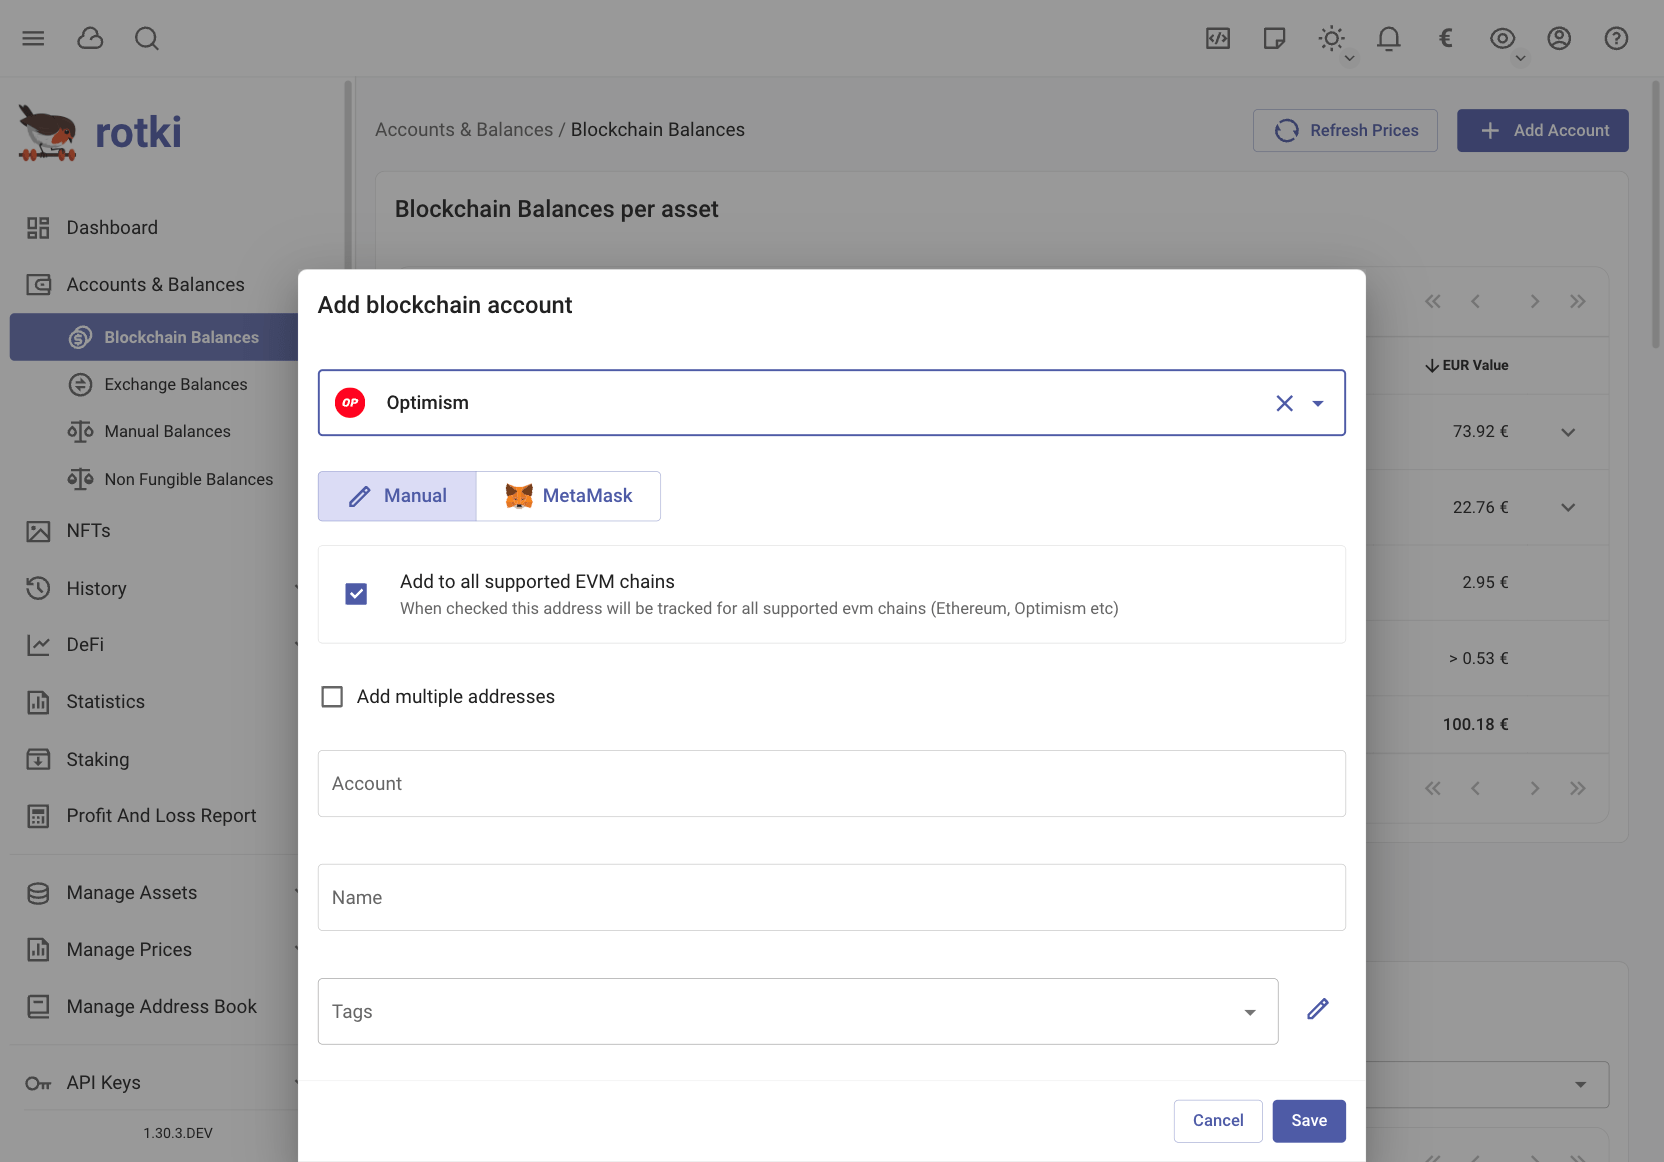
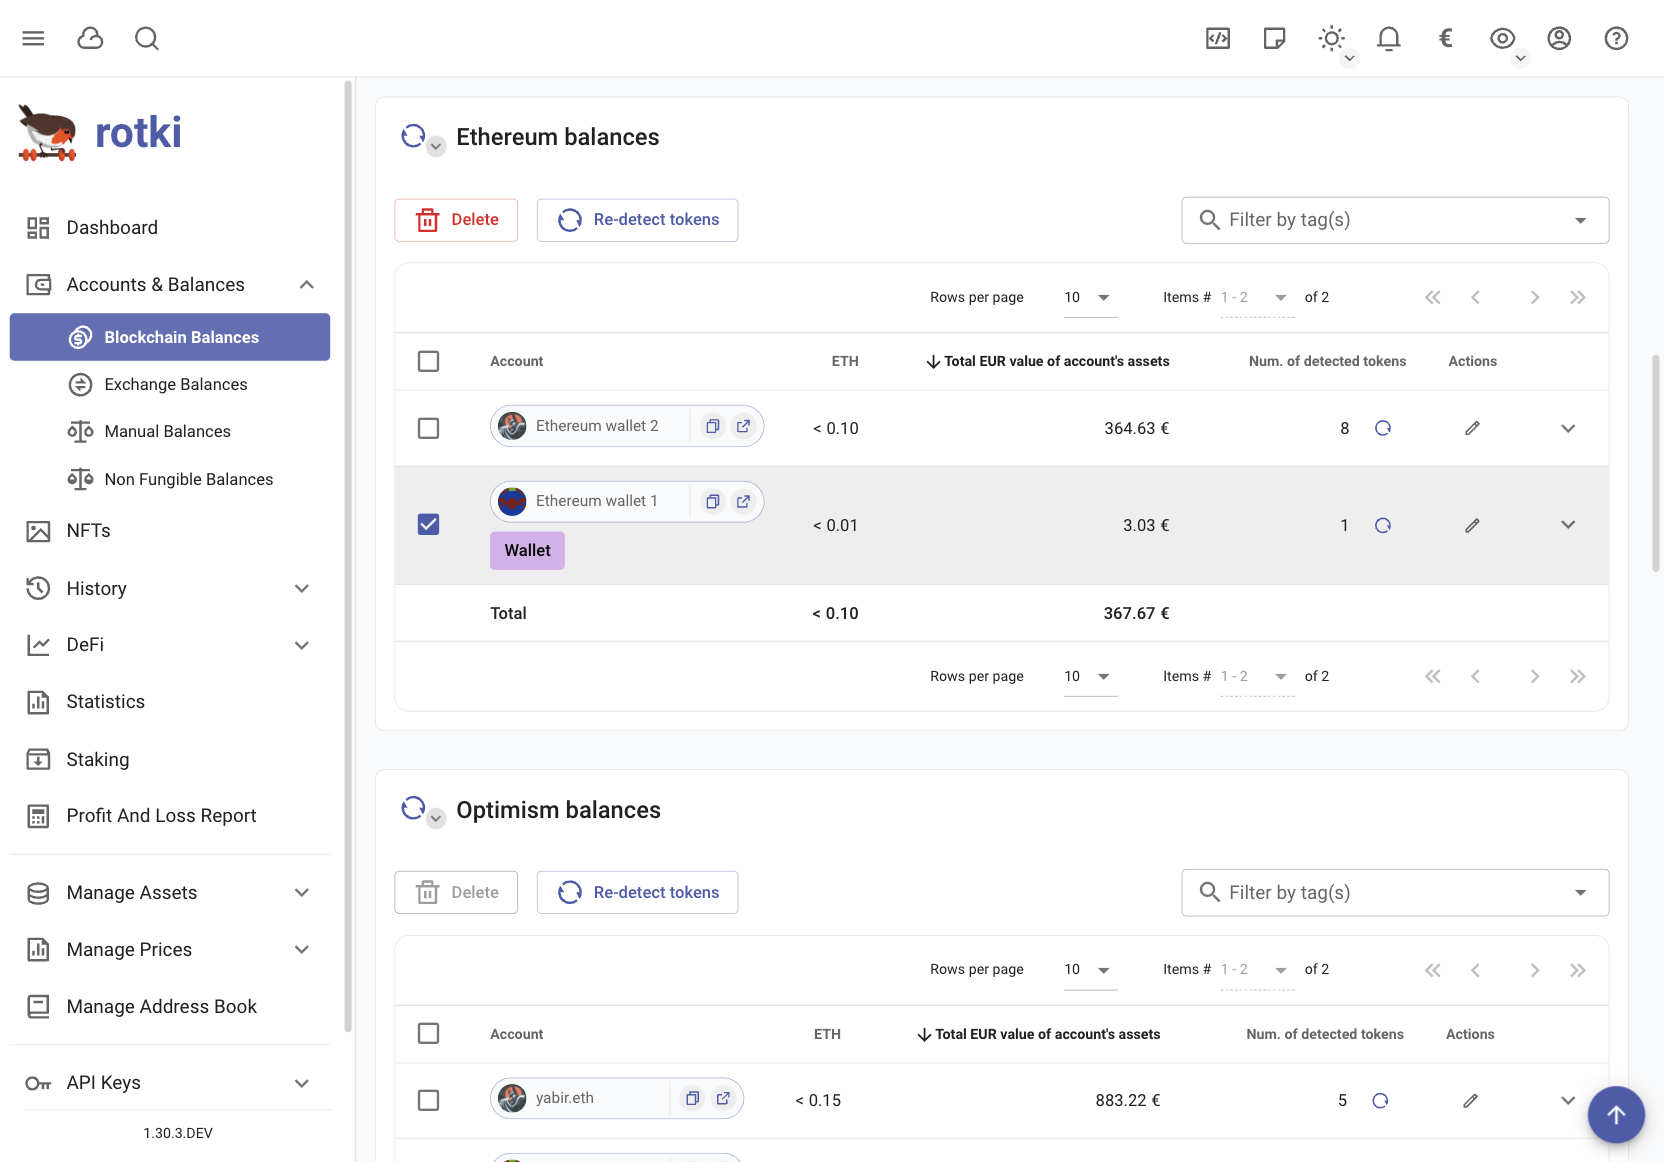
To add or modify an account navigate to the sub-page and click the “Add Account” button on the top right. Now choose the blockchain on which you want to add an account. Then type or paste the address in the “Account” textbox and press the “Save” Button. Note that you can add multiple accounts if you click the “Add multiple addresses” checkbox and provide a comma separated list of addresses.
To stop tracking one or more accounts you can check the corresponding box in the accounts table and click the “Delete” button.
EVM Chains
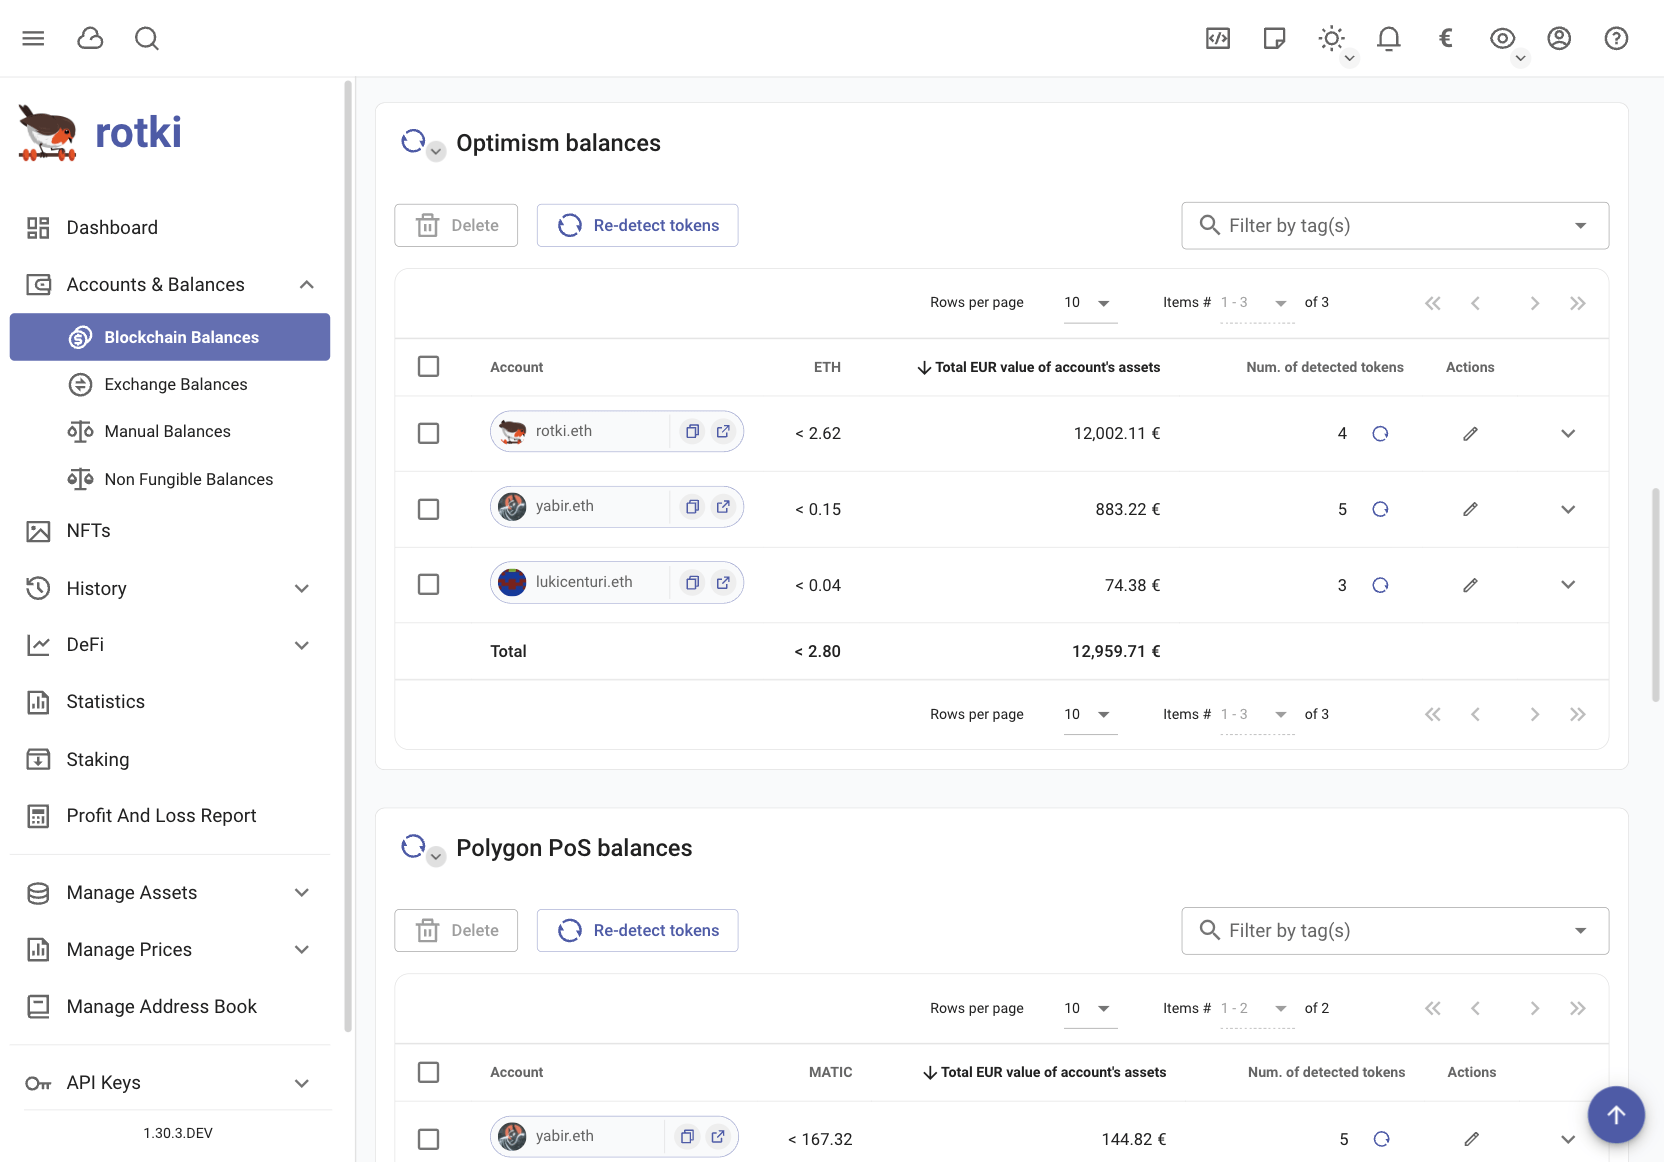
If the selected chain is an EVM chain you will see Add to all supported EVM chains checkbox. It is checked by default and it means that rotki will try to add the address for all EVM chains. If the address is a contract in Ethereum mainnet it will only be added to Ethereum. Otherwise for each chain rotki will check whether the address had any activity there and will add only if it has at least one transaction. If you uncheck the checkbox, then the address will only be added to the selected chain.
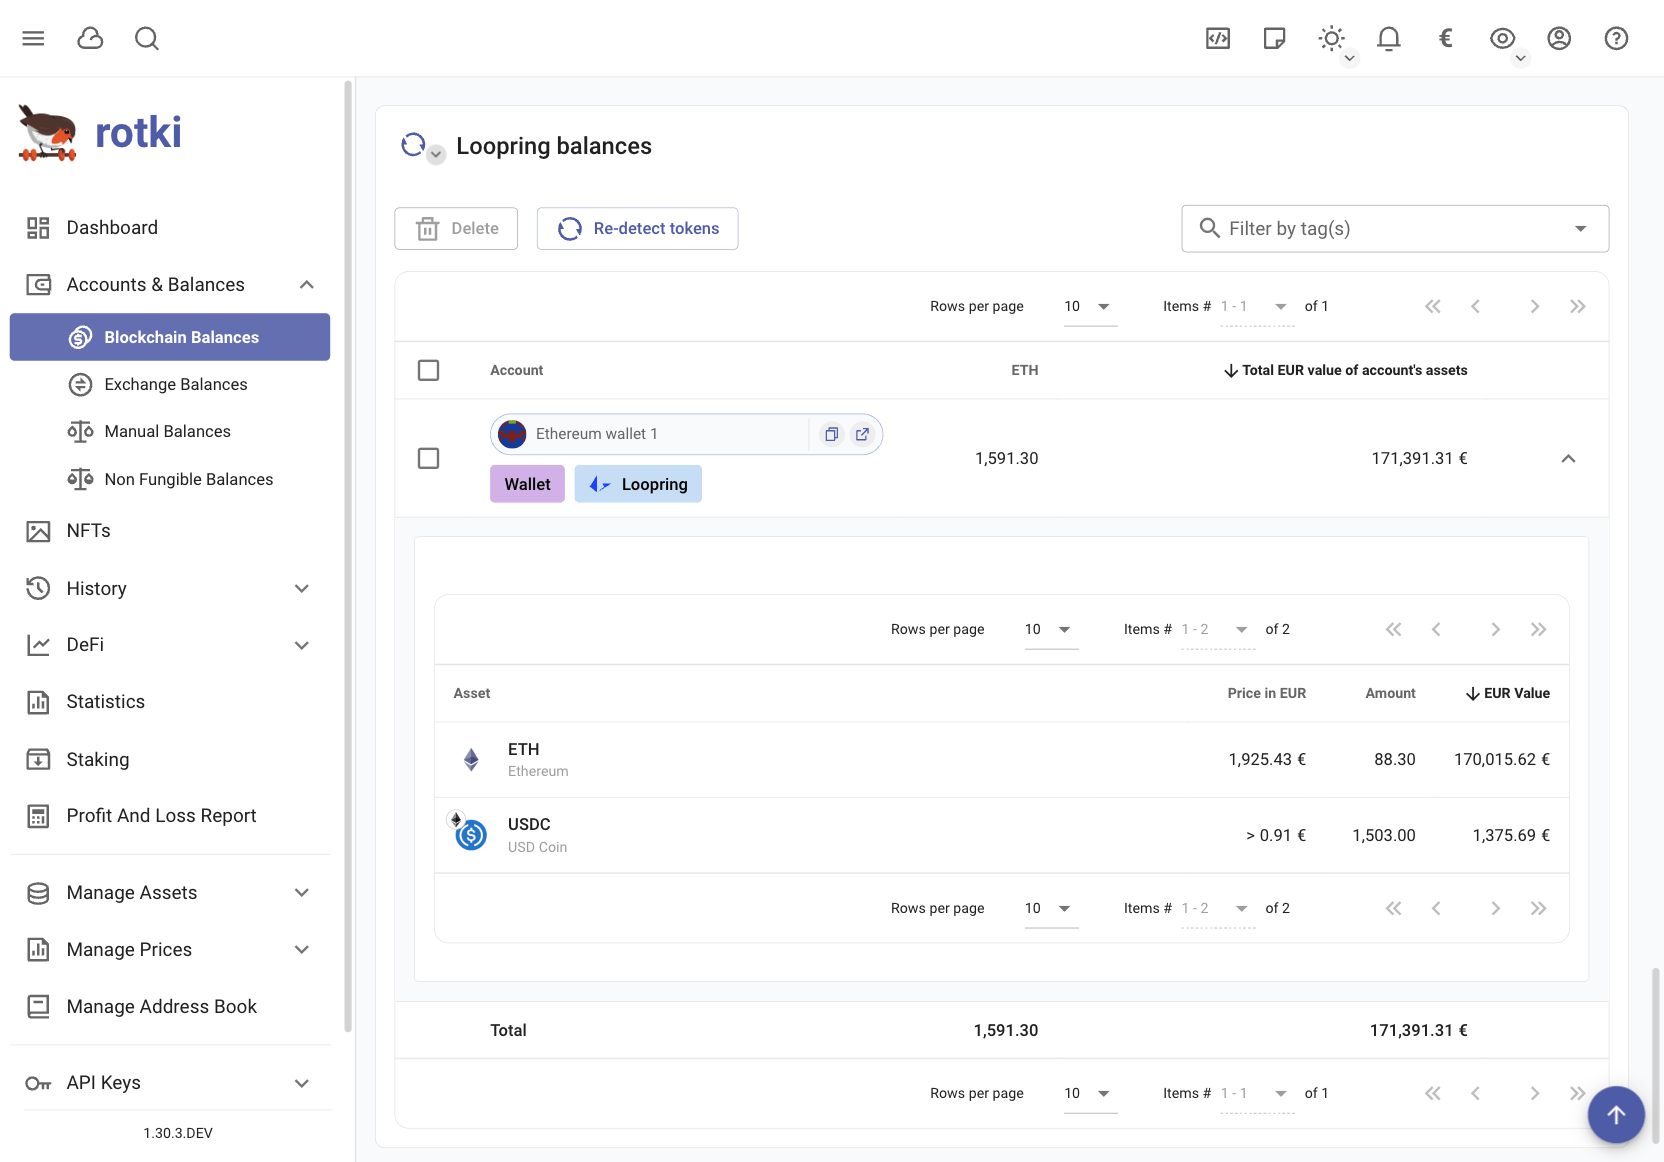
If an EVM account also contains tracked tokens you can click on the arrow under Actions in order to expand its view and show the balance breakdown for the account over all assets it holds.
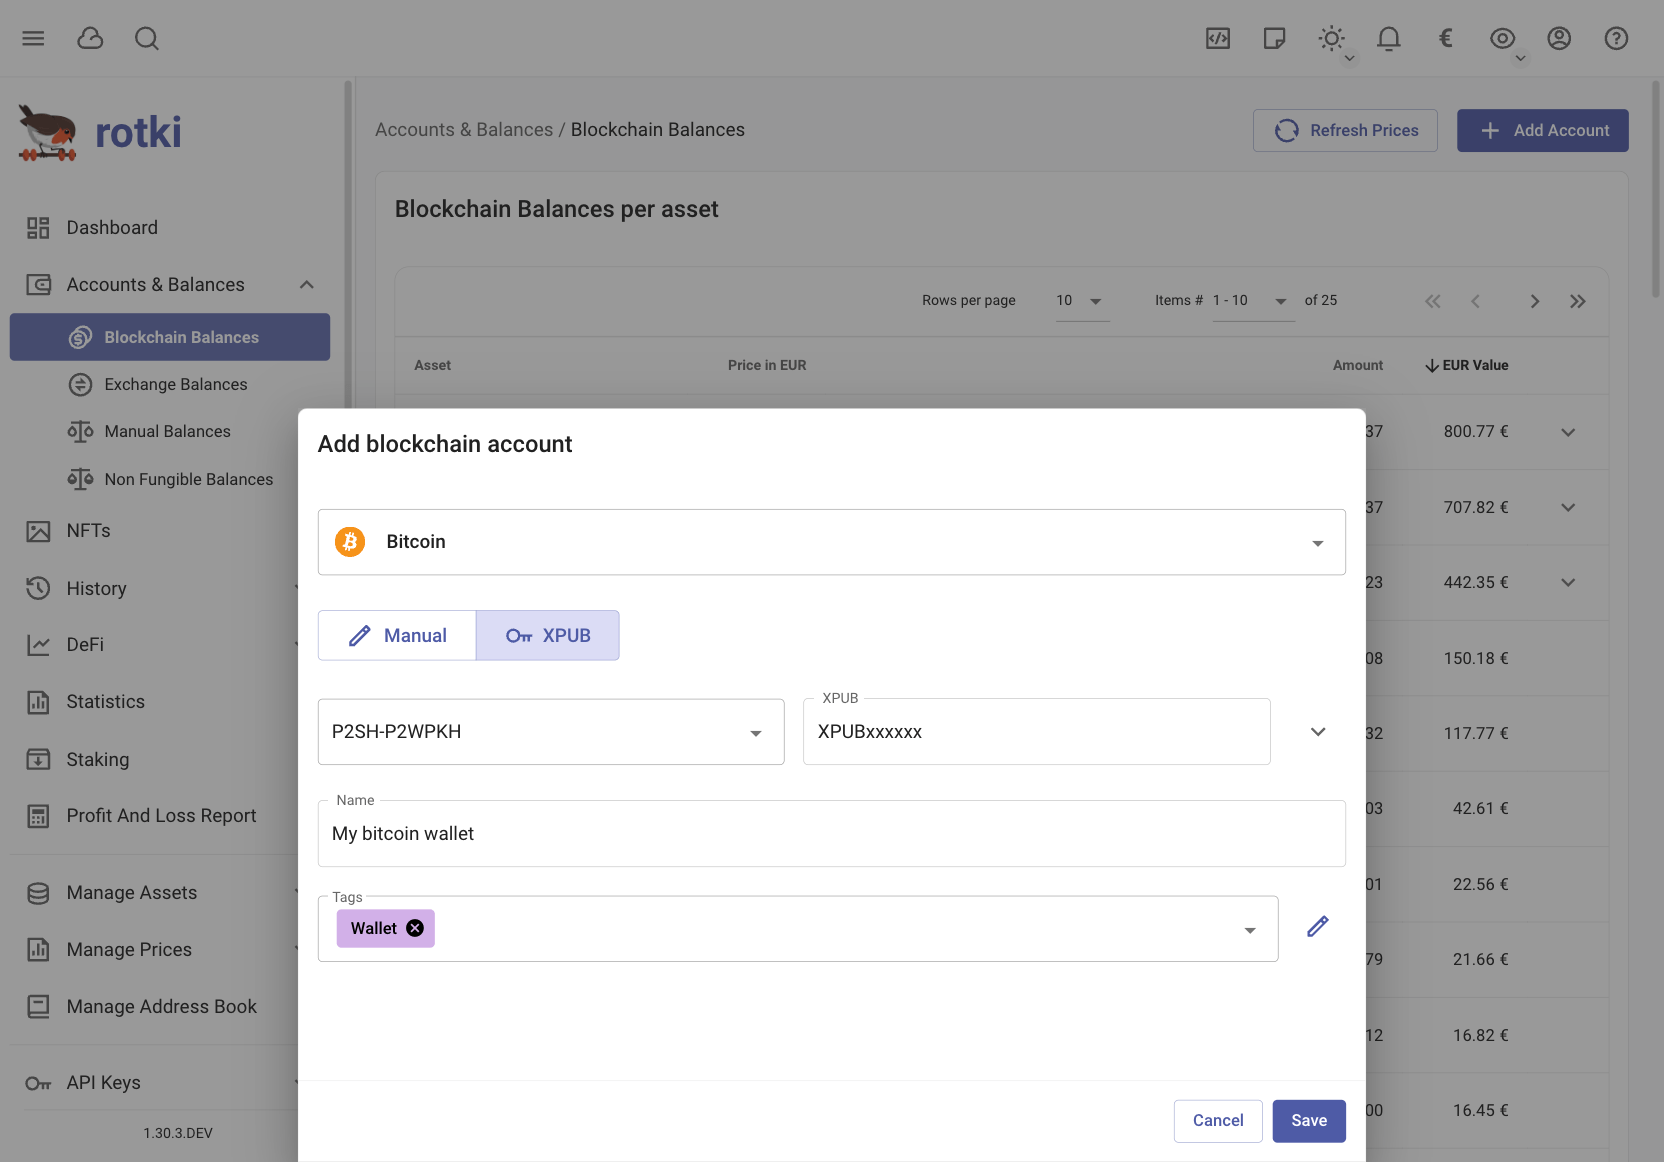
Bitcoin chains
For Bitcoin/Bitcoin Cash you can add addresses manually or let rotki discover them using an xpub. Using an xpub rotki can locally generate your addresses and query the Bitcoin/Bitcoin Cash blockchain for each one of them until it finds unused addresses.
There are also different types of xpubs, depending on the capabilities of the wallet used to generate them.
P2PKH: This is called legacy. Addresses generated by such an xpub have “1” as a prefix.
P2SH-P2WPKH: This is called segwit. Addresses generated by such an xpub have “3” as a prefix.
WPKH: This is called native segwit. Addresses generated by such an xpub have “bc1” as a prefix.
P2TR: This is called taproot. Addresses generated by such an xpub have “bc1p” as a prefix.
You will need to know what type of xpub your bitcoin wallet generates in order to choose the correct type at the dropdown menu. If your wallet generates an xpub prefixed with ypub or an xpub prefix with zpub rotki can deduce the type for you automatically. If you are using a ledger hardware wallet you can obtain an xpub by following this guide.
An xpub does not allow spending your coins but provides information about your wallet. In rotki this information is stored safely encrypted in your local database.
Note
Bitcoin Cash(BCH) only supports P2PKH & P2SH_P2WPKH xpubs.
ENS names resolution
Rotki automatically resolves ens name and ens avatar for every evm address that has ens name set in ethereum mainnet. If there is a primary ens name specified for an address, this name will be shown instead of a raw blockchain address across the app. You can find the blockchain address by hovering the mouse over the ens name. If an ens avatar is set, it will be shown instead of the address blockie.
Token detection
For every evm address it is possible to trigger the process of detecting tokens by clicking in the refresh arrow for that address. In addition it is possible to trigger the detection process for all the addresses by clicking on RE-DETECT TOKENS.
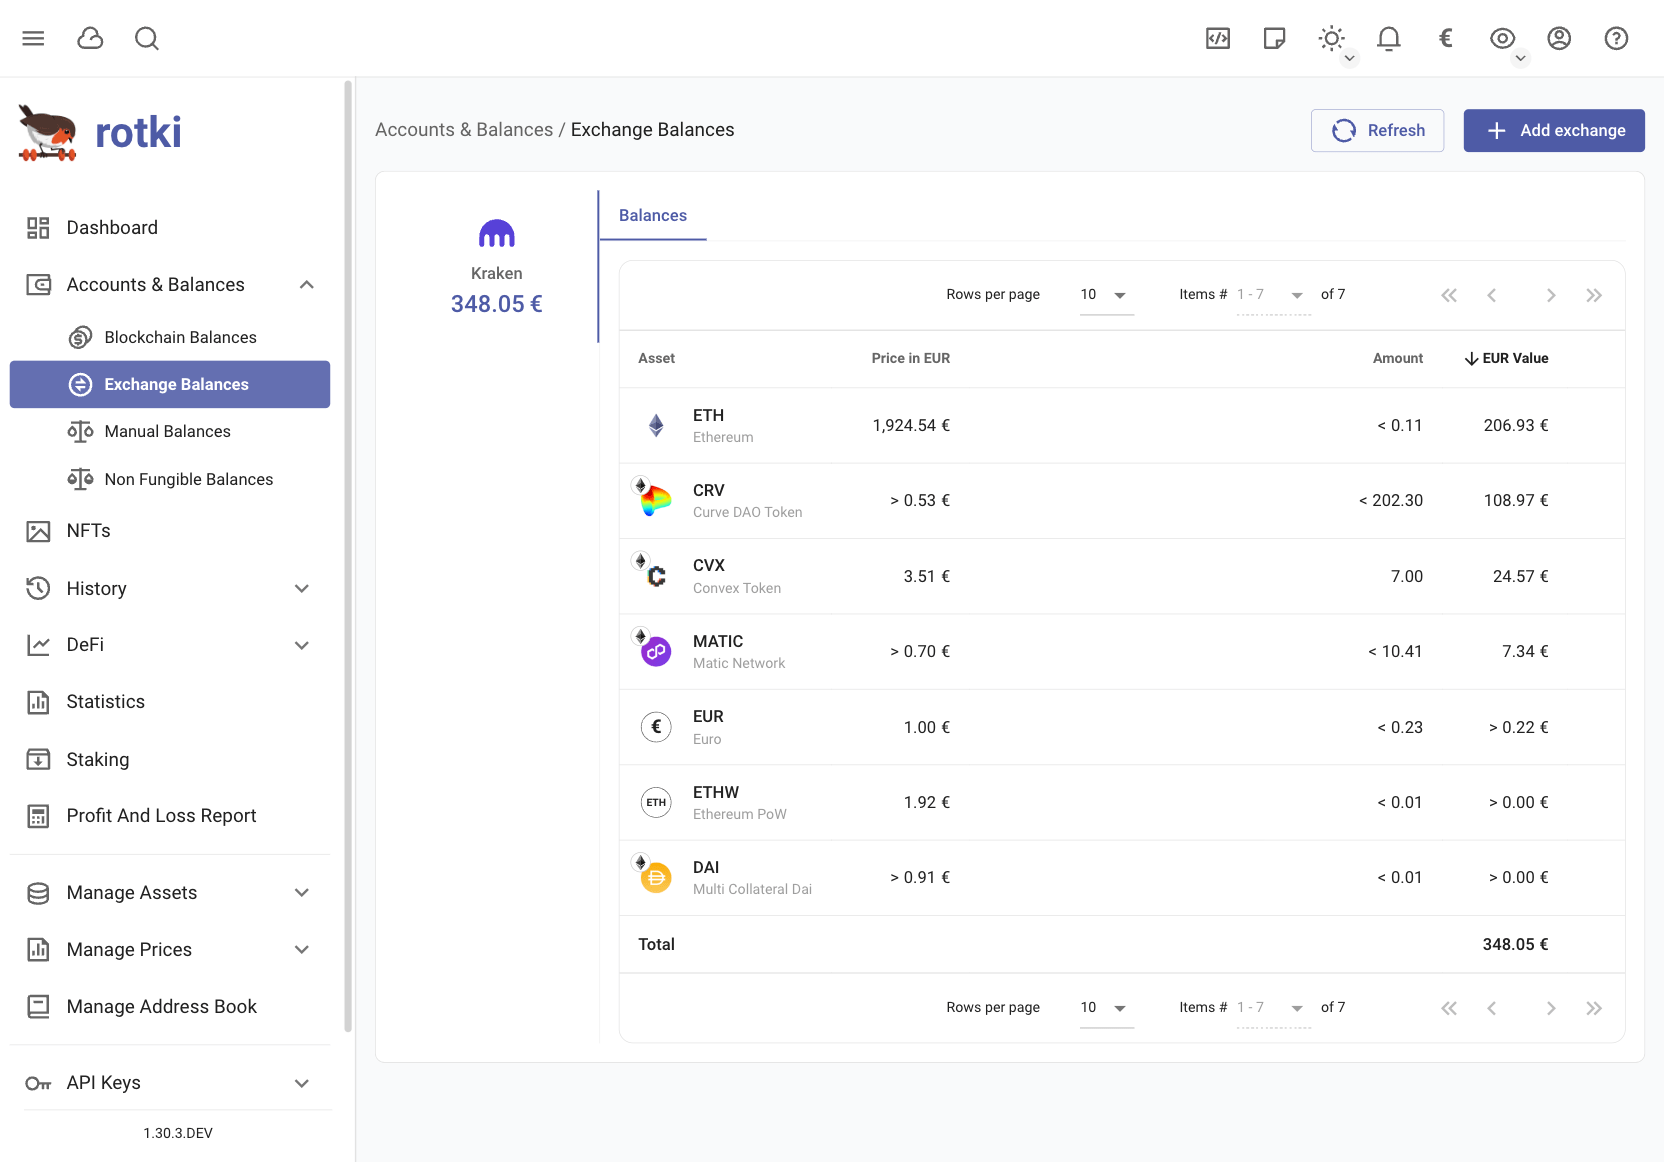
Checking Exchange Balances
You can check all of the asset balances that you have in each connected exchange in the “Exchange Balances” sub-page. Clicking the large “+” icon takes you to the API Keys page where you can manage your exchange connections ( see Adding an exchange).
Adding/Editing Labels and tags
You can edit any of your blockchain accounts and add a label. The label is unique to the account and will show up in the accounts tables instead of the address. You will still be able to see the address if you hover over the label in the tables.
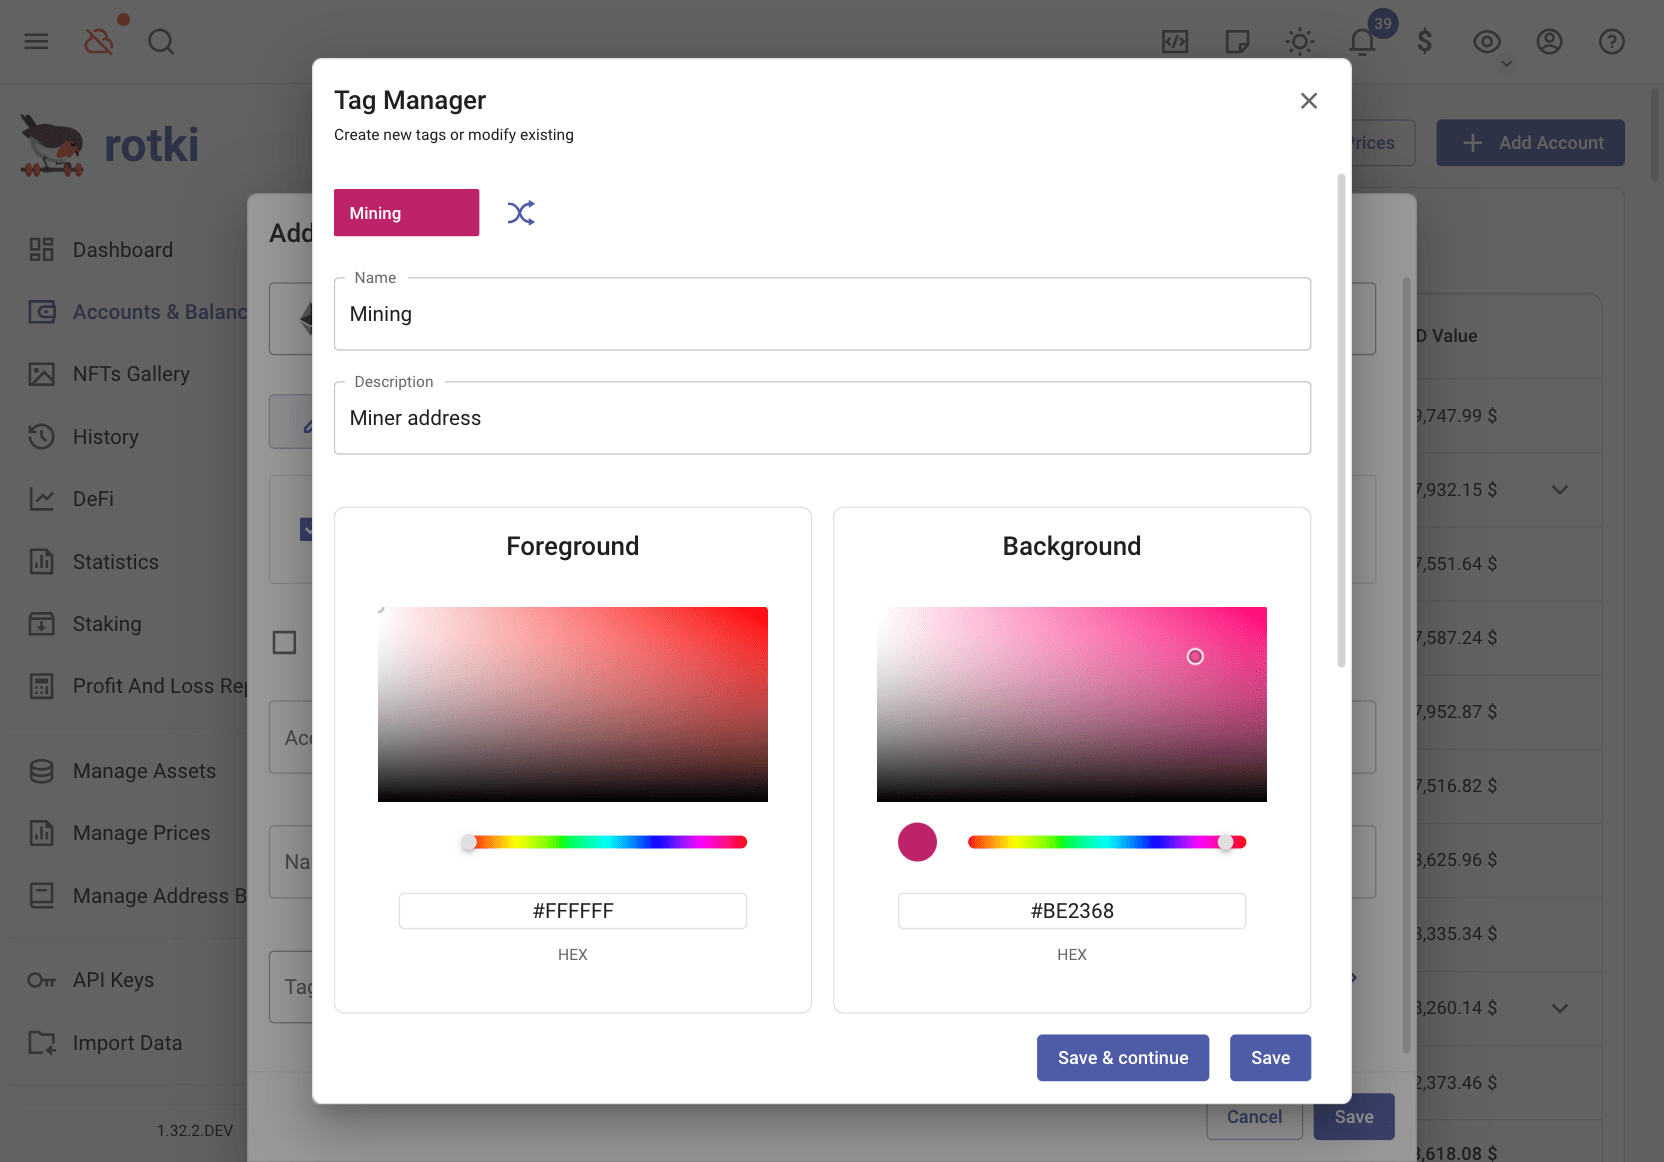
By pressing the edit button for the account you can also add tags to the blockchain account. If you want to create a new tag or edit an existing one you can open the tag manager and choose the name, description and colors of the tag.
Filtering by tags
You can filter the tables by a combination of tags.
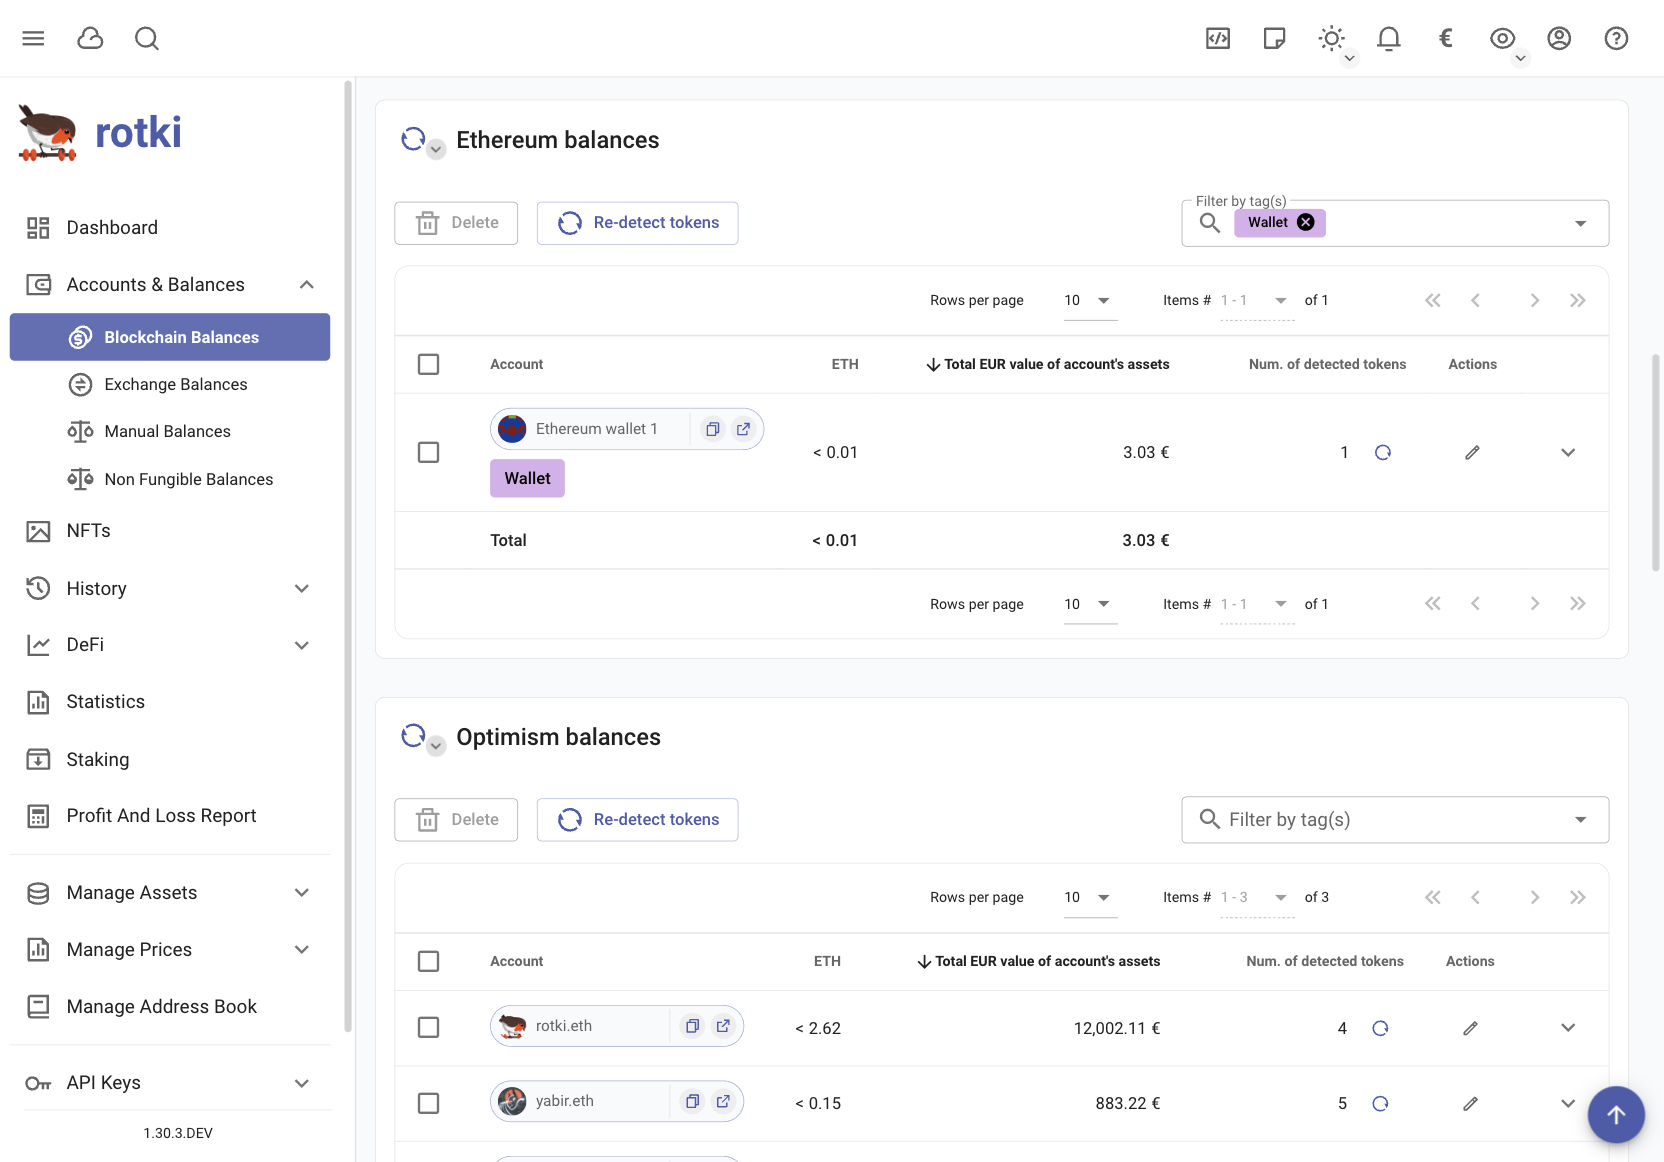
Simply add the tags you wish to filter by in the filter textbox above the tables.
Loopring balances
From the balances section you can quickly get an overview of the accounts having balances in Loopring and what assets these accounts hold.
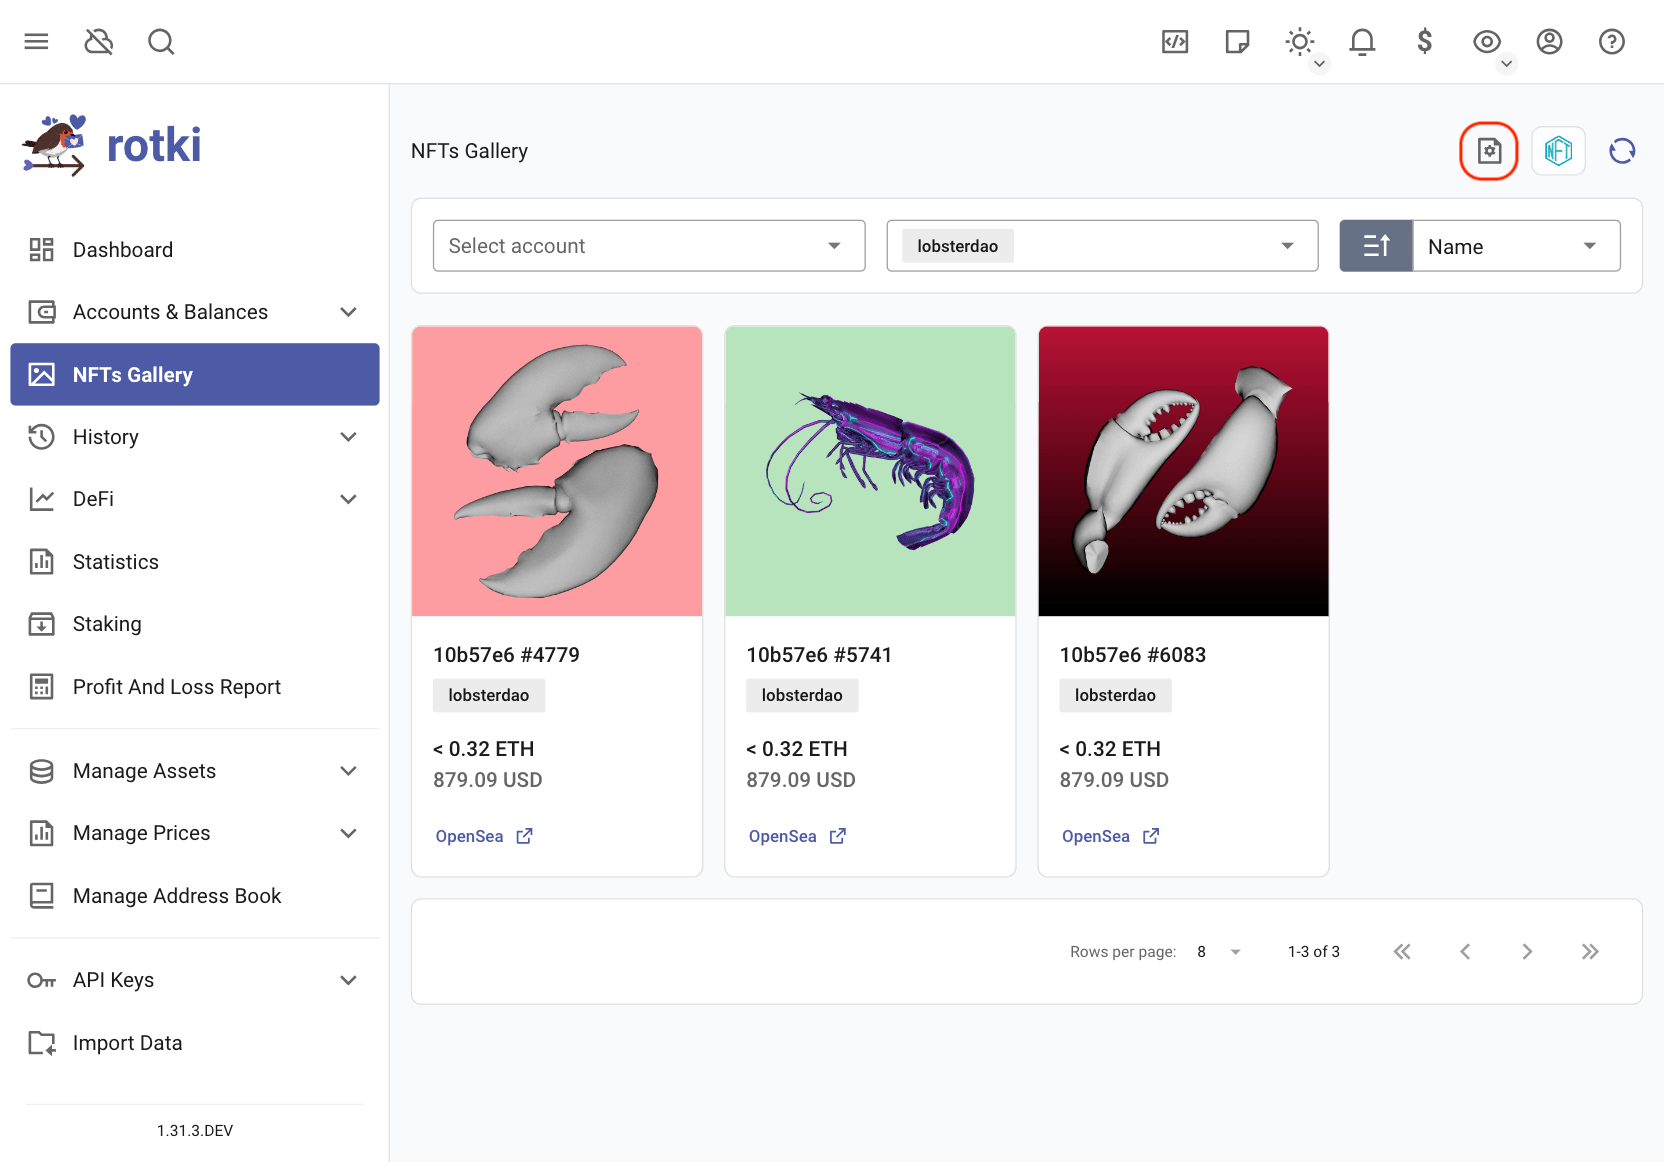
NFTs
Rotki provides an NFT gallery where you can view the NFTs owned by your accounts.
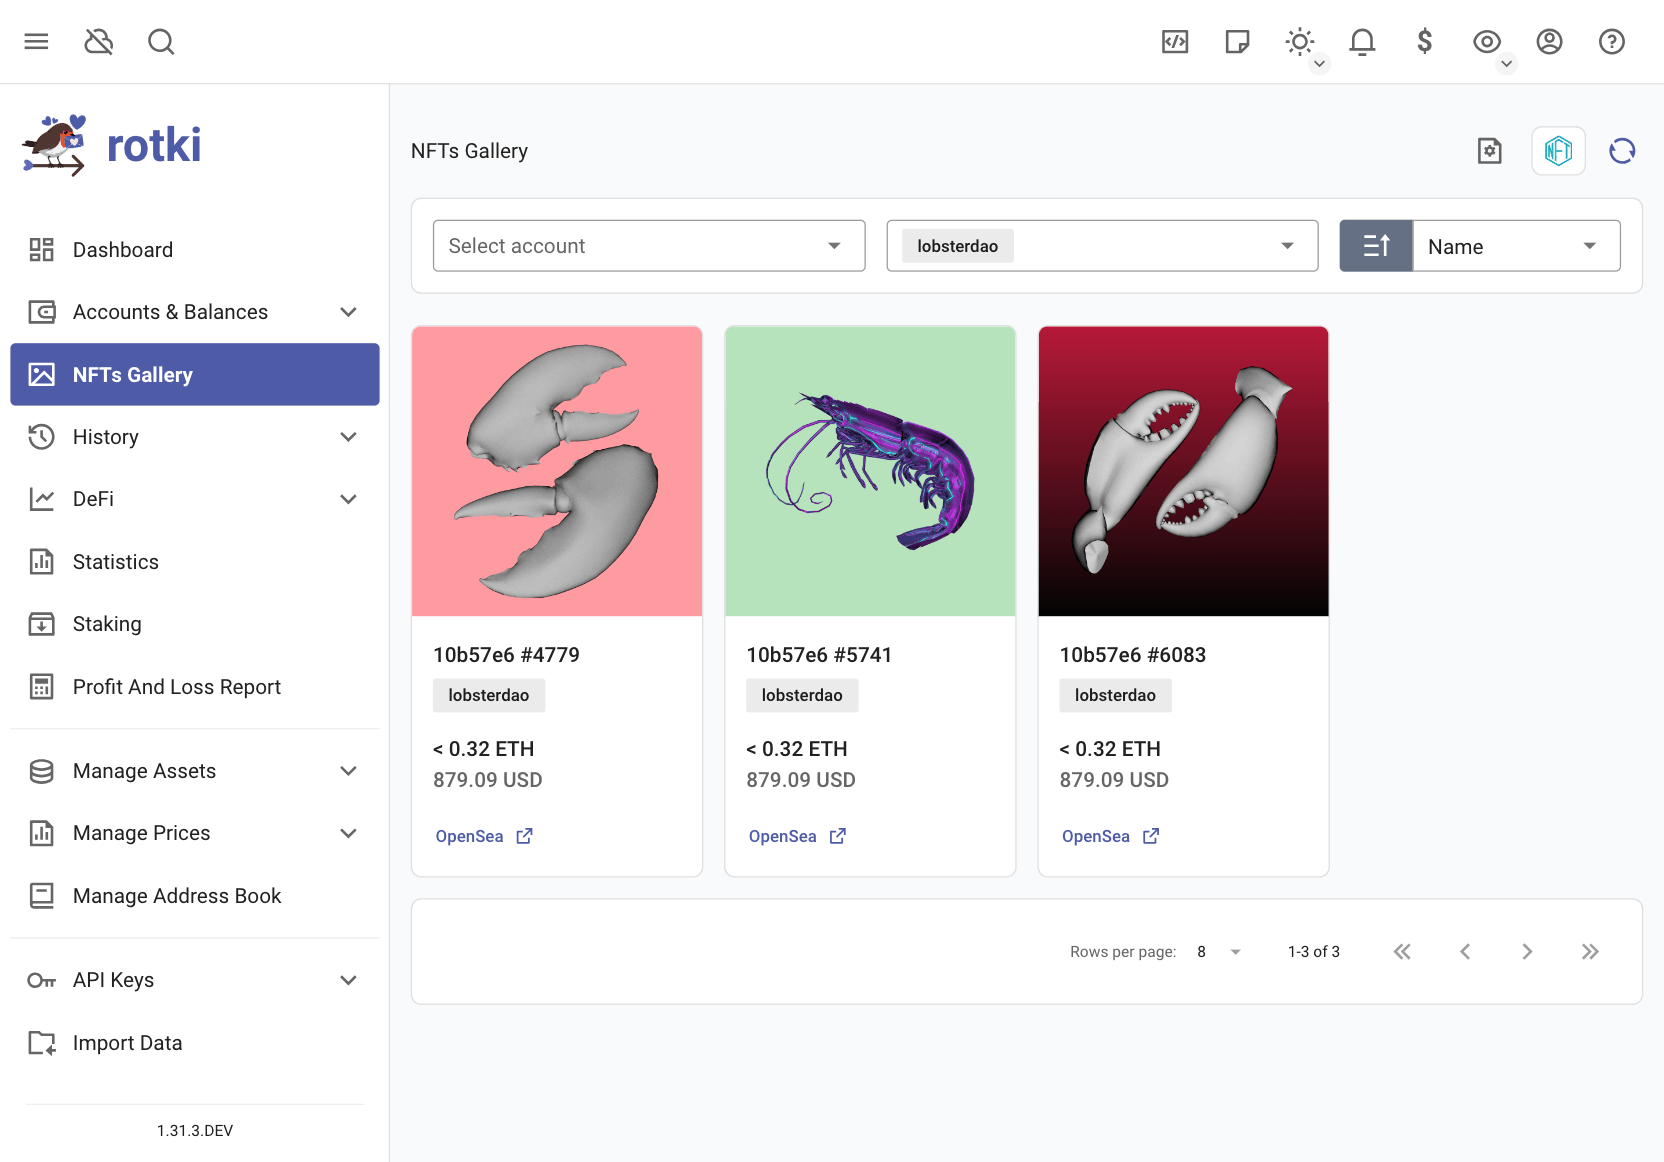
You have an overview of the total value of your NFTs in the application dashboard, on the NFTs table.
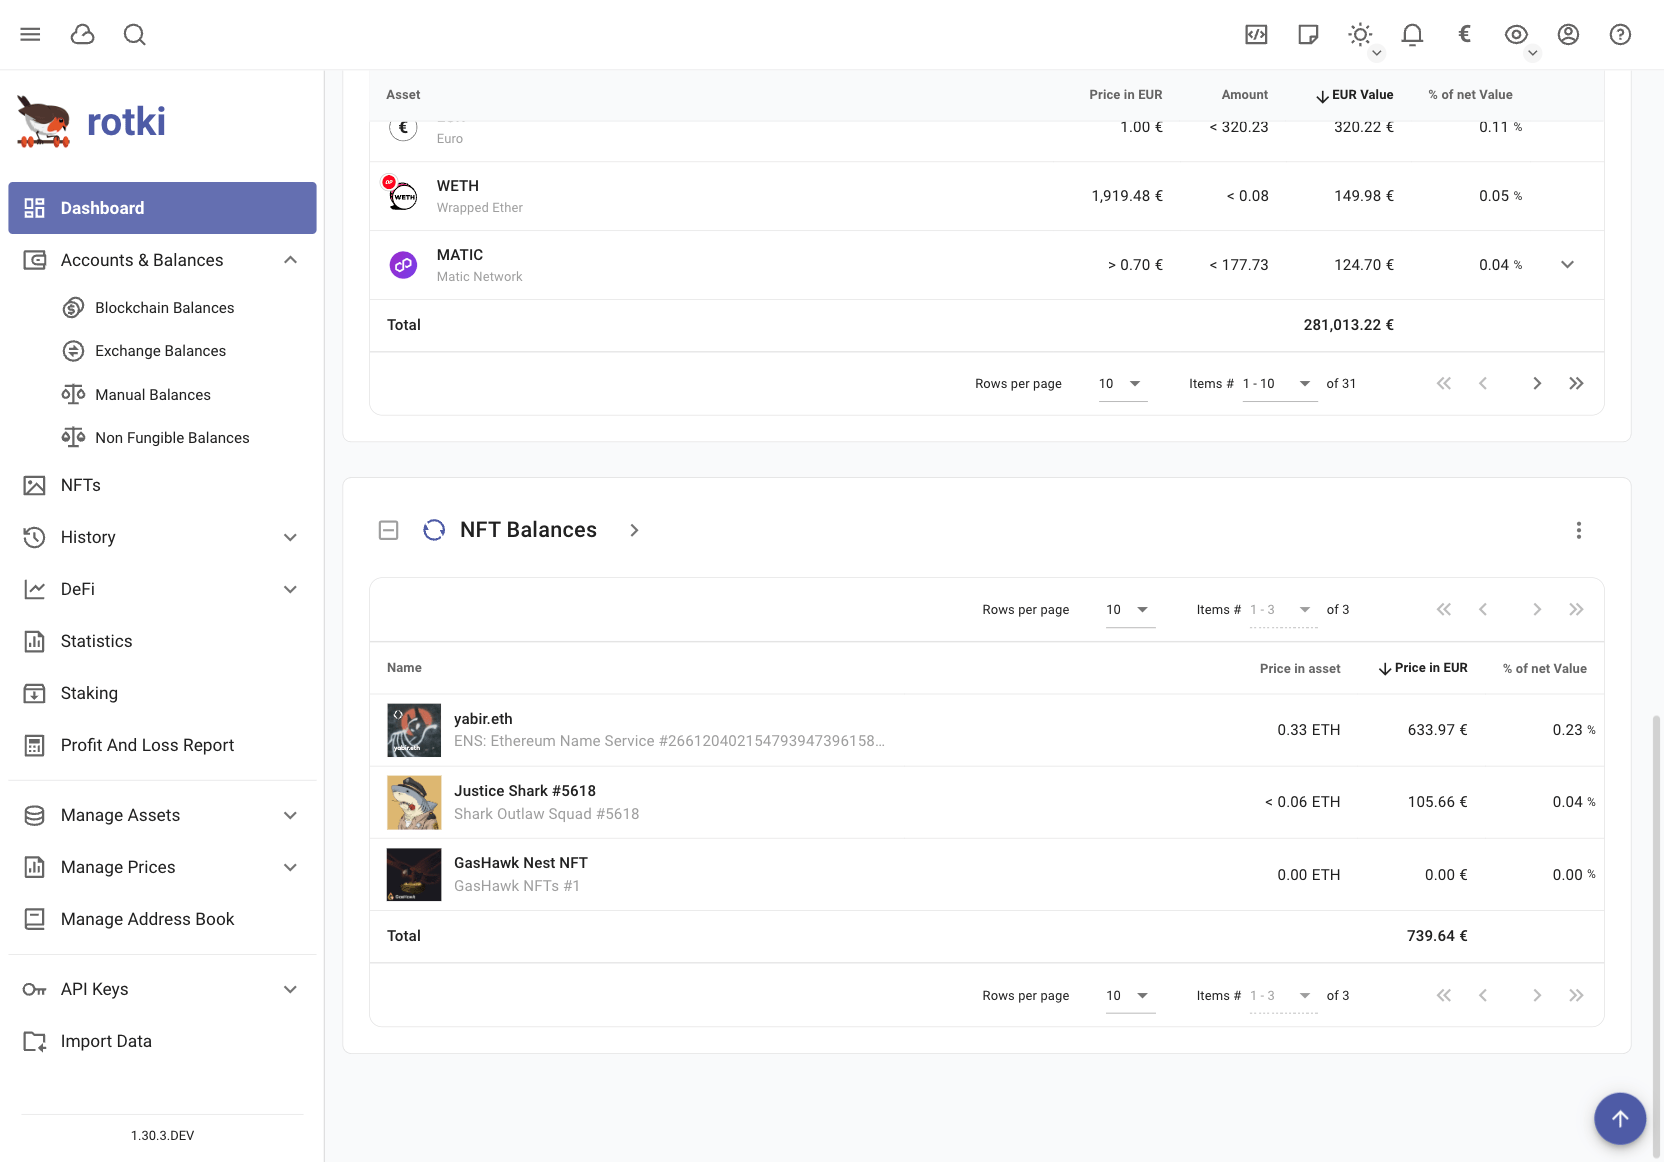
An estimation of the value of the NFTs you own is counted into your total net worth. The estimation strategy is currently the maximum of either the floor price of the collection or the last sale of the NFT. If a manual price has been given this is always preferred.

If a price cannot be found for an NFT asset or if you want to change the calculated price estimate you can easily set the price for an NFT asset manually. You can do this by either clicking on the > button in the NFTs table in the dashboard or by going to . And then click on the pen icon for the NFT you are interested in.
For privacy concerns, it is possible to allow all or only a certain list of domains for images rendered, this can be done here by clicking on the icon highlighted below.
More details here https://medium.com/@alxlpsc/critical-privacy-vulnerability-getting-exposed-by-metamask-693c63c2ce94
the configuration menu:
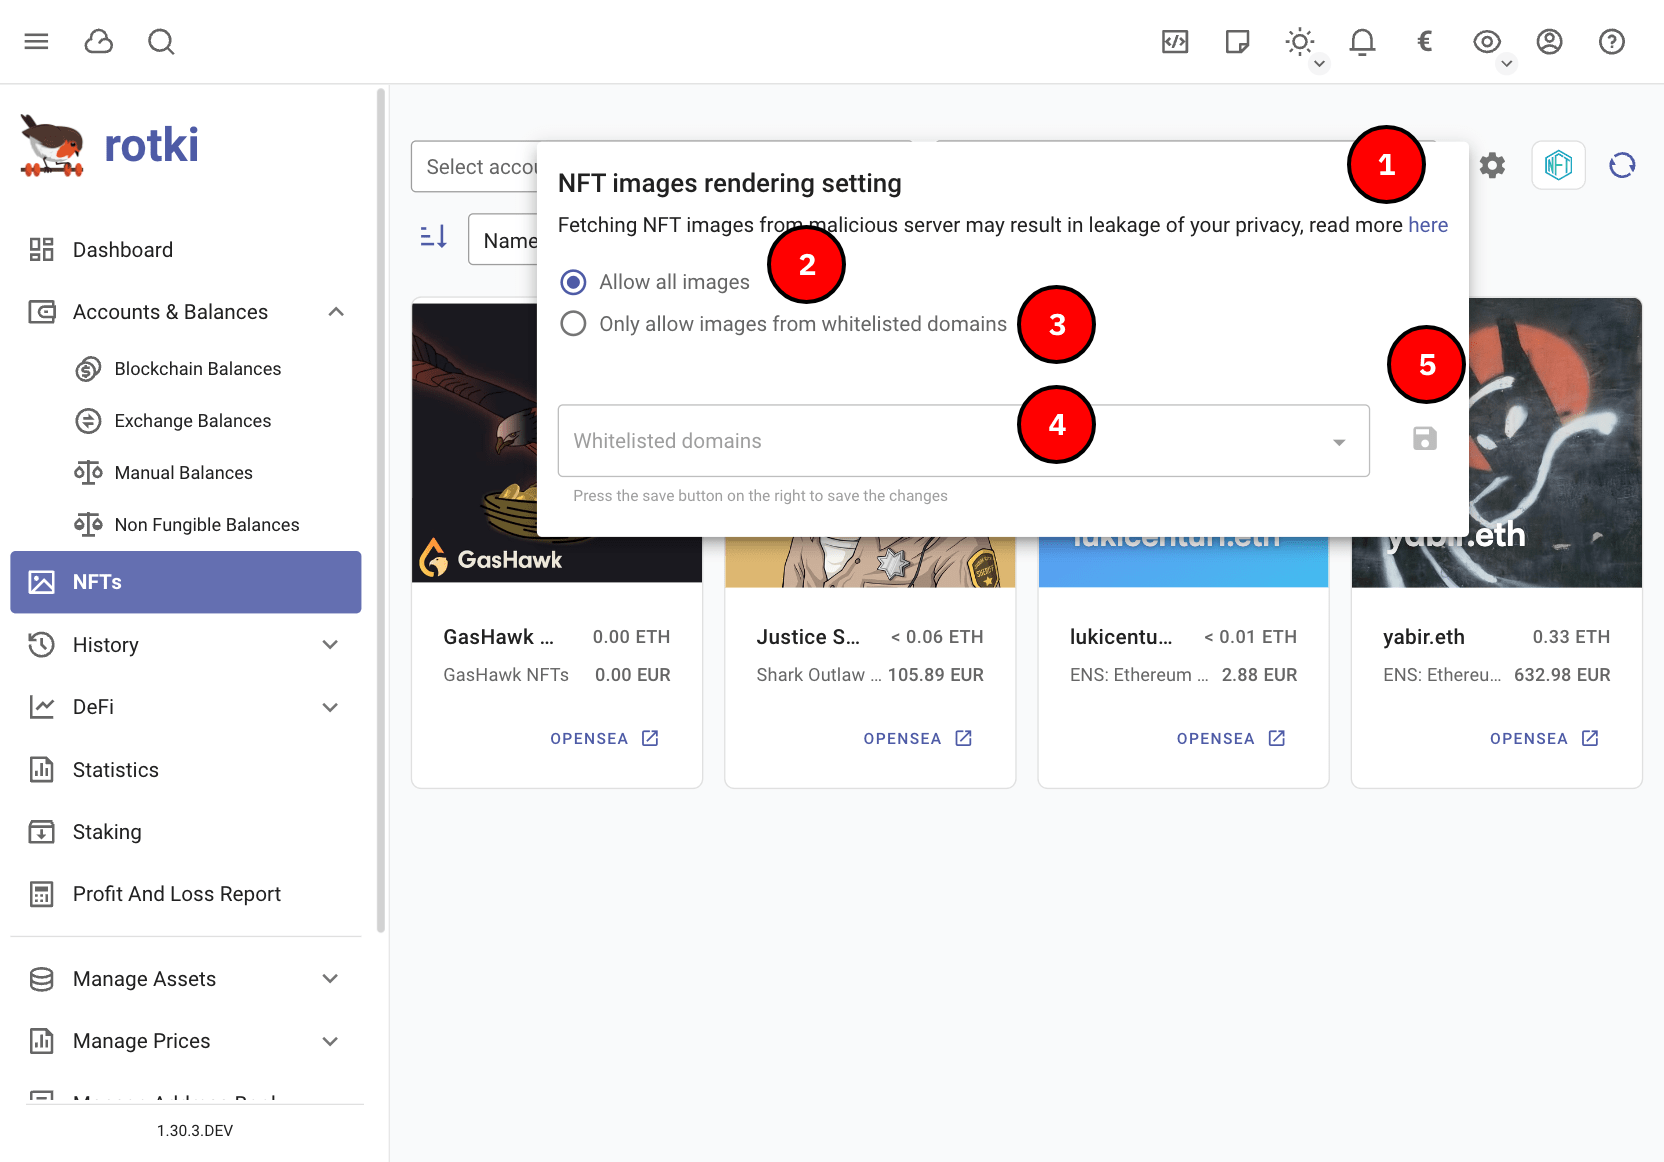
highlight details:
Link to blog post about image rendering and privacy.
Option to allow all NFT images to be rendered.
Option to allow only whitelisted domains.
If only whitelist, input list of allowed domains.
Save button.
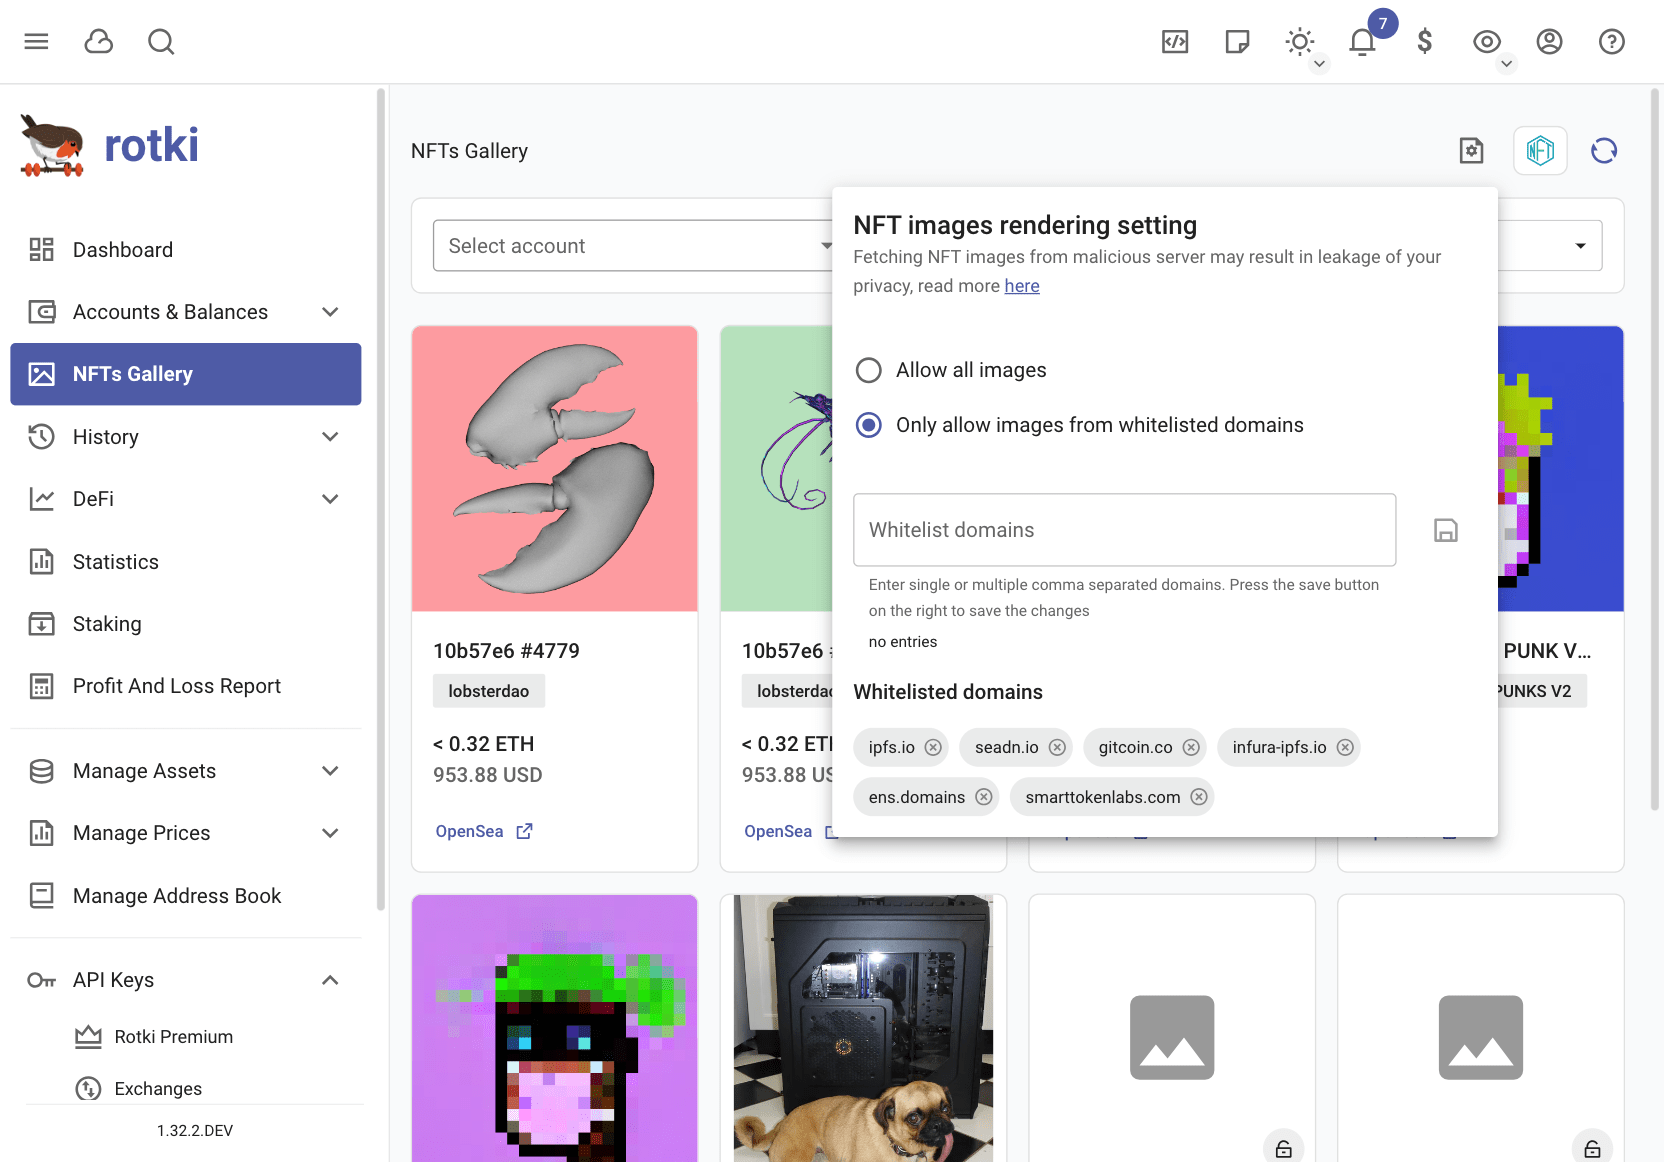
This will enable image rendering of only whitelisted NFT domains.
ETH2 Staking
There are two ways to track ETH2 Staking. The first is by adding tracking the account of an ETH account that deposited
the ETH for the validator. This will auto-detect any associated validators with the ETH1 address and it will start
tracking them. The second way is by adding a validator using the Add account button in the page. It can be added using its public key, its index or both of them for a faster query. Finally it
is also possible to customize the proportion of the validator owned for users who share one validator with more people.
After adding a new validator you will see the list of balances for each of these validators.
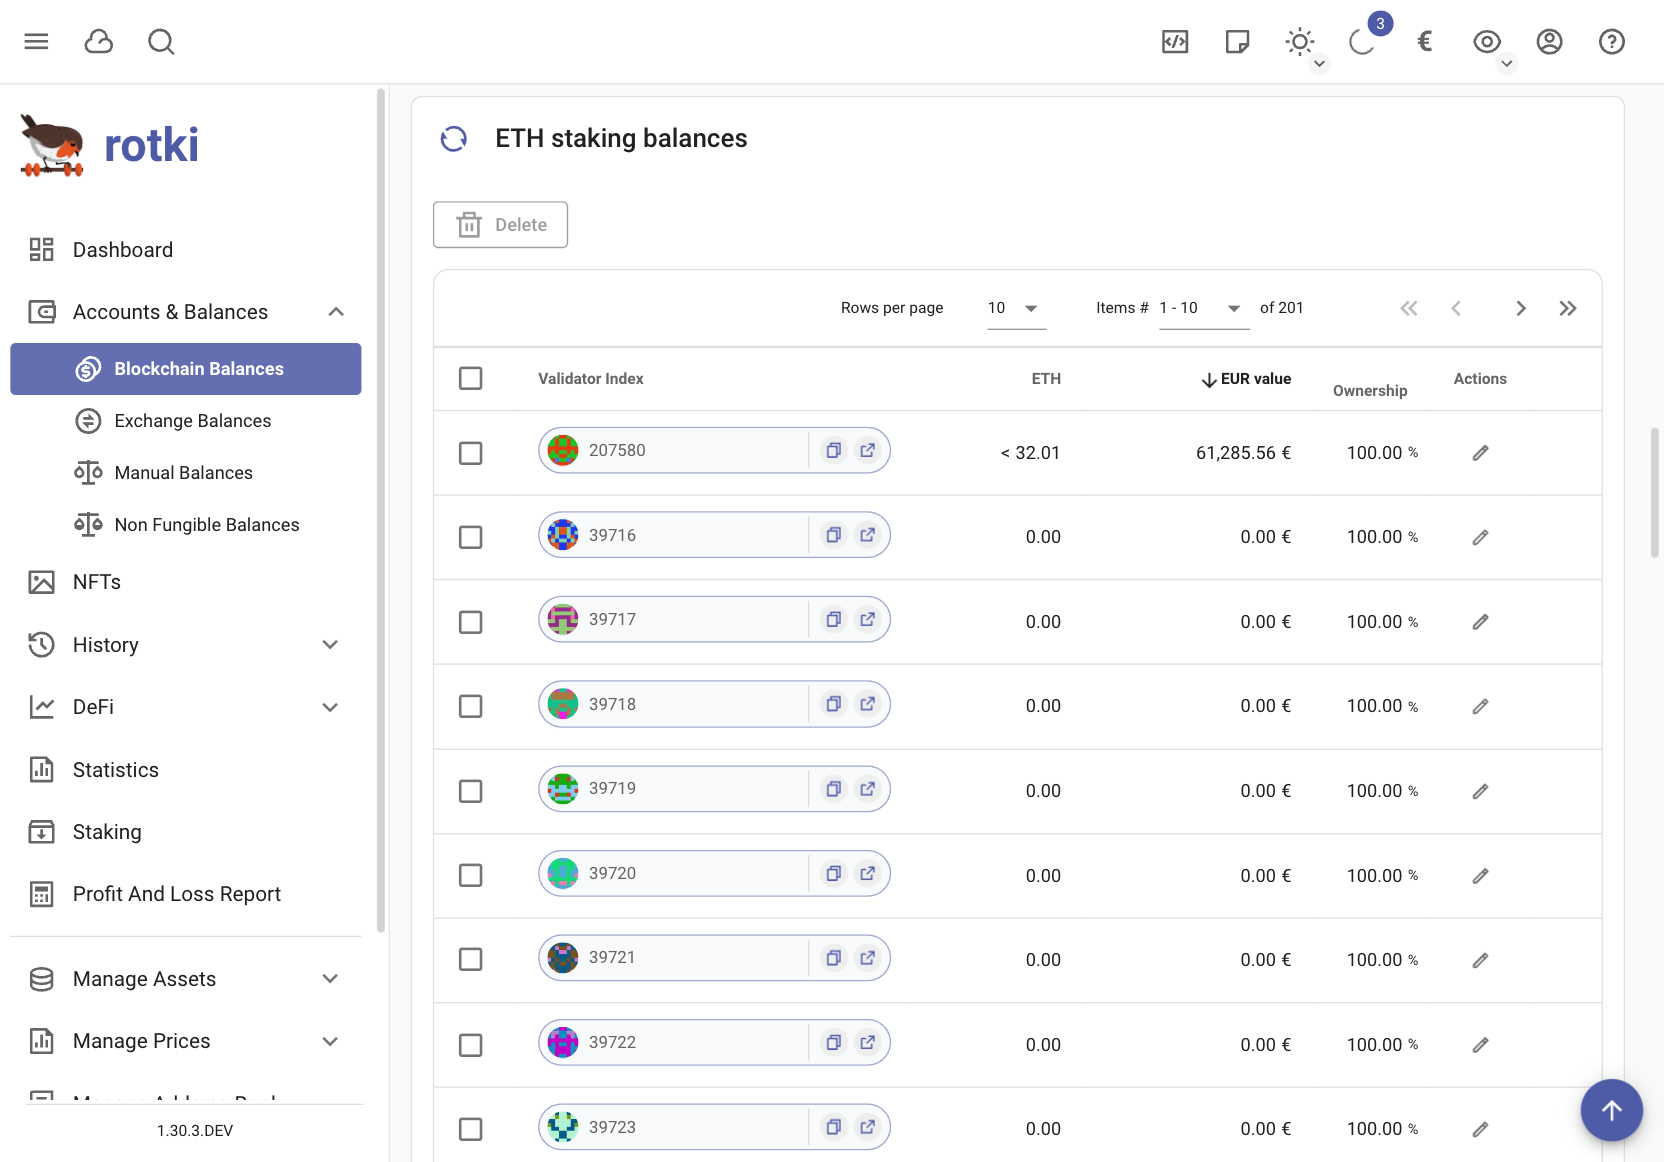
If you are an ETH2 staker you can see the total value earned both in the current ETH price (2) but also counting the price of the daily payouts of ETH2 staking (3).
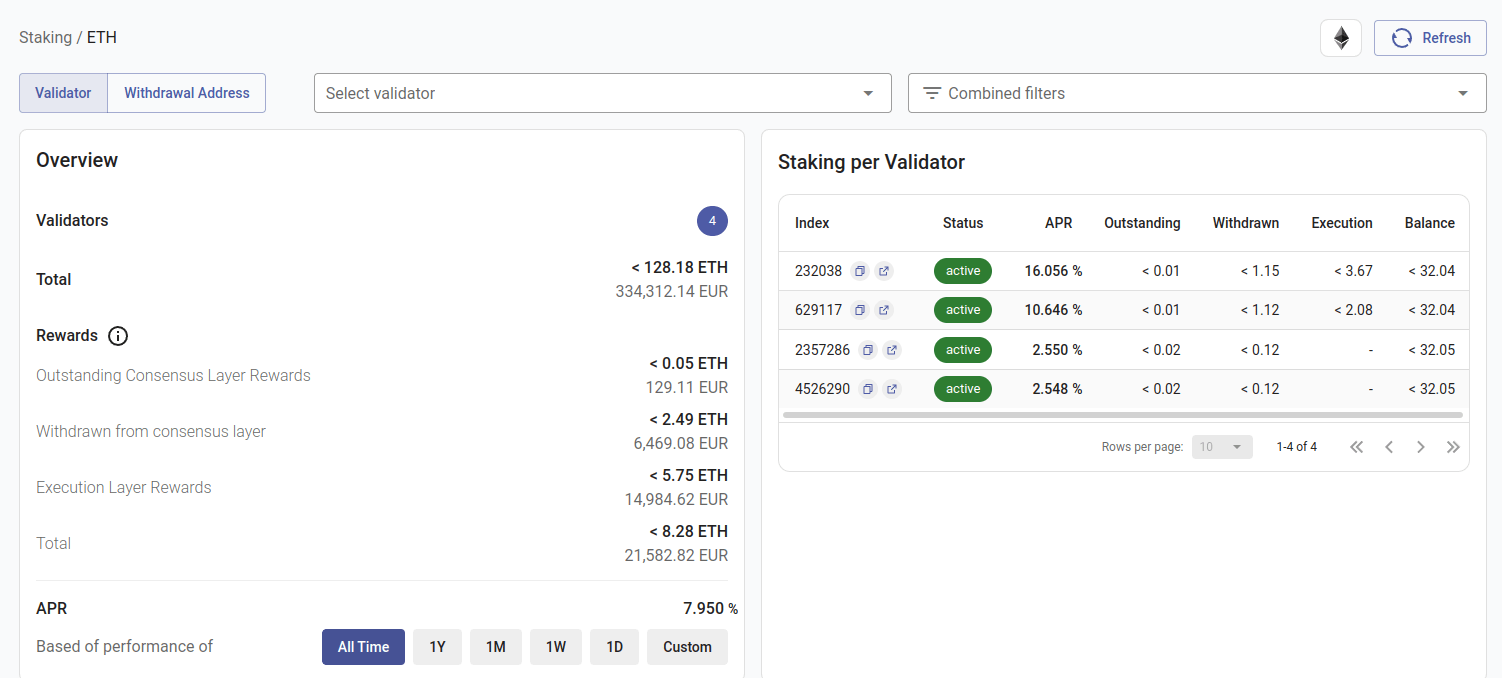
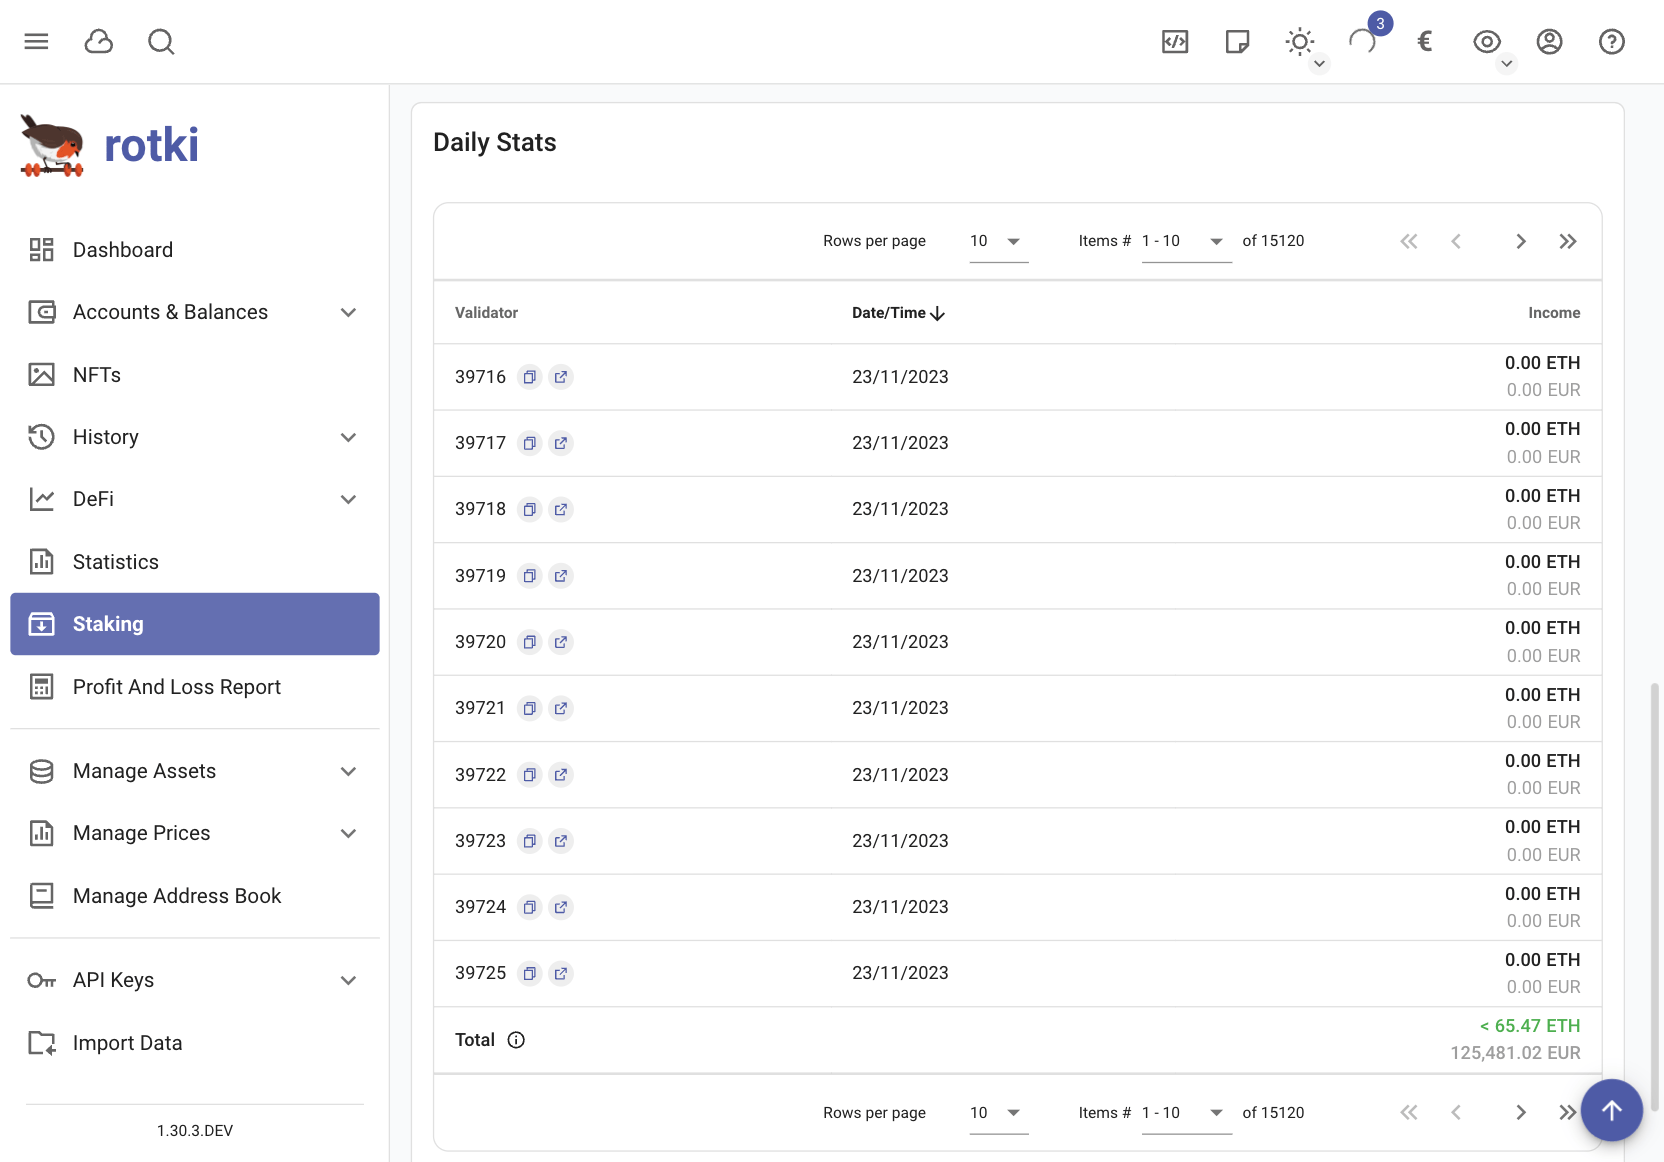
You can see the summary of how much ETH was earned each day, on the daily stats section.
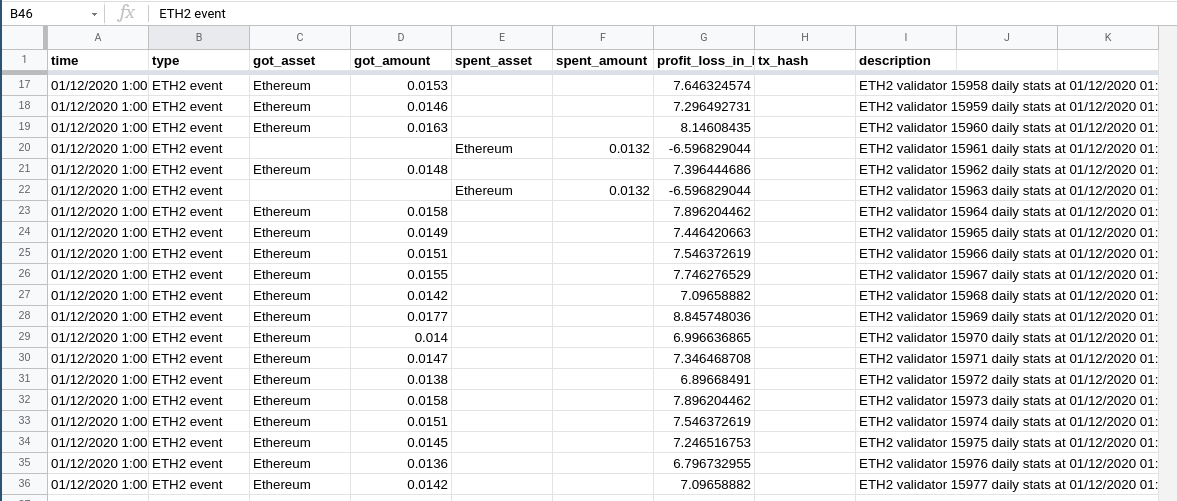
Finally this can also be taken into account in the profit/loss report for any given period of time and also exported via CSV to a spreadsheet.
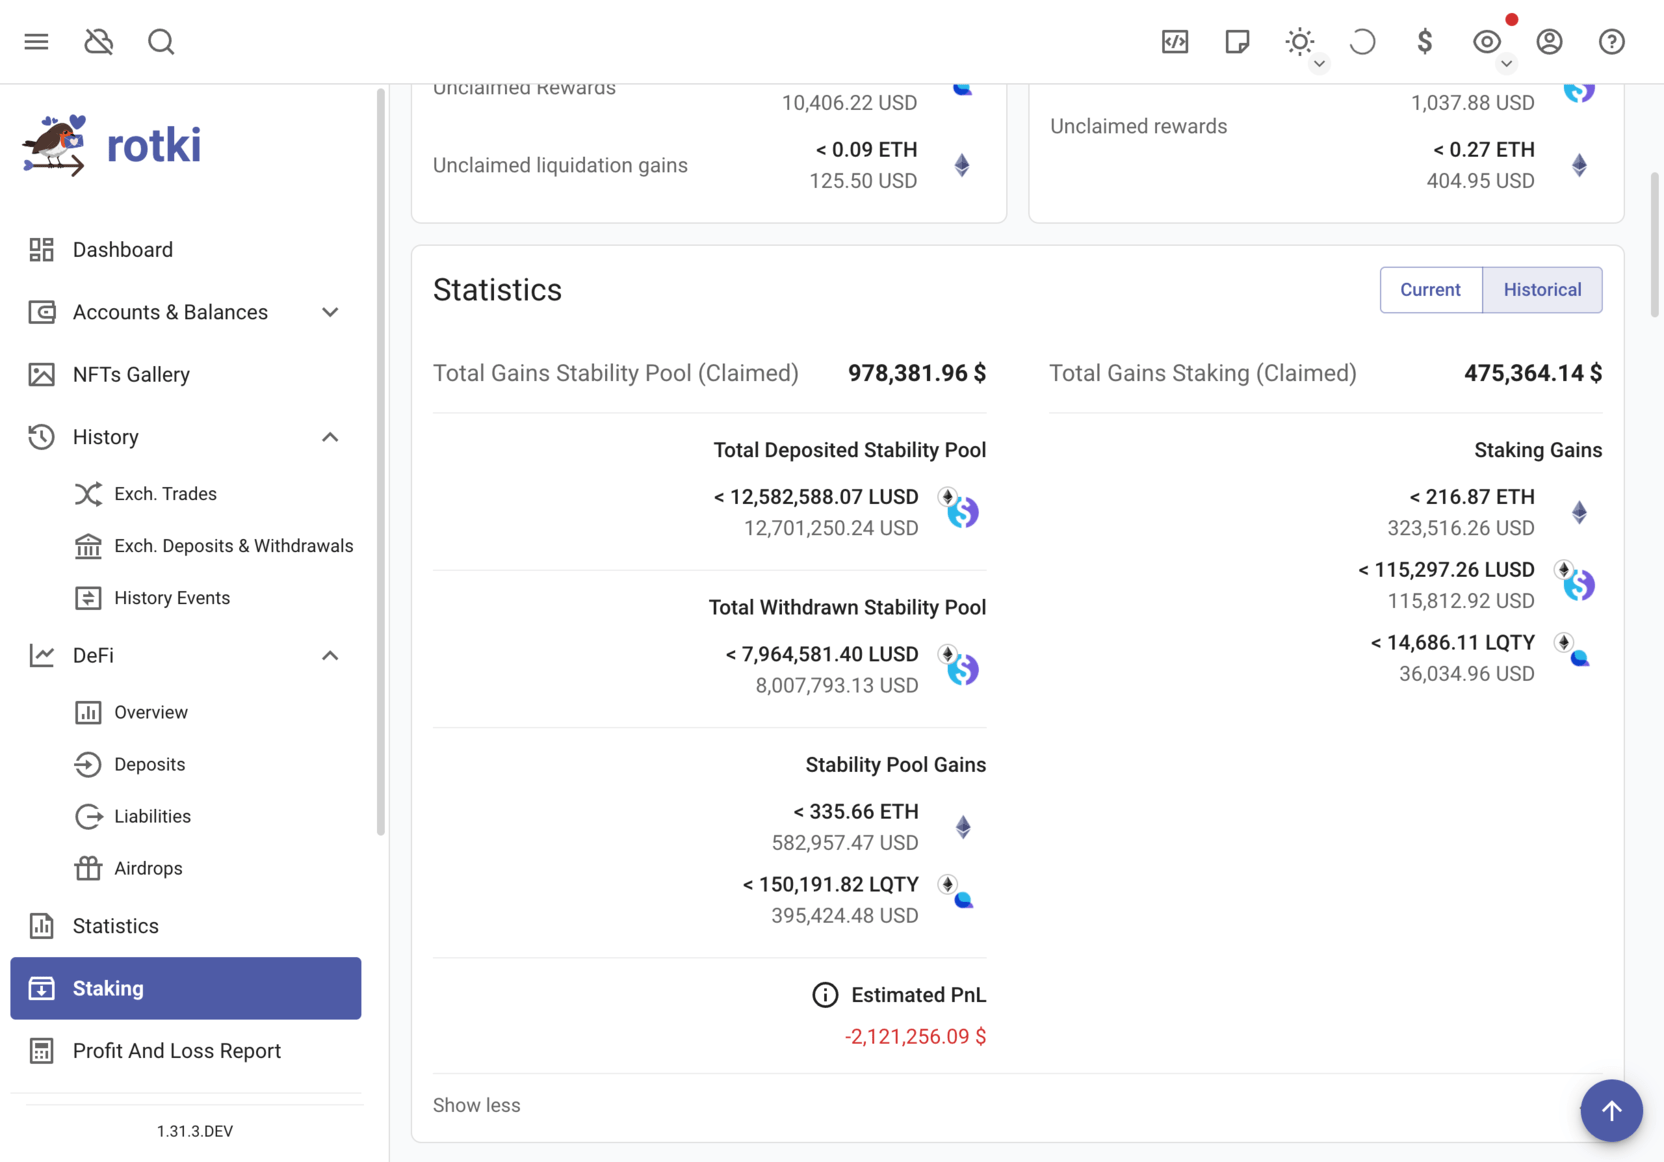
Liquity Staking
If you stake LQTY in the protocol you can see stability pool deposits, staked amount, and the stake events.
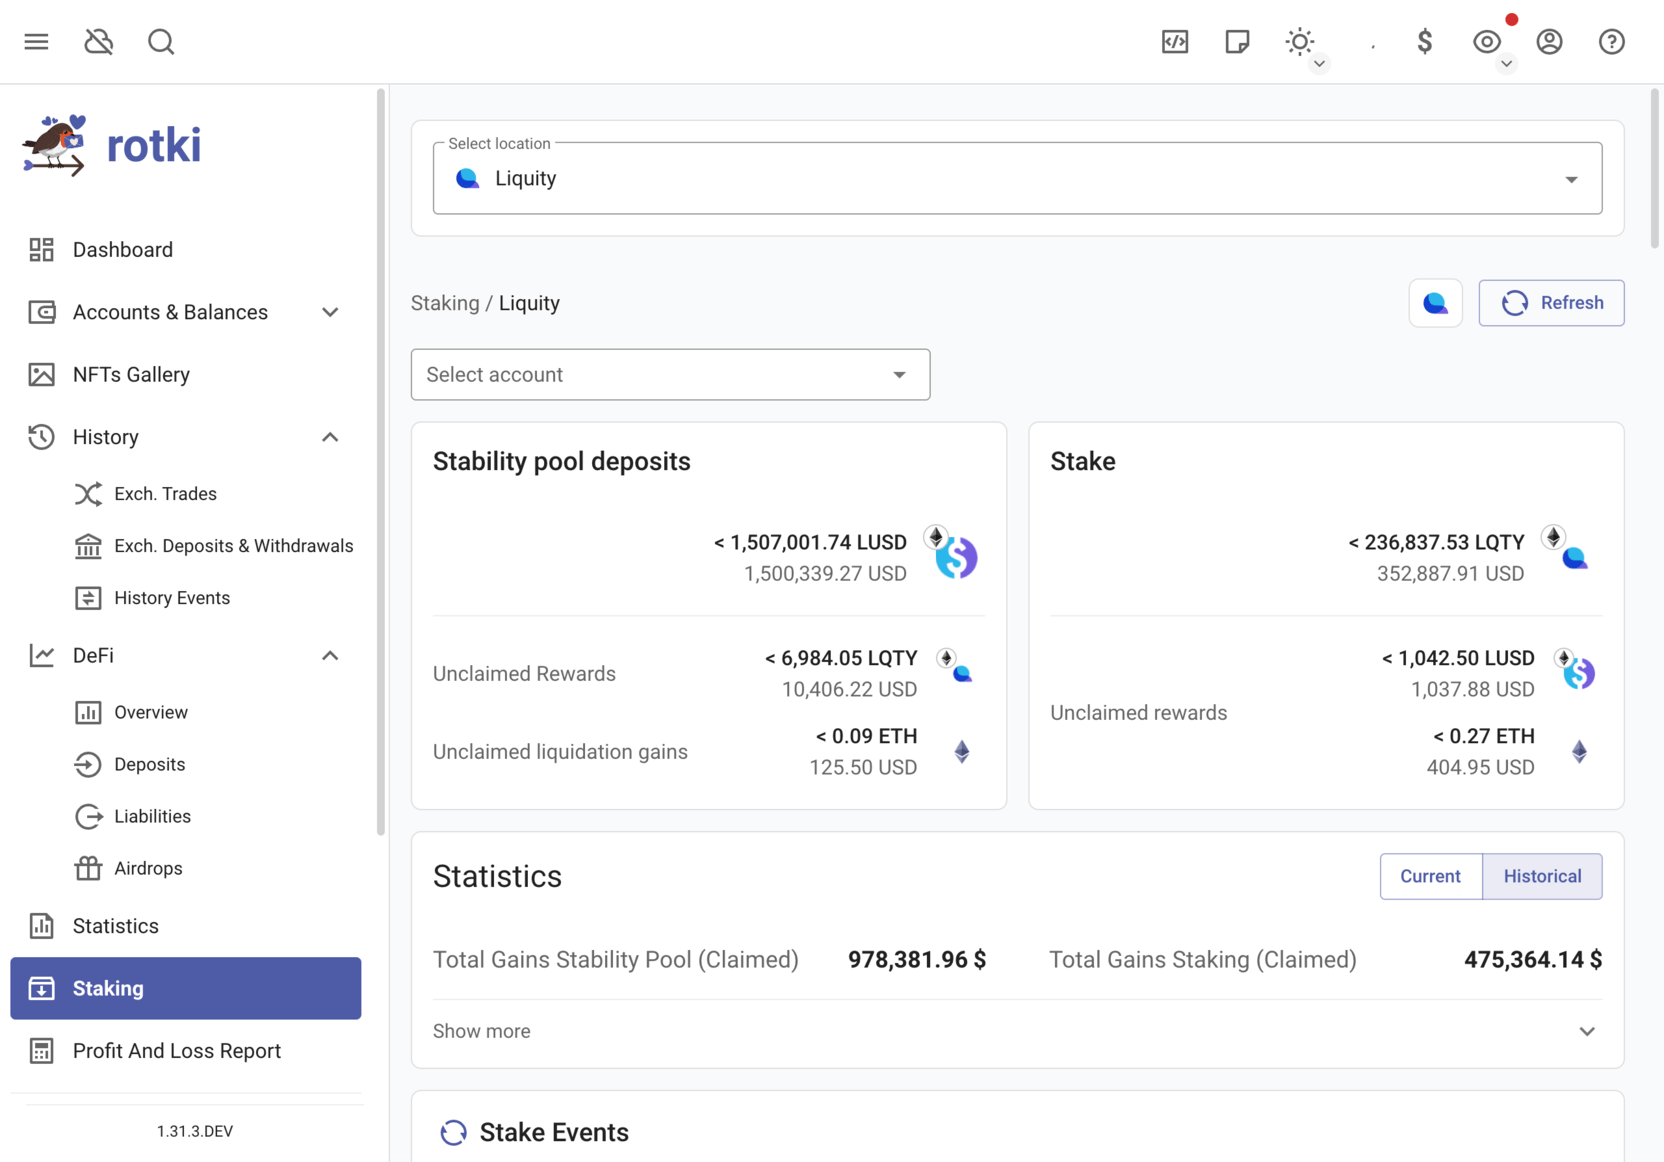
On the left side, we display information for your current deposited amount of LUSD in the stability pool along with the ETH and LQTY rewards that you haven’t claimed yet. On the right side, we display the staked LQTY and the ETH and LUSD that are available to claim.
The Liquity statistics are calculated using the queried events and you might need to wait for some time until all the events are queried to get the final values. The values in terms of USD can be displayed using prices at the moment of the different events (historical) or using prices at the present (current).
Total Gains Stability Pool: This is the value of Ether and
LQTYclaimed from the stability pool.Total Deposited Stability Pool: This is the value of
LUSDdeposited in the stability pool.Total Withdrawn Stability Pool: This is the value of
LUSDwithdrawn from the stability pool.Stability Pool Gains: A breakdown of the gains already claimed from the pool.
Estimated PnL: This value represents your returns from the stability pool after losing LUSD in exchange for
ETHandLQTY. For more information on how the stability pool works check the Liquity docs. This amount is calculated in rotki as follows:
A = Total Deposited Stability Pool - Total Withdrawn Stability Pool
LG = Claimed Liquity gains in current price.
R = Not claimed rewards in current price.
B = Total Gains Stability Pool + LG + R
C = (A - Current deposited amount) in current price
PnL = B - C
For LQTY staking we display the claimed rewards.
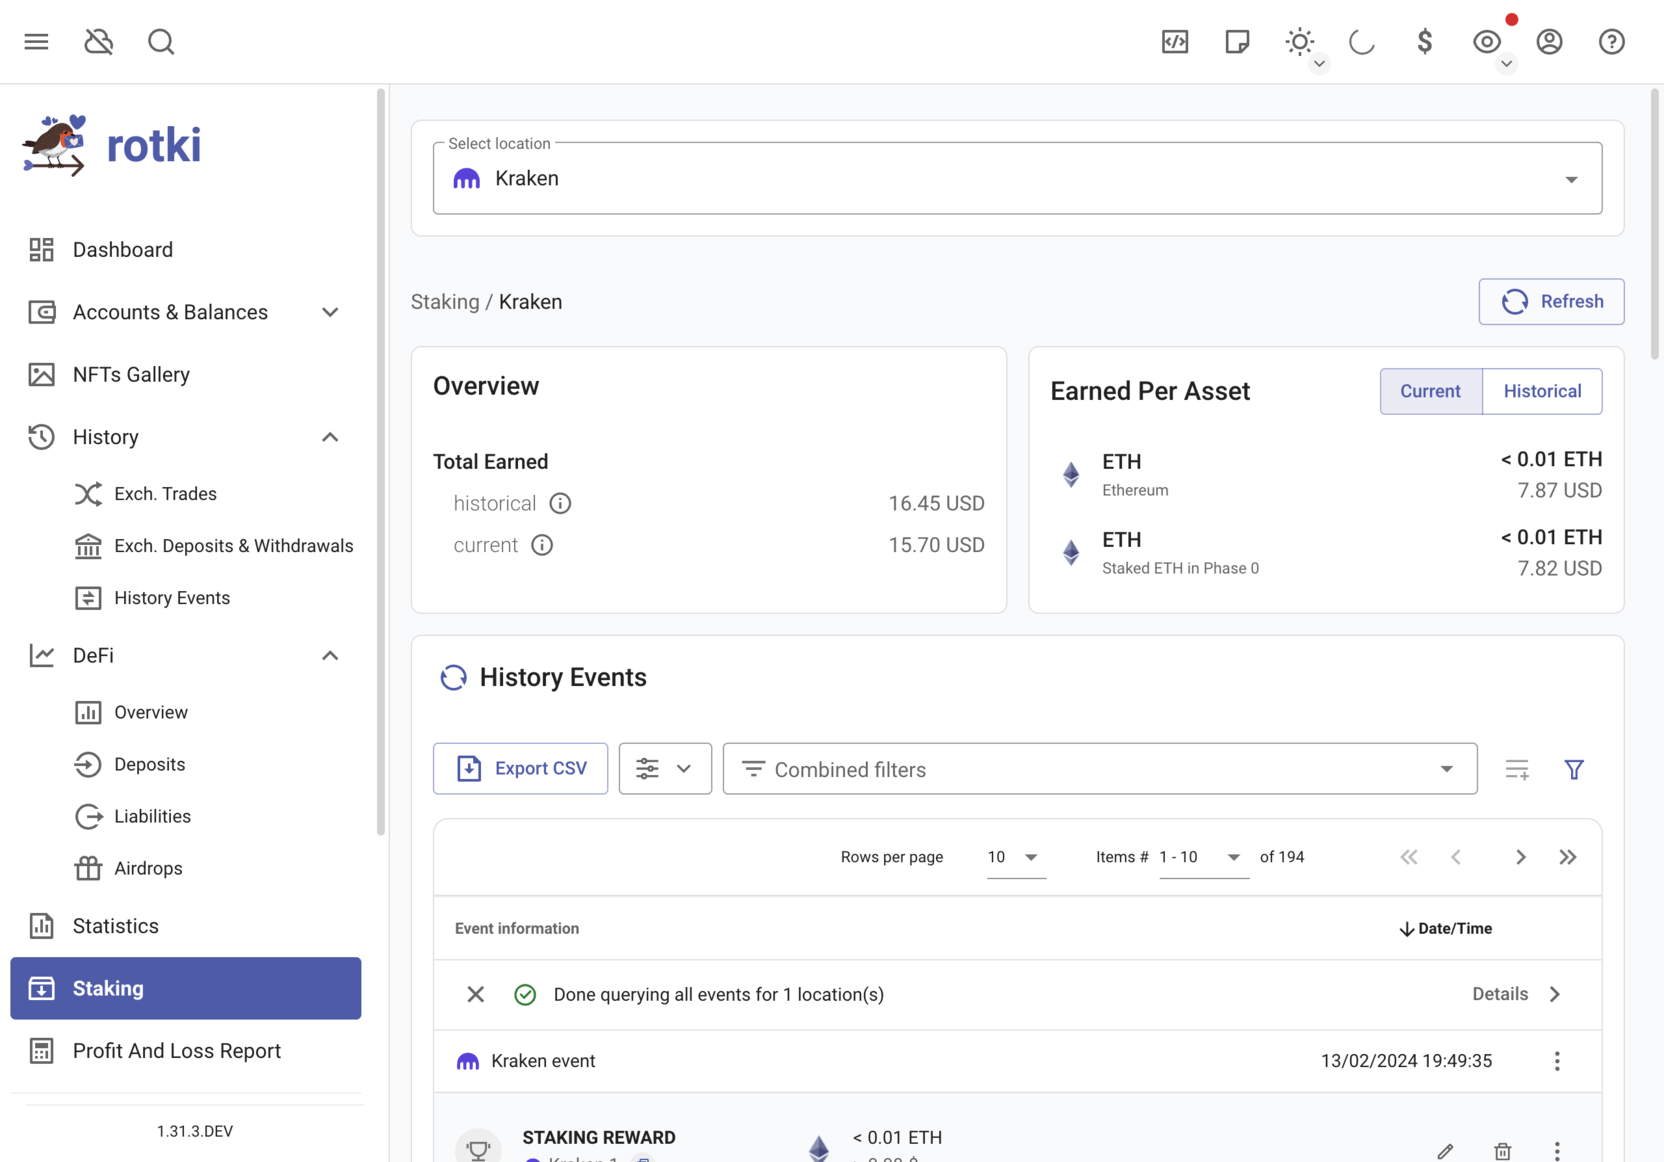
Kraken Staking
If you stake on Kraken you can see your gains, and events in the various staked assets.
Airdrops
Rotki can detect some airdrops for you
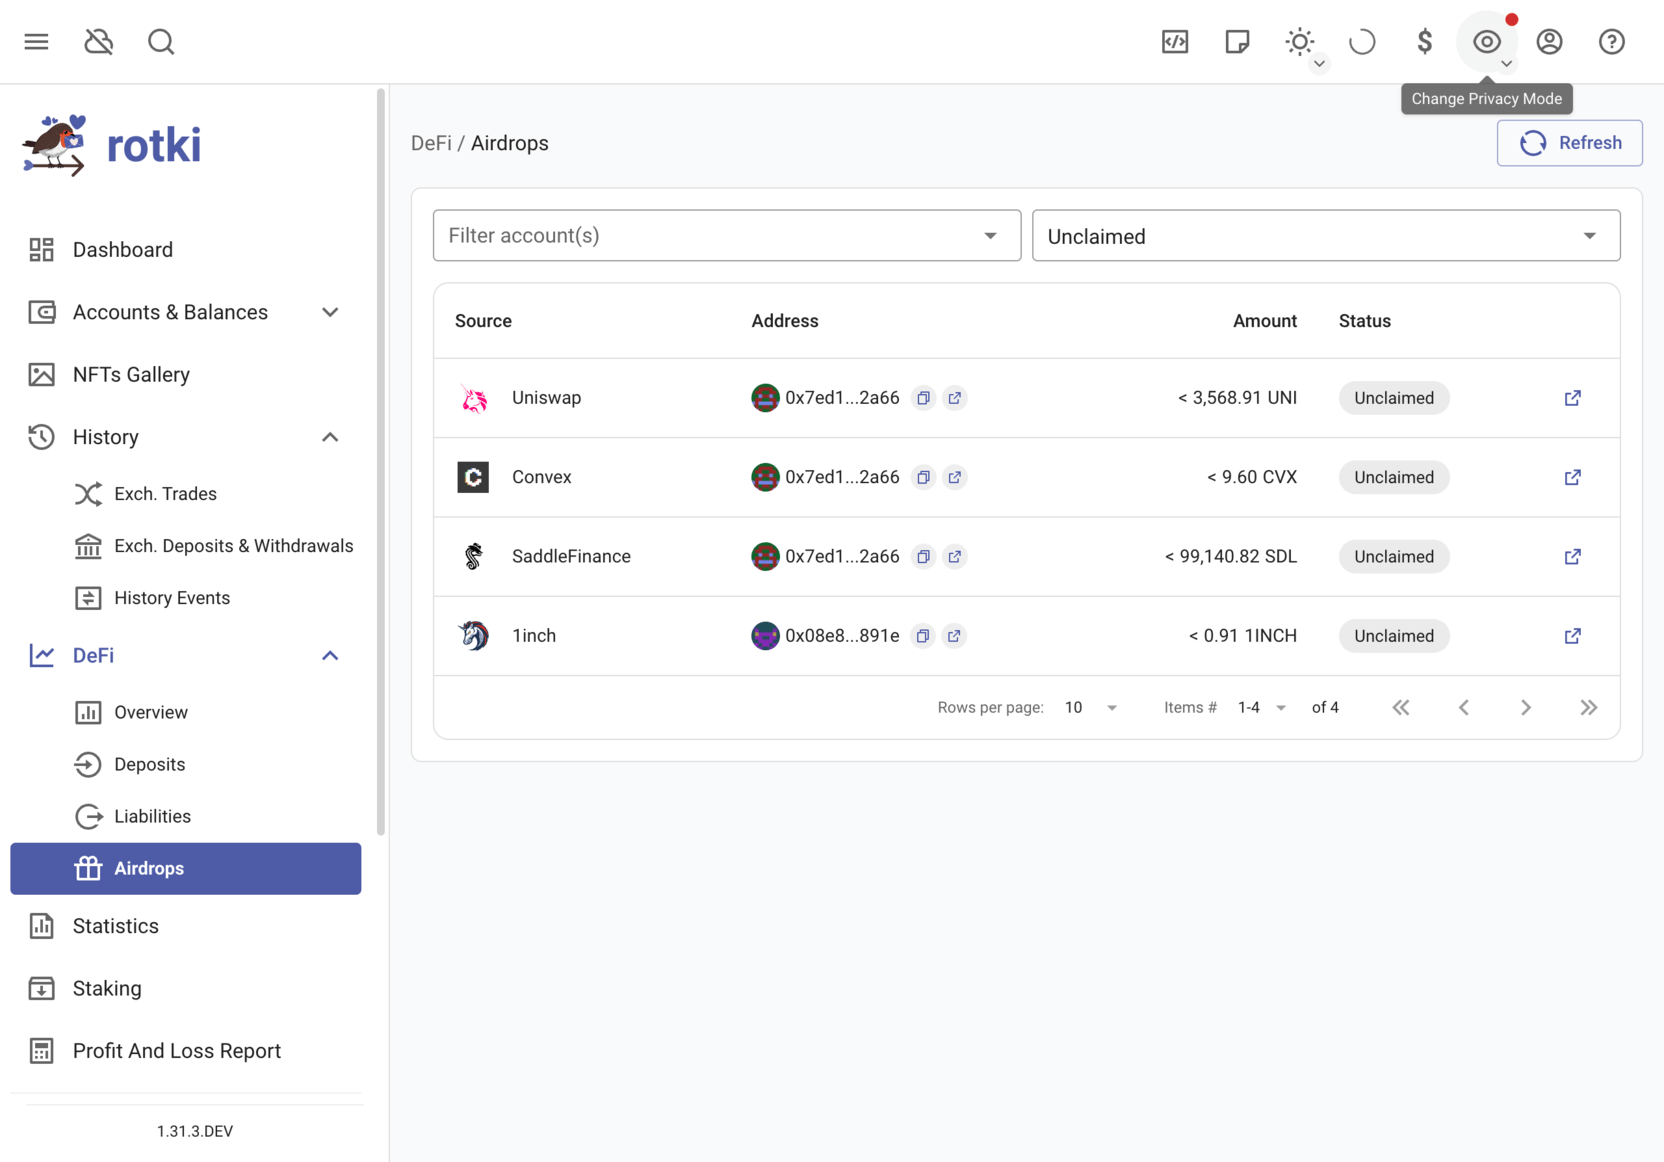
The list of currently supported airdrops is:
Uniswap
1INCH
Tornado
Cornichon
Grain
Furocombo
Lido
Curve
ENS
ParaSwap
Saddle finance
Shapeshift
Paraswap
Cow
Diva
Shutter
Snapshots
The application will on login snapshot to disk the information about balances from all the tracked sources every 24 hours (by default. The number of hours is configurable). This information is saved directly to your local database.
You can force a snapshot taking by clicking in the cloud icon at the top bar and then on Force Save
Snapshots won’t be saved if there is any error querying information for external sources. If you want to force the snapshot to be saved when an external source is reporting an error you can select the option Ignore Errors.
It is possible to remove balance snapshots from the history or edit them in case the information is not correct or needs to be modified. To do so click on a snapshot’s point at the dashboard’s net value graph and this will open a menu.
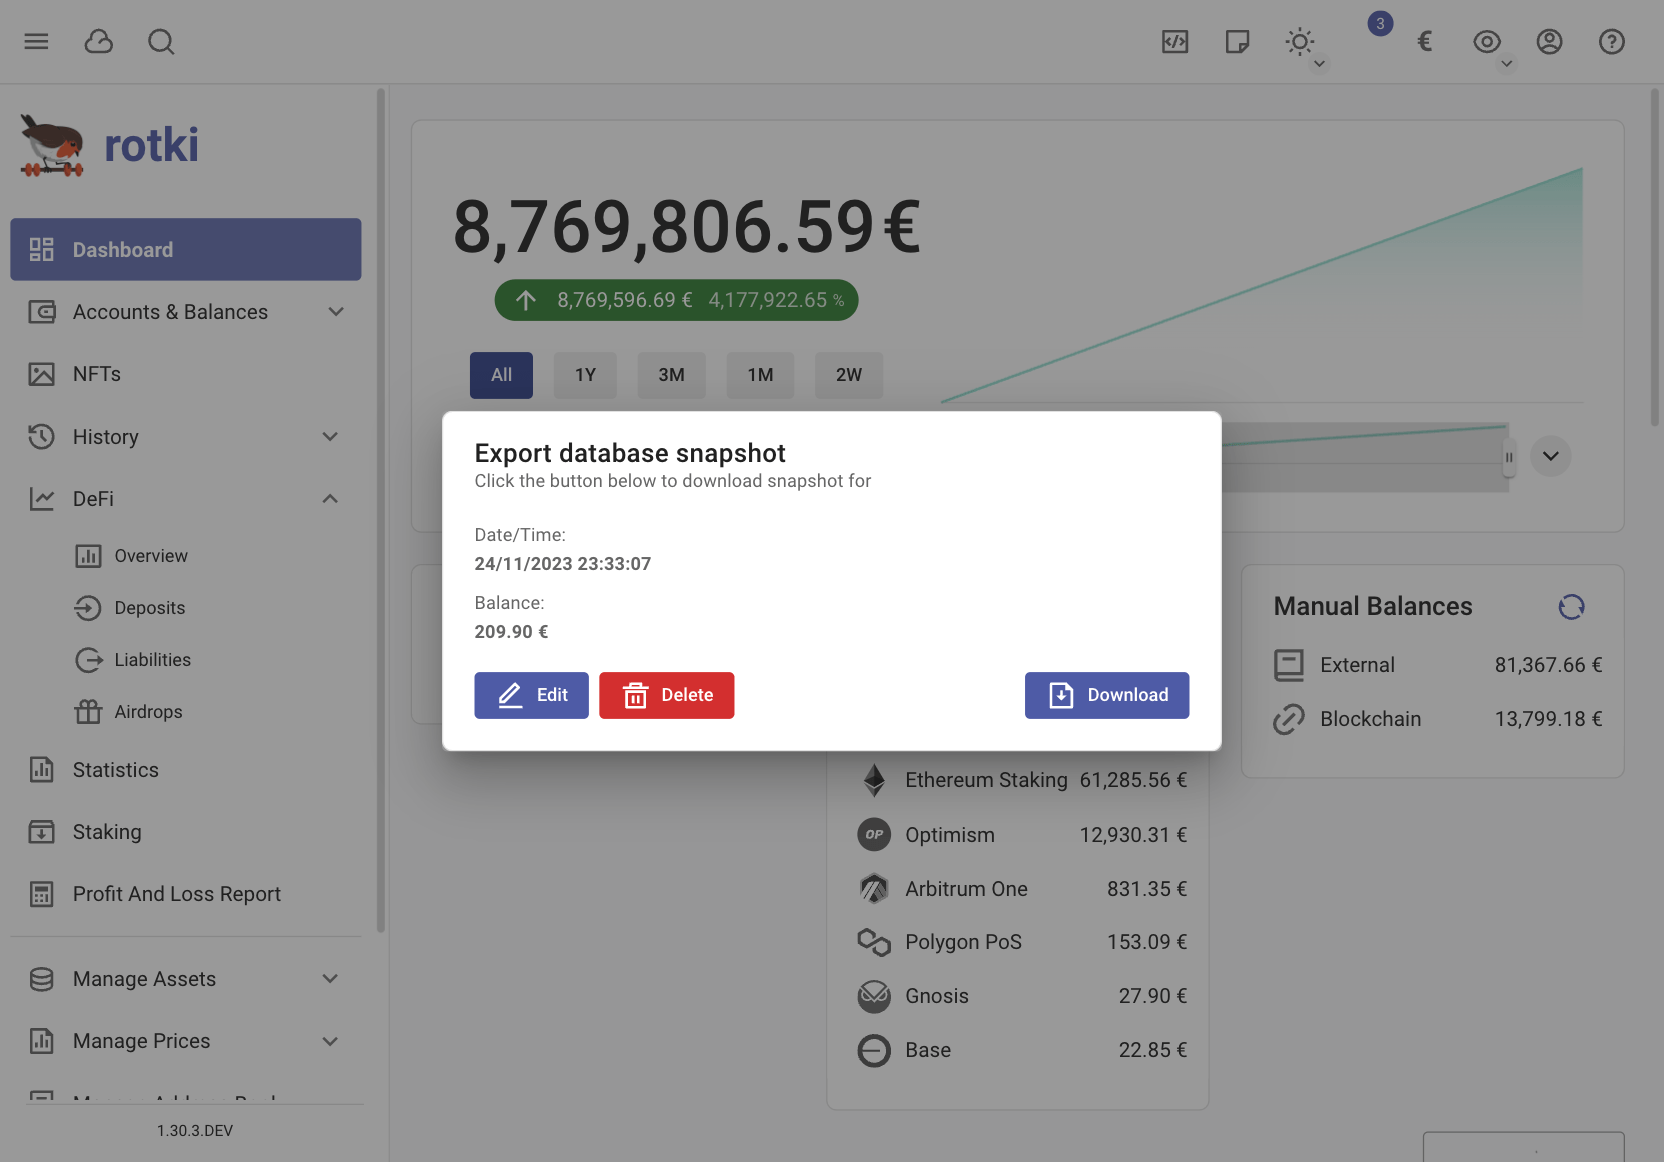
Clicking on delete will remove the saved information for that snapshot. The same menu allows exporting the information of the balance snapshot to an external file. Four files are then generated, two meant to be used if you want to import information about snapshots later and the other 2 have the same information in a human readable format to be used in accounting. balances_snapshot contains information about the balances at the snapshot time for all the different assets rotki knew you had and location_data_snapshot has the value per location for the same assets.
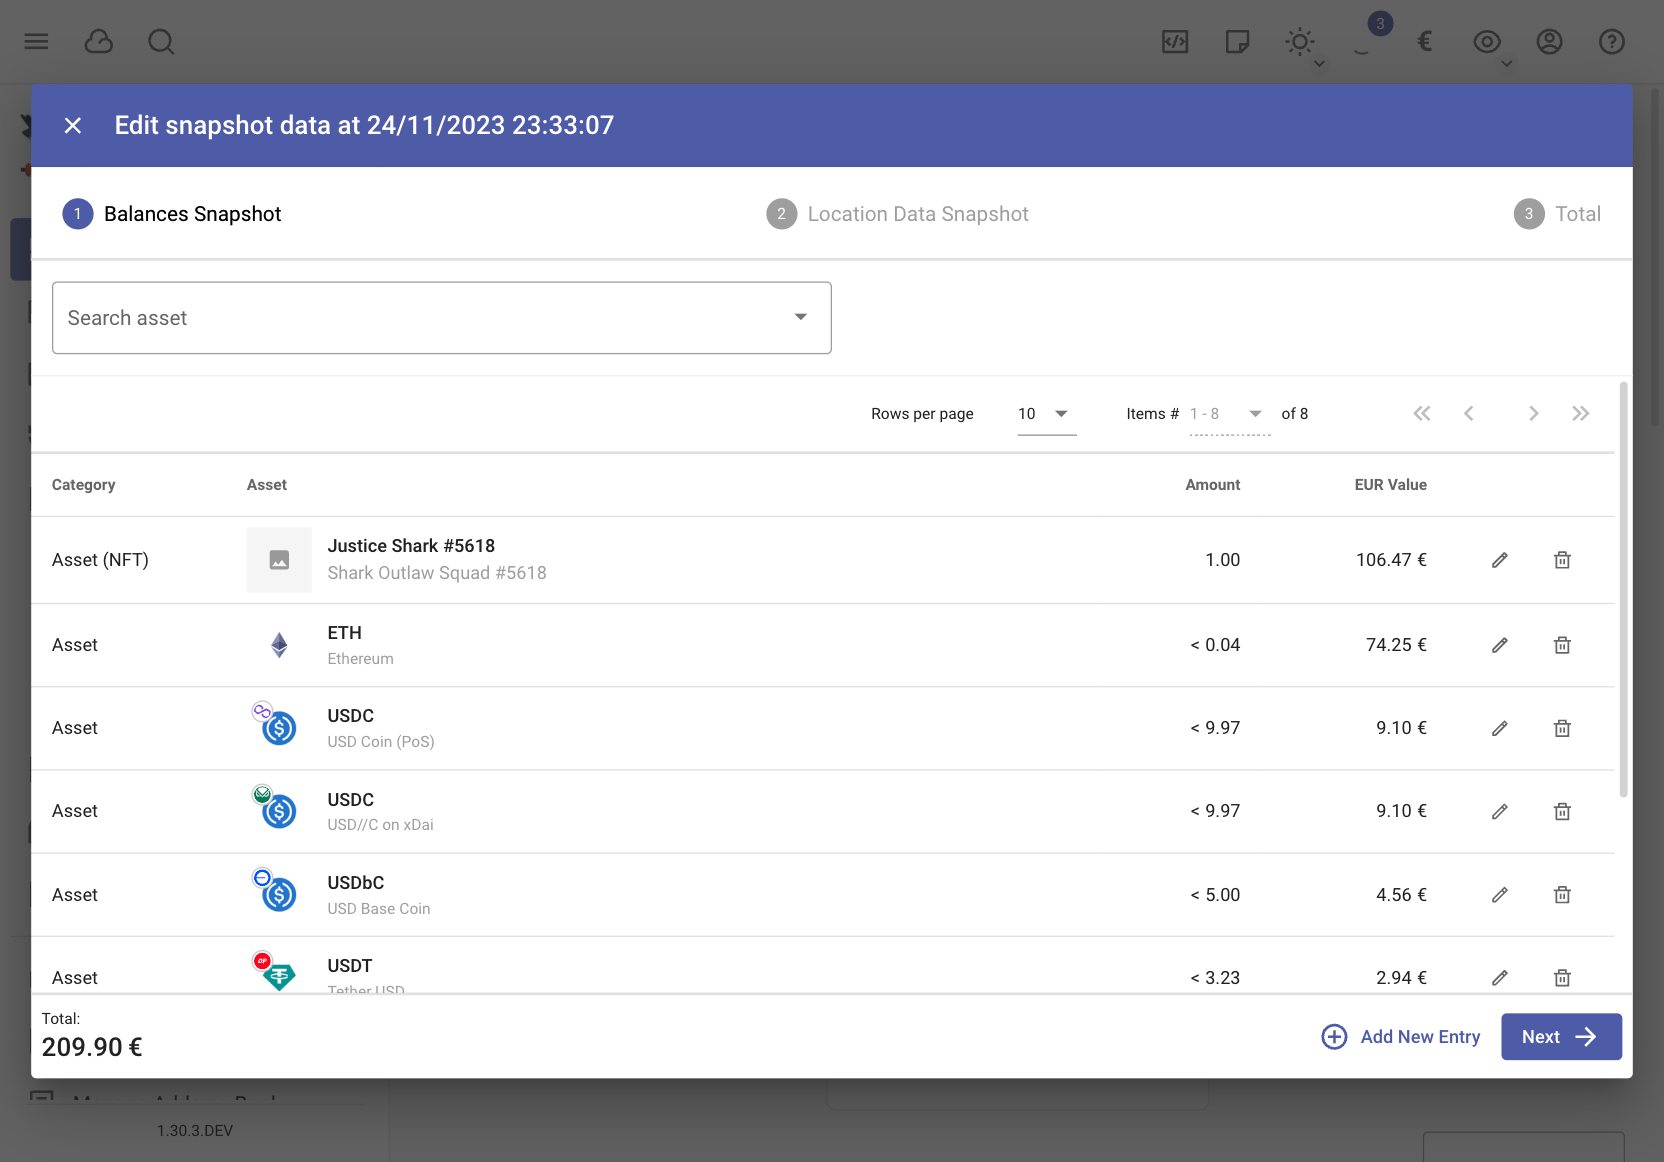
If you choose to edit the snapshot you can modify the values per asset and location as shown in the screenshot
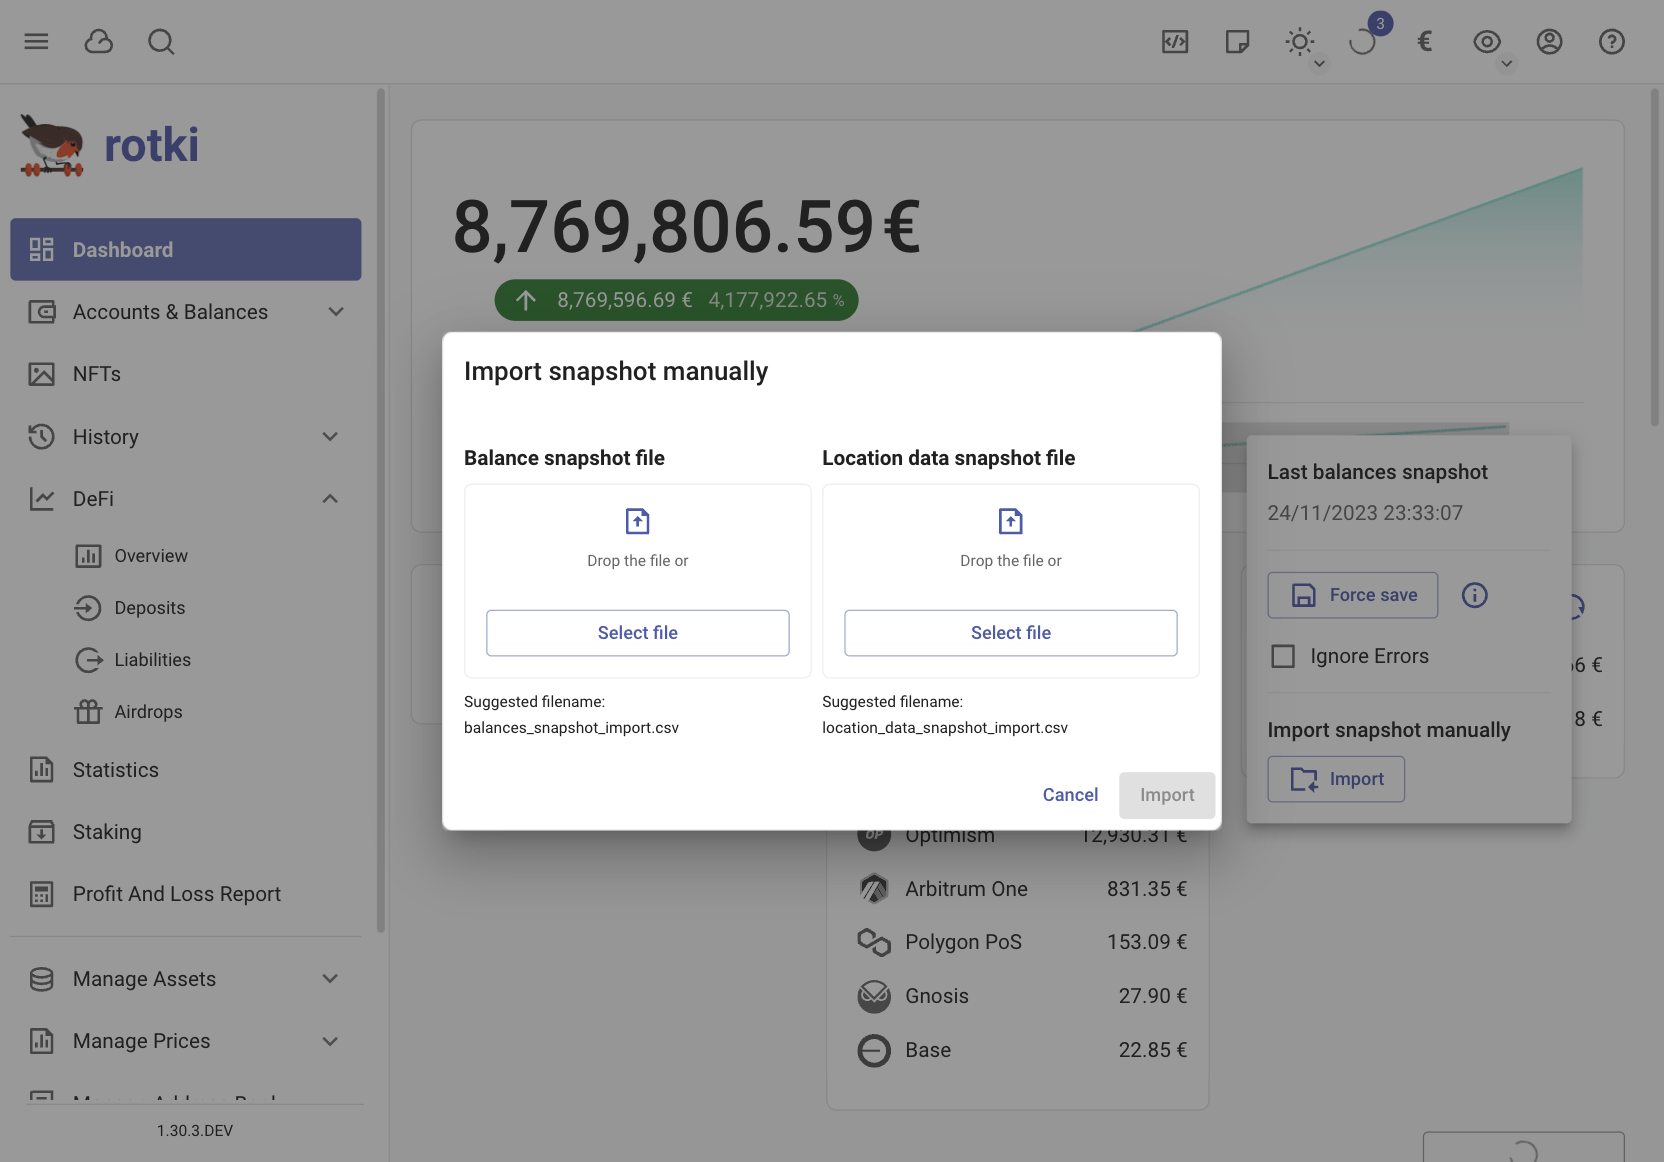
Finally information about snapshots can be imported back into the app using the files you exported with the suffix _import`. To import them use the import functionality by clicking on the Arrow down button near the chart and then click Import.
Historical events
Adding manual trades
Rotki will pull all your trade history from the exchanges whenever it needs it. But most of us have probably also done some OTC trades or taxable events at some point. Such events could even just be mining tokens, depending on your jurisdiction, participating in an ICO or getting paid in crypto.
You can go to this page via .
Clicking on the Add an external trade button will open a menu like the following.
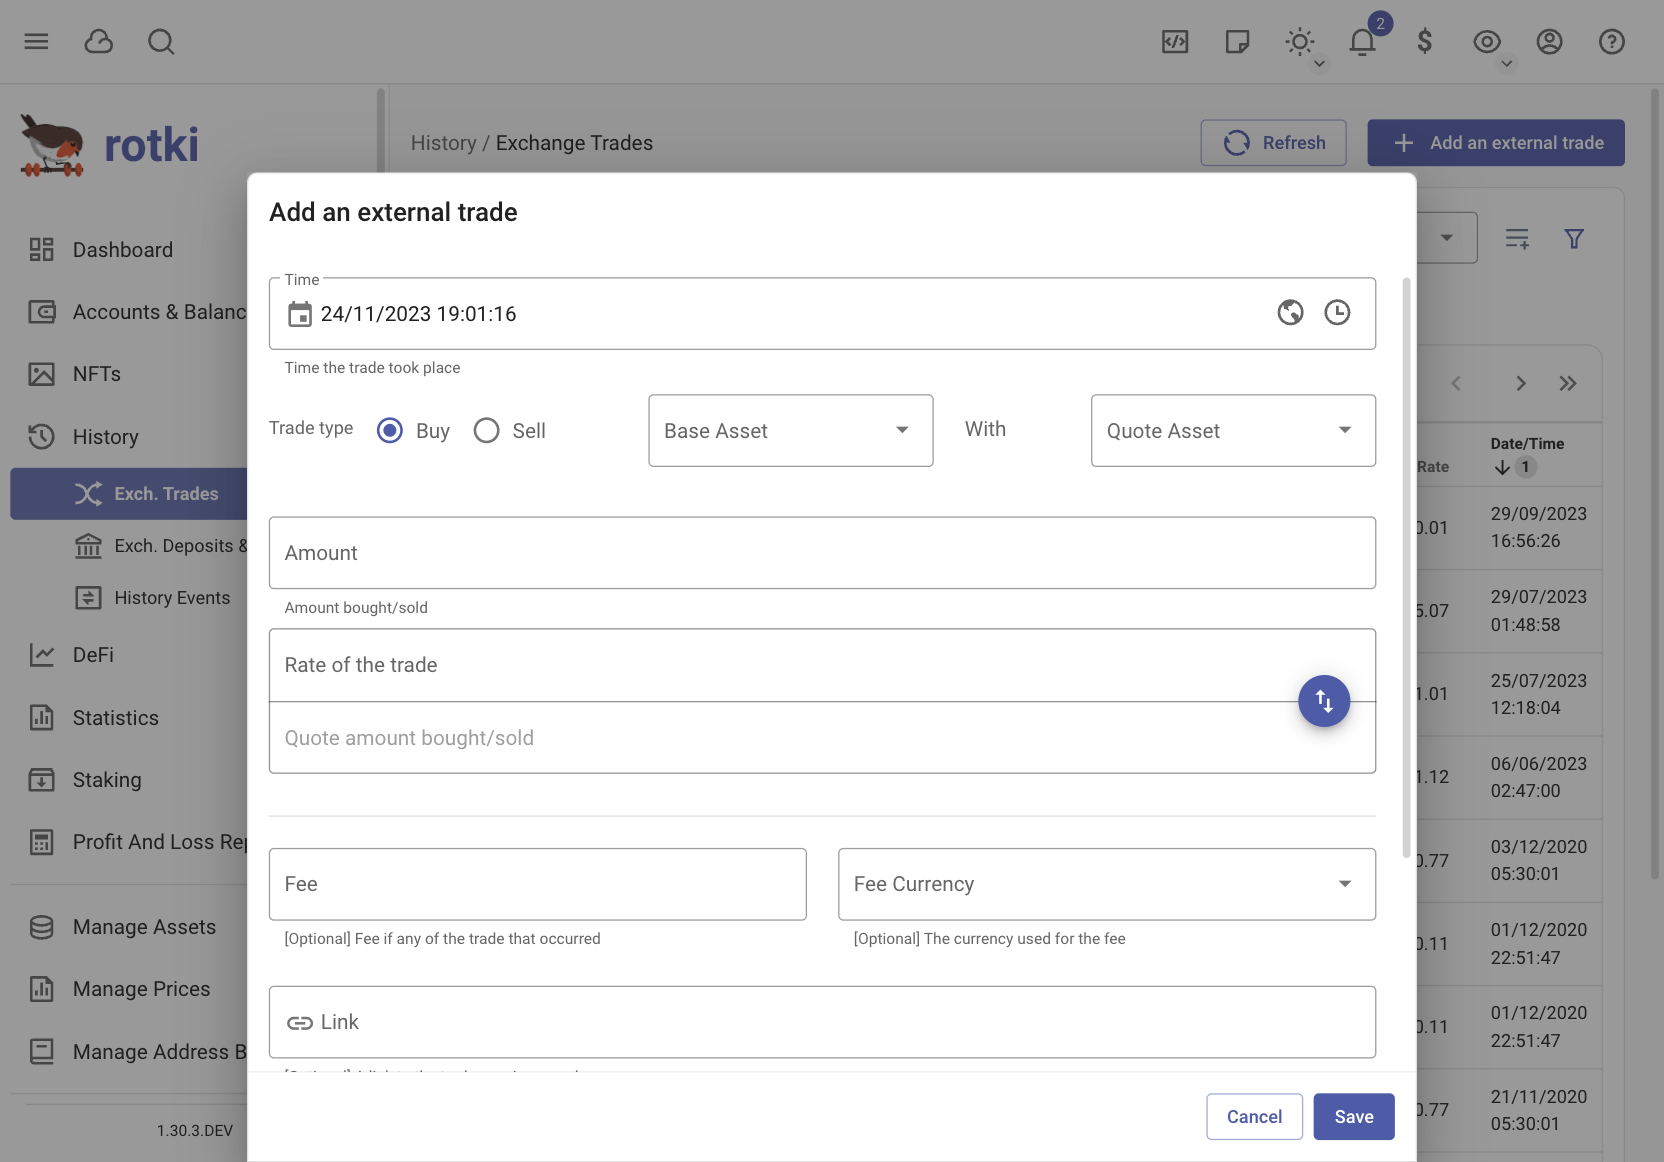
To add a new trade, fill in all the fields and press the “Save” button.
In the amount field you can register the amount of the base asset bought or sold. The rate field represents the rate of quote asset per base asset that was bought or sold. If there was a fee for the trade you should input it in the corresponding box and also enter the currency the fee was paid in. This field is optional so if the Fee was 0 you can leave this field empty. You can optionally provide additional notes or even links to blockchain explorers for each trade.
In the Trades page you can see a table of all your external trades. You can edit or delete a trade by clicking on the appropriate icon at the rightmost part of each trade under the “Actions” column.
Currently rotki tracks your balance by querying the different supported protocols, exchanges and blockchains. If you manually add information about a trade your balances will not be updated since trades are not consulted when updating the accounts’ balances. If you want to manually update your balance for an asset please refer to the manual balances section.
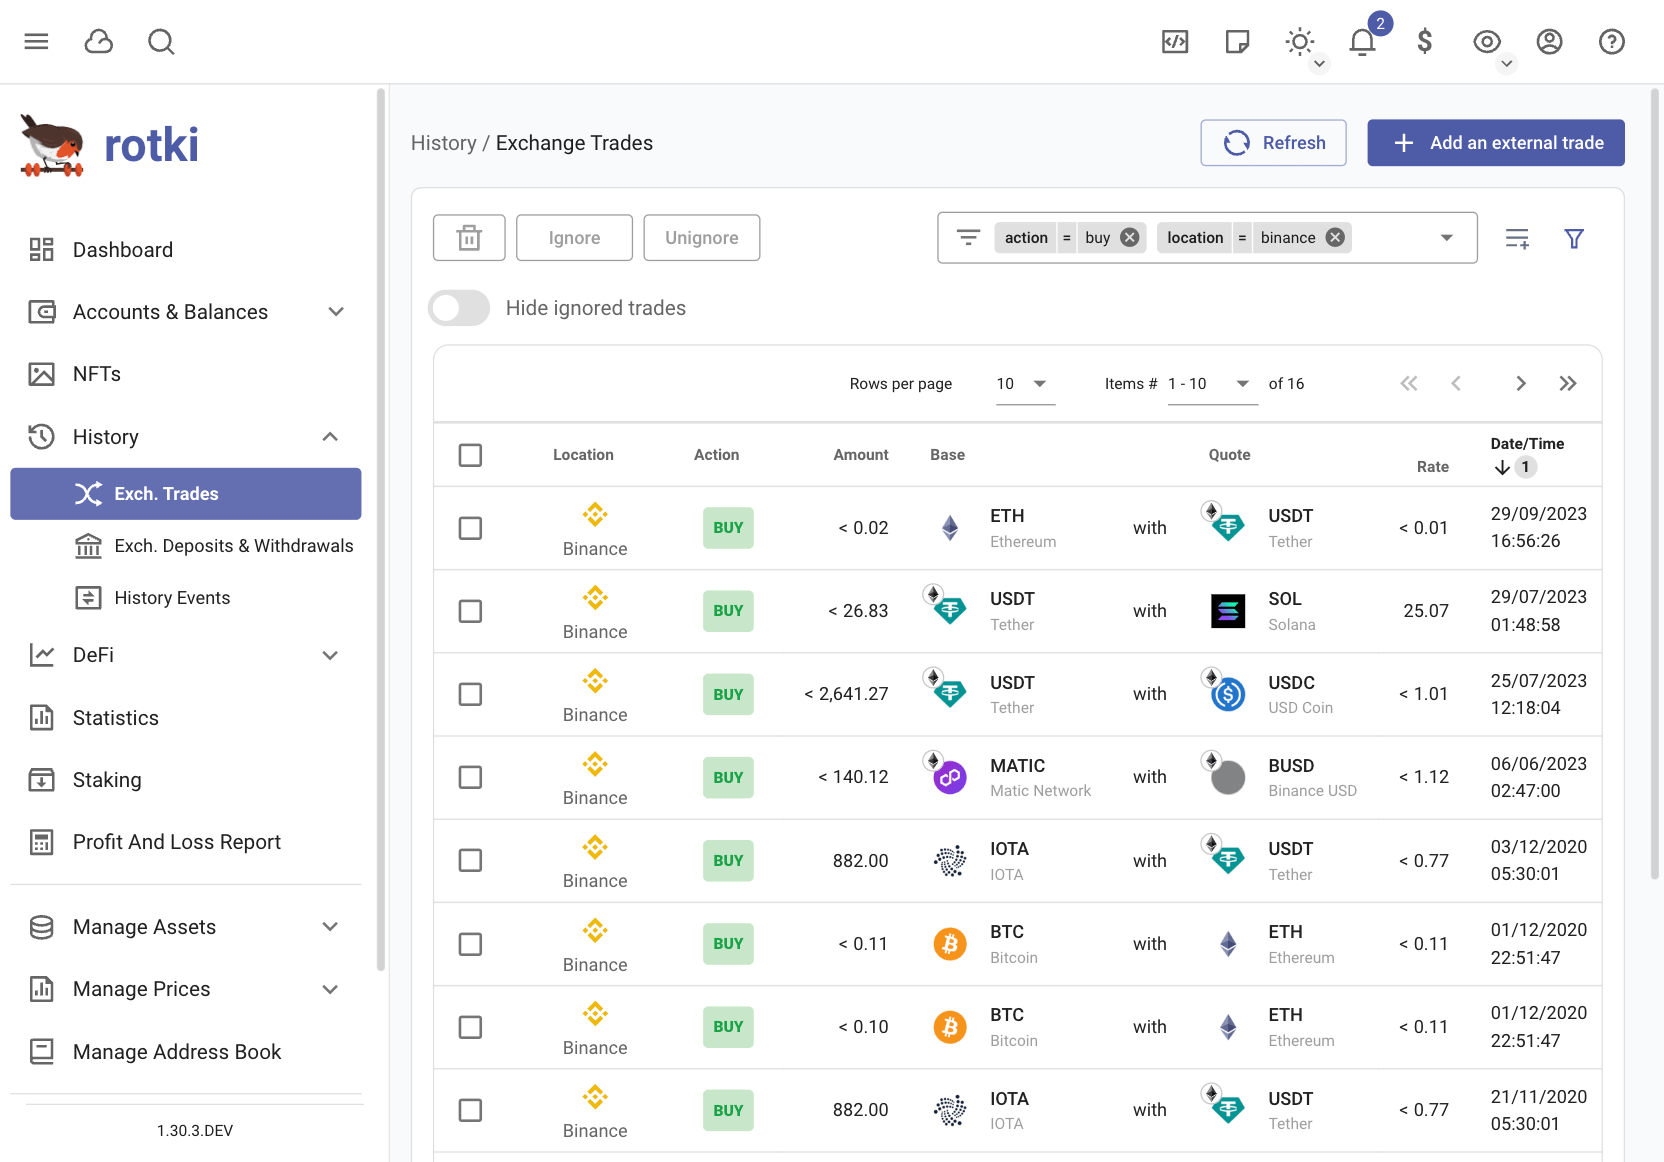
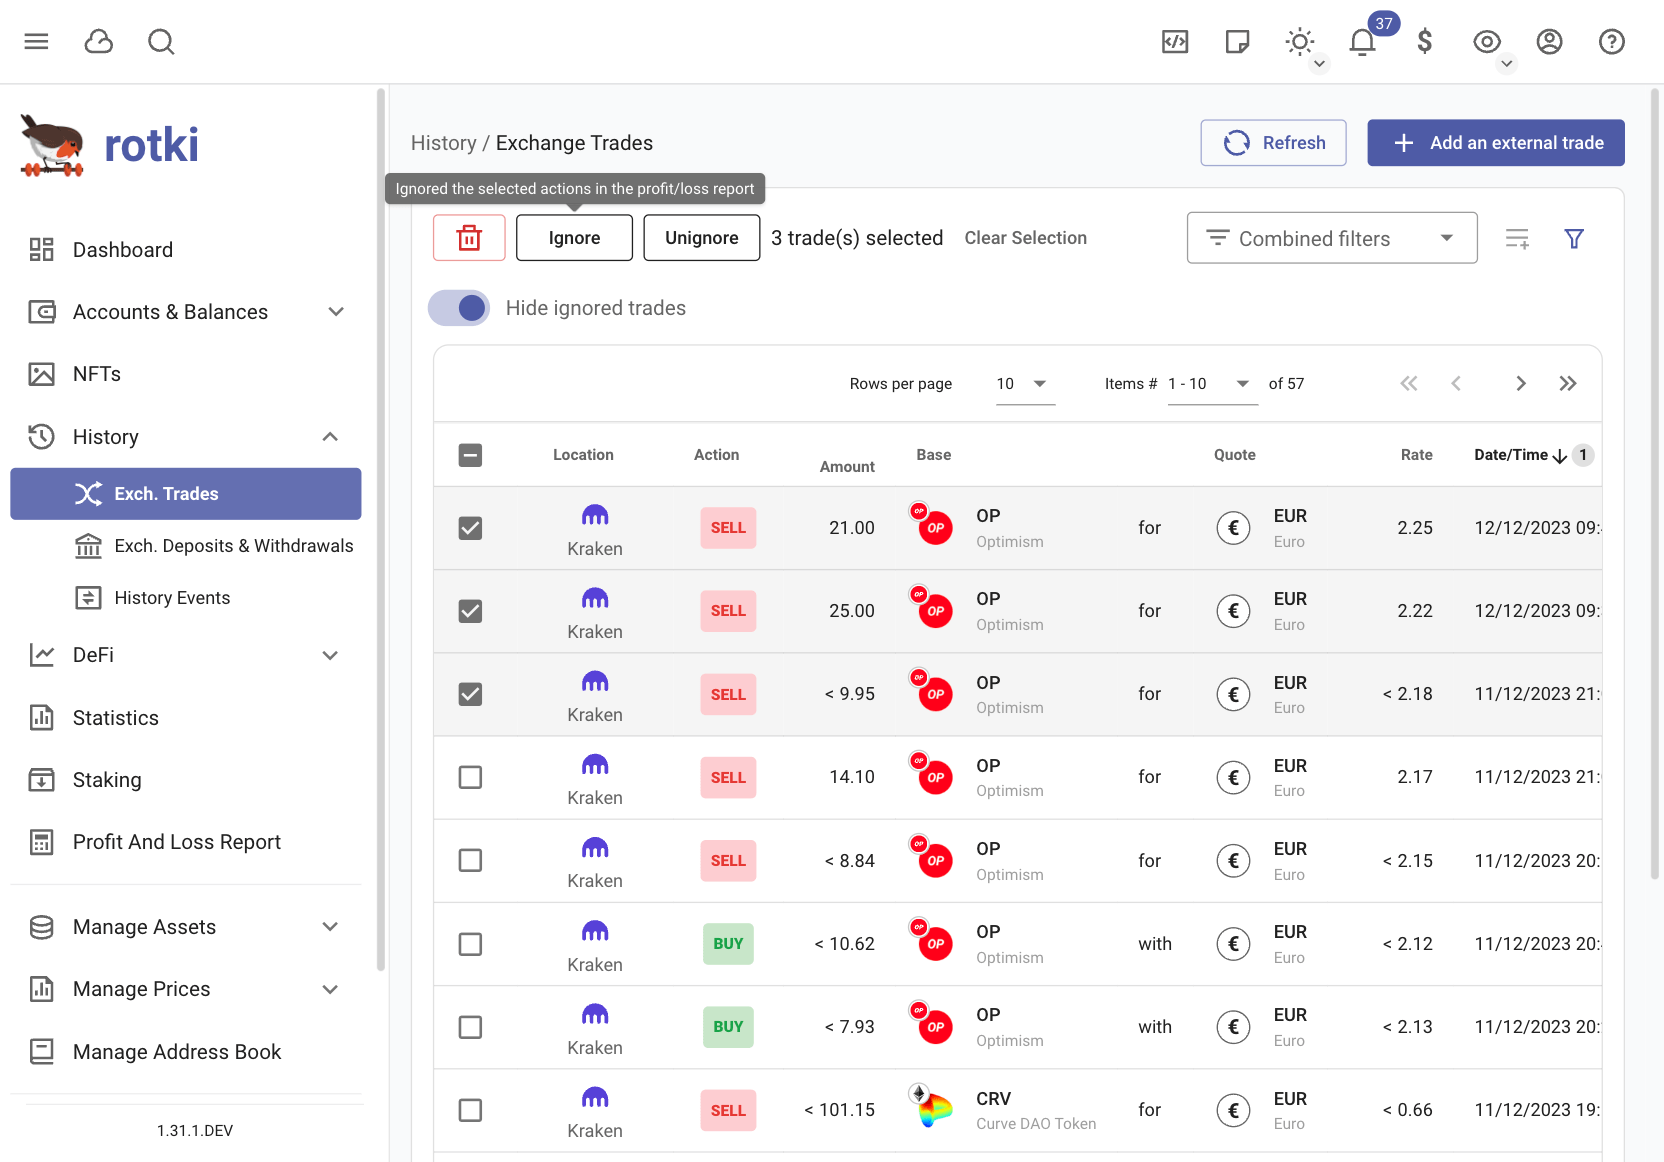
Filtering trades
Rotki supports filtering your trades with a combination of filters. All of the filters are applied at the same time limiting the trades to the ones that satisfy all the applied filters.
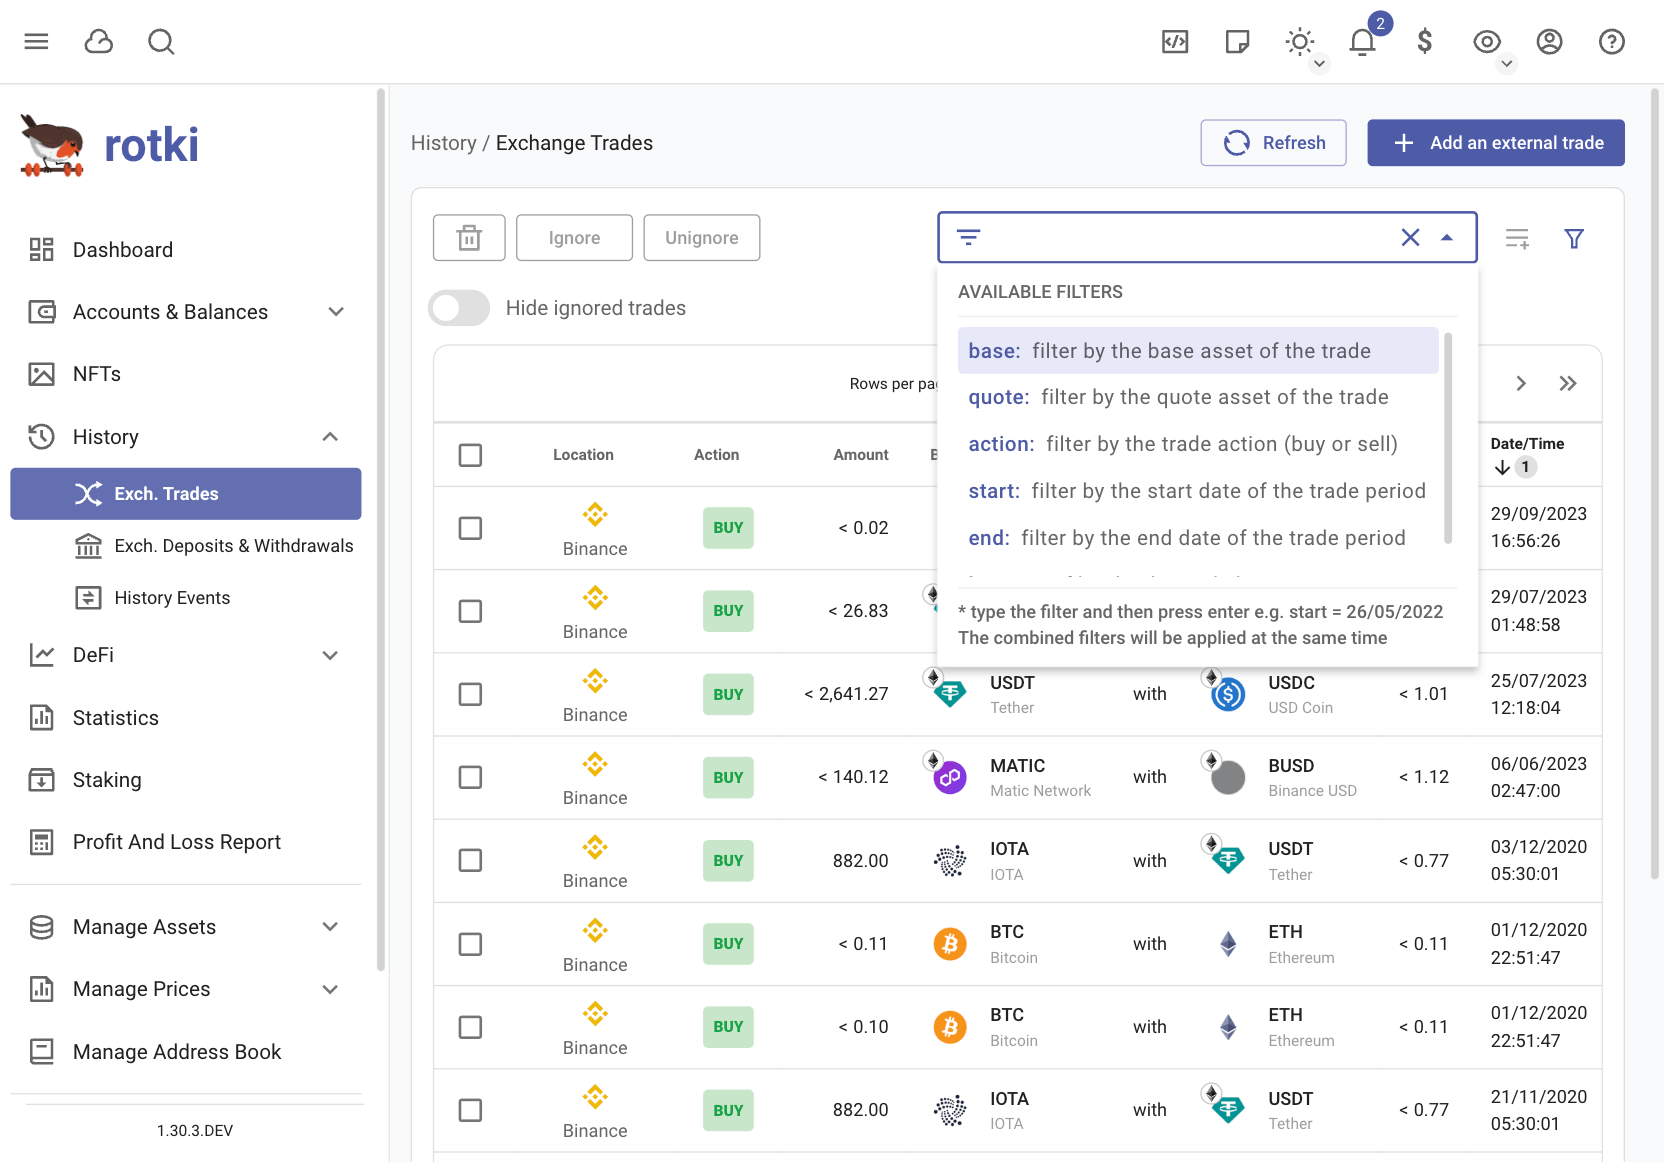
You can filter using the following keys:
base: the base asset of the trades [1].
quote: the quote asset of the trades [1].
action: it can be buy or sell [2].
start: will only filter any trades from that date onwards [2].
end: will only filter any trades that happened before the selected date [2].
location: the location of the trade, e.g. kraken, uniswap etc [1].
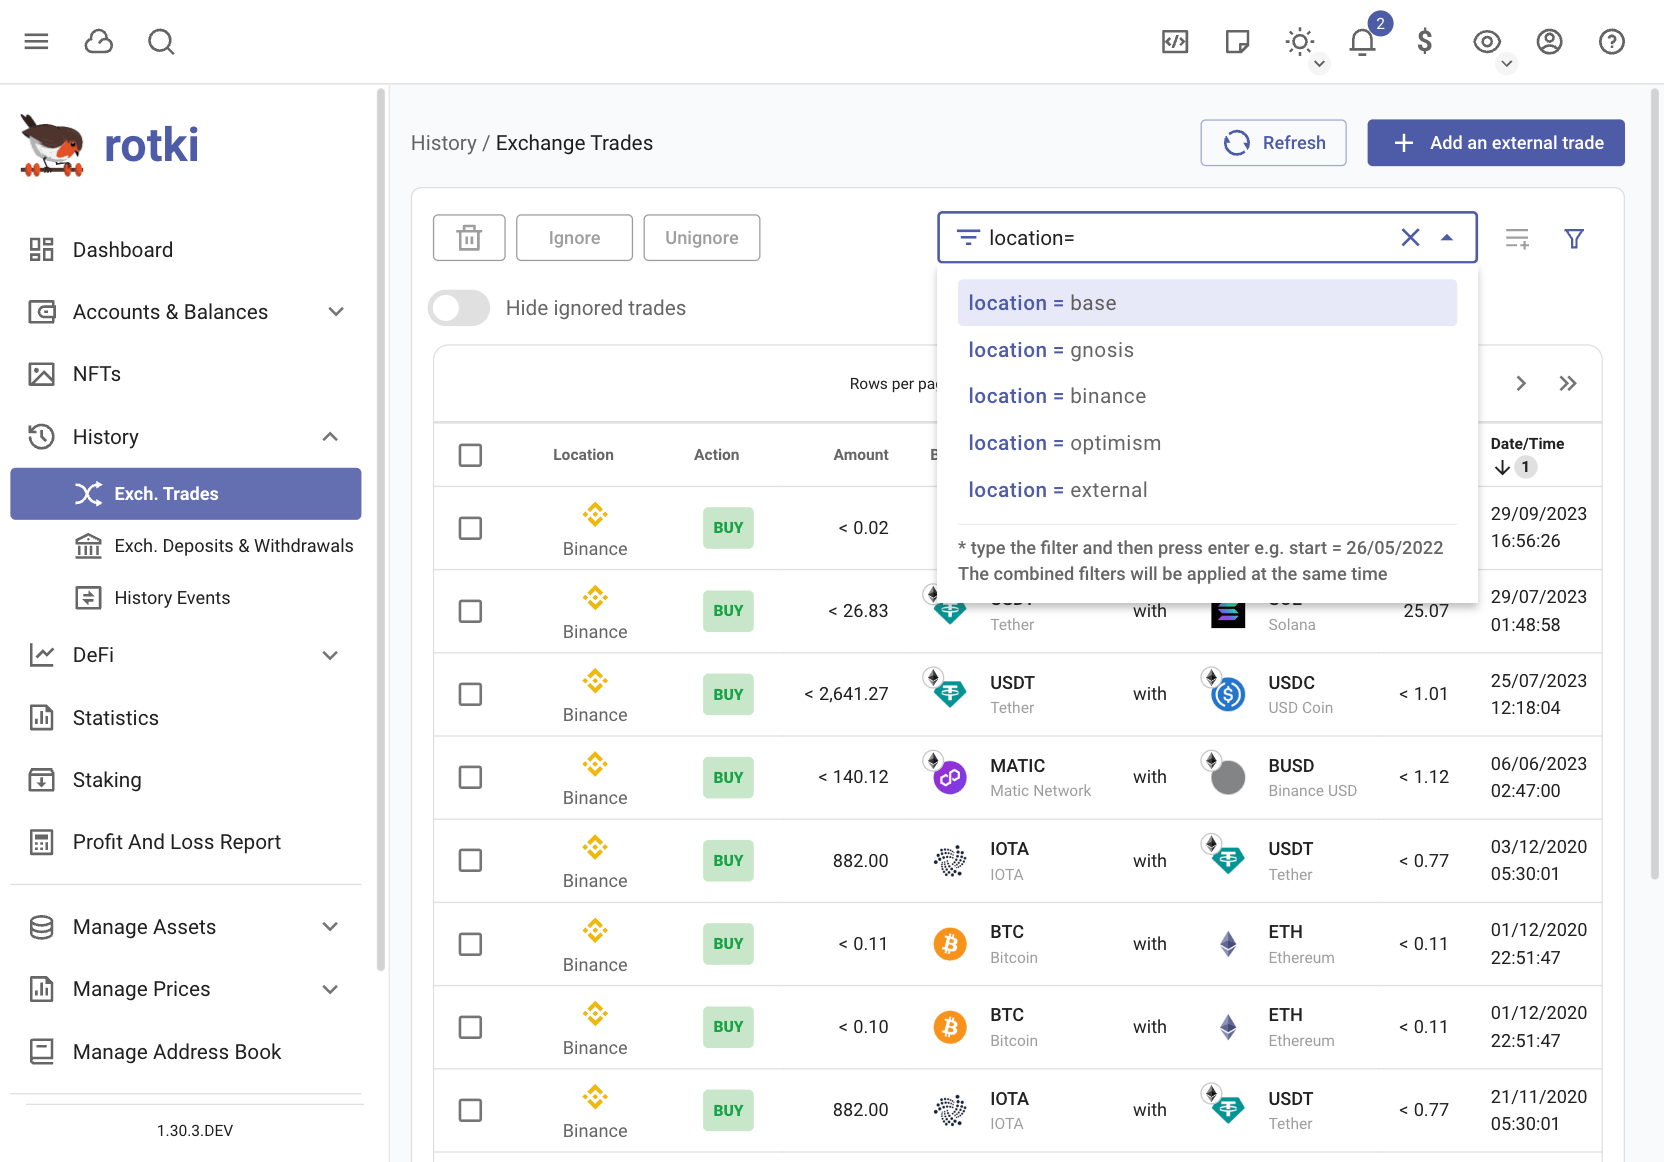
When selecting a filter, by clicking or typing the filter you will get some suggestions based on the available data.
When a suggestion appears you can navigate to the next available suggestion using the tab button or you can also change the select suggestion using the up/down arrows in your keyboard. You can submit the selected filter by pressing enter.
After adding your filters you can press enter to close the menu.
By default, all trades will be processed in accounting, but you can ignore unwanted trades, so they won’t be processed.
You can select the checkbox on the left part of each entry and click Ignore/Unignore.
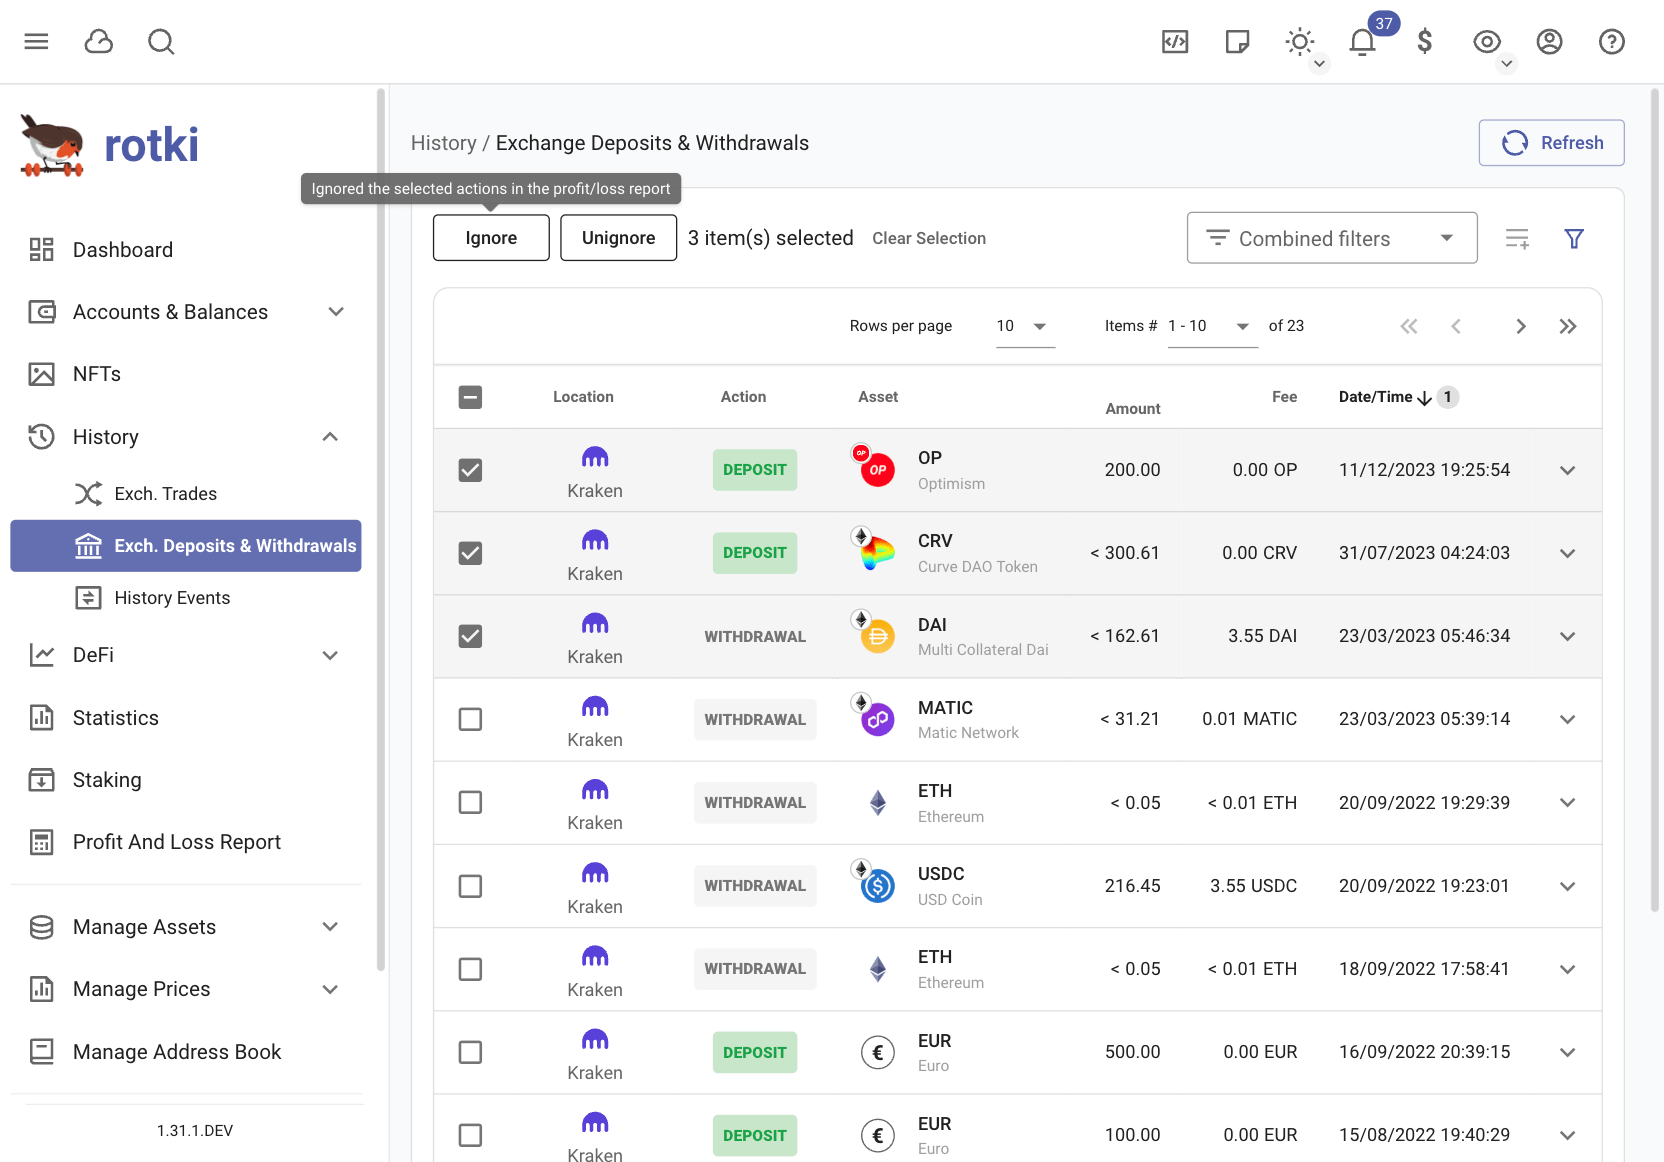
Filtering deposits & withdrawals
You can filter your deposits and withdrawals in the same way you can filter your trades.
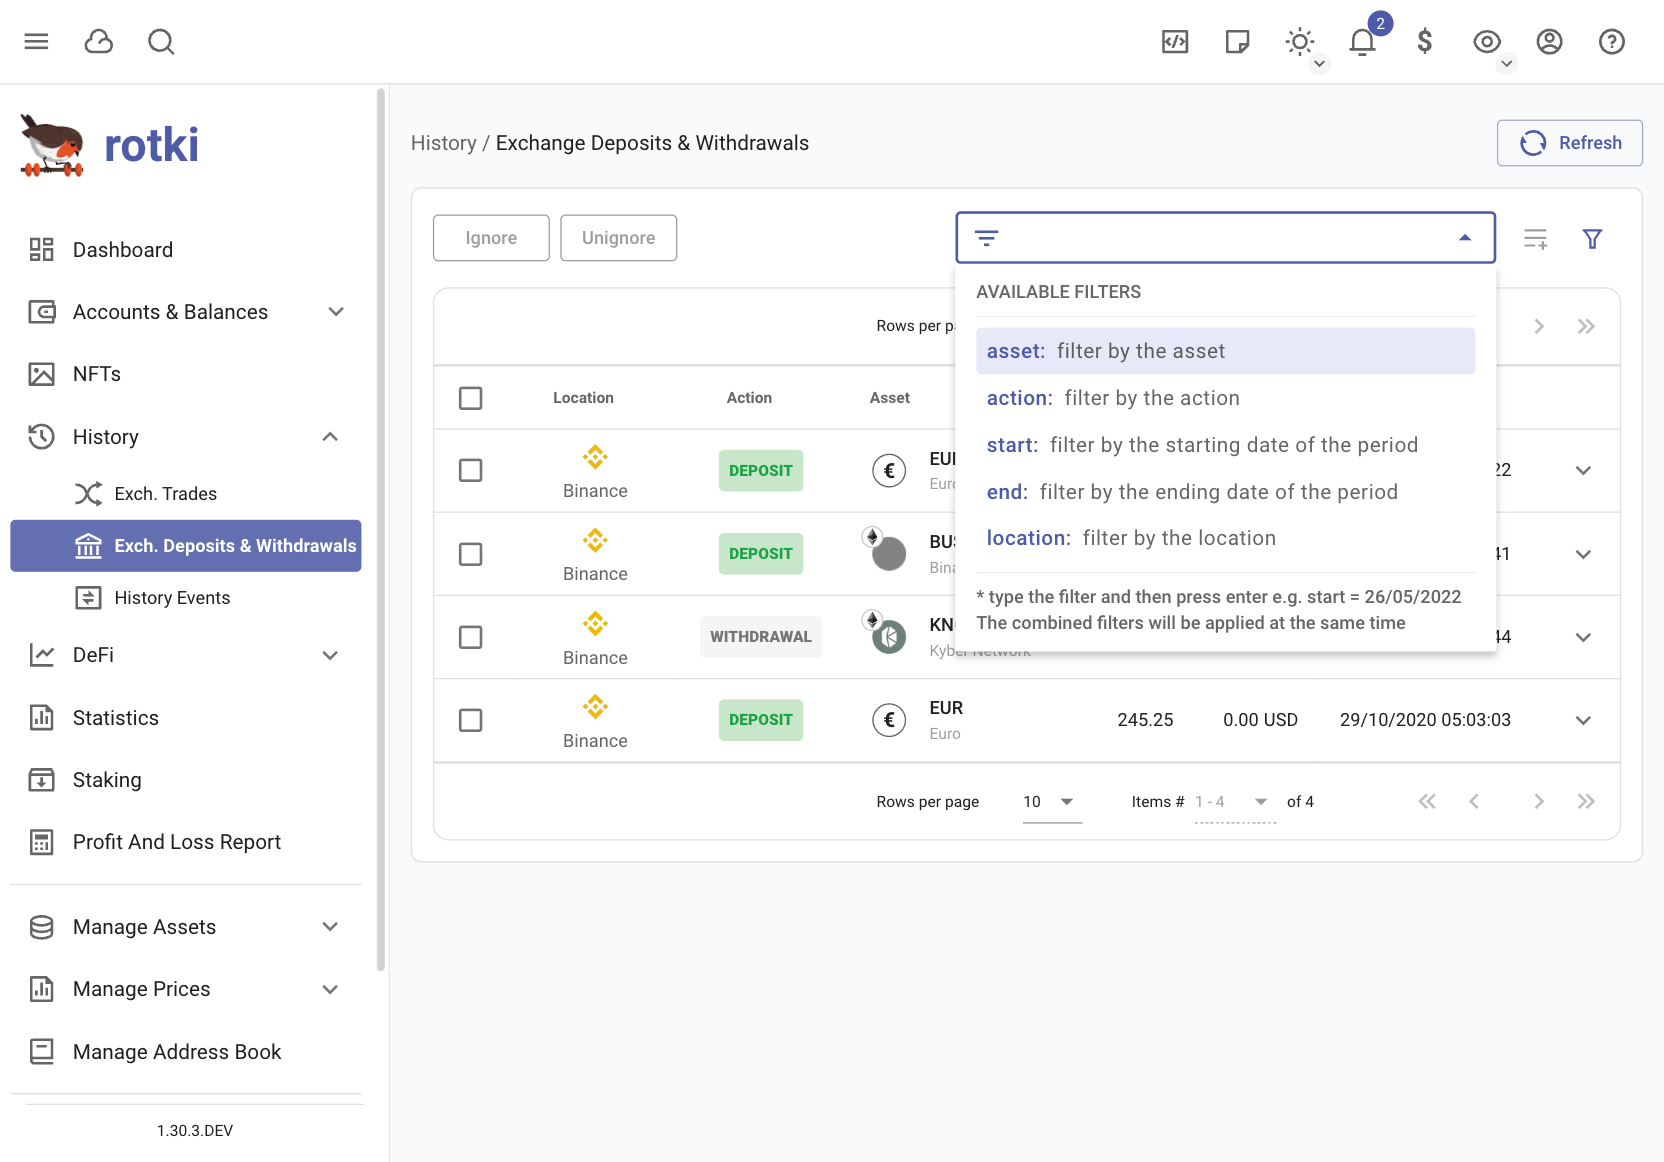
For deposits you can use the following filters:
asset: the asset that was deposited or withdrawn [1].
action: the actions (withdrawal or deposit) [1].
start: will only filter any trades from that date onwards [2].
end: will only filter any trades that happened before the selected date [2].
location: the location of the trade, e.g. kraken, uniswap etc [1].
By default, all deposits/withdrawals will be processed in accounting, but you can ignore unwanted deposit/withdrawals, so they won’t be processed.
You can select the checkbox on the left part of each entry and click Ignore/Unignore.
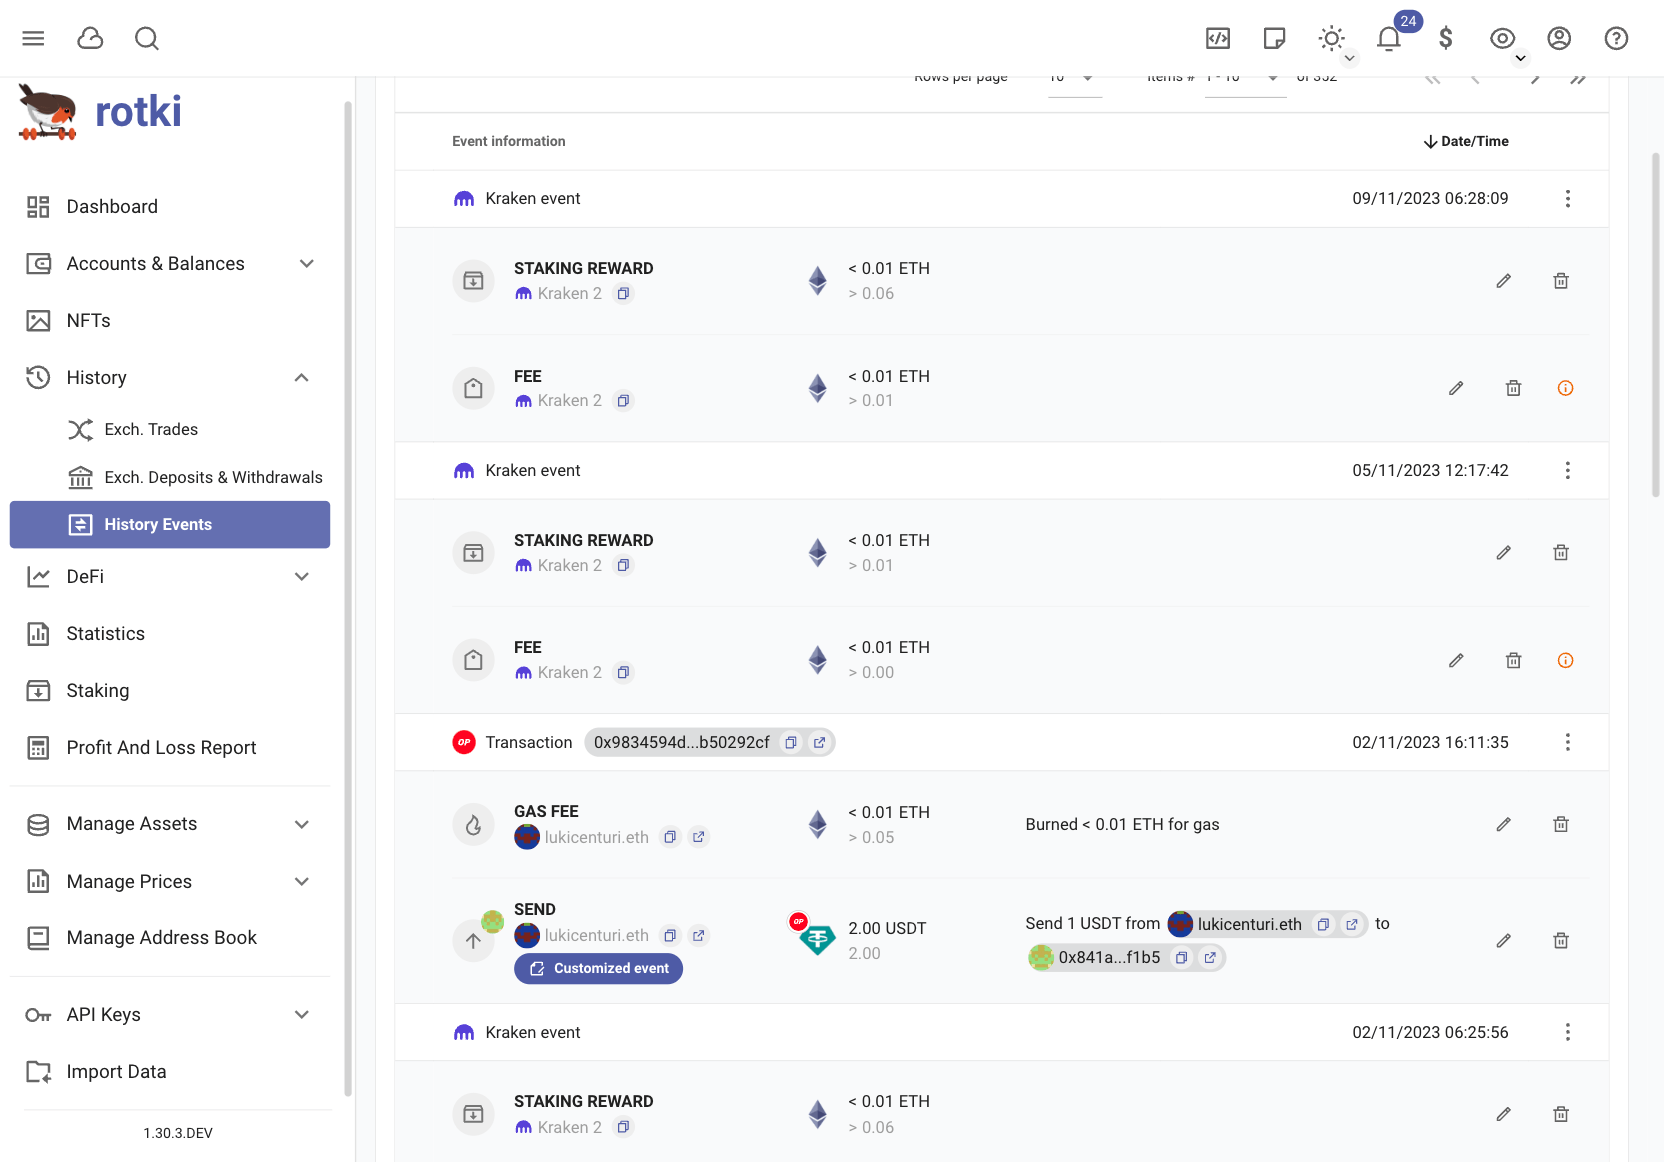
History events
Rotki is capable of pulling and decoding a bunch of different events, ranging from EVM chain transactions to exchanges events and more. When you visit the History Events section the process to obtain all the information will start. You will be able to check the status in an informative breakdown per blockchain address. Free users are limited to a number of latest events.
History events can be filtered if you have a premium subscription activated. You can filter by:
Account (a tracked blockchain address)
Time range
Asset involved in the transaction
Protocol that interacted in the transaction
Location of the event (ethereum, optimism, kraken, etc.)
Event type (deposit, withdrawal, etc.)
Event sub type (fee, spend, etc.)
Entry type (EVM event, ETH block event, etc.)
Counterparty address
Tx hash of a particular transaction that you want to check
Index of an eth2 validator that you want to see events for
Only show customized events
… more
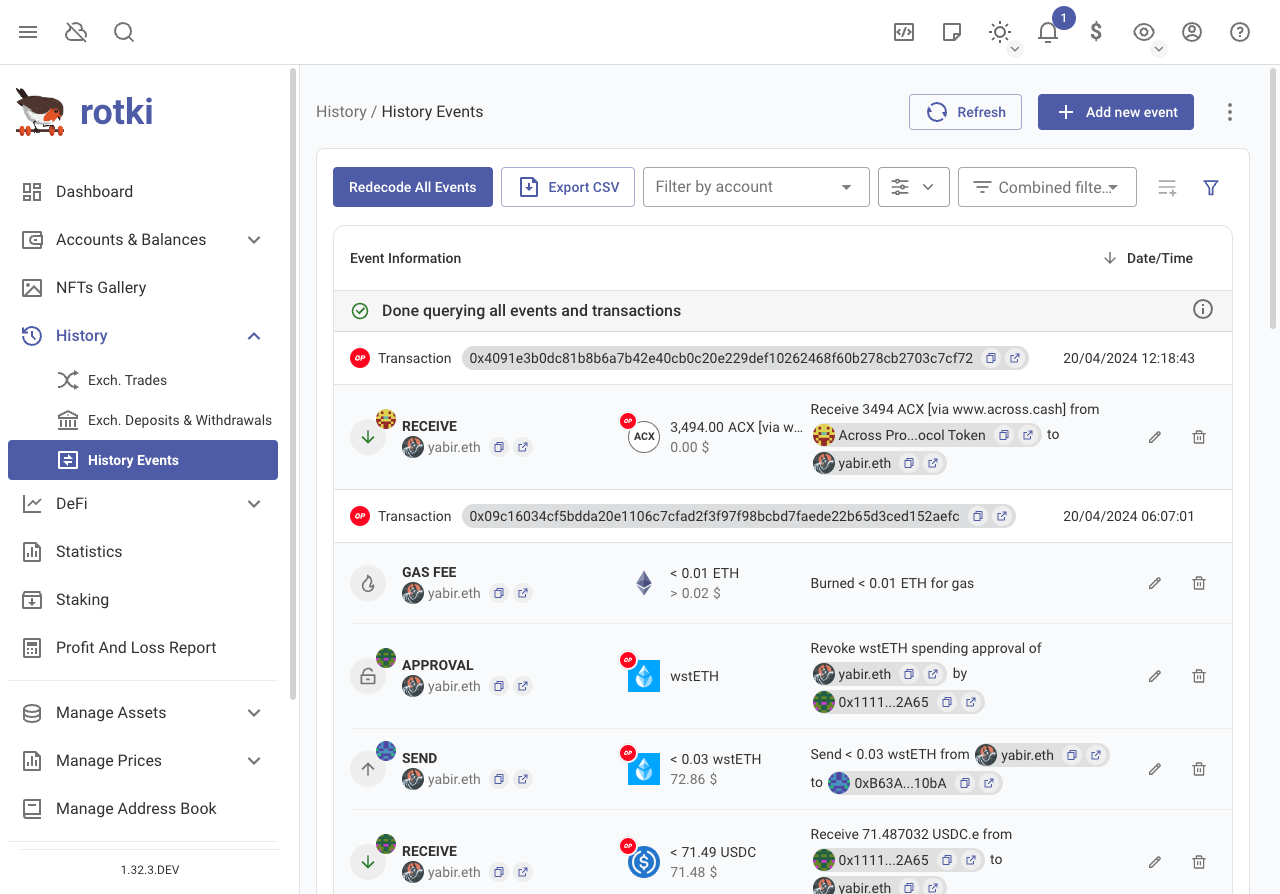
By default, all events will be processed in accounting, but you can ignore unwanted events, so they won’t be processed. You can click on the three dots to display the options for the group of events, and click Ignore events in accounting/Unignore events in accounting.
Events can be exported as CSV, click on Export CSV button and accept prompt to download exported events.

It is possible that you need to redecode events for an evm transaction. To do that you have two options. The first of them is to click on the three dots to display the options for an EVM transaction and click on Redecode events. This will start the process to read the transaction’s events again and try to understand what happened in them.
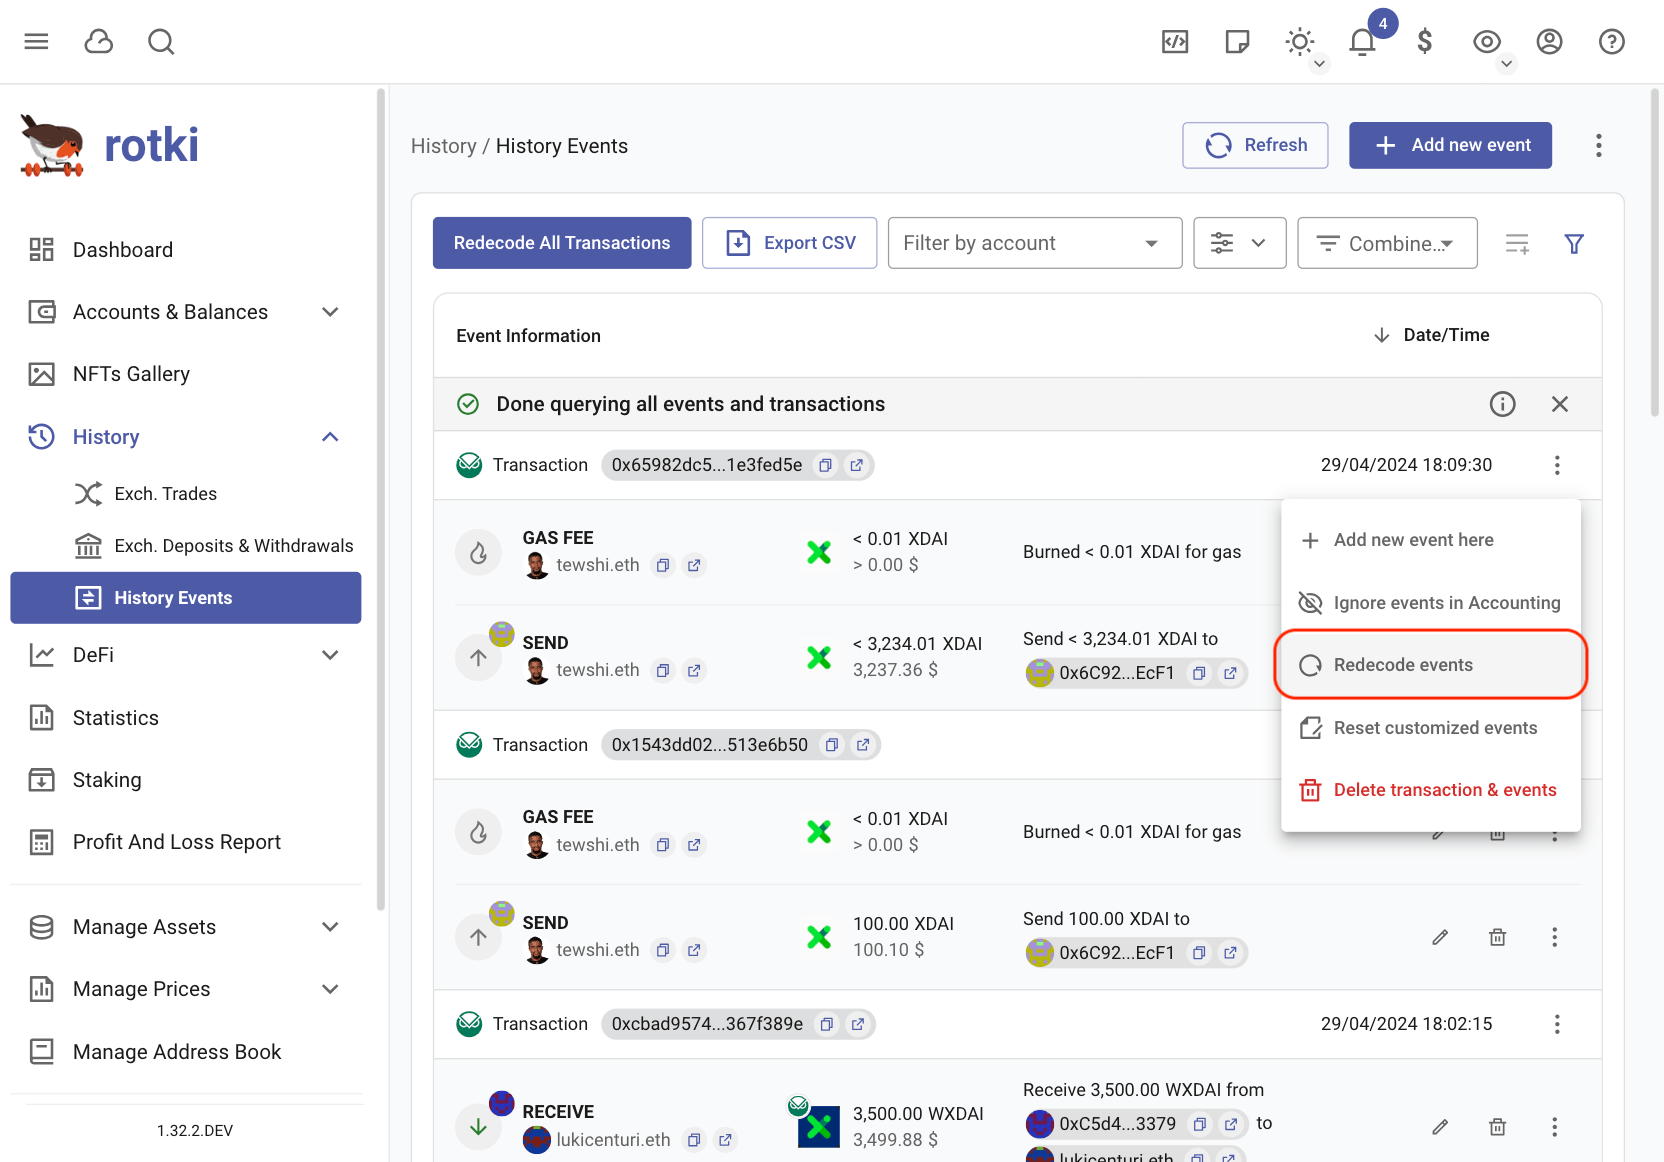
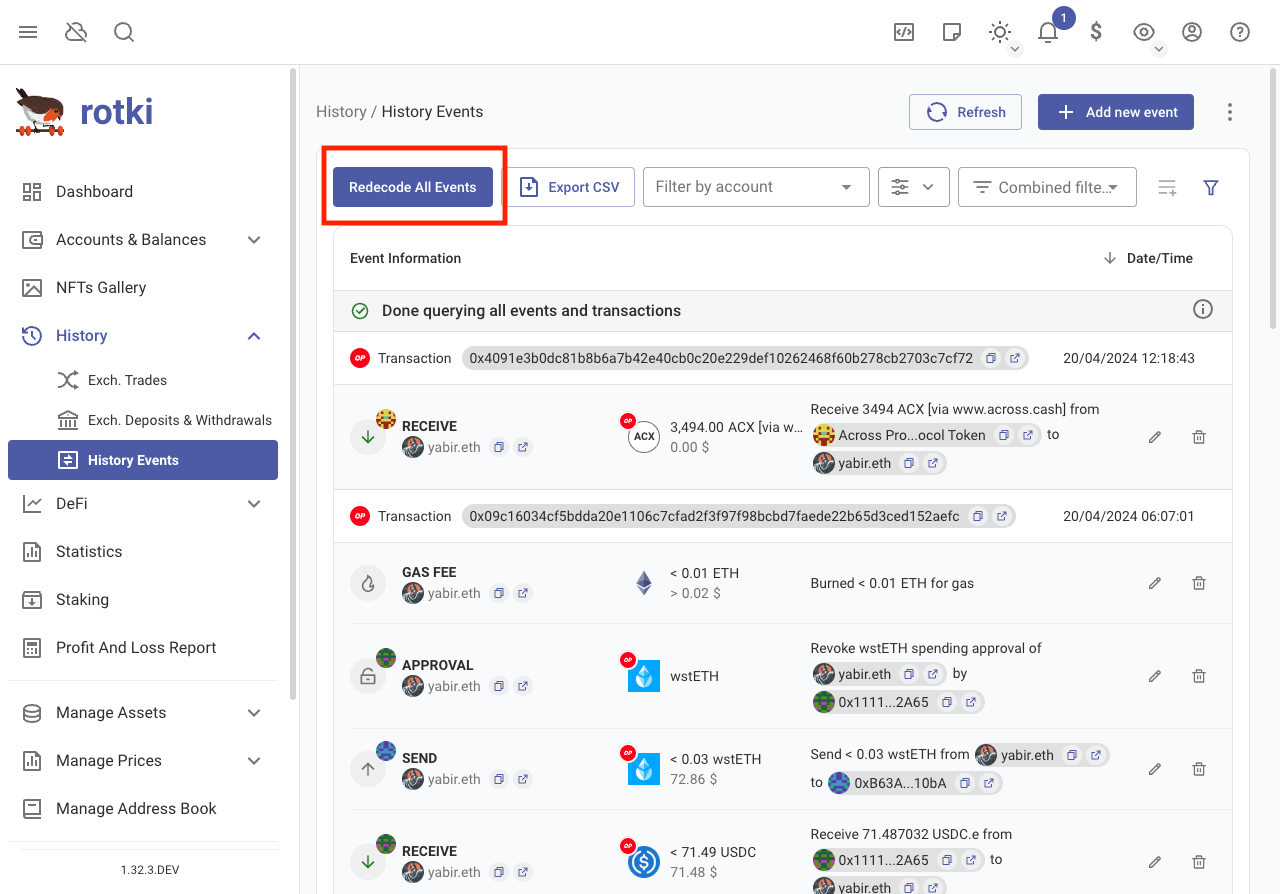
The second option is to redecode all EVM transactions that have been queried. To do so you need to click on the three dots at the top of the page, and choose Redecode EVM Events
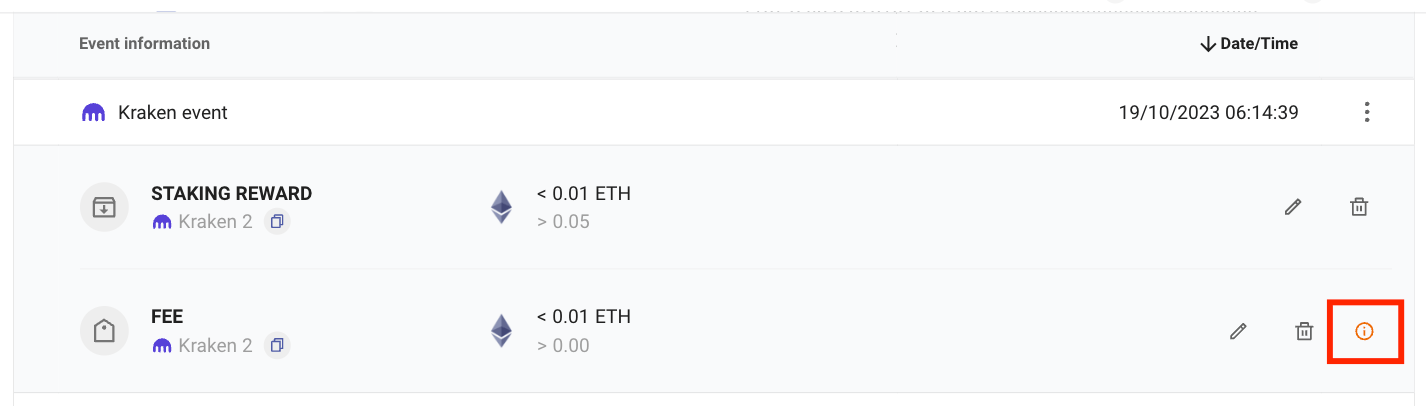
If you see this warning button, it means the event won’t be processed correctly in accounting. It could be due to improper decoding or a missing accounting rule for that event. You can fix it by editing the event or adding the missing accounting rule. You can also edit the events if they have special meaning to you, such as OTC trades or transfers between accounts.
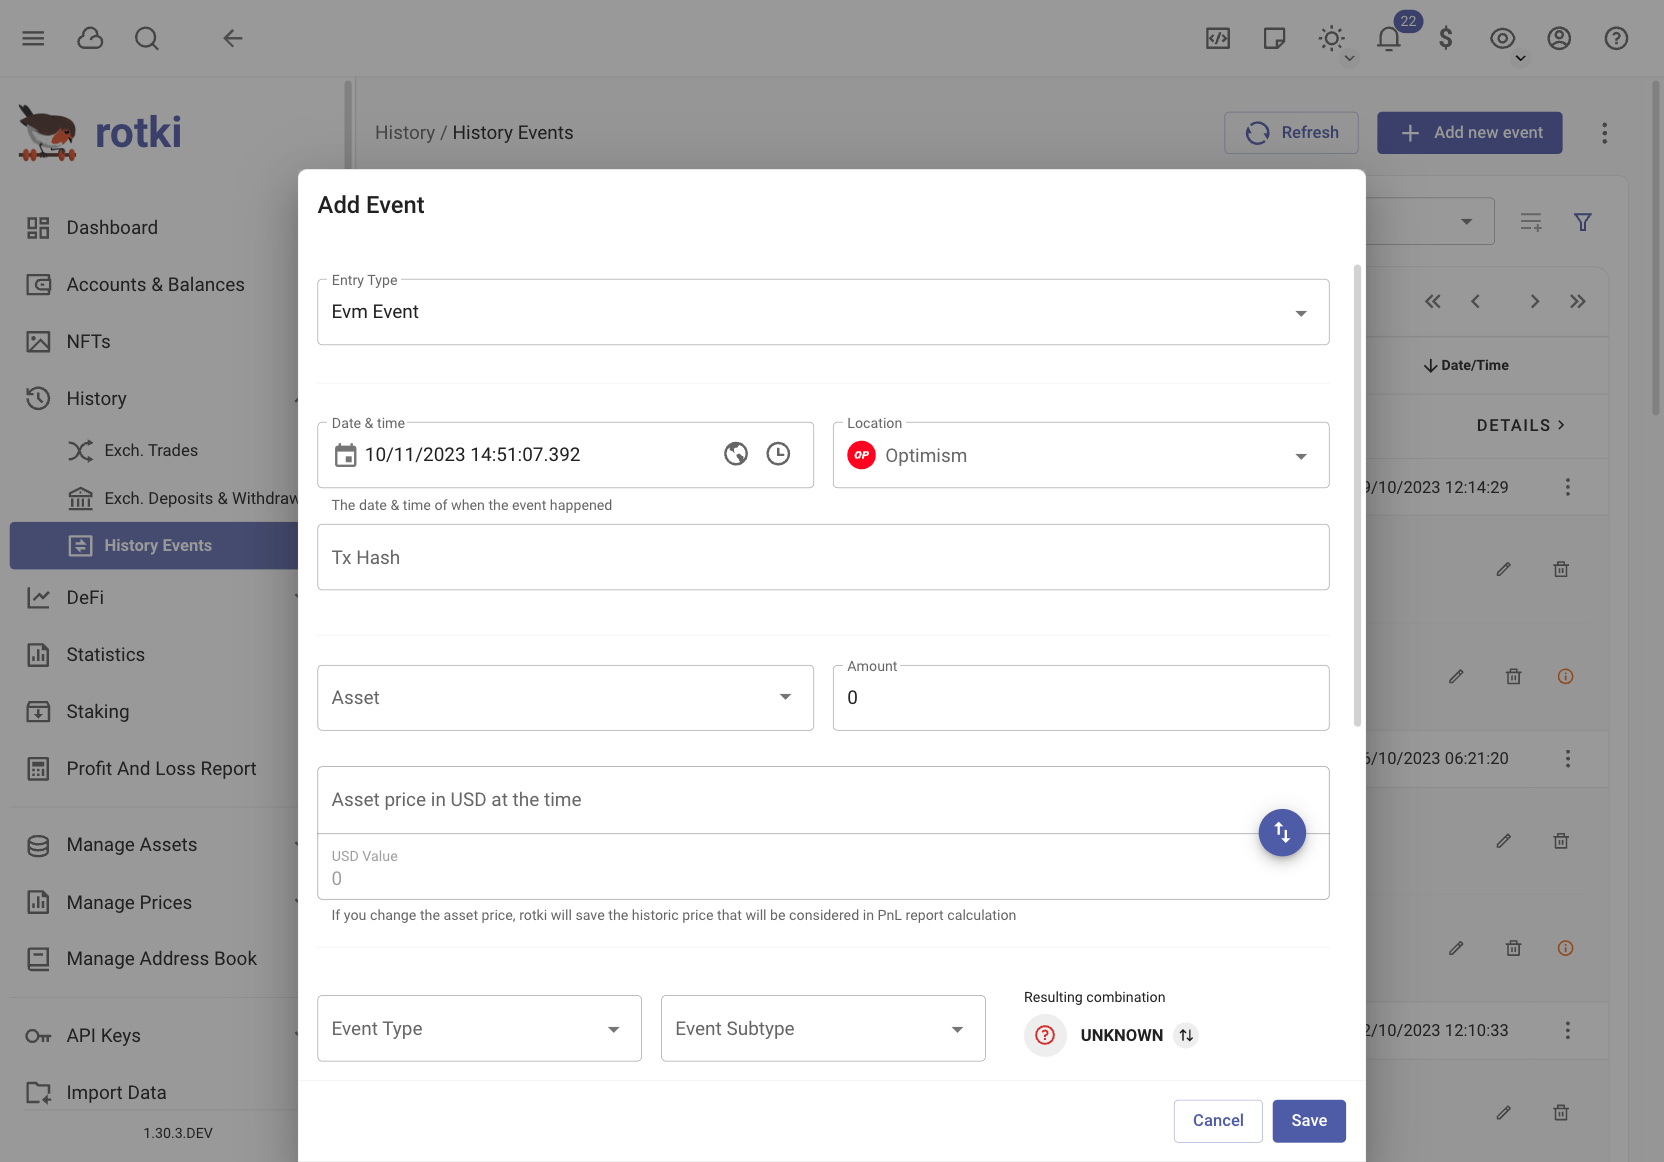
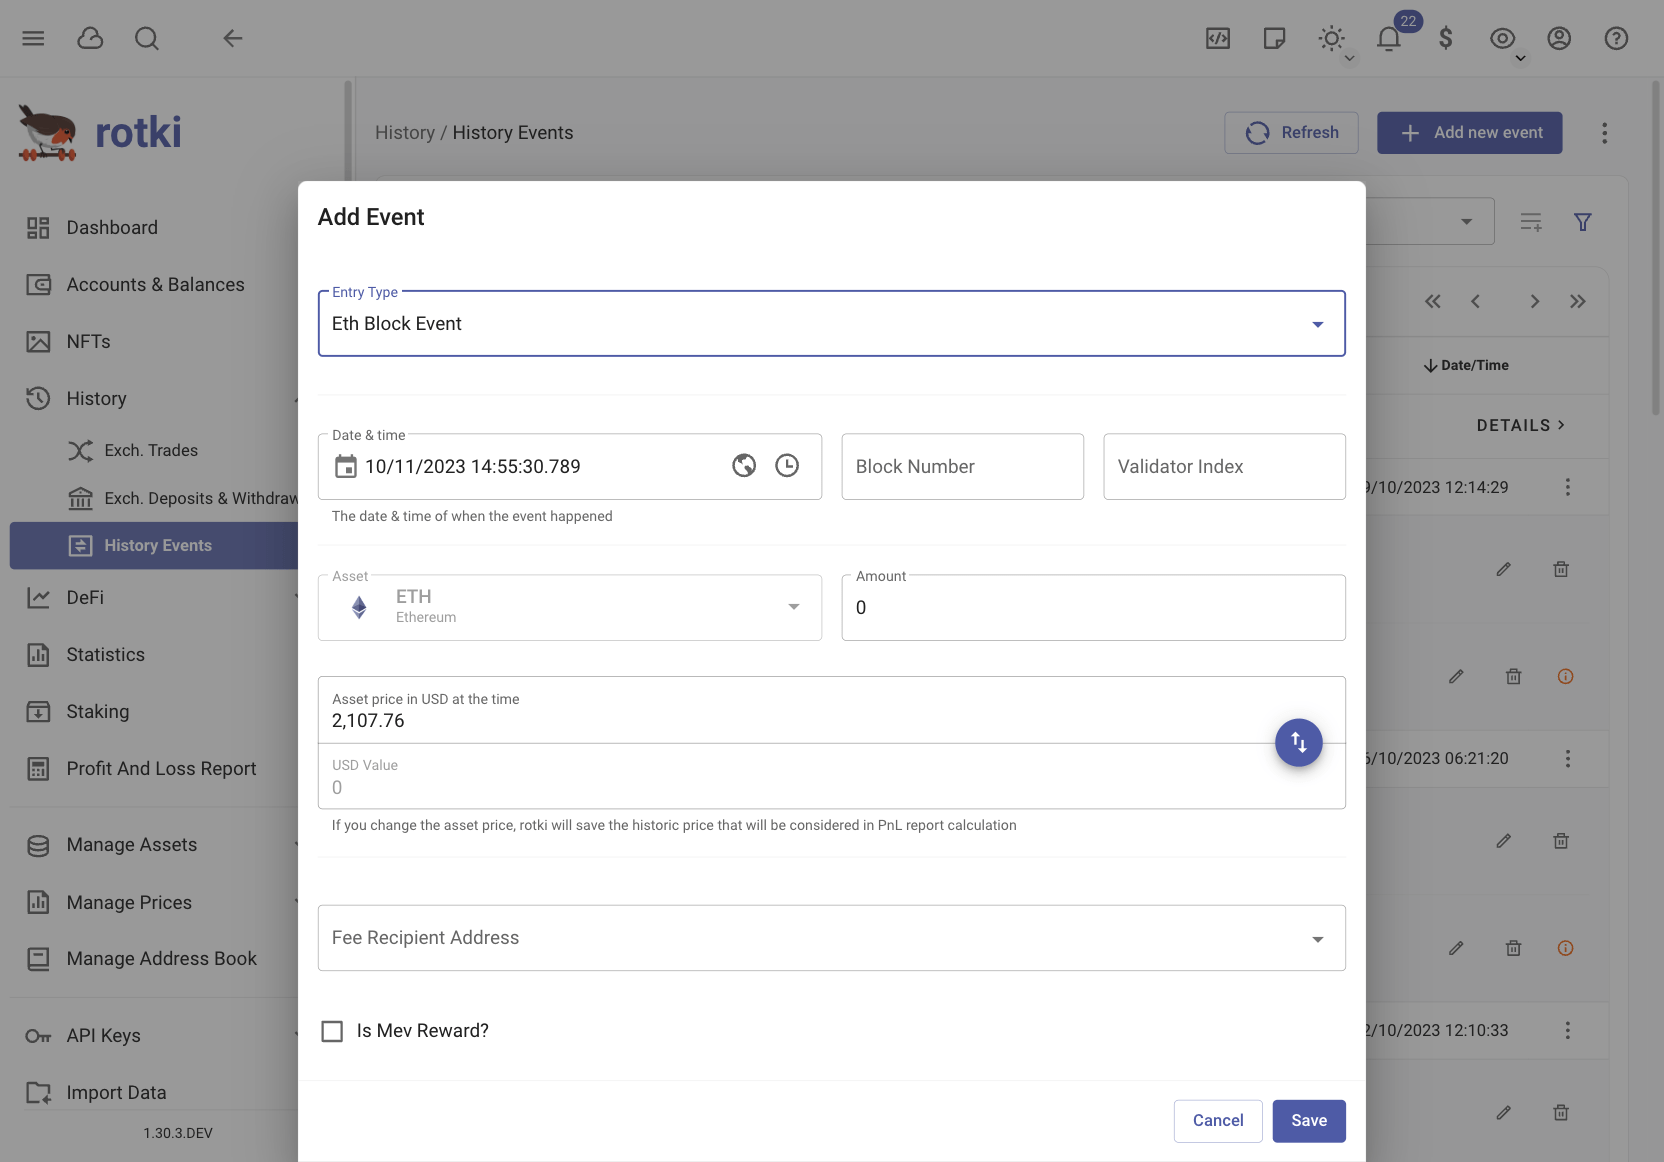
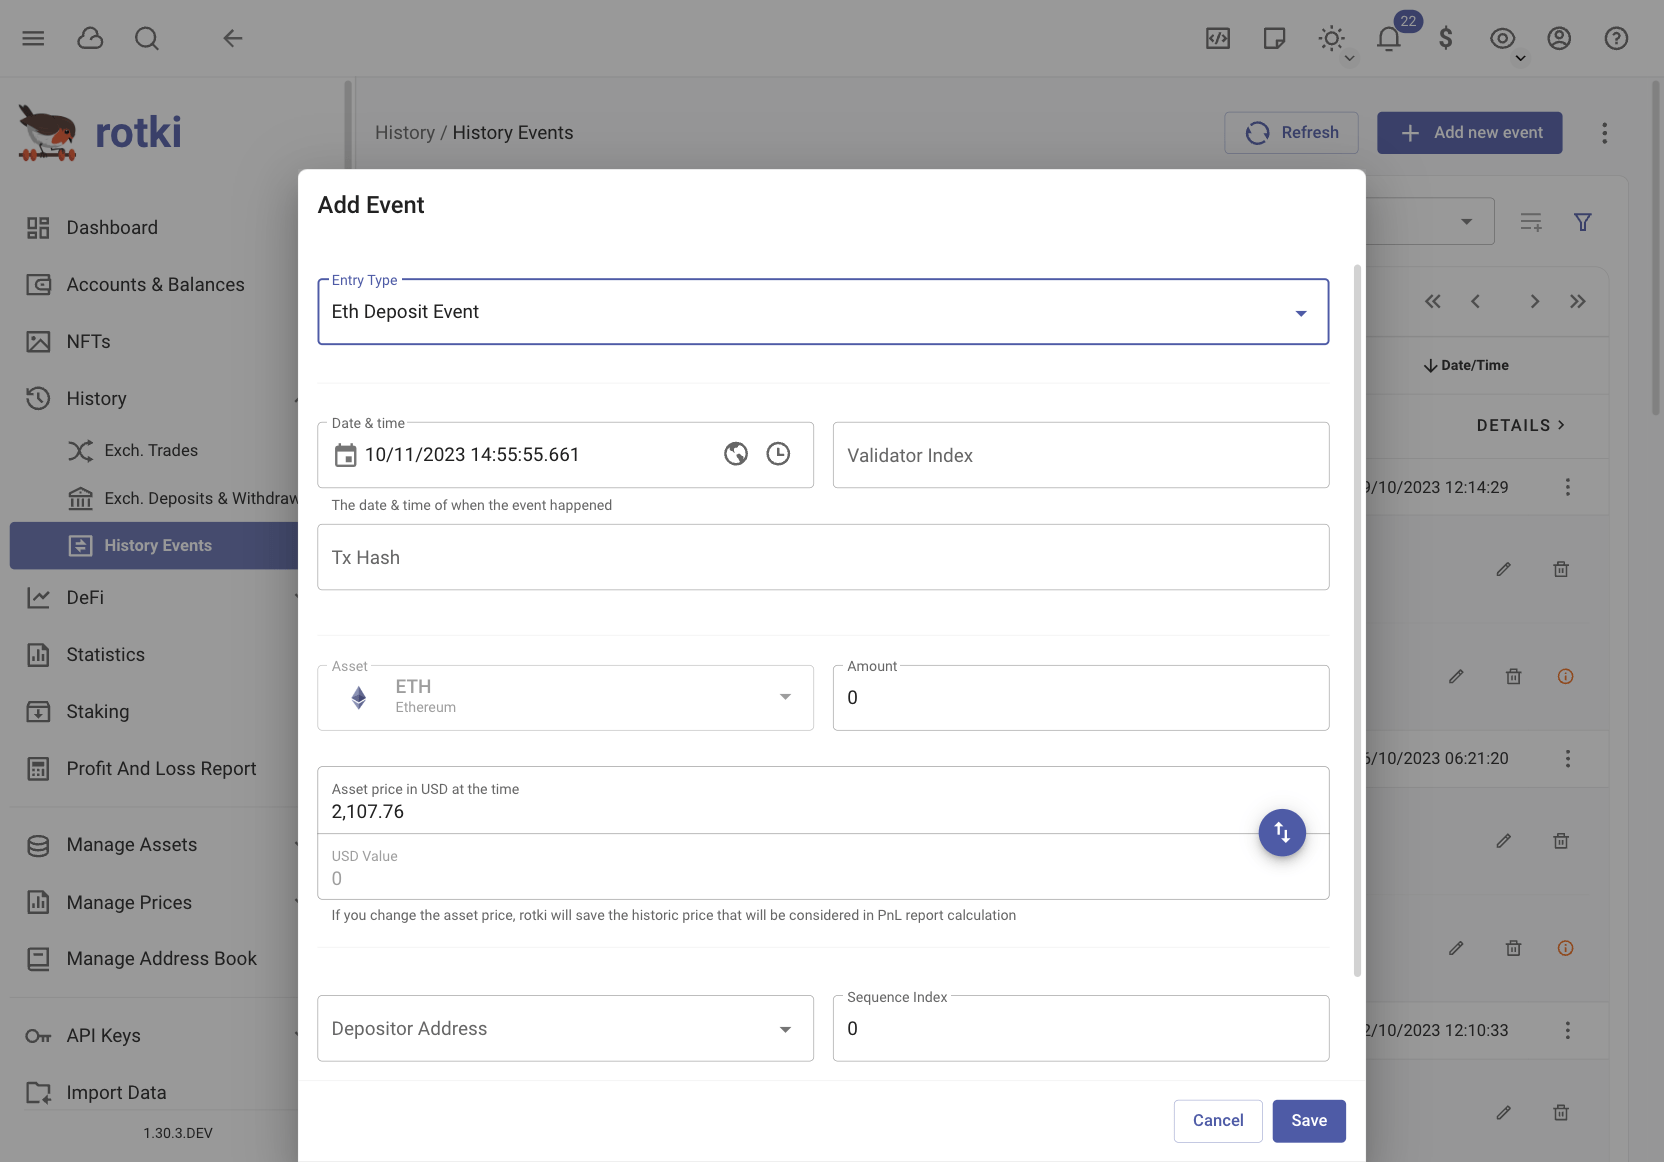
There are 5 types of events in rotki:
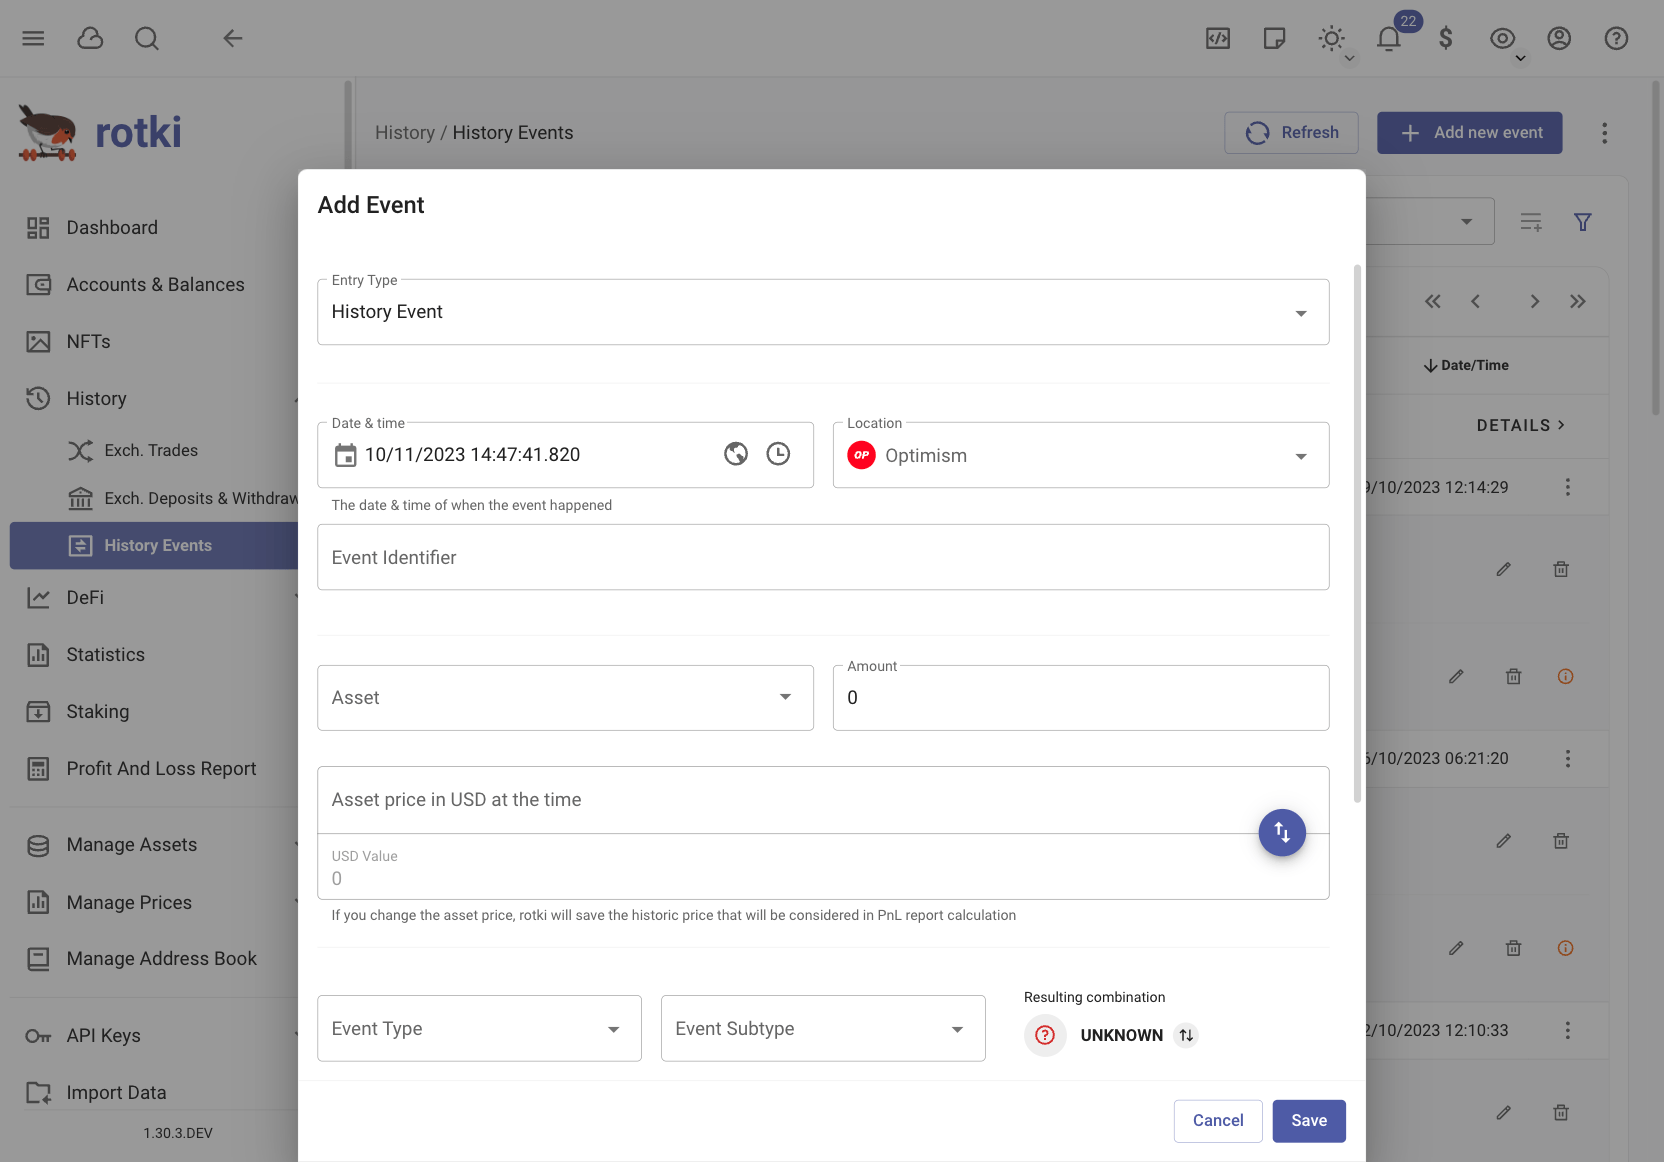
Here the non obvious fields are:
Event Type: We have created a categorization of all the actions in a set of major event types. This field will describe the action category.Event Subtype: Inside an event type you can perform different actions. This subtype will let you describe exactly what is happening in the event.Sequence Index: Is an internal index that sets the order in which events happened in the transactions. This allows knowing how events are sorted and should be taken into account. By default it corresponds to the event log index in the blockchain with a few exceptions.
Currently we support EVM events for these chains:
Ethereum
Optimism
Polygon PoS
Arbitrum One
Base
Gnosis
Here the non obvious fields are:
Event Type: We have created a categorization of all the actions in a set of major event types. This field will describe the action category.Event Subtype: Inside an event type you can perform different actions. This subtype will let you describe exactly what is happening in the event.Sequence Index: Is an internal index that sets the order in which events happened in the transactions. This allows knowing how events are sorted and should be taken into account. By default it corresponds to the event log index in the blockchain with a few exceptions.Location Label: This is the address related to the event, for example if you are receiving one asset in a transfer or calling a contract will match with your address.Address: Registered rotki account which this event is linked to.Counterparty: This is the other part of the transaction, the address you are interacting with. Can be a protocol identifier if the transaction is decoded as part of a protocol.

For history event, and EVM history event, if any event was not decoded the way you expected it to be, you can always customize events using the settings described above or file a bug report on our github repository / in our discord server. The customizations that you make also affect how events are processed in accounting.
Examples of customization. You can set:
Event TypetoTransferif you are sending money to a friend / (another account you own) and don’t want the event to be taxable. TheEvent Subtypeshould beNonein that case.Event TypetoDeposit/WithdrawalandEvent SubtypetoDeposit Asset/Remove Assetif you are depositing or withdrawing assets from an exchange or a protocol. Then this event won’t be considered taxable in P&L reports. Currently rotki doesn’t detect deposits / withdrawals automatically for all exchanges and protocols.Event TypetoWithdrawalandEvent SubtypetoBridgeif you are receiving something from another chain via some kind of bridge. AndEvent TypetoDepositandEvent SubtypetoBridgeif you are depositing to a bridge in order to move something to another chain.For a swap: The first event should be
Event Type:TradeandEvent Subtype:Spend, while the second event should beEvent Type:TradeandEvent Subtype:Receive. But in swaps what’s also important is thesequence_index. They need to be subsequent and the send should come before the receive.Event TypetoSpend/ReceiveandEvent SubtypetoNoneif it is a plain expenditure / receipt.Event TypetoReceiveandEvent SubtypetoRewardif you got a reward for something.Event TypetoReceiveandEvent SubtypetoAirdropif you received an airdrop.Event TypetoReceive/SpendandEvent SubtypetoReceive Wrapped/Return Wrappedaccordingly if you interacted with a protocol (e.g. Curve, Yearn, Aave, etc.) and received wrapped / returned some wrapped tokens.Event TypetoSpendandEvent SubtypetoFeeif you are paying a fee for some of your actions.Event TypetoMigrationif it is a migration of assets from one protocol to another and you don’t lose / gain anything from this event. For example when migrating from SAI to DAI. There is two events in a migration. Both should have typeMigrationand the OUT event should haveEvent Subtypeset toSpend, while the IN event should haveEvent Subtypeset toReceive.Event TypetoStakingandEvent SubtypetoDeposit Assetif it is a staking deposit event. For example staking in eth2 or in liquity.Event TypetoRenewandEvent SubtypetoNoneif it is a renewal of any subscription or service that you are paying for.Event TypetoInformationalandEvent SubtypetoNoneif the event contains some useful information but it shouldn’t be considered in accounting at all.
Events that have been modified will appear marked in the UI.
Customization of the list of supported assets
Inspecting list of assets
You can now manage the list of supported assets by your local rotki instance. You can inspect the list of all supported assets, edit them, delete them or add new ones. They’re divided into 3 sections; assets, custom assets, and newly detected assets.
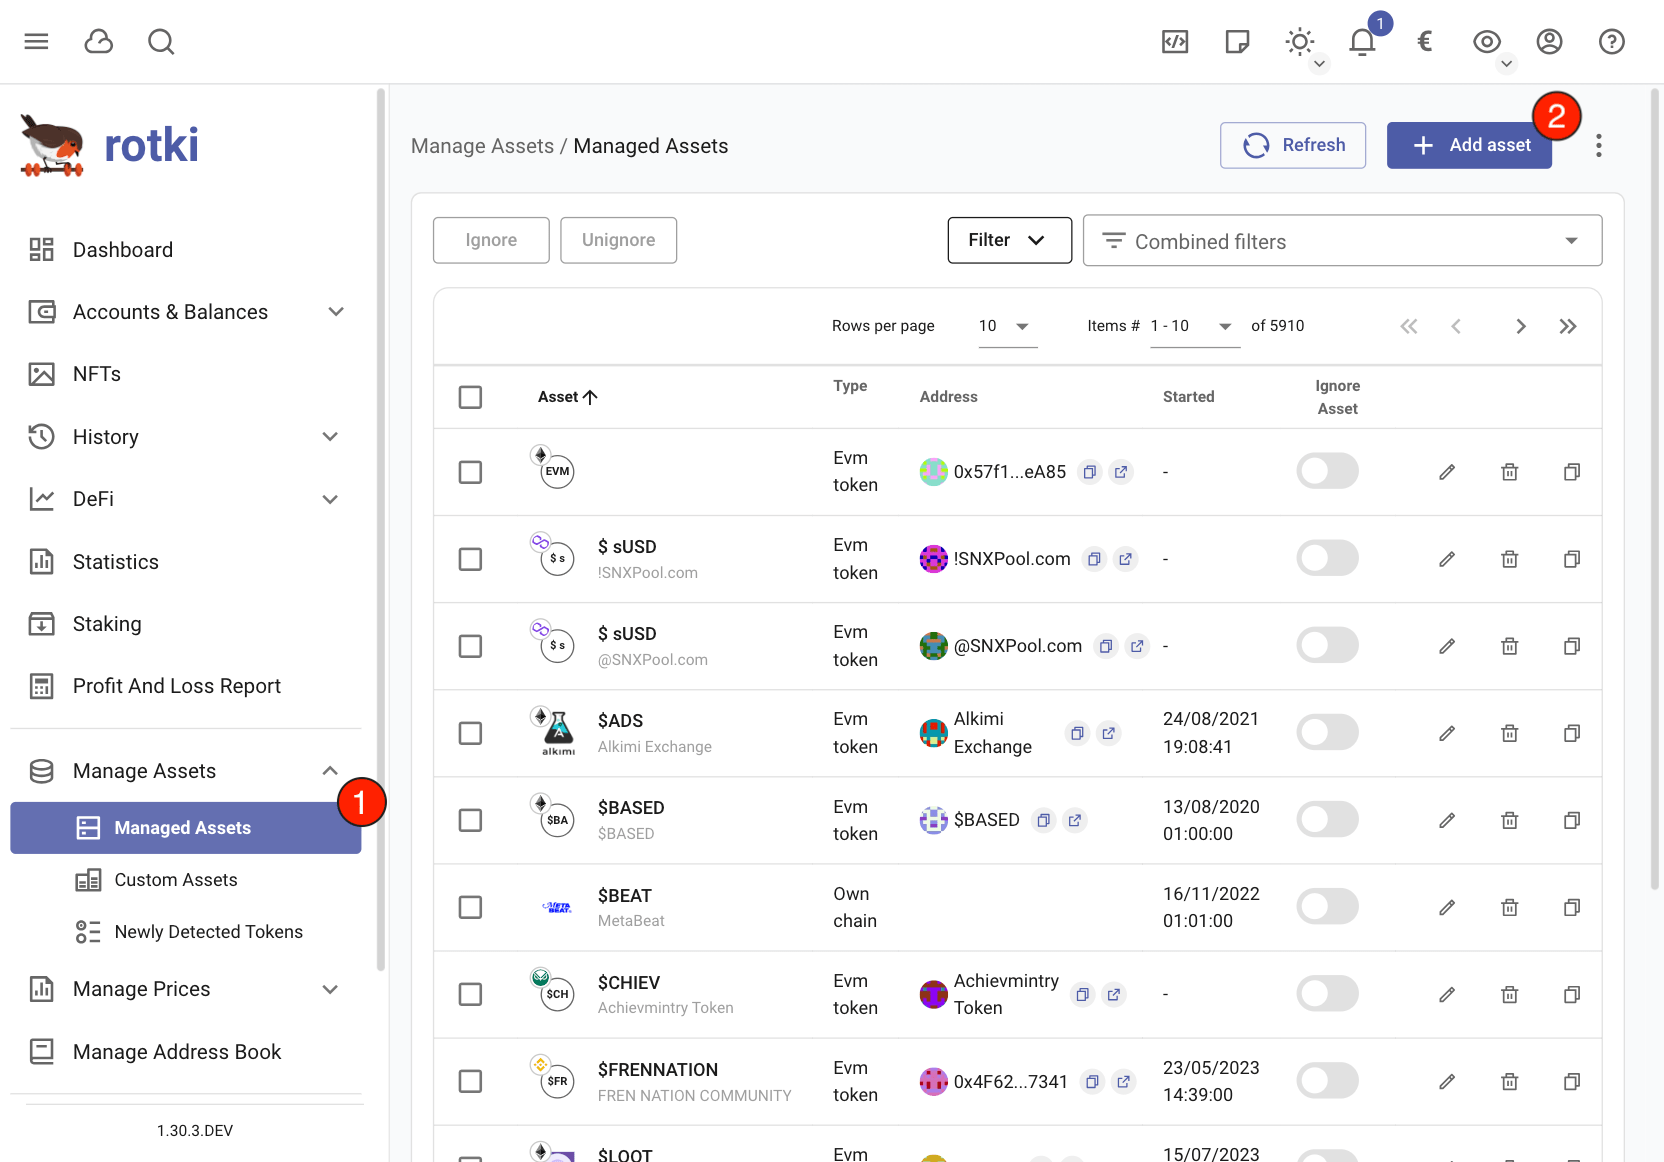
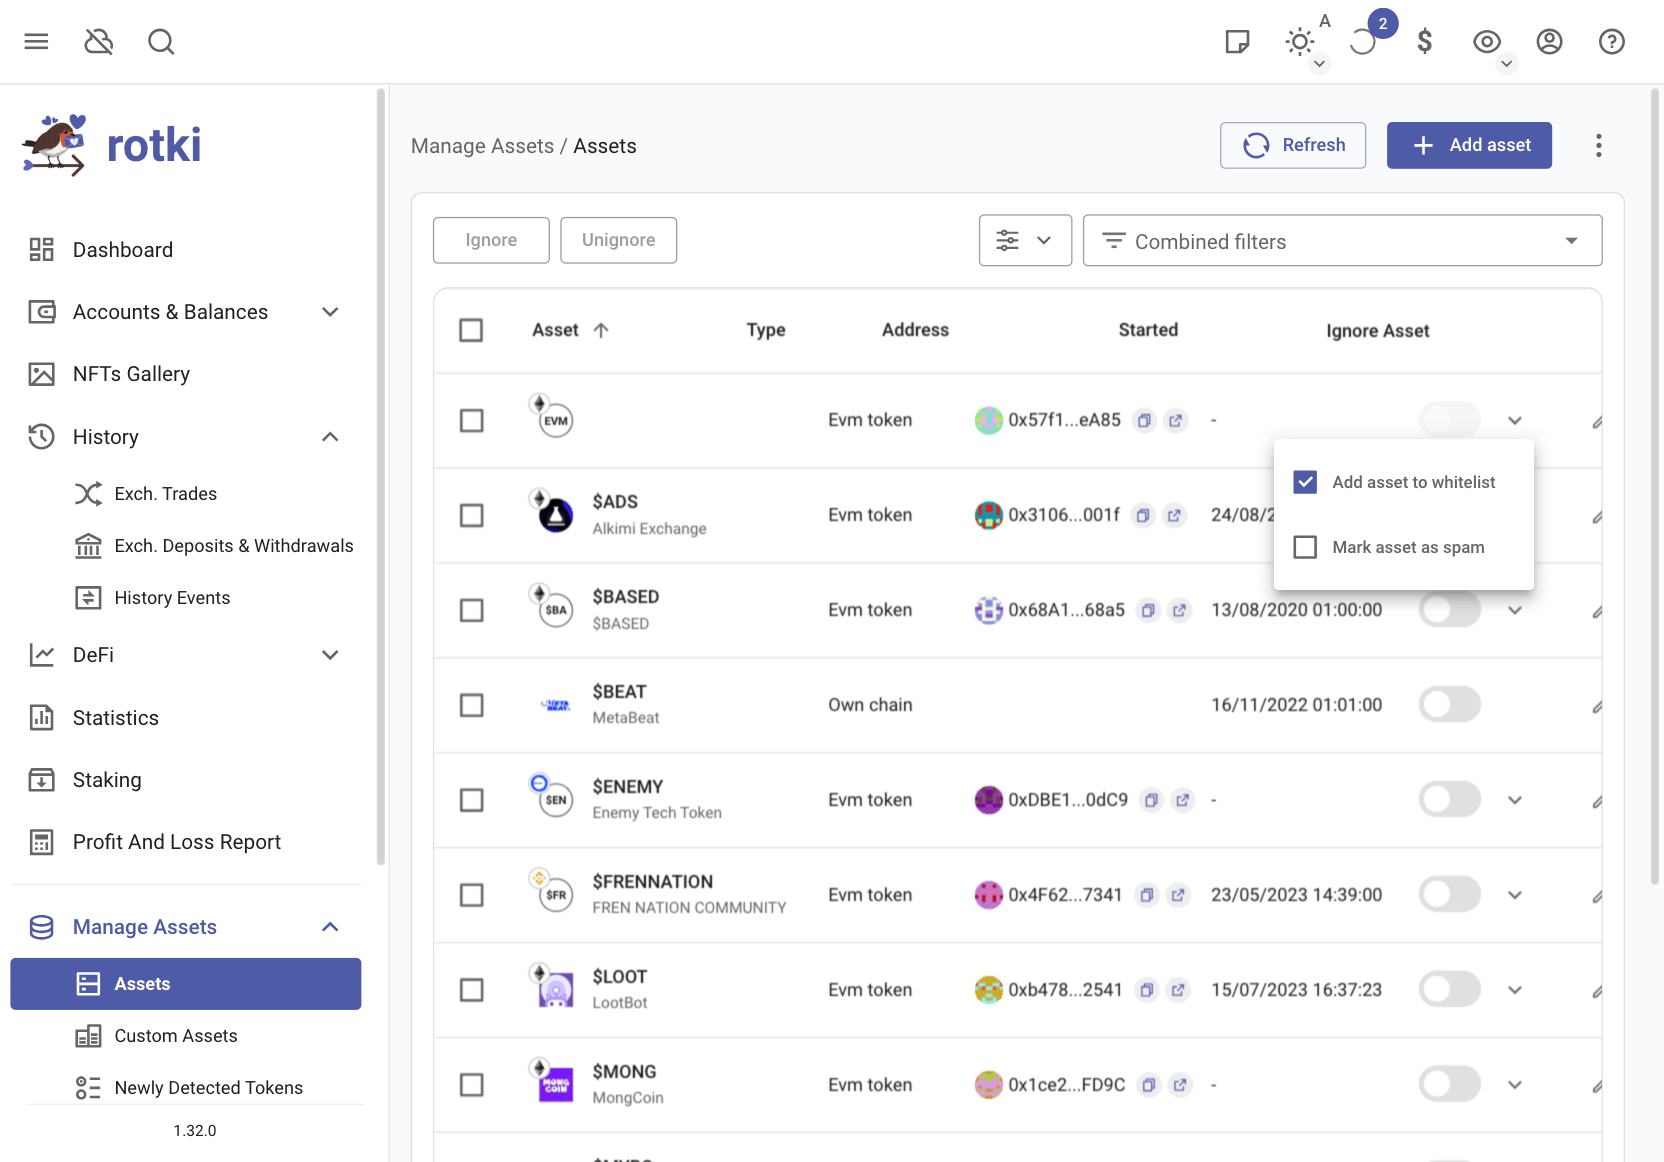
Whitelisting of ignored assets
Spam assets are a plague in EVM chains. rotki has an automatic algorithm trying to match assets as spam to not bother the user with automatically ignoring them. You can see all ignored assets in and filter by ignored. A problem with automatic algorithms marking something as spam is that mistakes can be made and a legit token may be ignored.
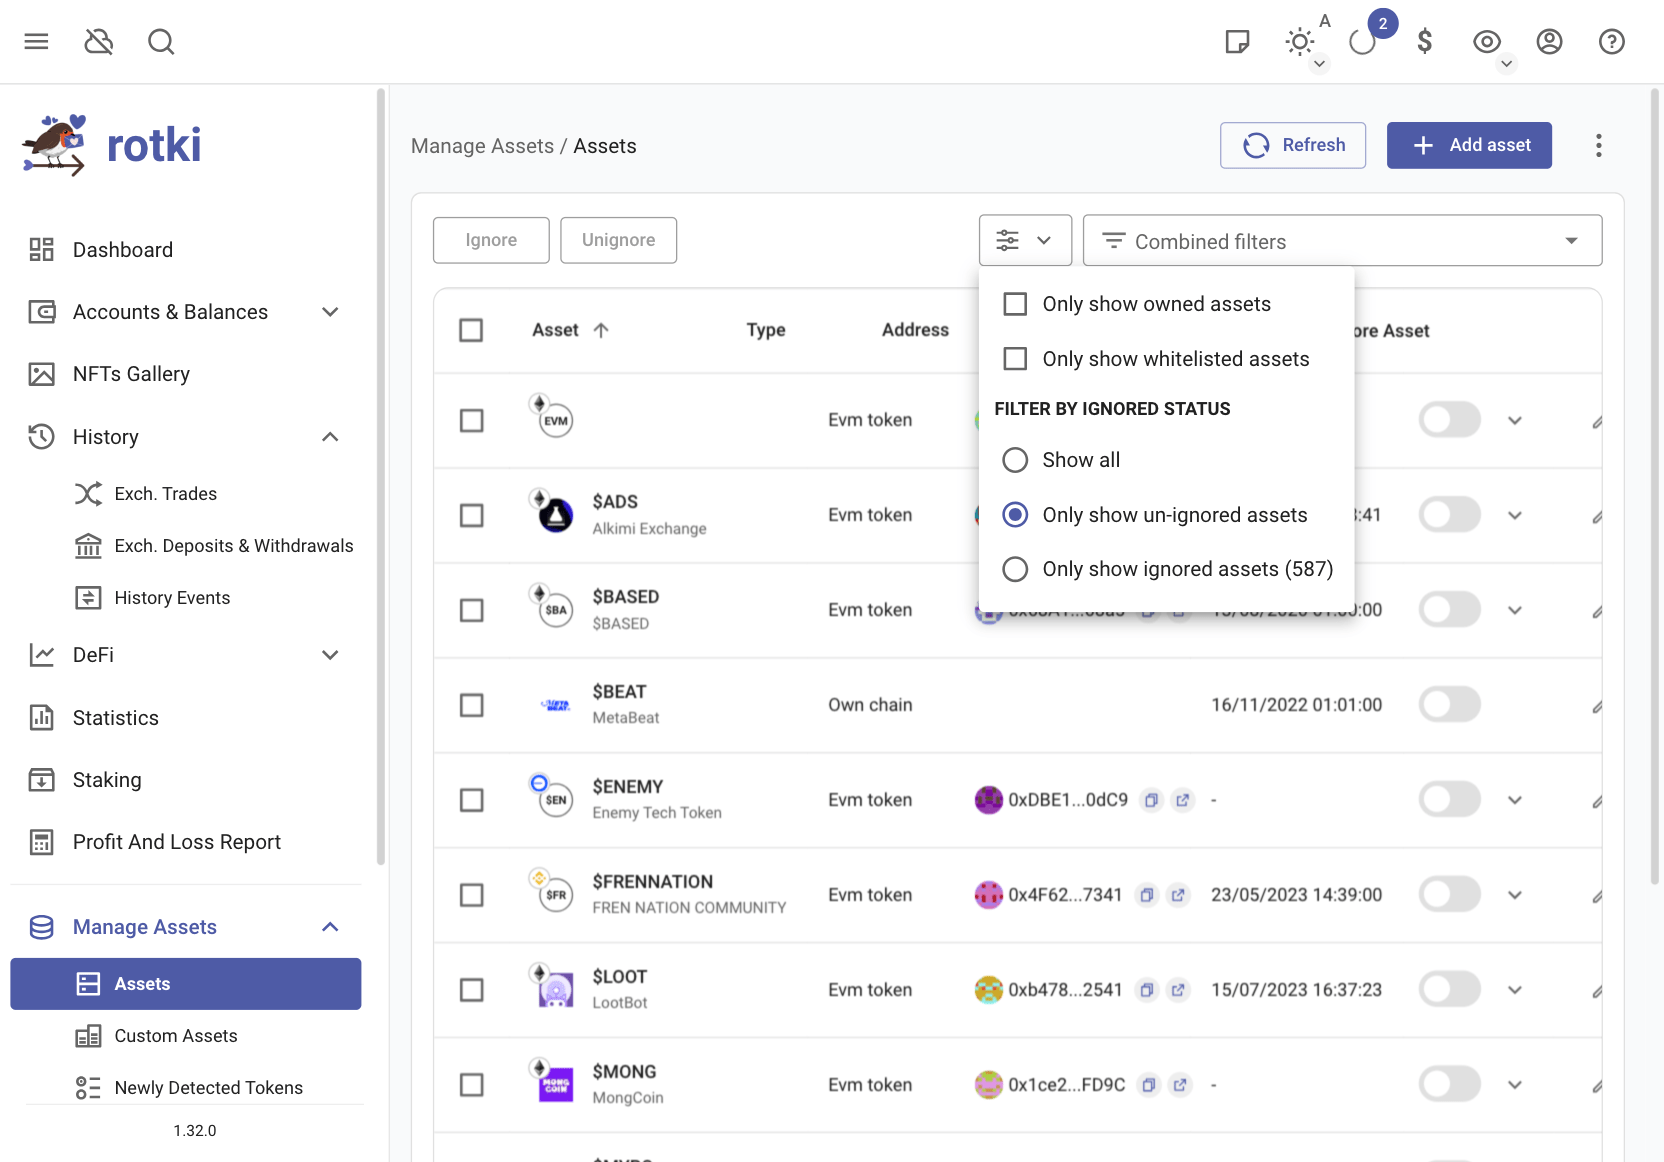
To solve this problem we added a whitelist which you can add assets to as can be seen below. Once an asset is added to the whitelist it will be removed from the ignore list and the automatic algorithm will not mark it as spam in the future.
Adding/editing an asset
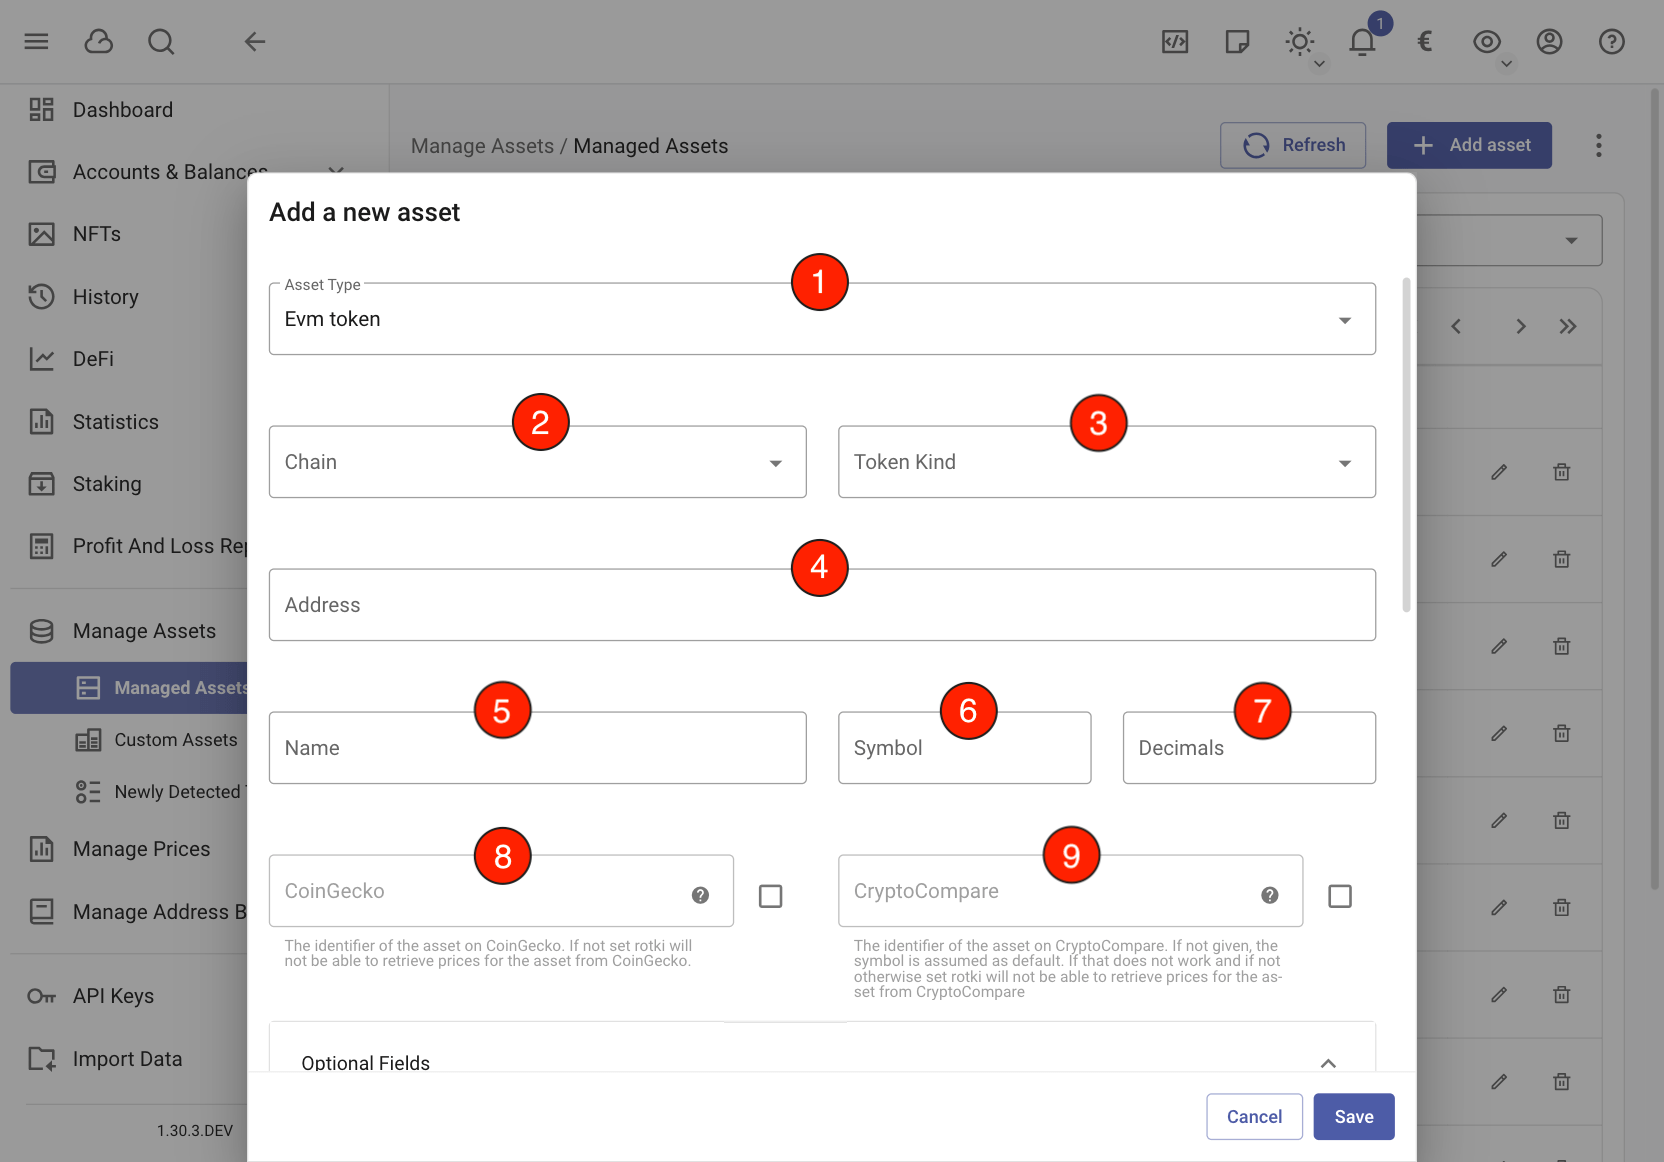
When you press the + button on the top right, or edit an existing asset you can see the Asset form.
You can fill in the following fields:
The type of asset being created. This is required.
The chain where the token is located. This is required if the asset type is
`EVM Token`.The token kind. This is required if the asset type is
`EVM Token`.The token address. This is required if the asset type is
`EVM Token`.The token name. This is required.
The token symbol. This is required.
The token decimals. This is required if the asset type is
`EVM Token`.Coingecko identifier. This is optional, but highly recommended. If the asset is supported by coingecko you should get its coingecko identifier. This will allow the usage of coingecko as a price oracle and also will automatically pull the asset icon from coingecko. You can get the coingecko identifier for an asset by searching this list: https://api.coingecko.com/api/v3/coins/list . It may also be the same as the last part of the coingecko url. For example from
https://www.coingecko.com/en/coins/ethereumwe haveethereumas the identifier for ETH.Cryptocompare identifier. This is optional but recommended. At least one of coingecko or cryptocompare should be given so that prices can be queried. If not given, the symbol of the asset will be used. If that fails, then cryptocompare is not used. To get the cryptocompare identifier, search for the coin in cryptocompare, visit its url and take it from there. For example for https://www.cryptocompare.com/coins/eth/overview/USD the identifier is
ETH. It’s always what comes aftercoins.Optional fields section. This section will be explained below.
Preview of the icon. This section will show the icon you upload, or the current icon on edit mode. Additionally, on edit mode, there is also a button to fetch the latest icon.
You can upload an icon for the asset. Any of the common image extensions is accepted (png, jpg, jpeg, webp). The custom icon always takes precedence over the one auto-detected by coingecko.
When you input the address of the token rotki will try to fetch its name, symbol and decimals and use them if they are available.
There are also some other fields that are completely optional and expand if you press the (7) Optional Fields section.
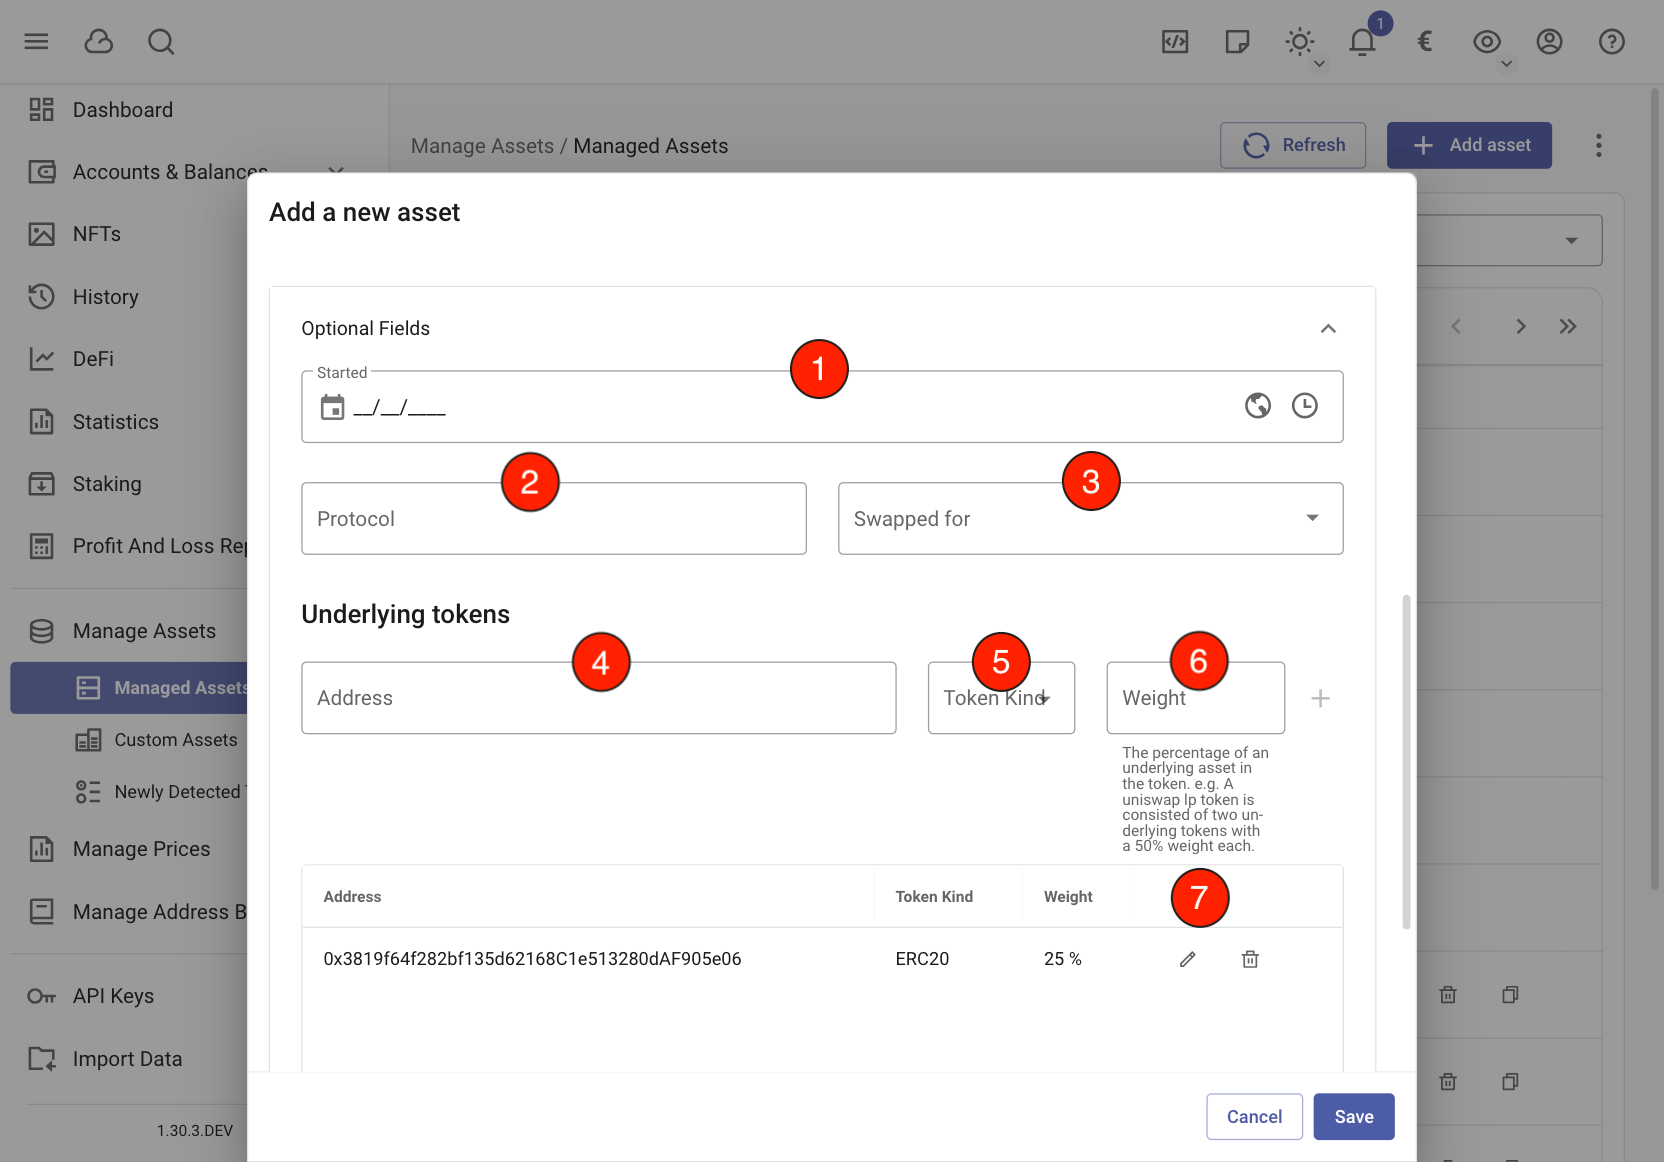
You can specify a timestamp at which the asset started to exist. This should be the token deployment timestamp for tokens.
If the asset is part of a protocol, specify it here. For example ‘uniswap’ for uniswap pool tokens, ‘aave’ for aTokens etc.
If the token is swapped for another token, specify it here. For example LEND was swapped for AAVE.
A token can have underlying tokens. Like a pool, or a token set. Here add the underlying token’s address.
You have to specify the token kind.
And here add the underlying token’s weight.
Here you can edit or delete underlying token address/weights. Note: The weight of the underlying tokens should add up to 100%.
Note
Underlying tokens only apply to asset type of EVM Token.
Adding/editing a custom asset
There is a lot of assets that rotki can’t automatically track and they don’t fit into traditional crypto assets. For example an ETF, real estate, ancient coins, valuable art etc. To represent those you can create custom assets, and then add a manual balance of those assets.
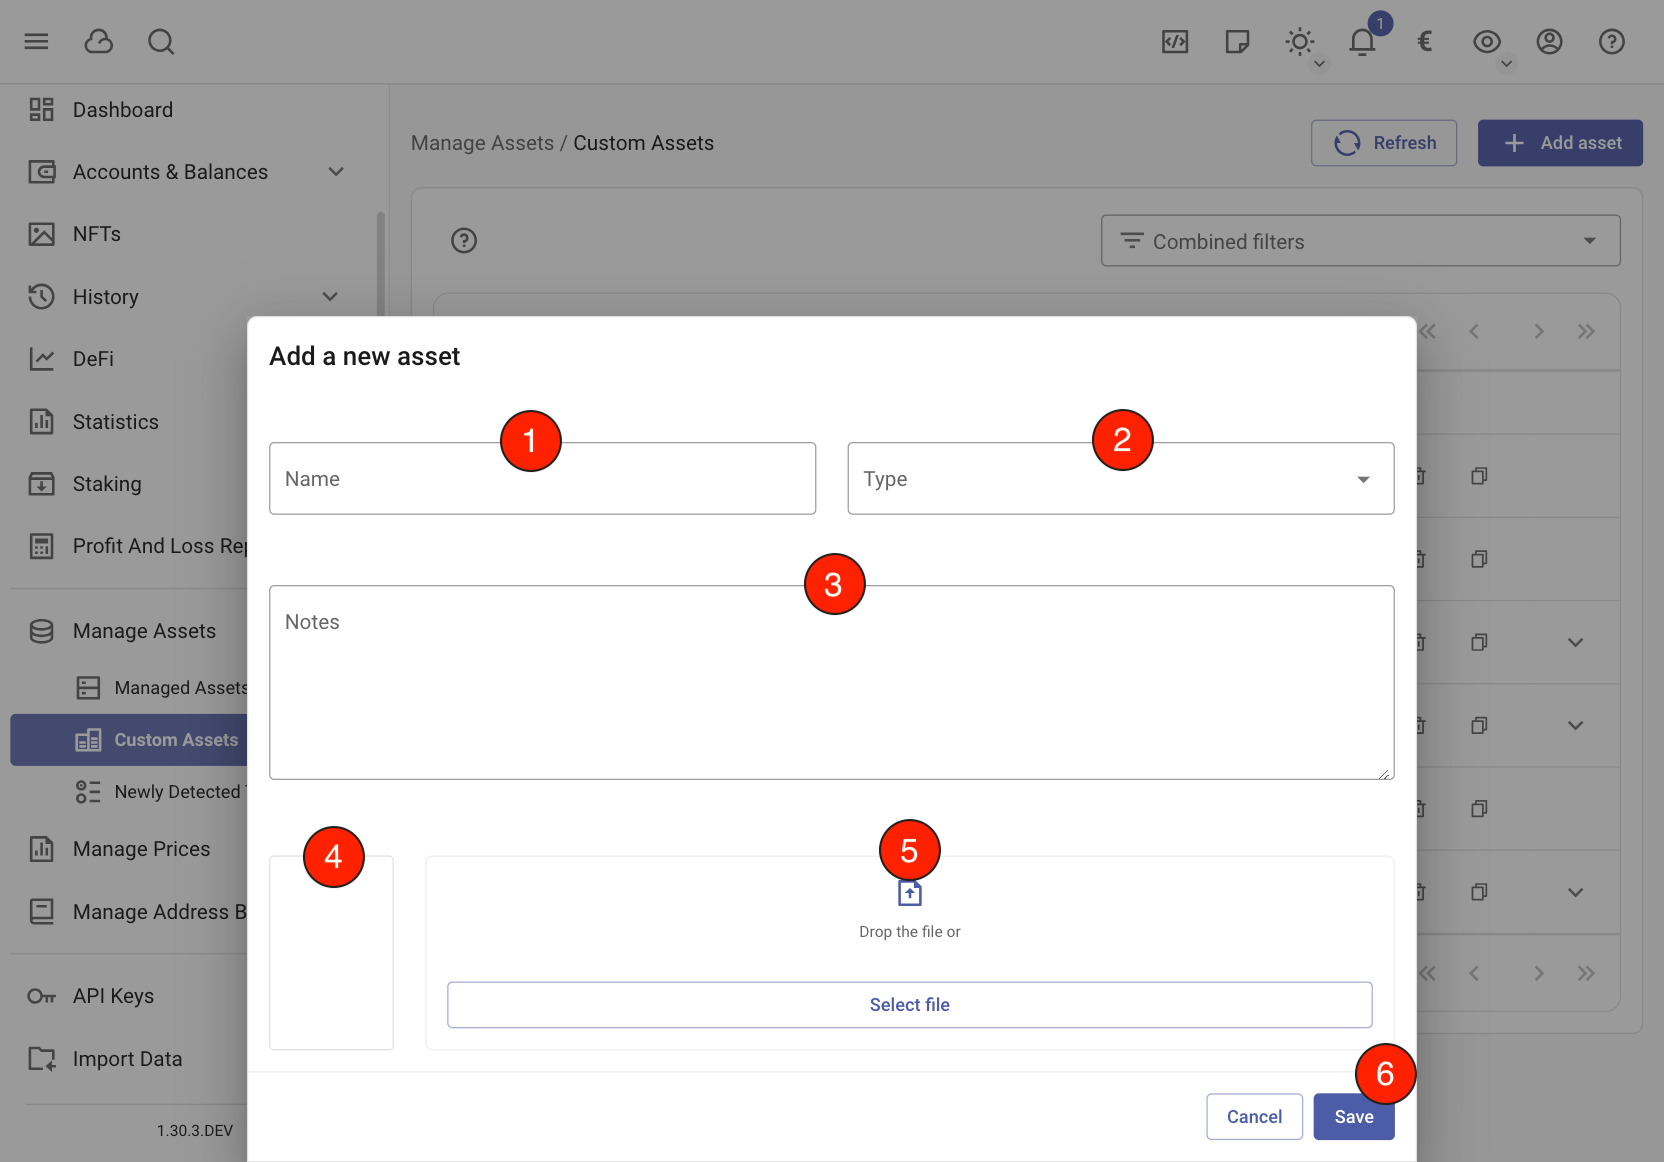
When you press the + button on the top right, or edit an existing custom asset you can see the Asset form.
You can fill in the following fields:
The name to be given to the custom asset. This is required.
The type of custom asset being represented. It’s just a string. The type field remembers all previously used types. This is required.
The note to be added to the custom asset. This is optional.
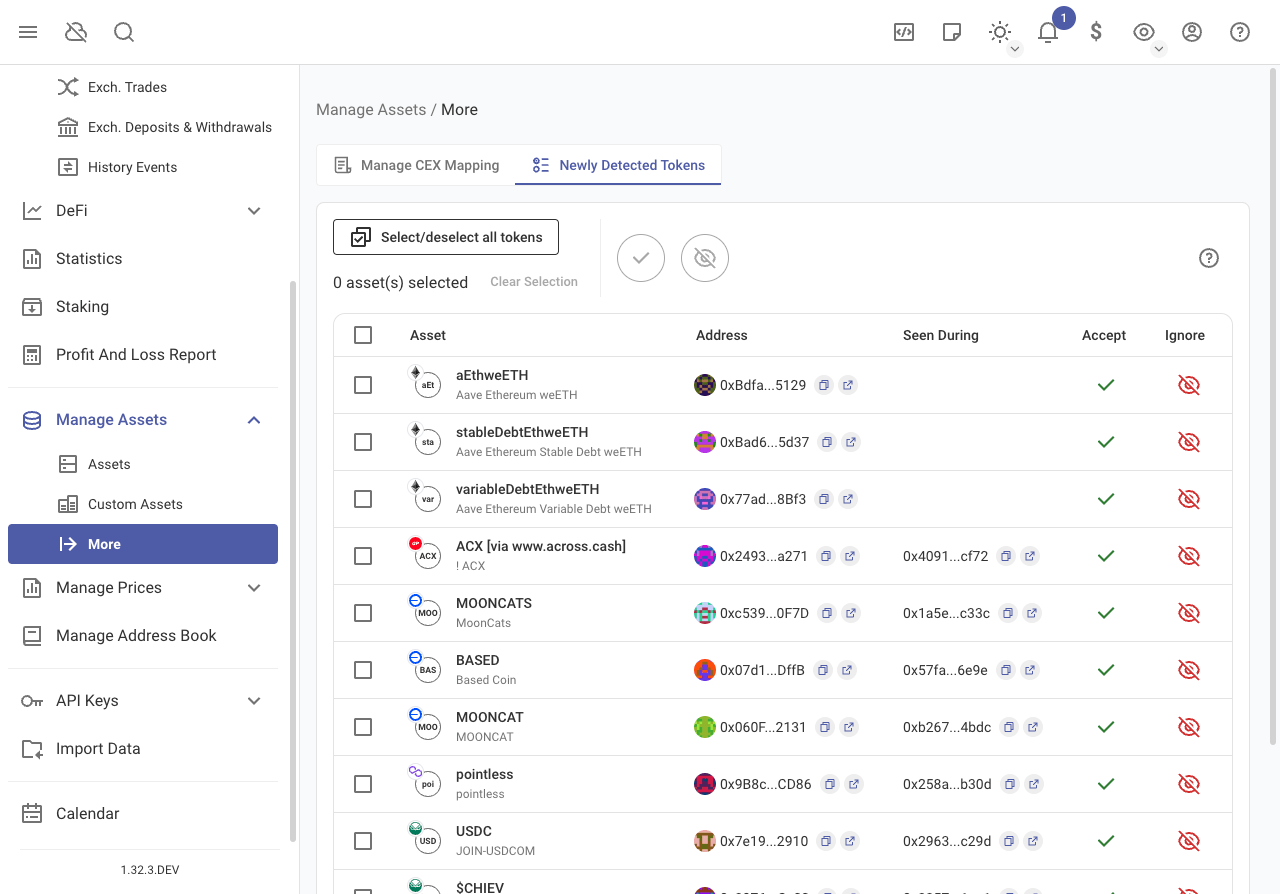
Newly detected tokens
All newly detected EVM tokens will appear in the list of newly detected tokens. You should inspect this list often and accept valid tokens and reject spam assets by adding them to the ignored tokens list.
Merging two assets
There are two possible situations where you might need to merge two assets into one.
You added a custom asset that was later officially supported on rotki. In this case you should merge your custom asset with the officially supported one. If you don’t do this, you will see split balances between entries, especially for supported exchanges that will use the officially supported entry.
There was an issue and an Unknown asset notification is now visible. This can happen if you somehow end up deleting your global DB of assets. This way all your custom assets will be unknown. In this case you would need to re-add the deleted assets, and merge the old asset id that errors to the new one that you created.
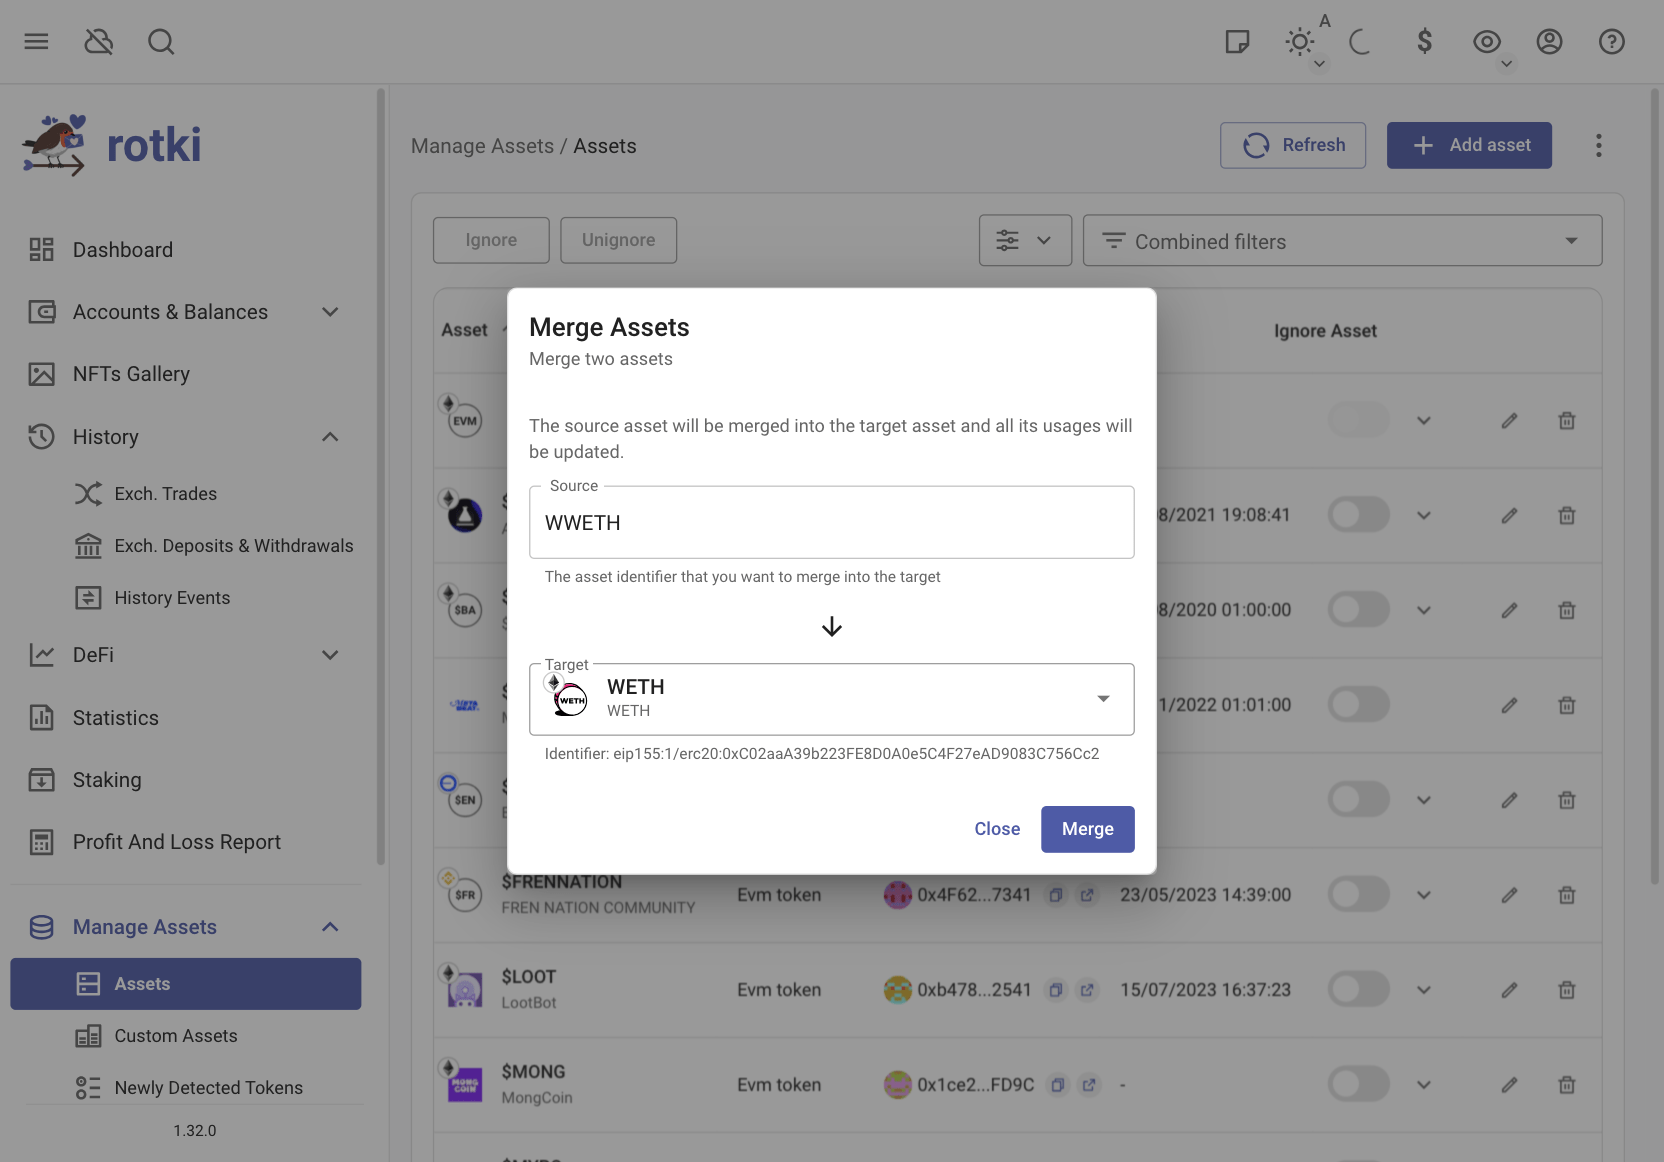
To merge two assets you can use the merge dialog by pressing the Merge Asset button in the Asset Management screen. In the dialog you can put the identifier of your custom or missing asset in the source field. For a custom asset, you can get the identifier using the copy button in the asset table. If you have a missing asset then you can copy it from the notification message
Then you can go to the target field and search for the asset into which the source will be merged to. When both the source identifier and target asset are selected you can press the merge button.
On a successful merge you will be notified to either re-login or refresh the balances manually to see the changes on the frontend.
Special assets
Rotki allows you to track special assets like:
Uniswap/Sushiswap LP tokens: You can track LP tokens by adding them and using UNI-V2 as protocol. This will make the app query balances and prices. As for now historical prices are not queried so you will need to add missing prices manually.
Yearn vaults: To add a yearn vault you need to add a new ethereum token and use yearn_vaults_v2 as protocol. In addition you need to specify the underlying token that the vault uses with a 100% weight.
Ignoring assets
Specify which assets you own and would like to completely ignore from all calculations and balance queries. Any actions that involve these assets are ignored. You can ignore/un-ignore the assets by toggling the switch on the table. You can also ignore/un-ignore multiple assets by using the checkboxes.
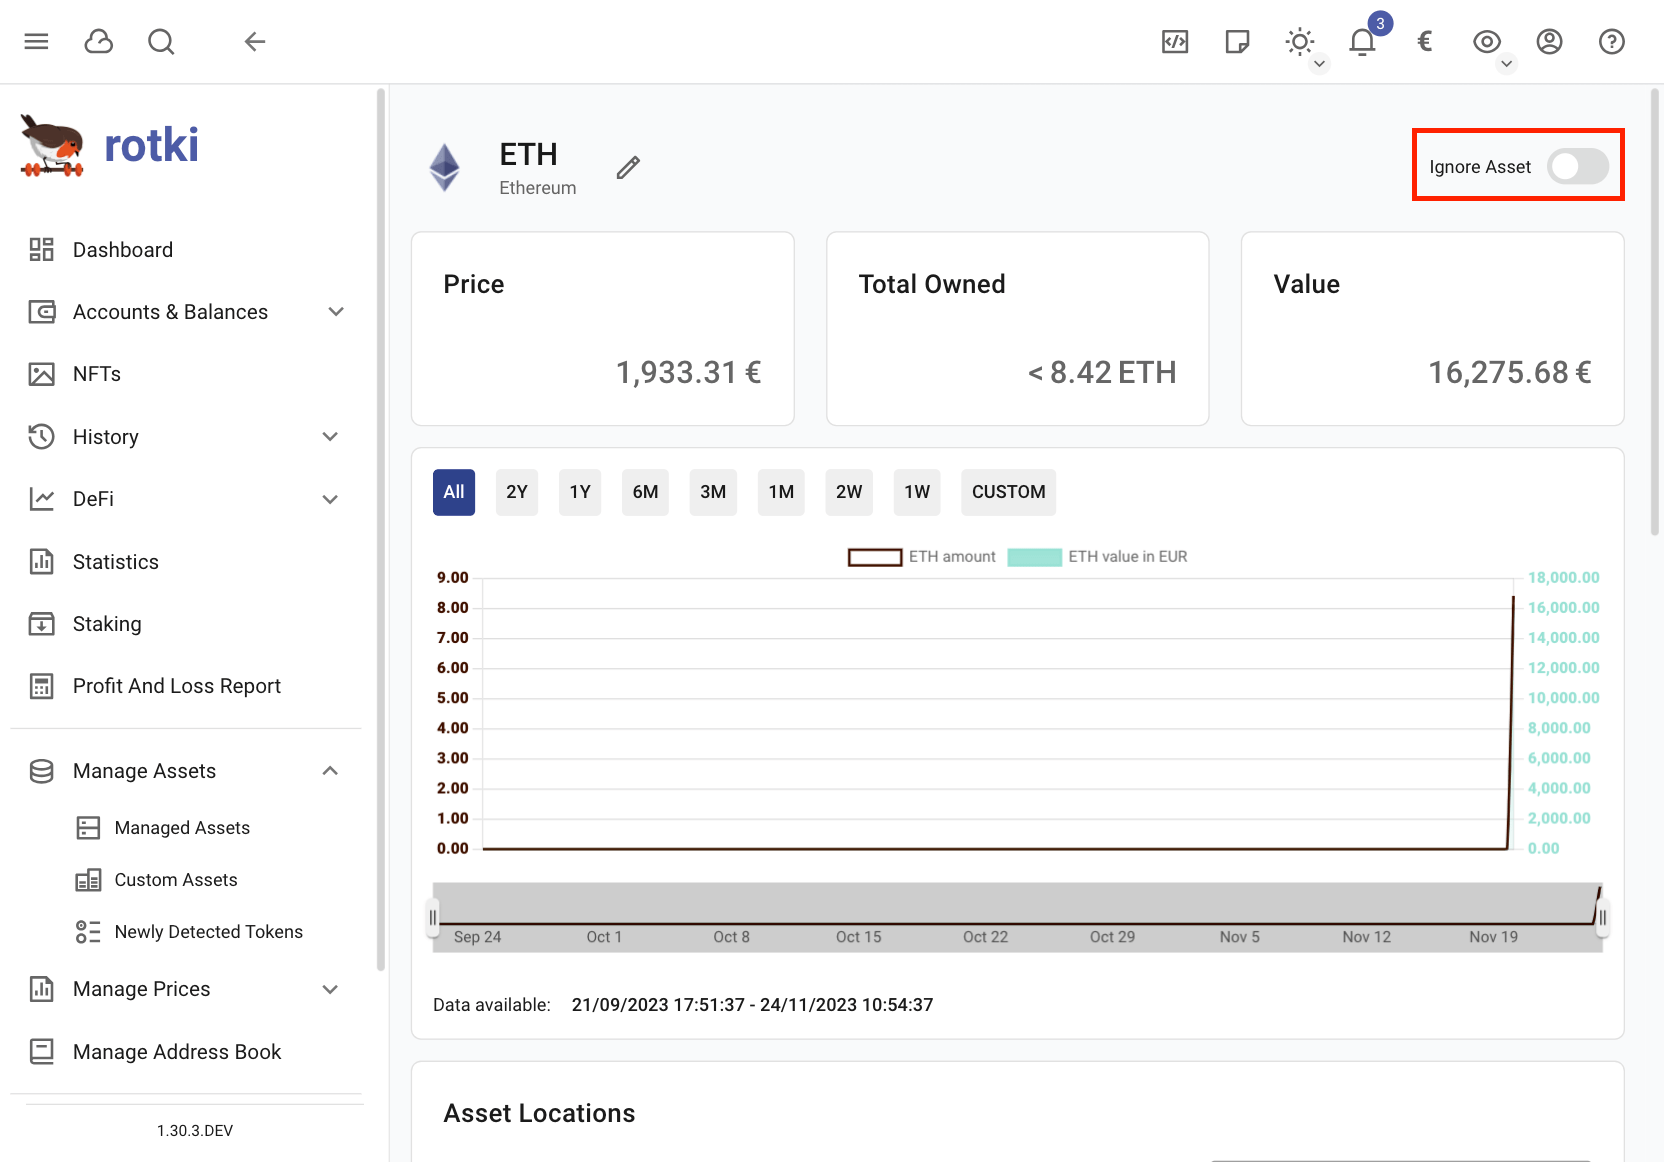
You can also ignore assets by clicking asset icons anywhere on the app, that will redirect you to this overview asset page. In this page, you can ignore or un-ignore a selected asset.
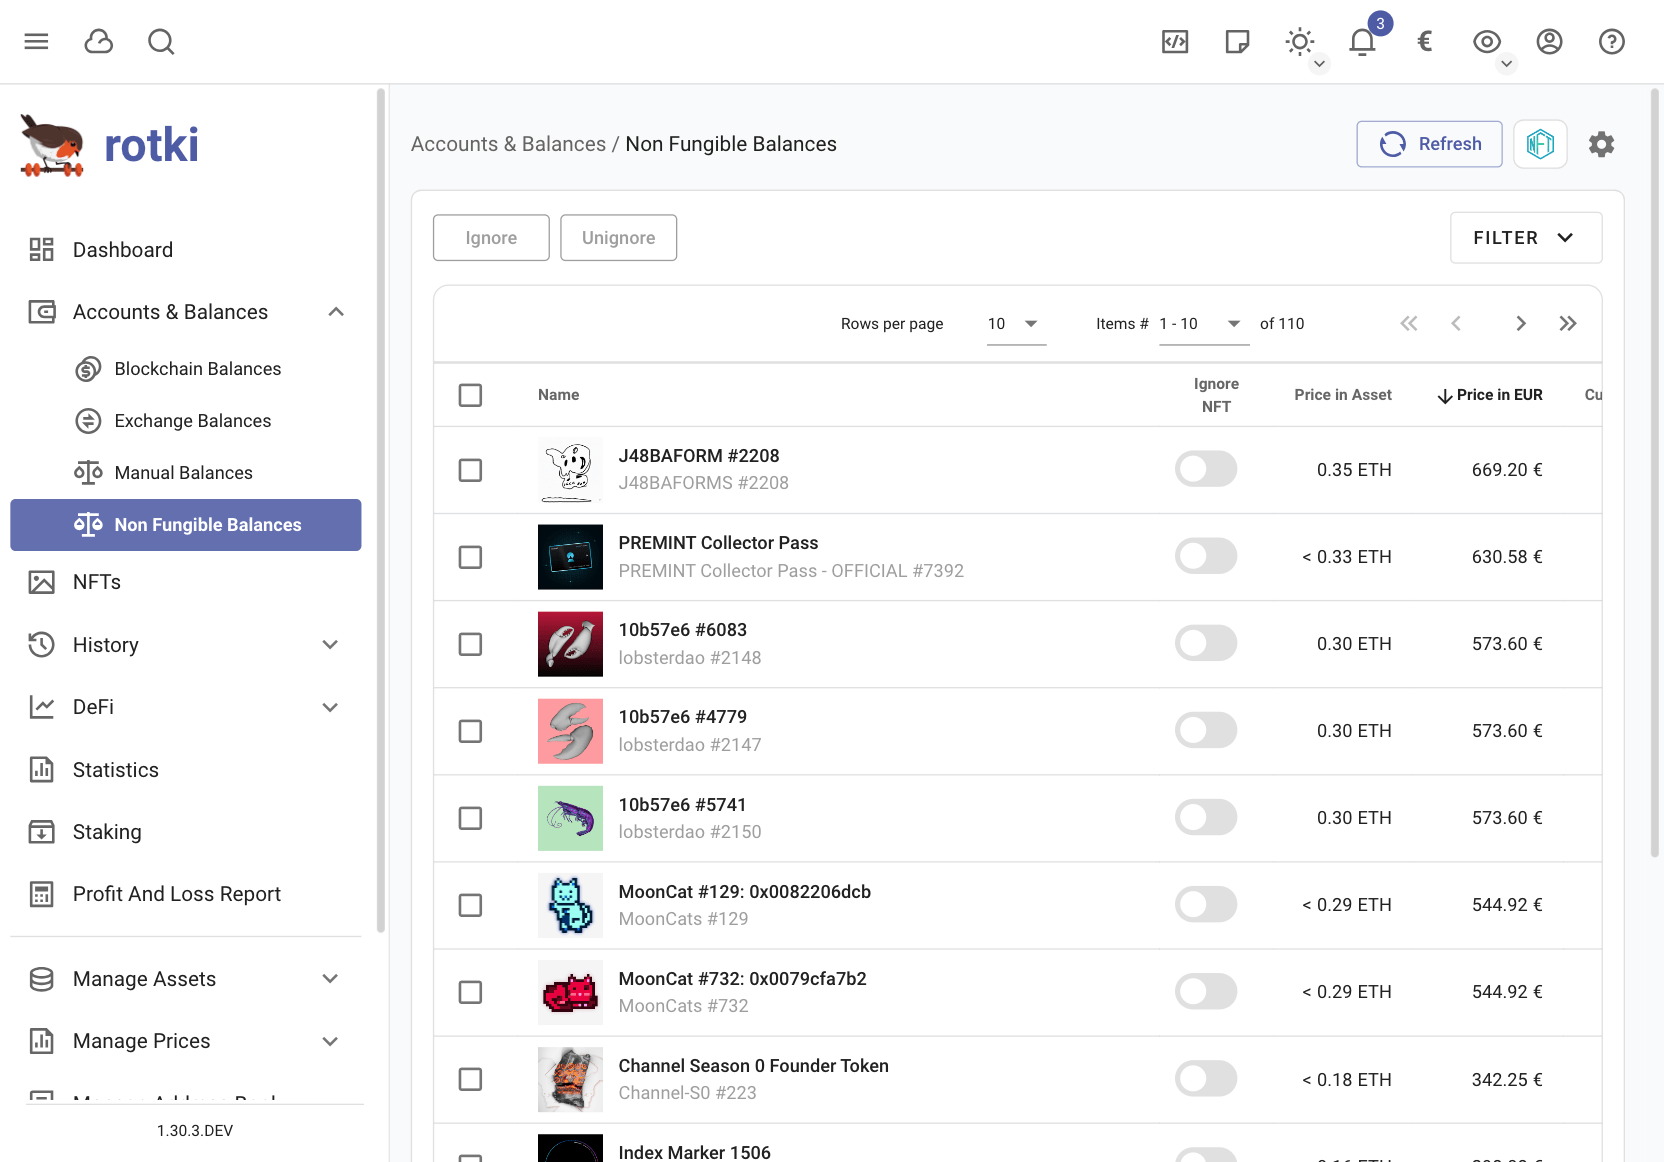
It is also possible to ignore NFTs. To do this navigate to and toggle the ignore NFT switch. Then you can use the filter to view the ignored NFTs.
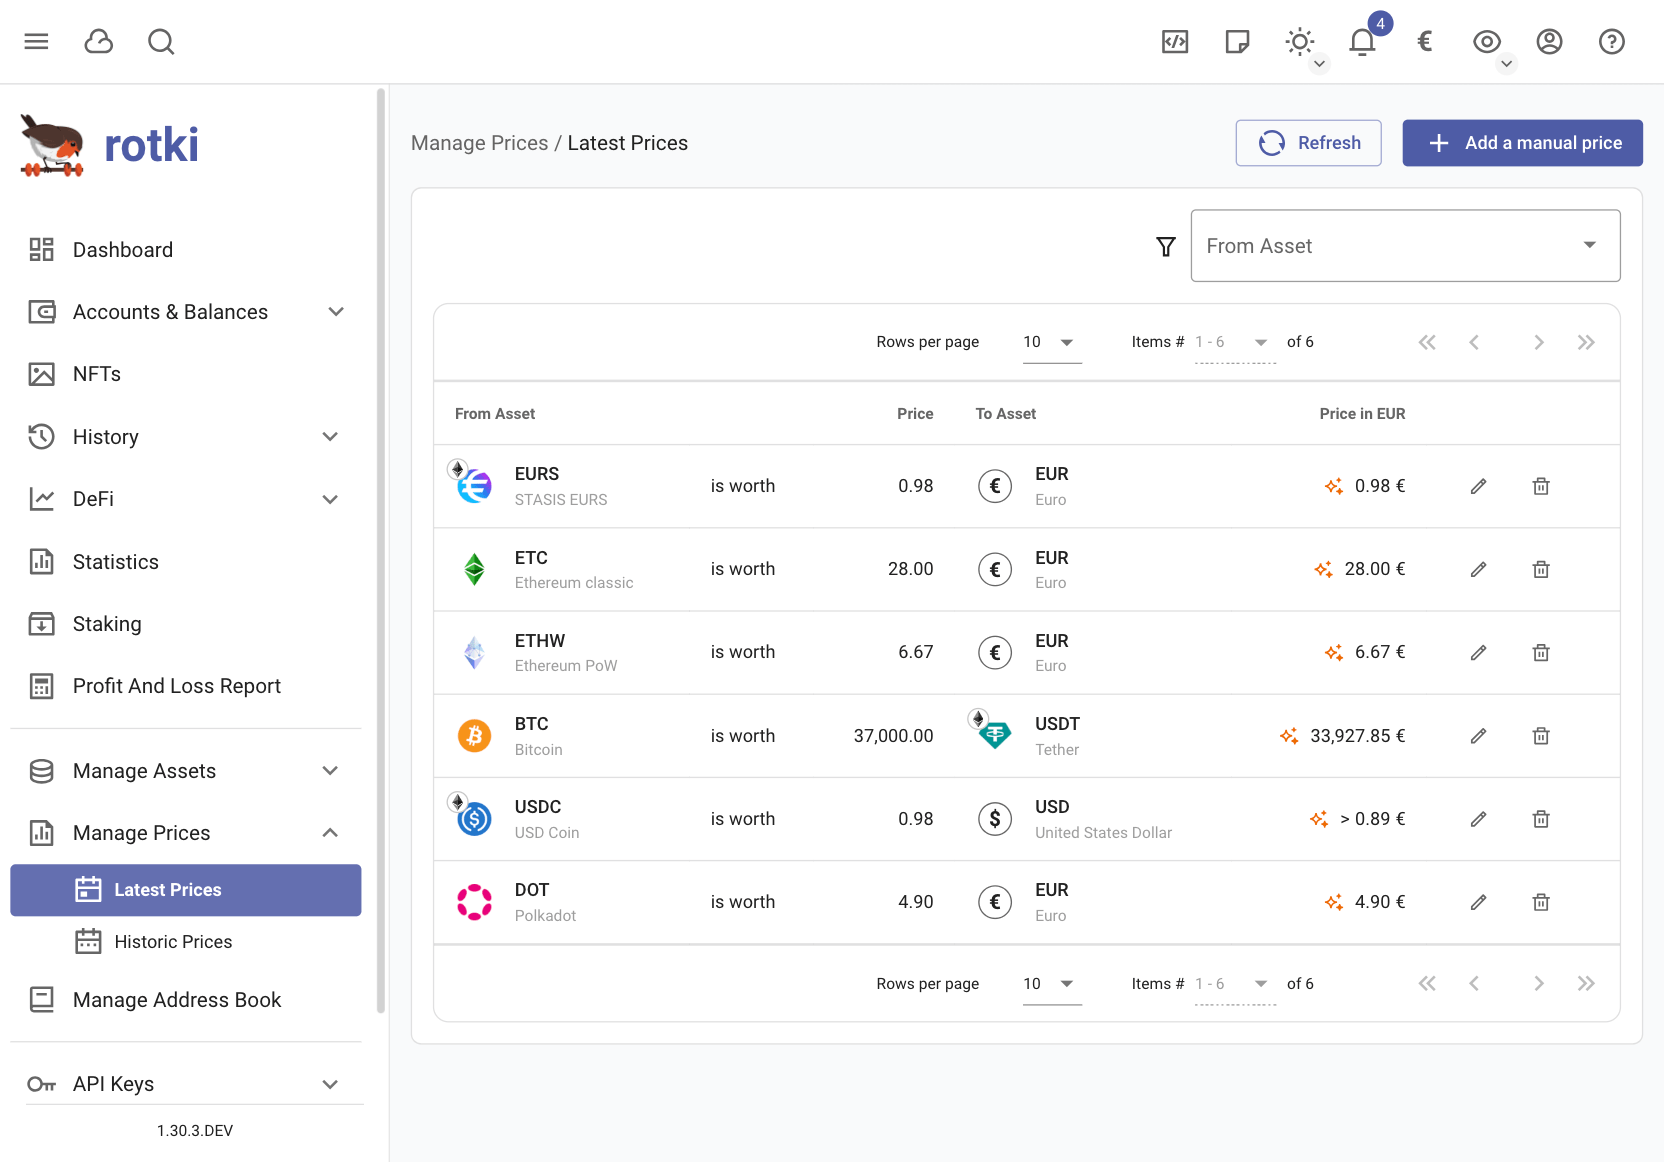
Adding missing prices
Sometimes rotki might be unable to retrieve prices for some assets. In order to always have the ability to show a price we provide two types of manual price additions: and .
Latest price: Will be the price displayed when we need to display the current price of an asset.
Historical price: The price used in a specific time in the past for an asset.
To add a new price you have to press the plus button. This will open the add form.
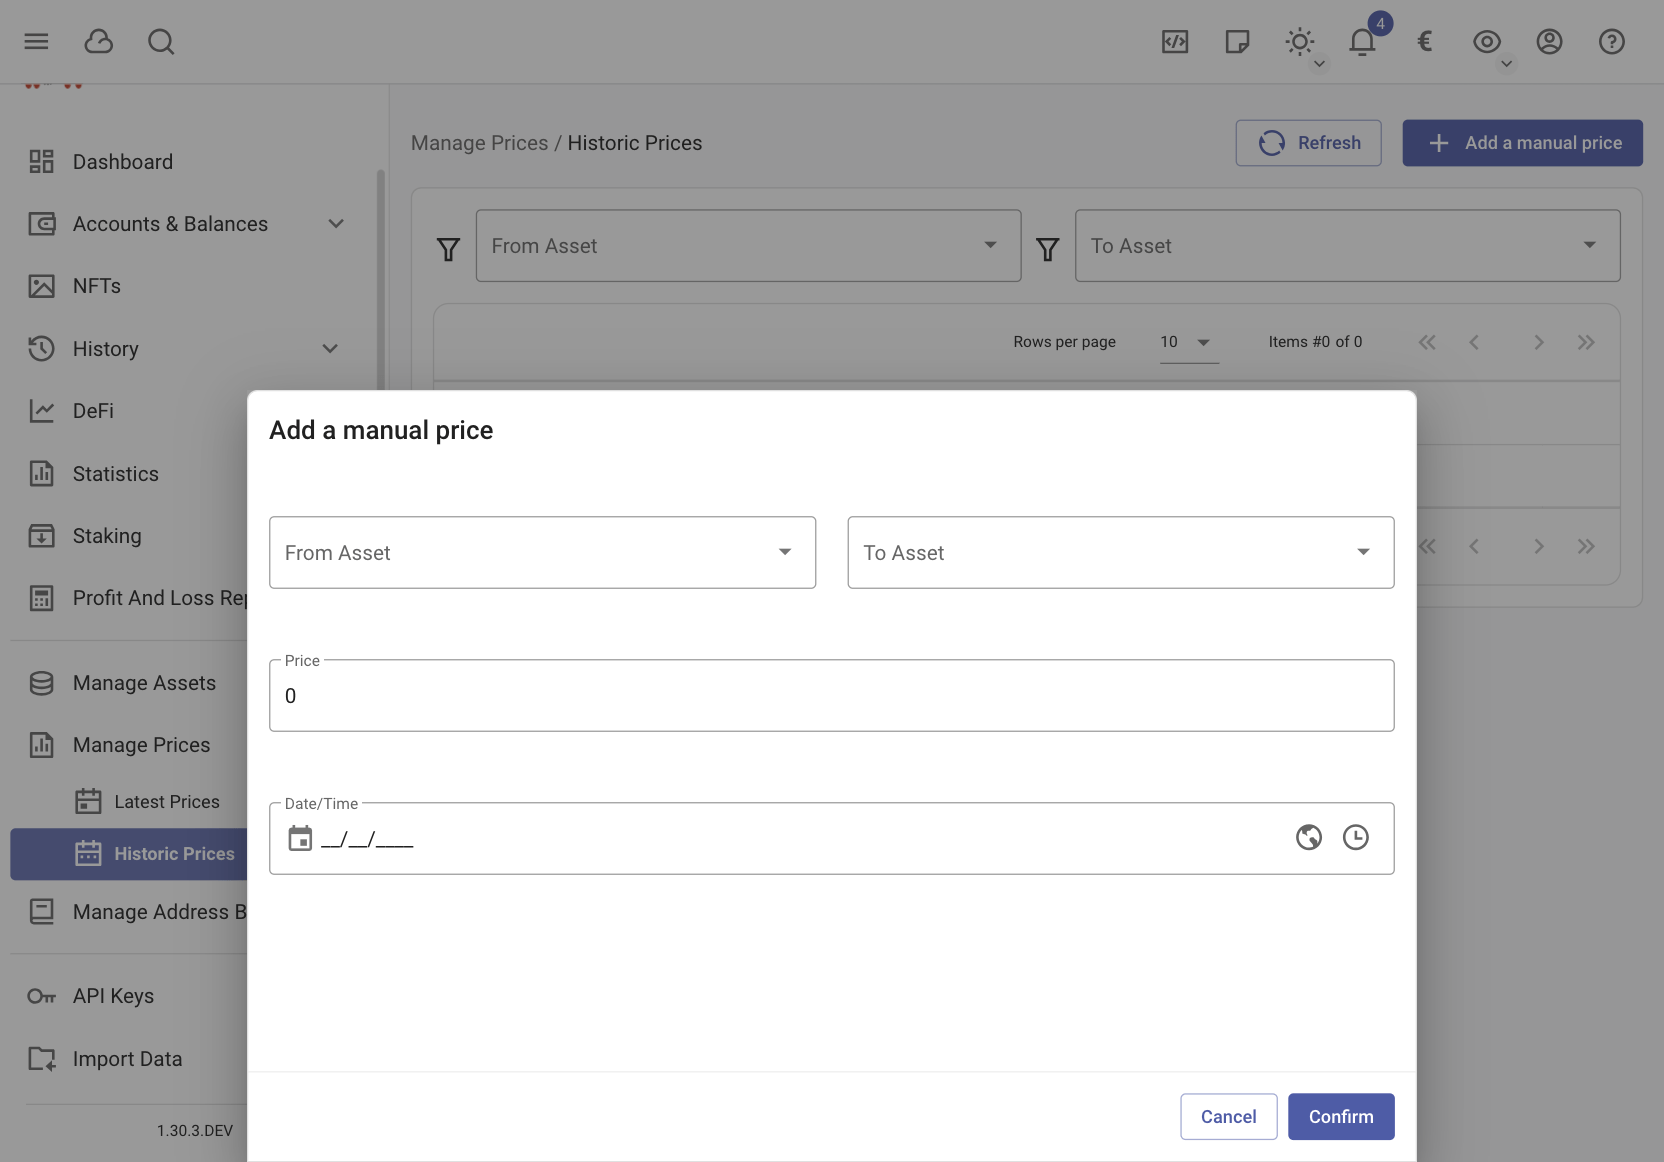
There you can specify the assets, the price and the date of the price. Then you can proceed to save the entry. After saving you should be able to see the new entry.
When a latest price is used it will be visually displayed in the UI.

Decentralized Finance
To track and analyze your DeFi actions use the Decentralized Finance tab from the left side menu. You can choose from the different types of DeFi actions presented in the submenu.
Overview
Rotki provides an overview of your assets in the different Defi protocols.
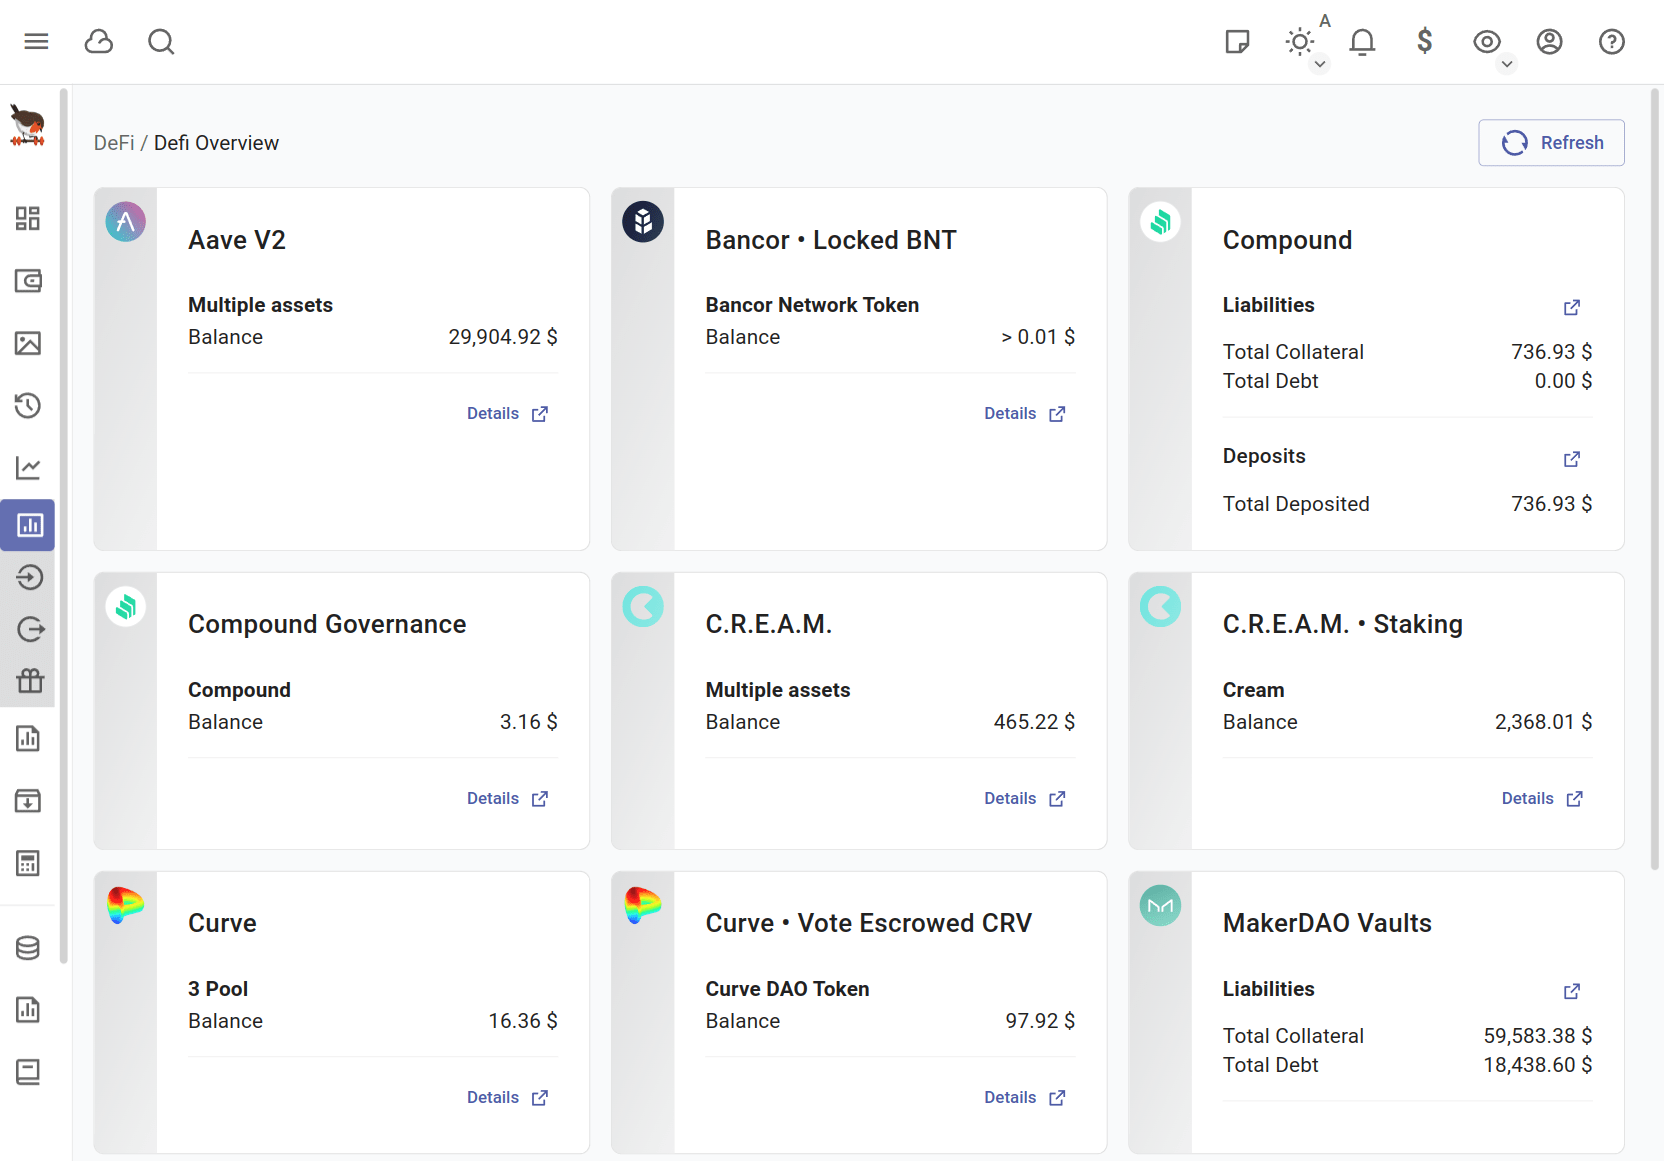
Deposits
In the deposits section you can see the status of your different Defi lending protocols. You can see the status of your Yearn Vaults, Aave lending, Compound supply along with your DAI in MakerDAO DSR.
The accounts are auto-detected from your given blockchain accounts. However you can, and most probably should, manage the different modules and addresses that are queried to make the retrieval faster. For more information you can check Customizing the Module settings.
You can see how much of each asset you have locked over all of your accounts and how much of each is locked for each account across the different protocols.

You can also filter by account and protocol and you can see how the assets are locked in the various protocols.
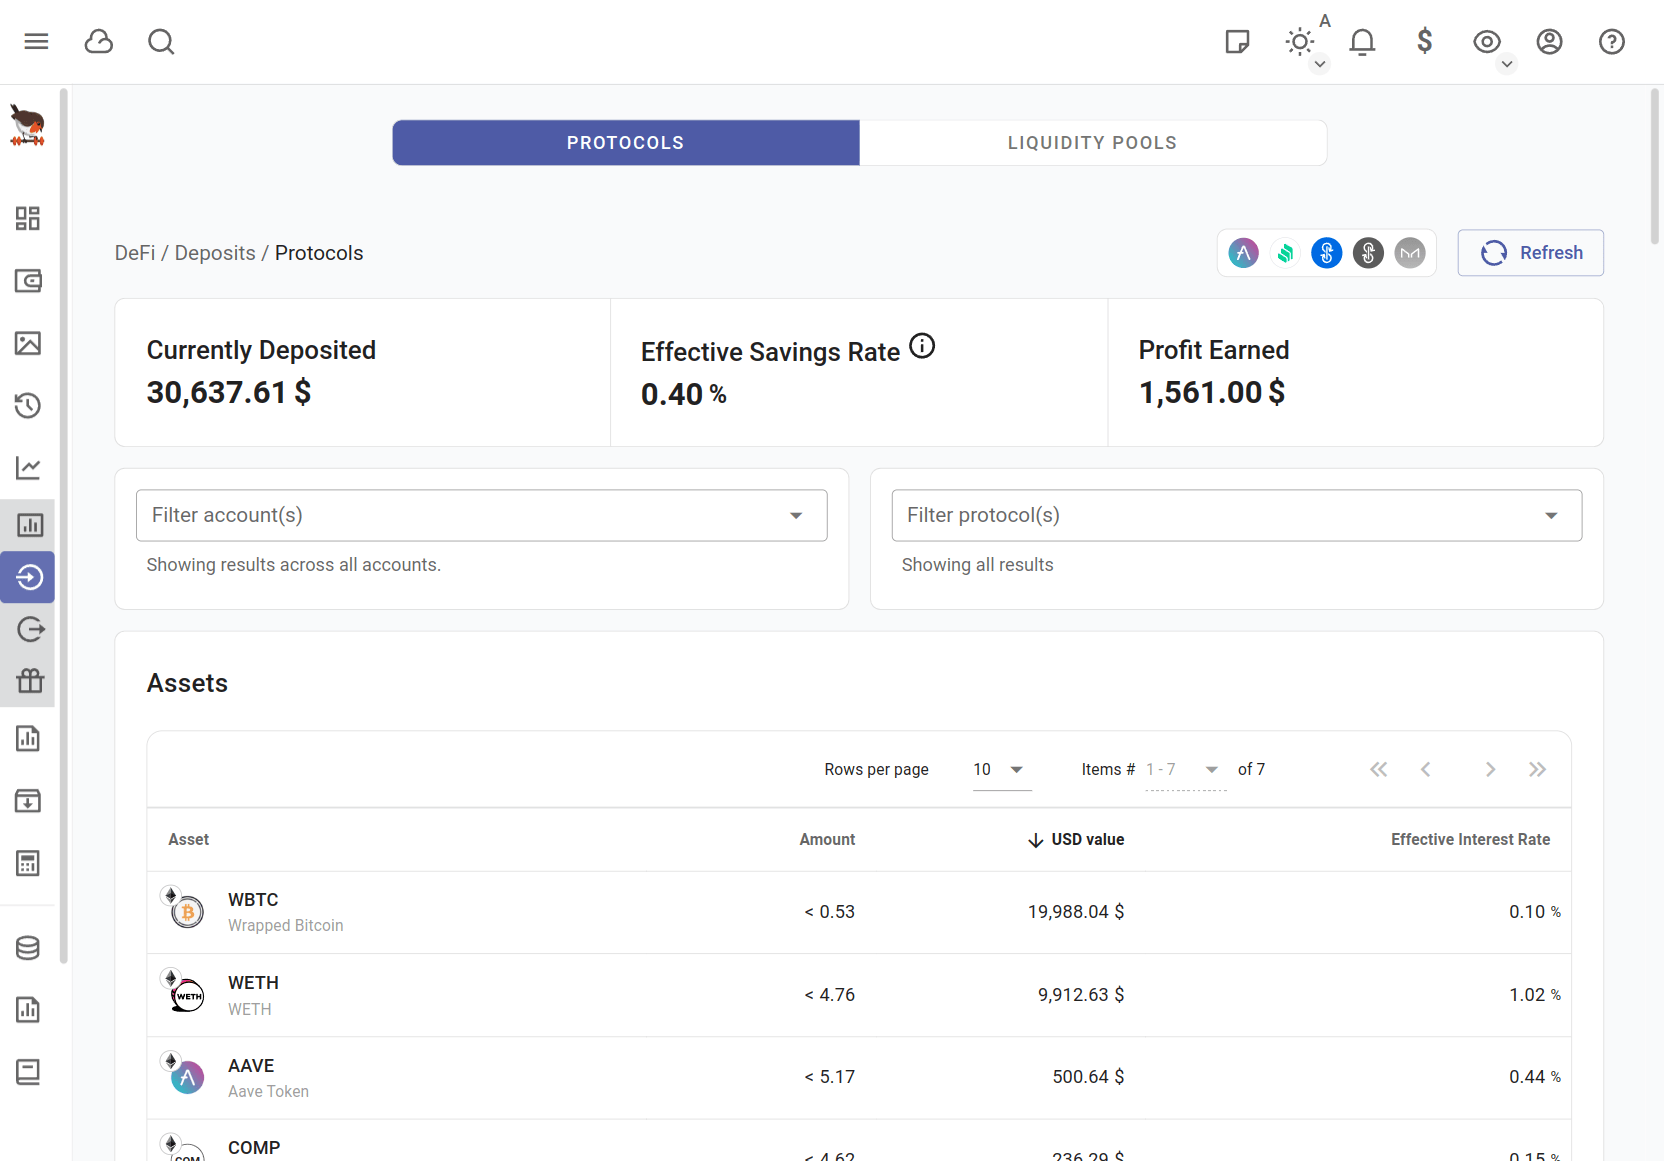
You can see details about the assets locked in your Yearn vaults and check the profit/loss per asset.
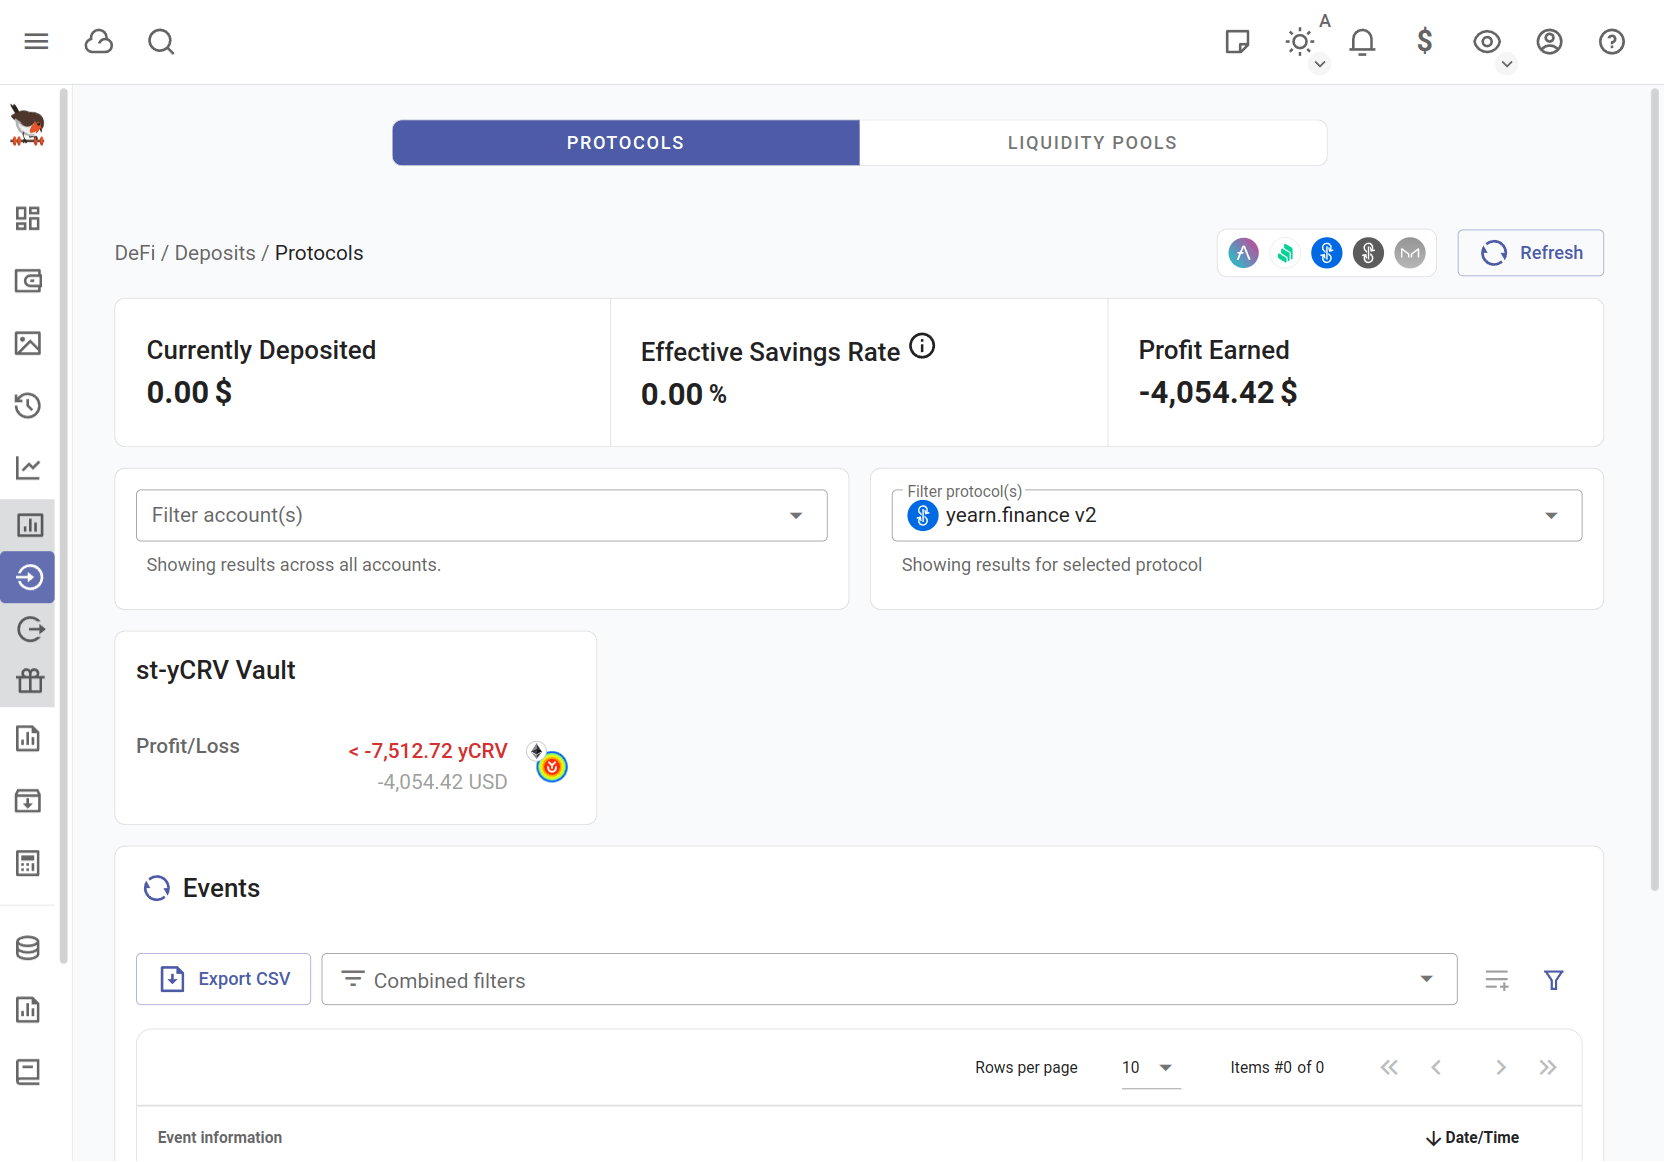
You can also get a detailed list of historical actions performed in the supported Defi protocols such as deposits withdrawals etc.

Finally you need to have a premium subscription in order for the total amount of earned or lost value per asset in a given time period to be counted in the profit/loss report.
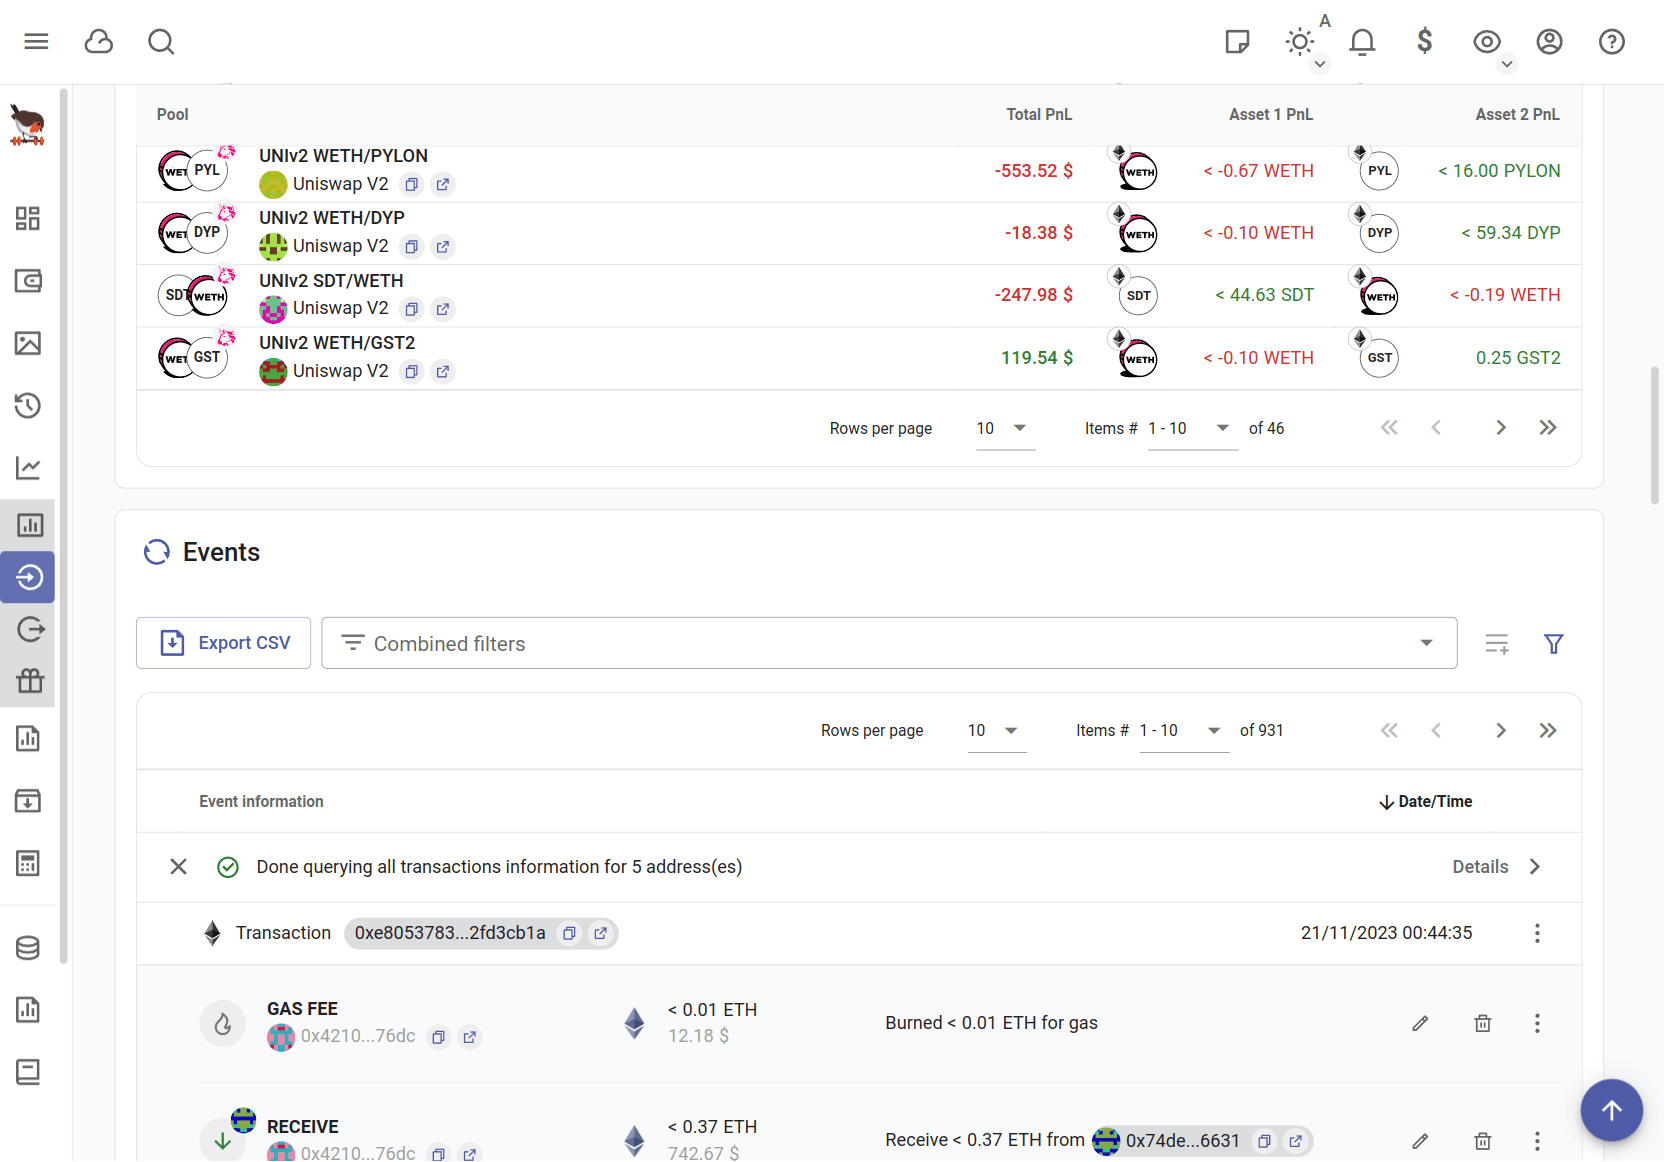
Liquidity Pools
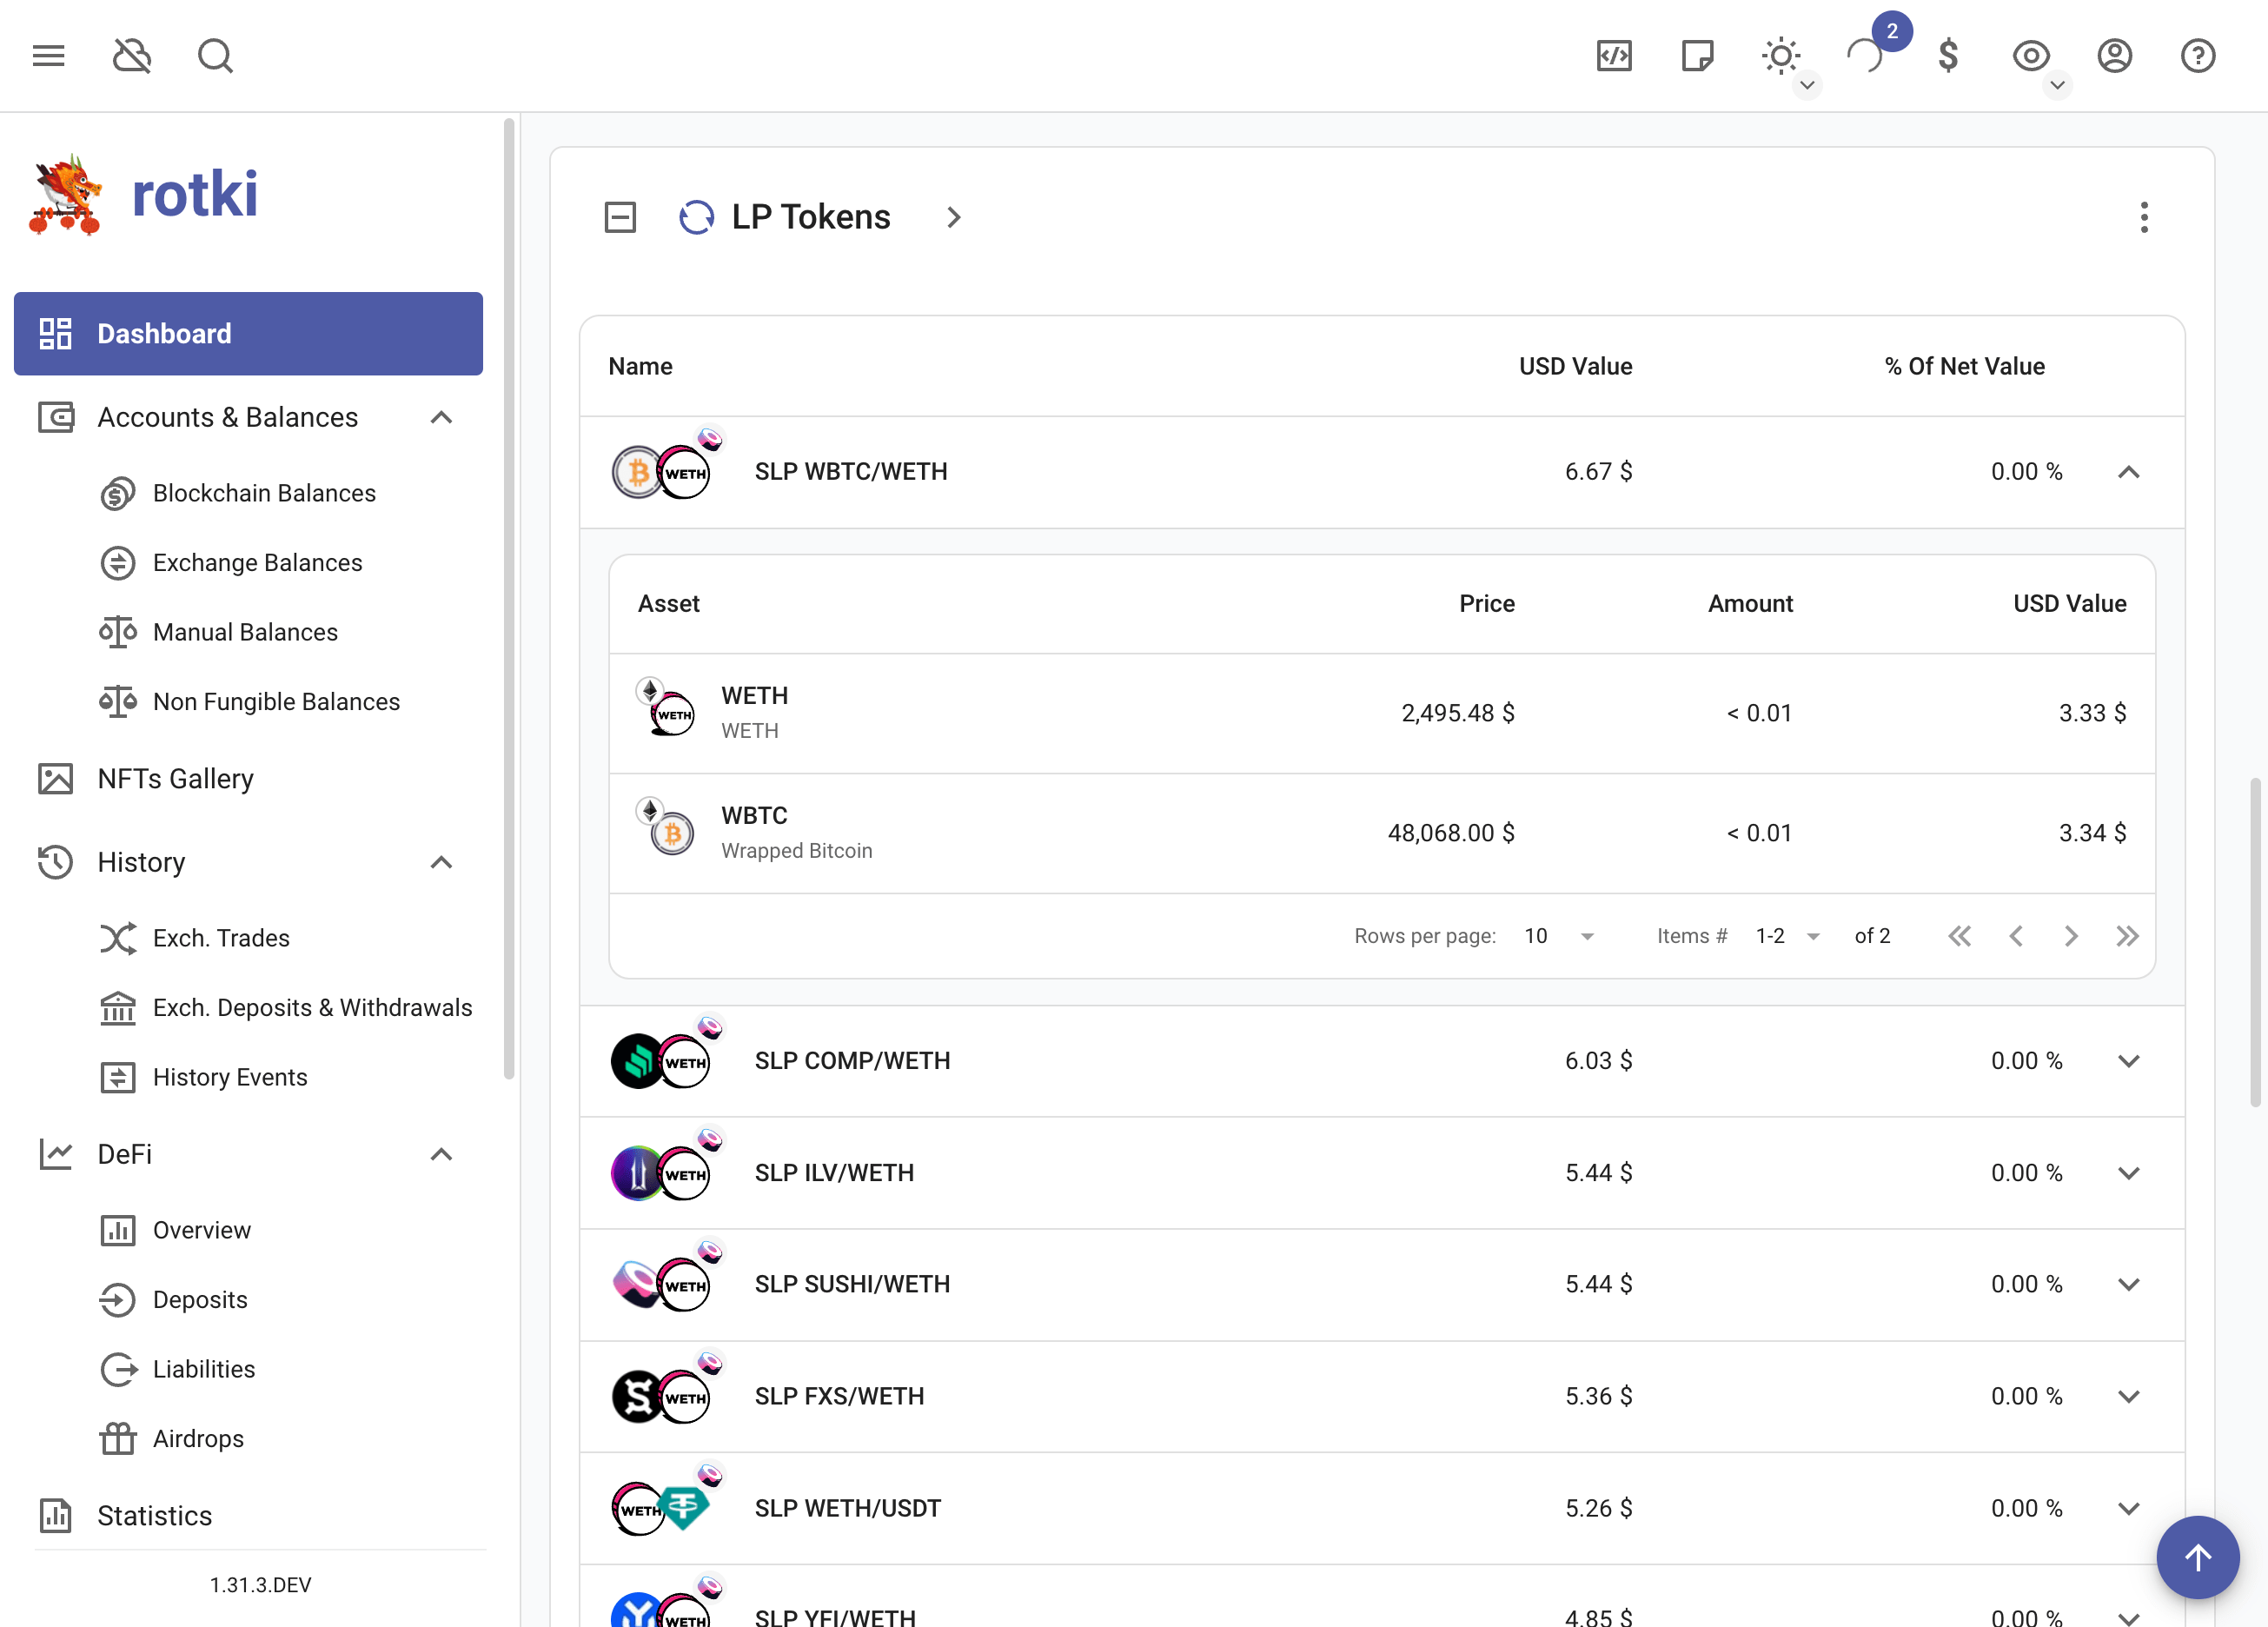
Rotki allows its users to keep track of their Liquidity Pools. An overview is available in the dashboard and it is also possible to get a per protocol view in the deposits section.
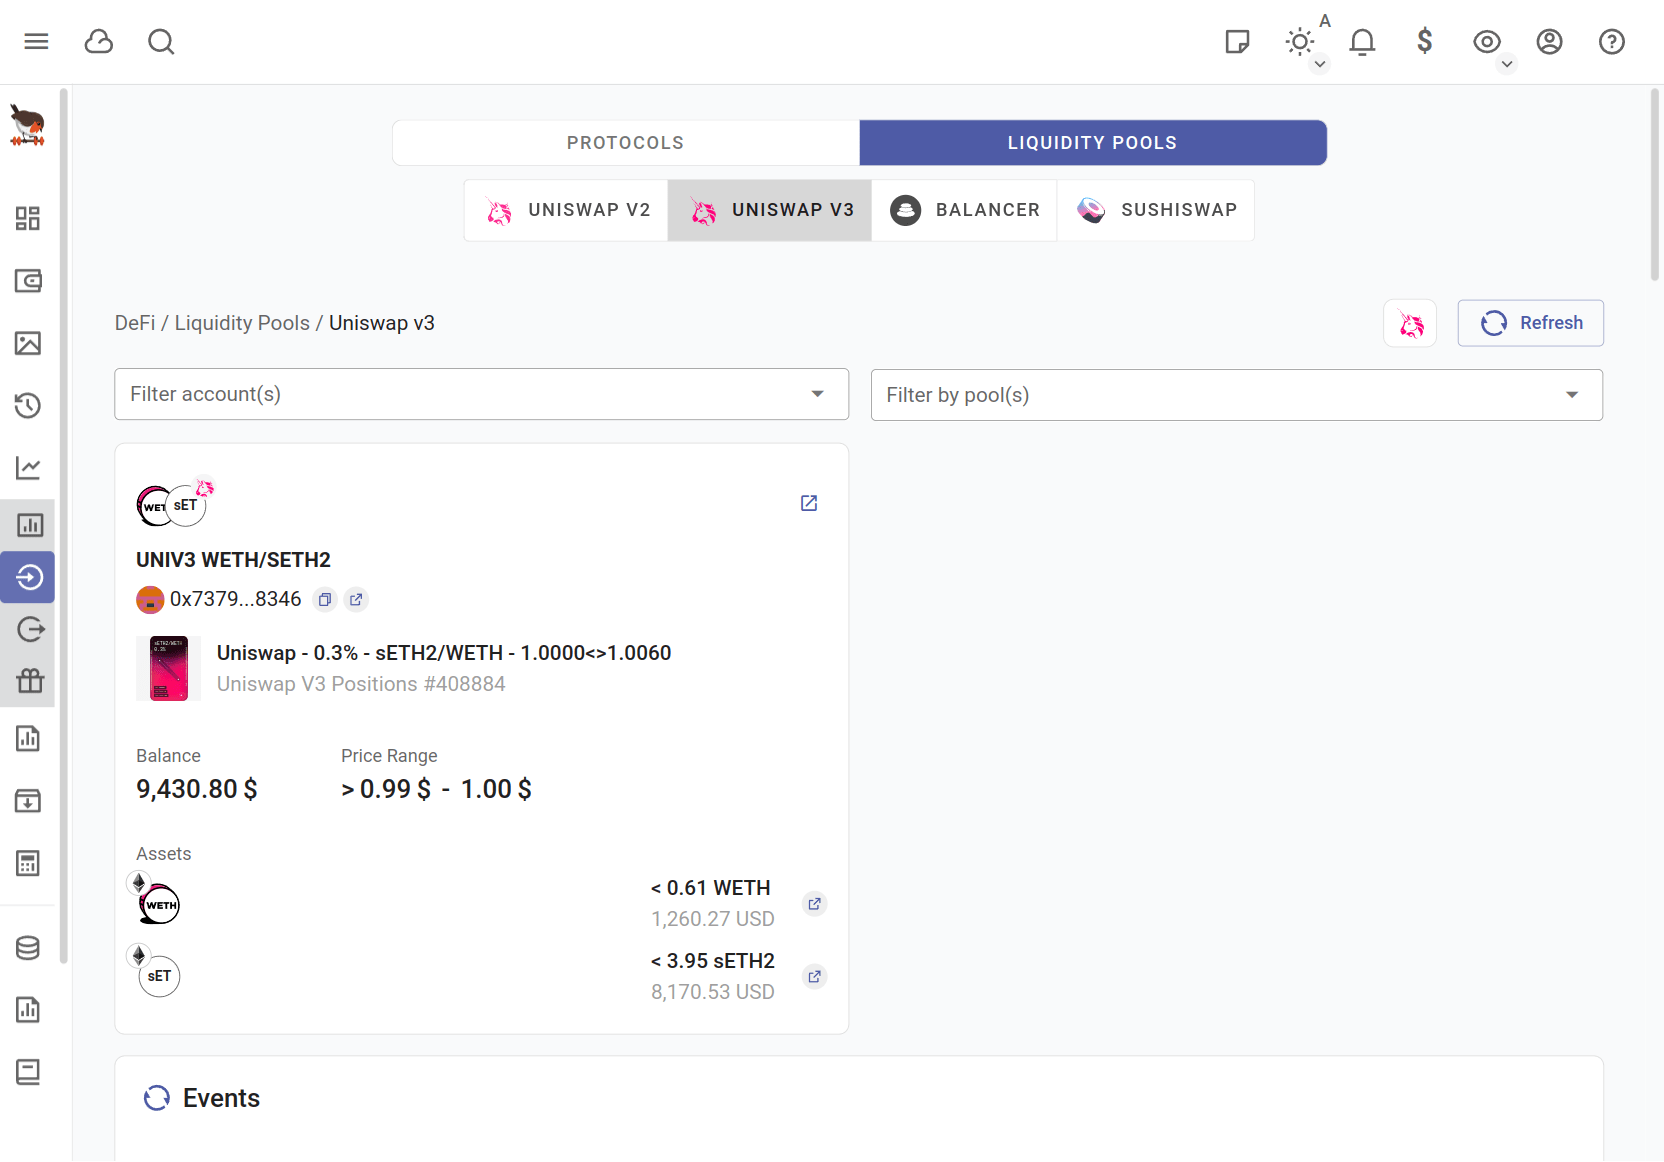
These are the supported Liquidity Pools balances by rotki:
Uniswap v2
Uniswap v3 (Underlying assets available to premium users only)
Sushiswap (Premium users only)
Balancer (Premium users only)
The liquidity pool support allows premium users to see their balances, the per pool profit/loss and any events (such as mint/burn) performed.

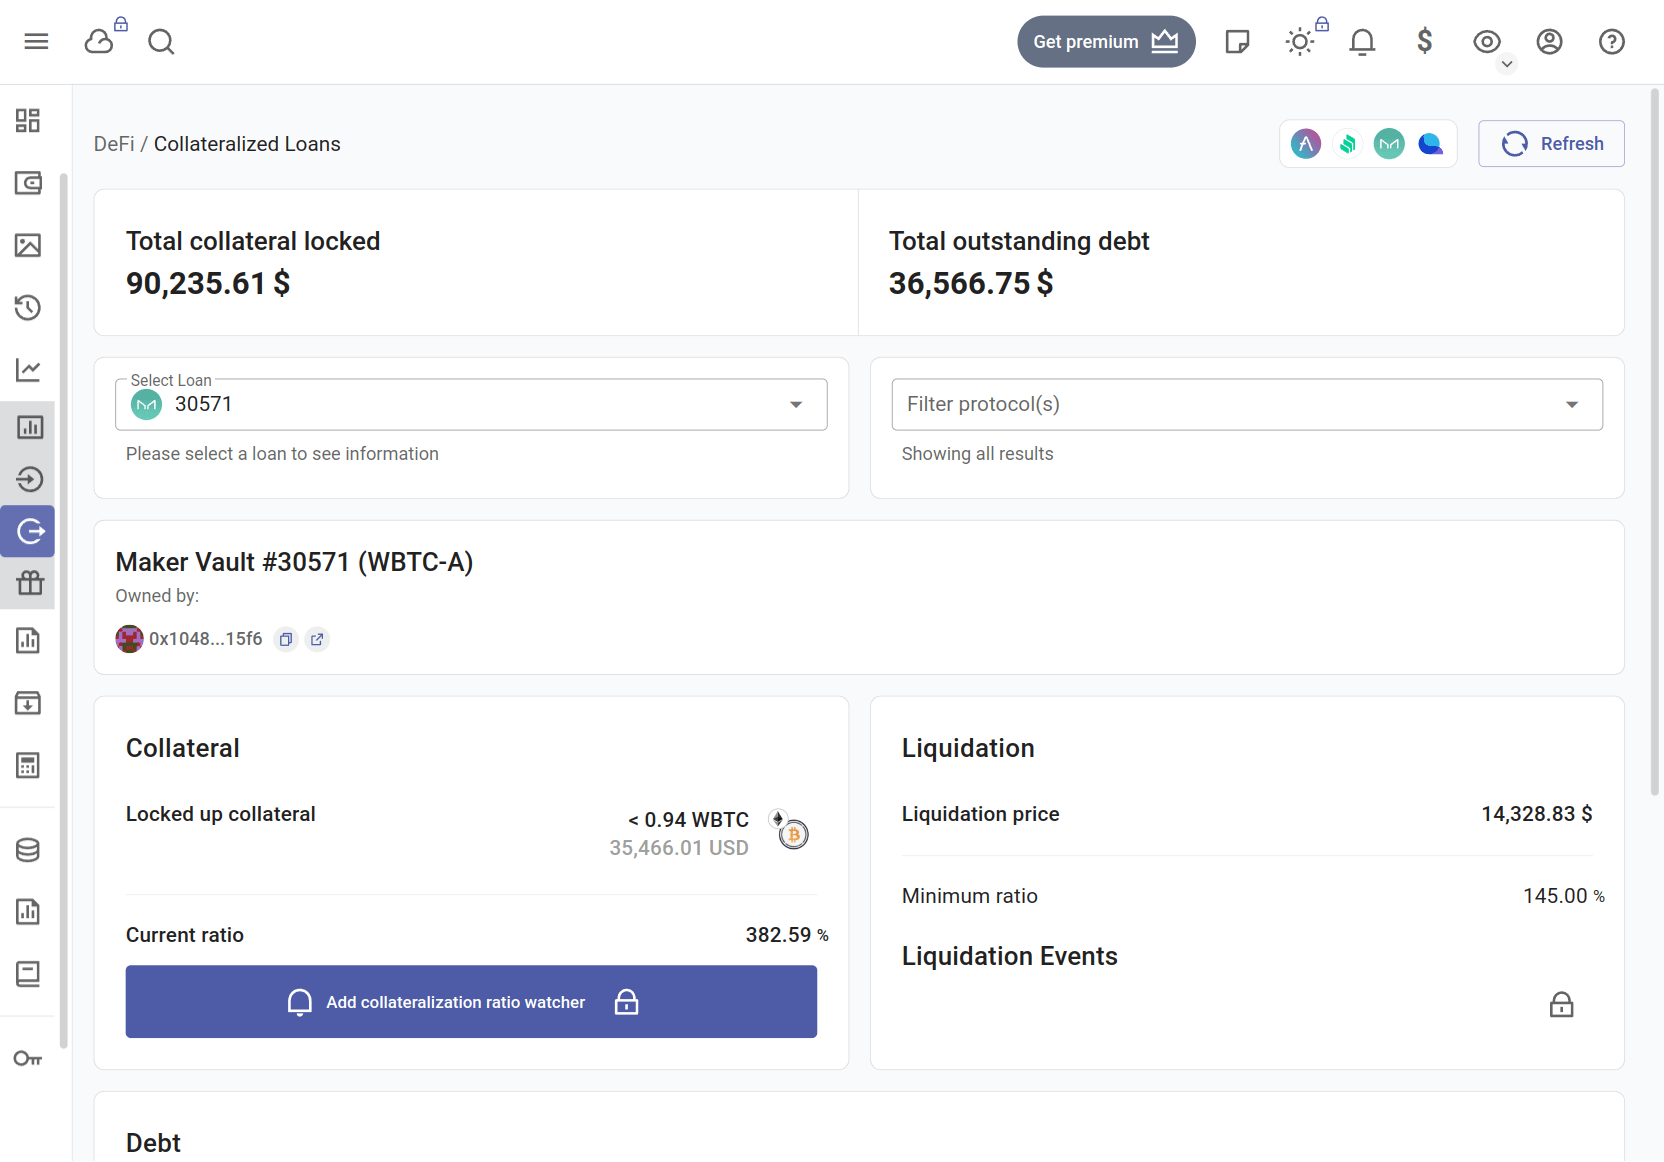
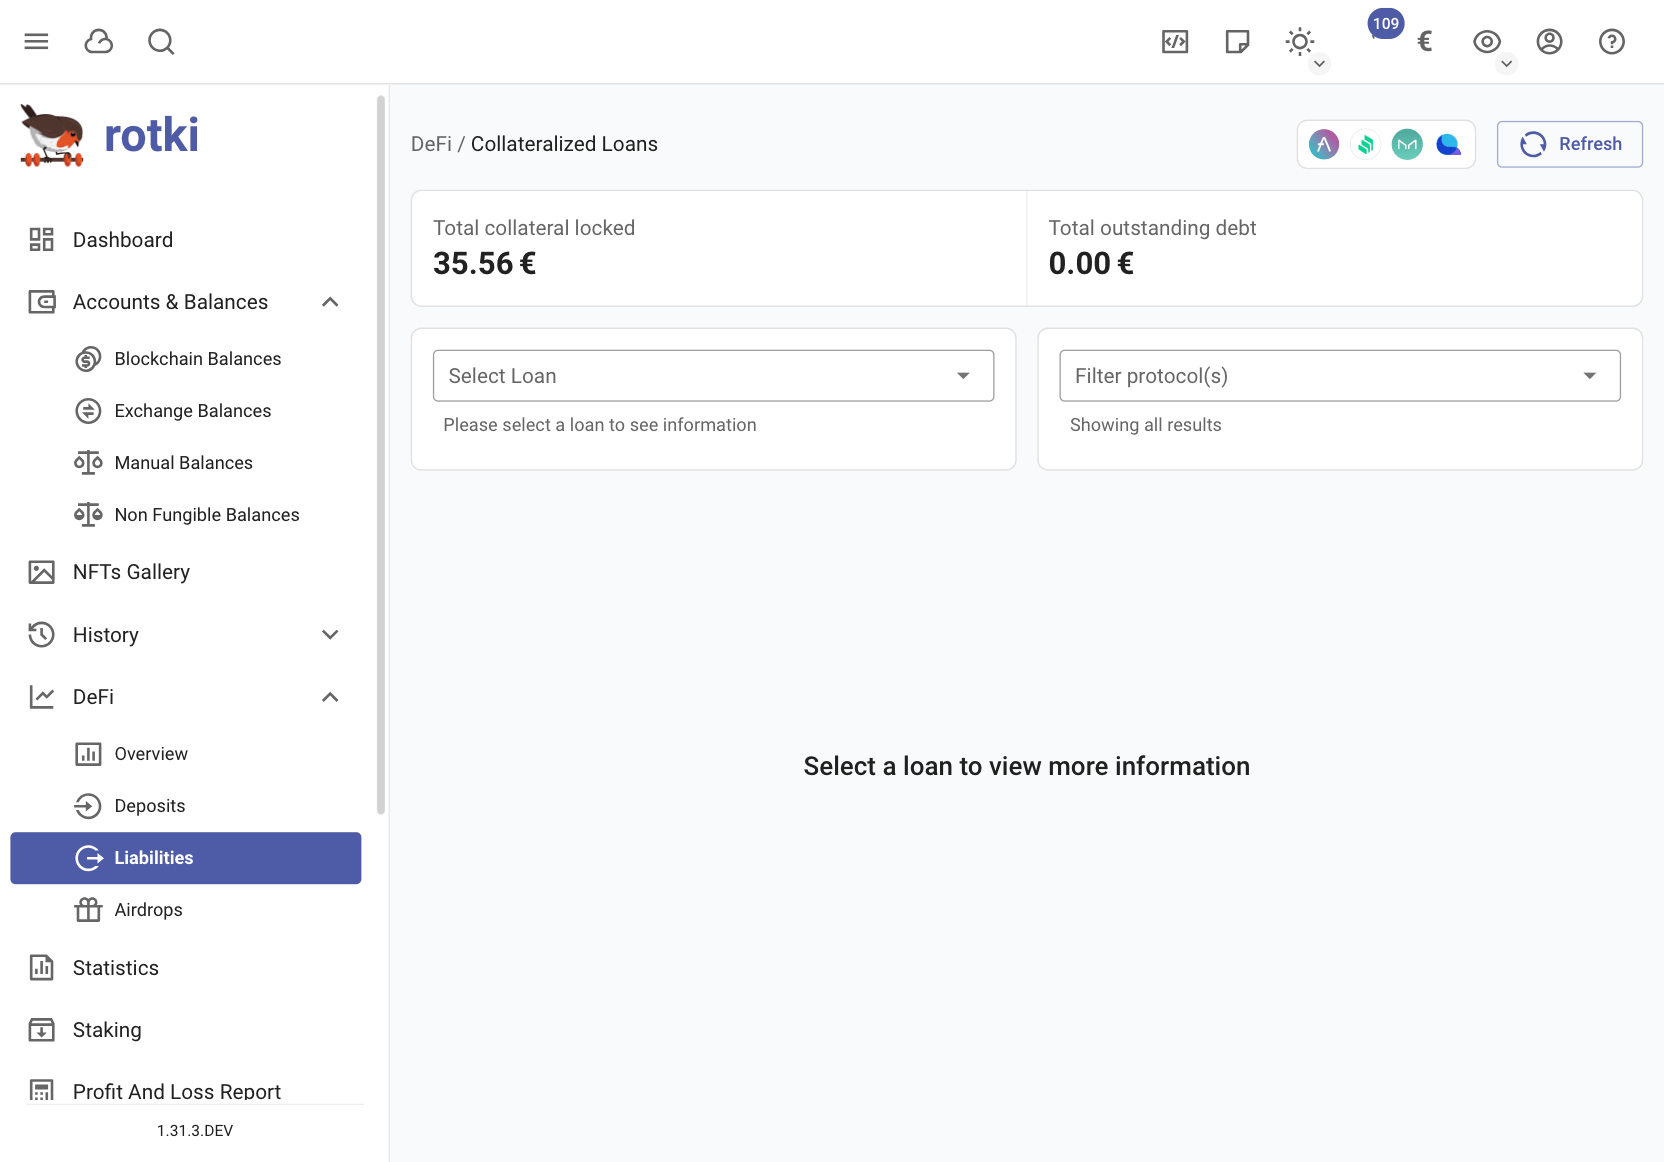
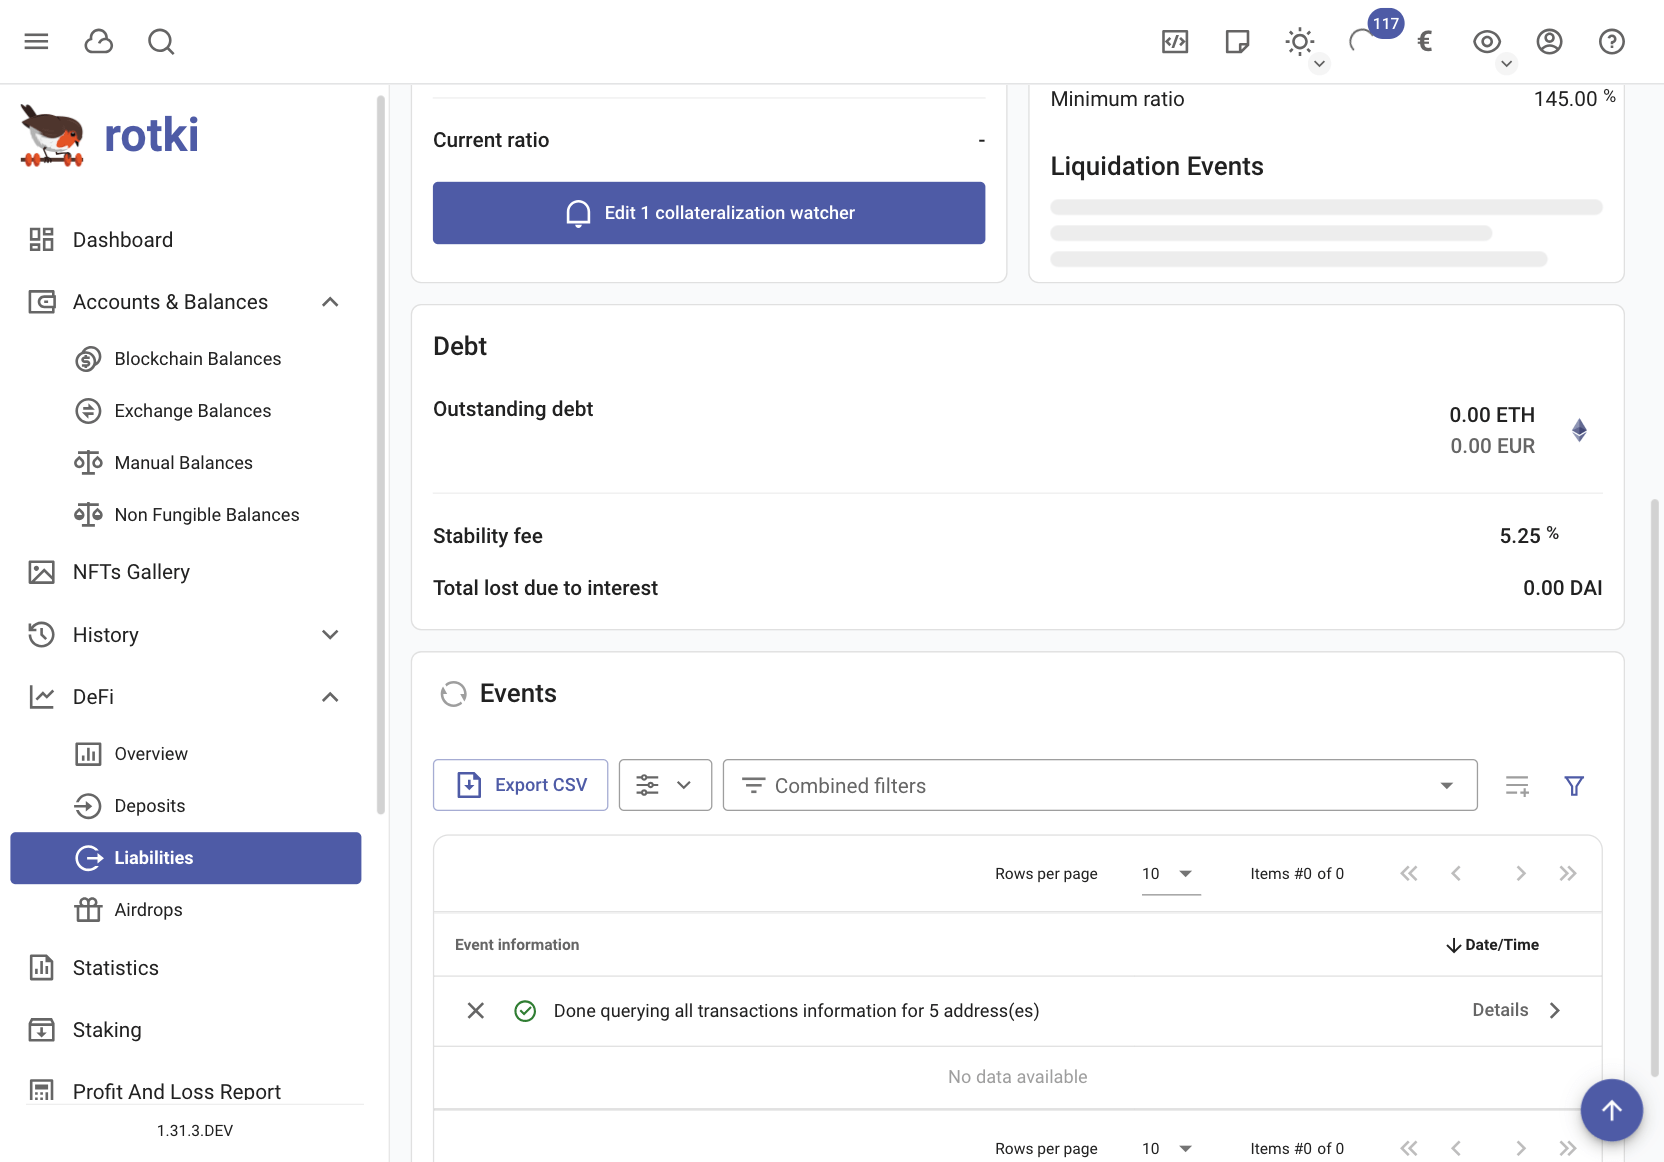
Liabilities
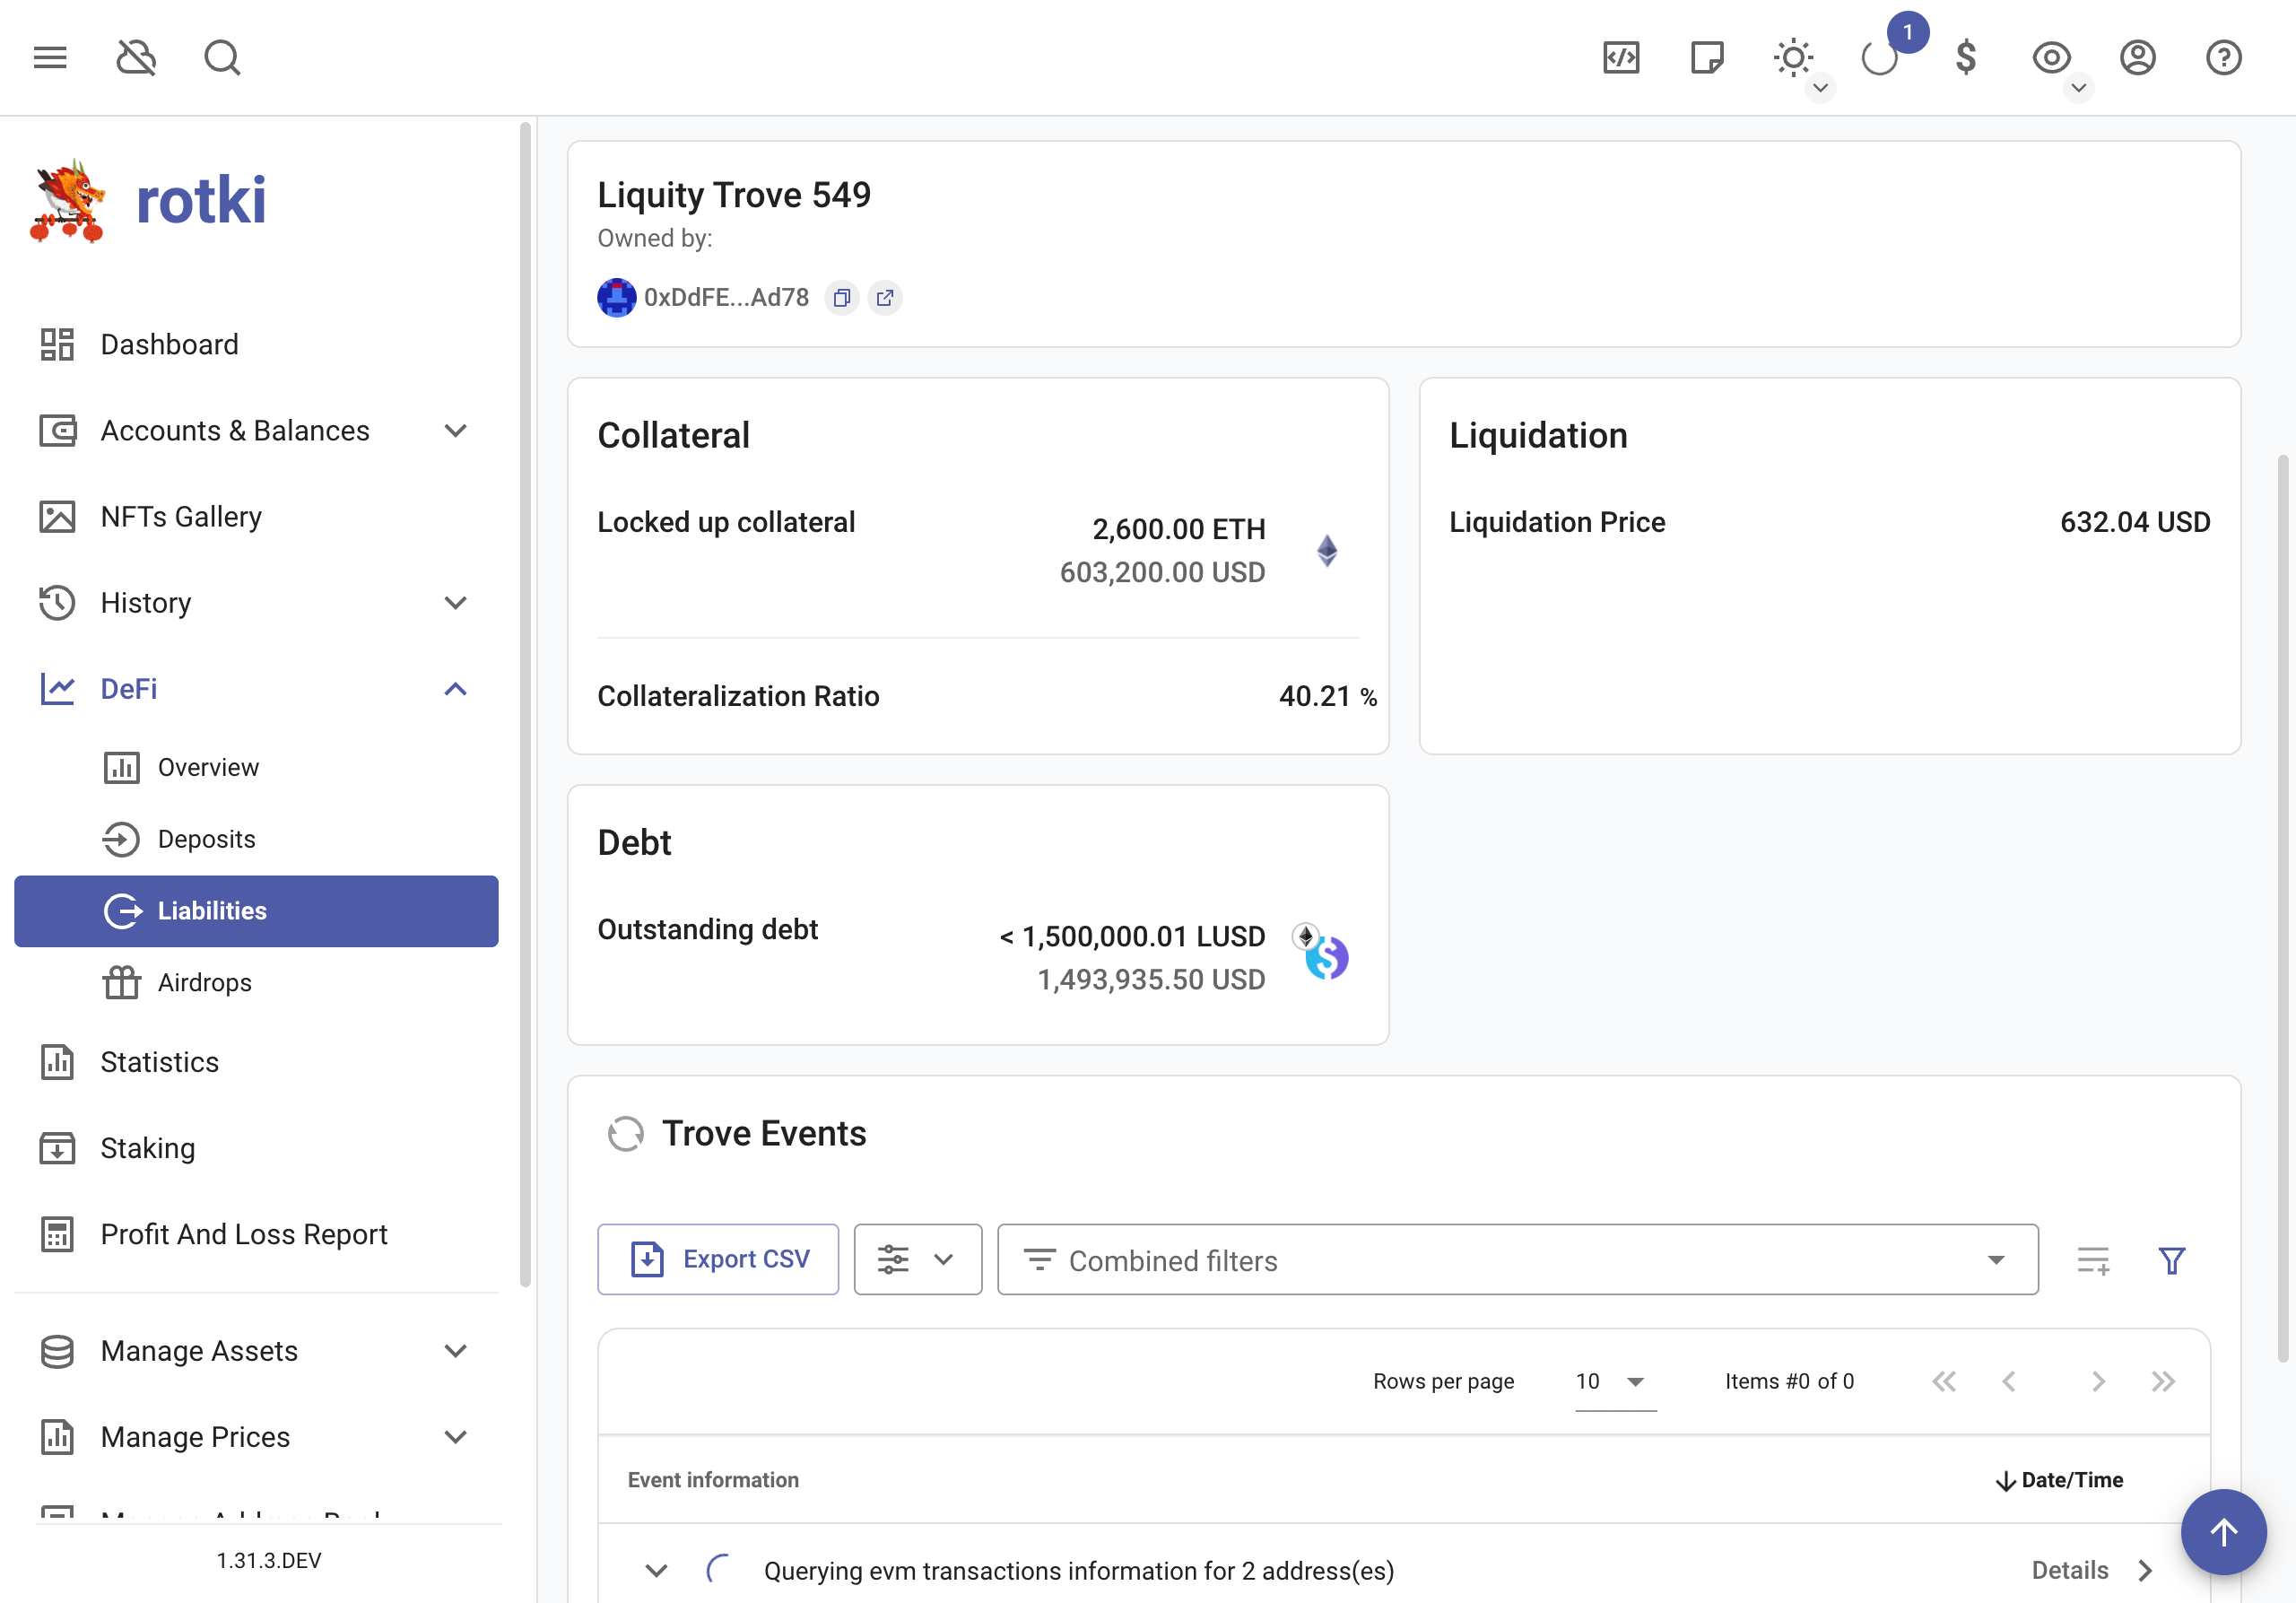
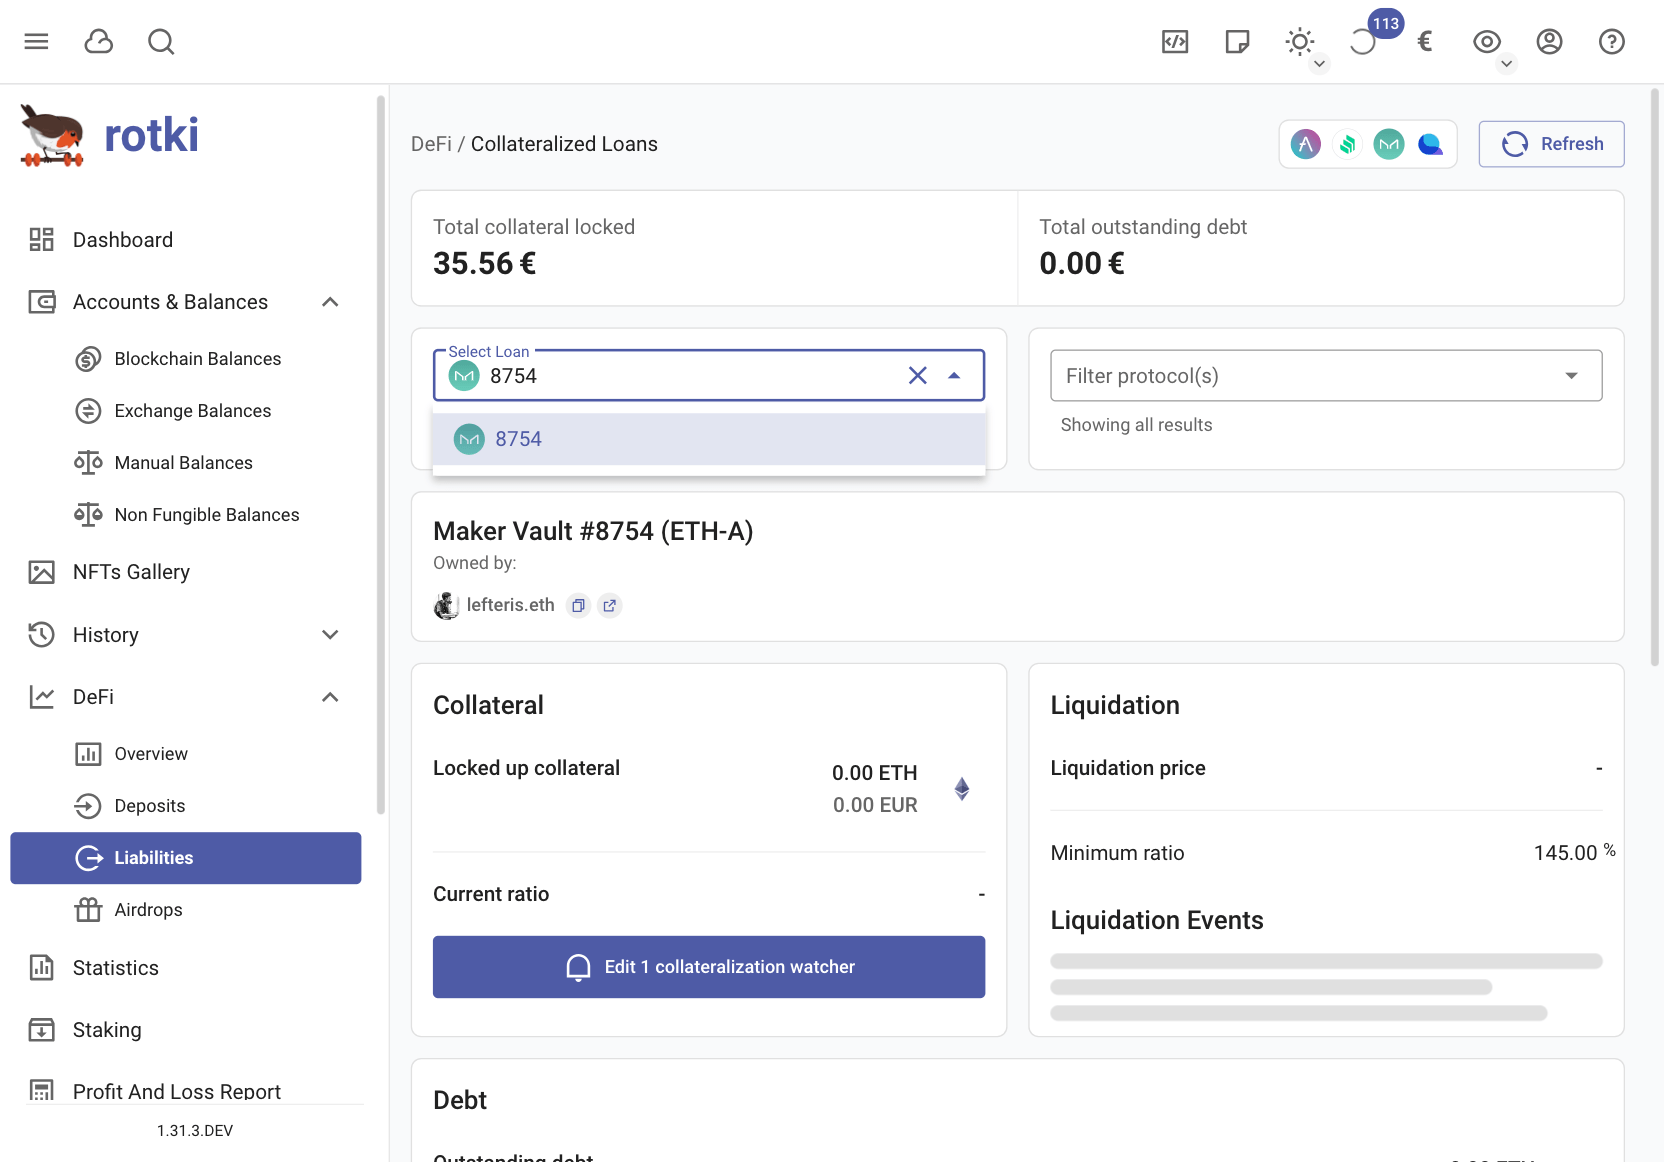
In the liabilities section you can find information on your Aave Borrowing, Compound Borrow, Liquity troves and MakerDAO Vaults. These collateralized loans can be autodetected from your ethereum accounts and information about each one of them is displayed. However you can manage the different modules and addresses that are queried to make the retrieval faster. For more information you can check Customizing the Module settings.
As a normal non-premium user you can see all your vaults/troves, and for each one inspect the locked collateral, collateralization, debt generated and the liquidation price.
The information displayed for a Liquity trove shows as in this capture
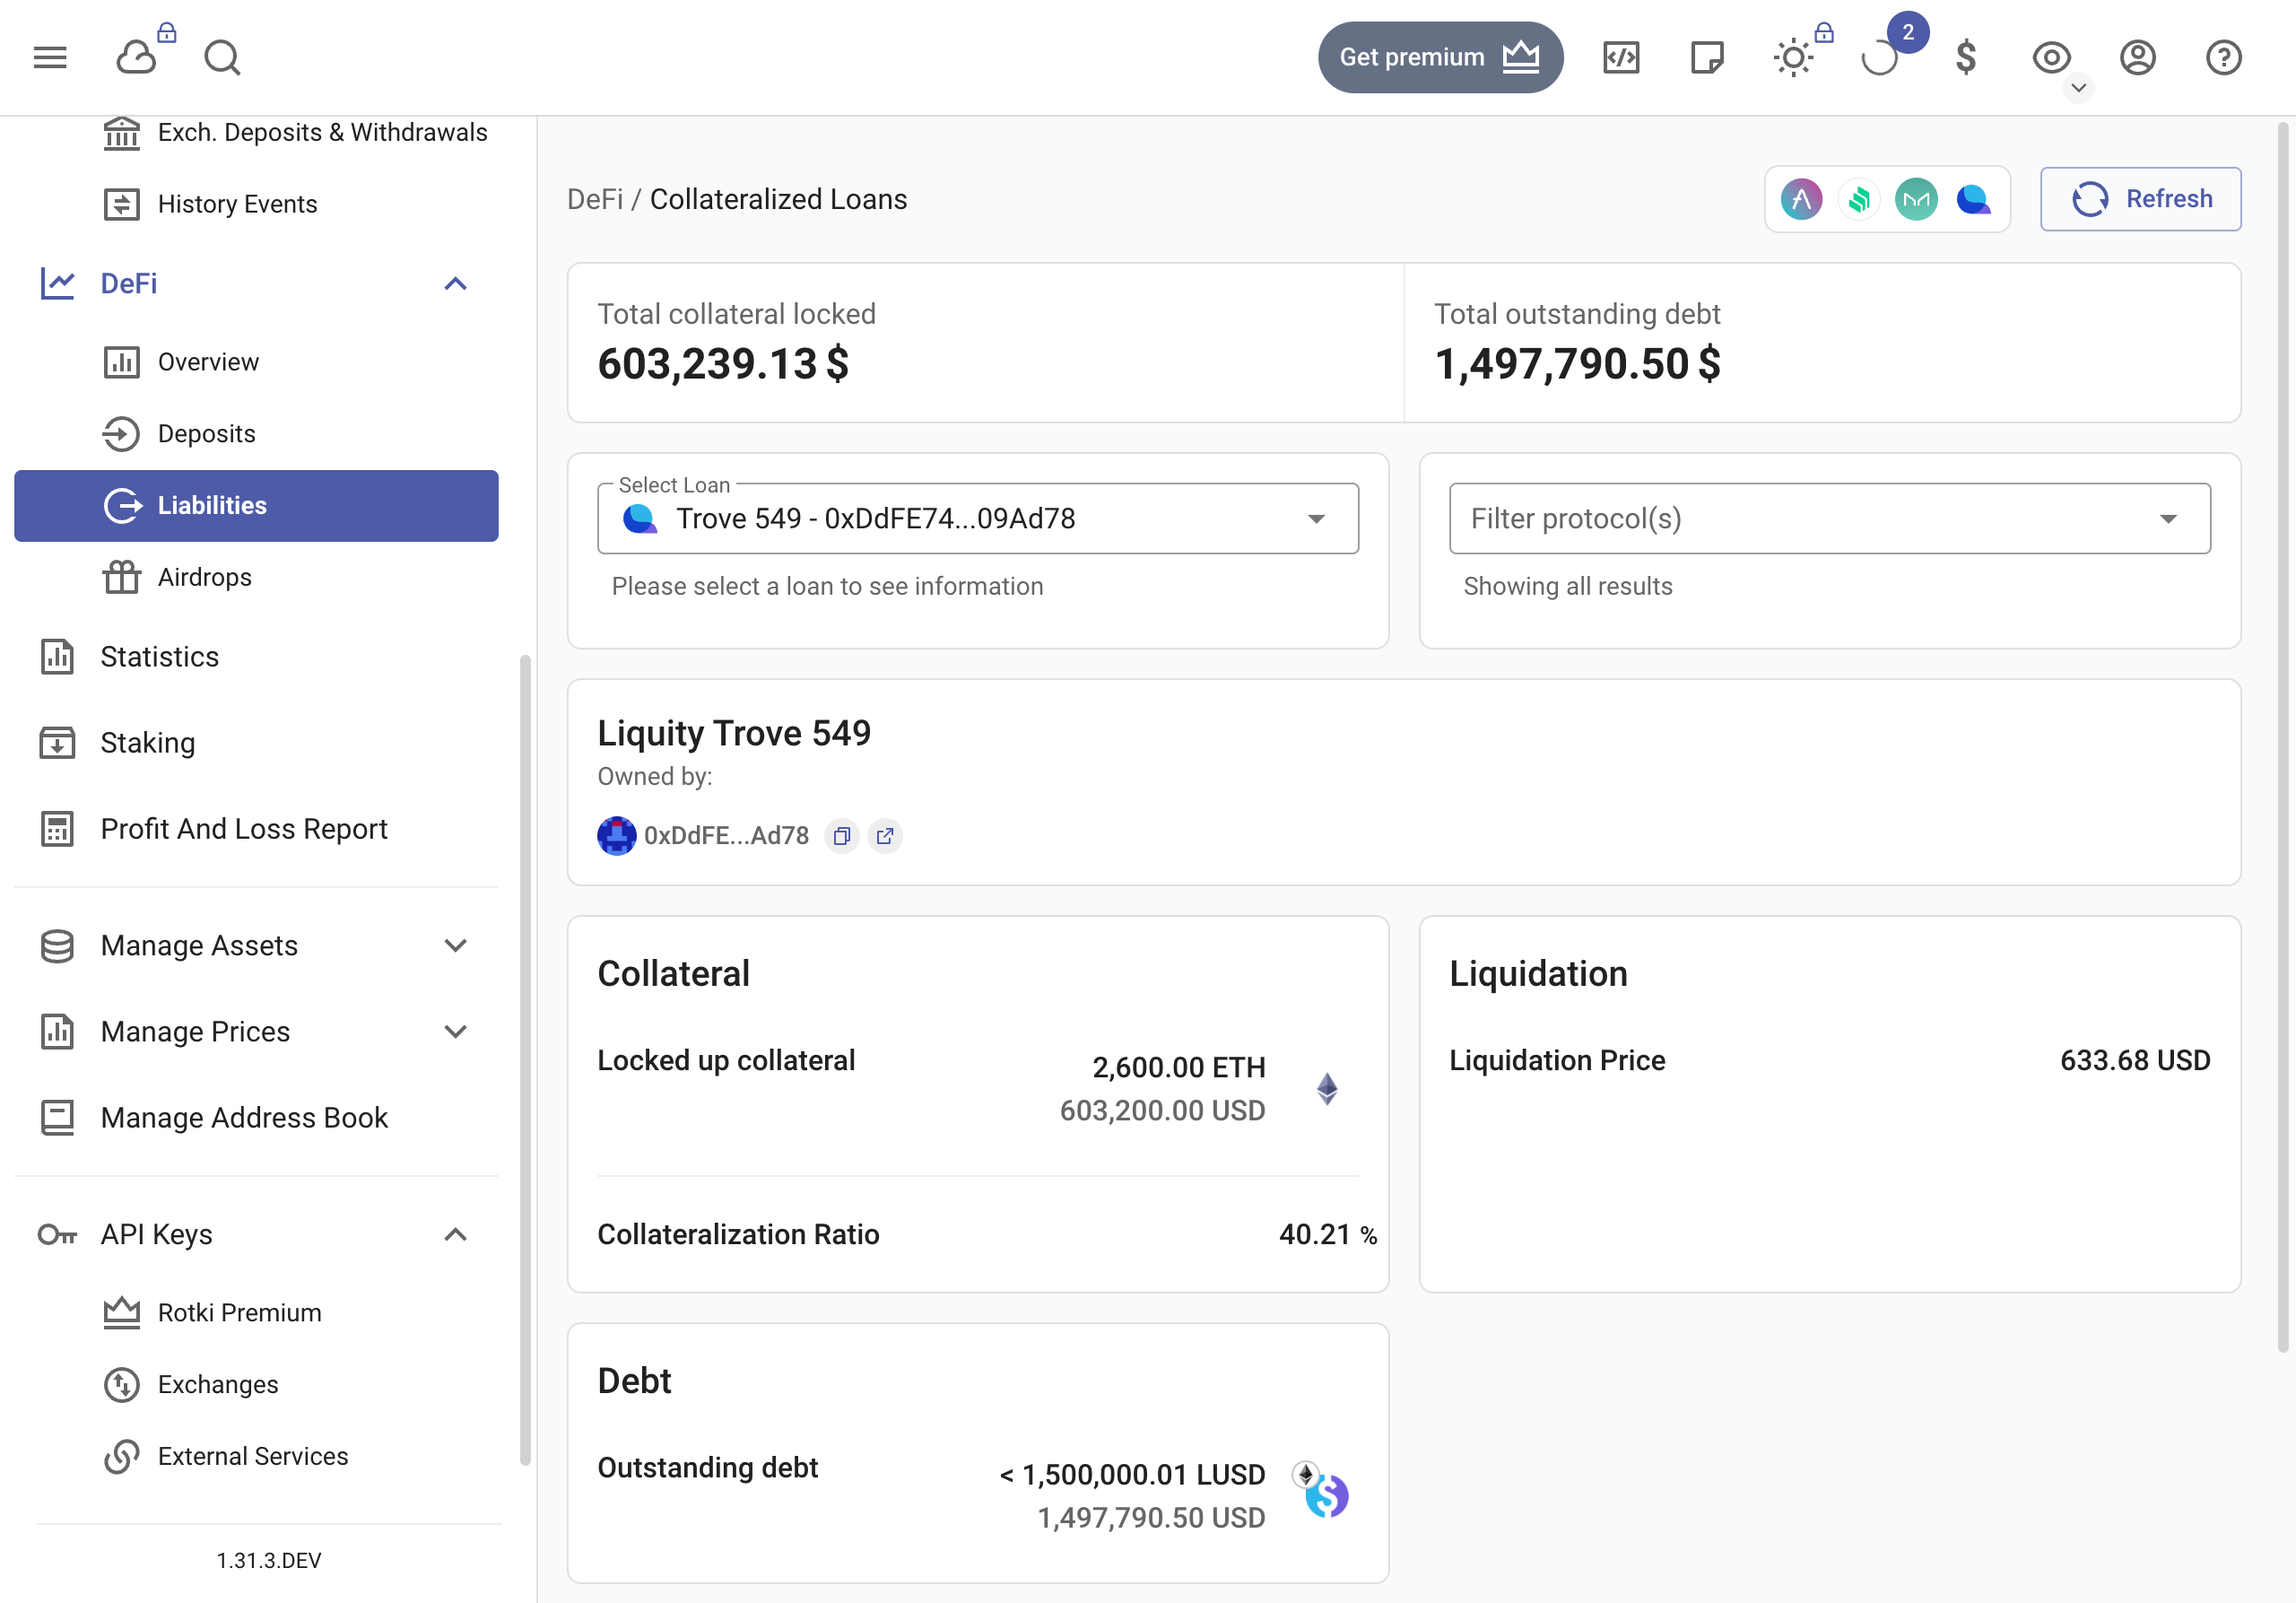
With a premium subscription you can also see additional information such as the creation time of the vault, list of historical activities, total interest owed and liquidation events.

in the case of troves with a premium subscription you can see the history of events and the changes in collateral and debt
Premium users can also have makervault interest taken into account in the profit/loss report.
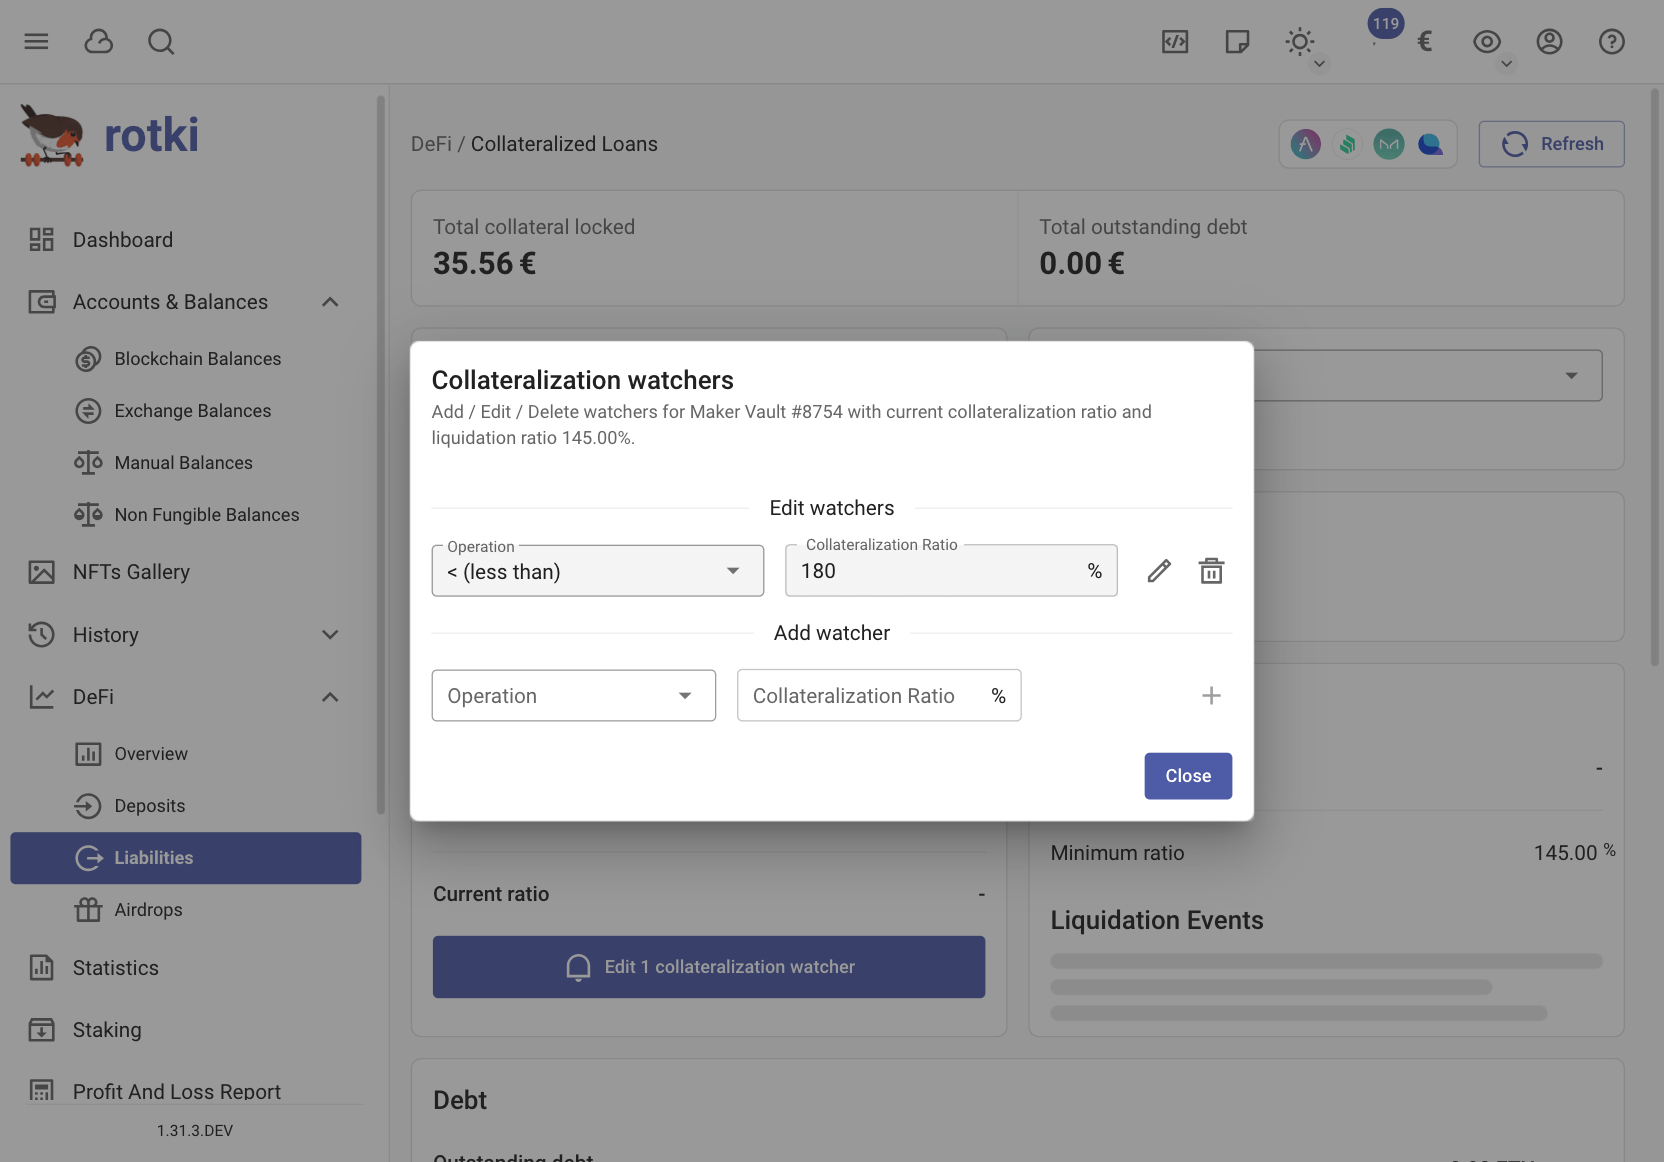
Finally premium users can create watchers for their vaults.
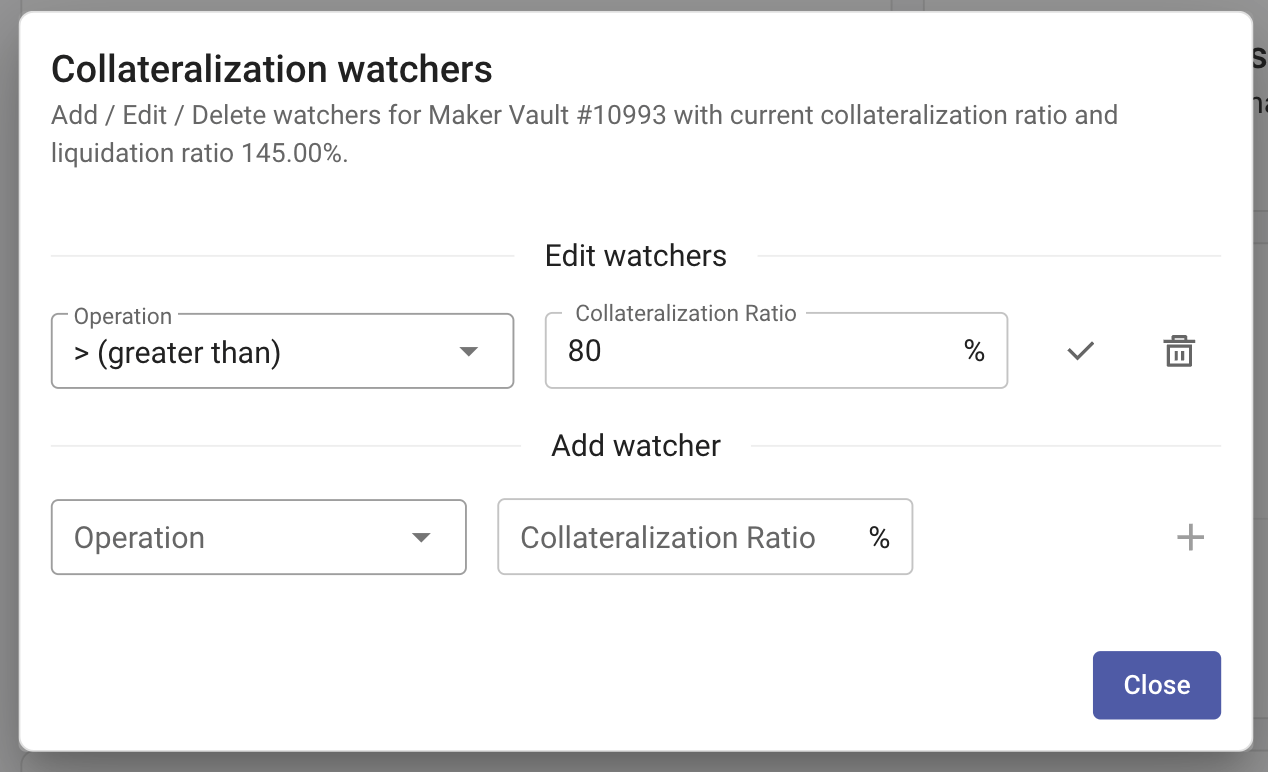
They can add a target collateralization ratio they would like rotki to watch for in a vault. If the collateralization ratio becomes less/greater than that ratio then an alert is sent to your email. This watcher service runs on the rotki server so you don’t even need to leave the application open.
Below you can see a small demonstration of the usage of makerdao vaults by a premium account.
Creating a profit/loss report
Rotki creates a profit/loss report (called PnL for short) for you based on your trades and other events and the provided accounting settings. This is essentially a calculation of profit or loss for all your events based on the given dates. Before getting into the details of generating a report, here’s a few important details regarding the report generation algorithm:
By default, rotki uses an accounting strategy called “First In - First Out” (short: FIFO). There are plans to implement other strategies (e.g. “Last In - First Out”).
Rotki allows users in jurisdictions offering a tax free holding period (e.g. Germany with 1 year) to specify the period in days. To adjust this value, see the section Customizing the account settings.
When generating a report for a custom period, where rotki is aware of the user’s previous crypto holdings (e.g. we trade BTC between the years 2017 - 2019 but we ask for a report between 2018 - 2019), it takes all prior crypto holdings into account to calculate a starting balance for the given period. For example, say you traded BTC between 2017 - 2019 with a balance of 0.1 BTC on December 31, 2017. When generating a pnl report for 2018 - 2019, rotki will take the 0.1 BTC from December 31, 2017 as a start balance for its calculations in the period of 2018.
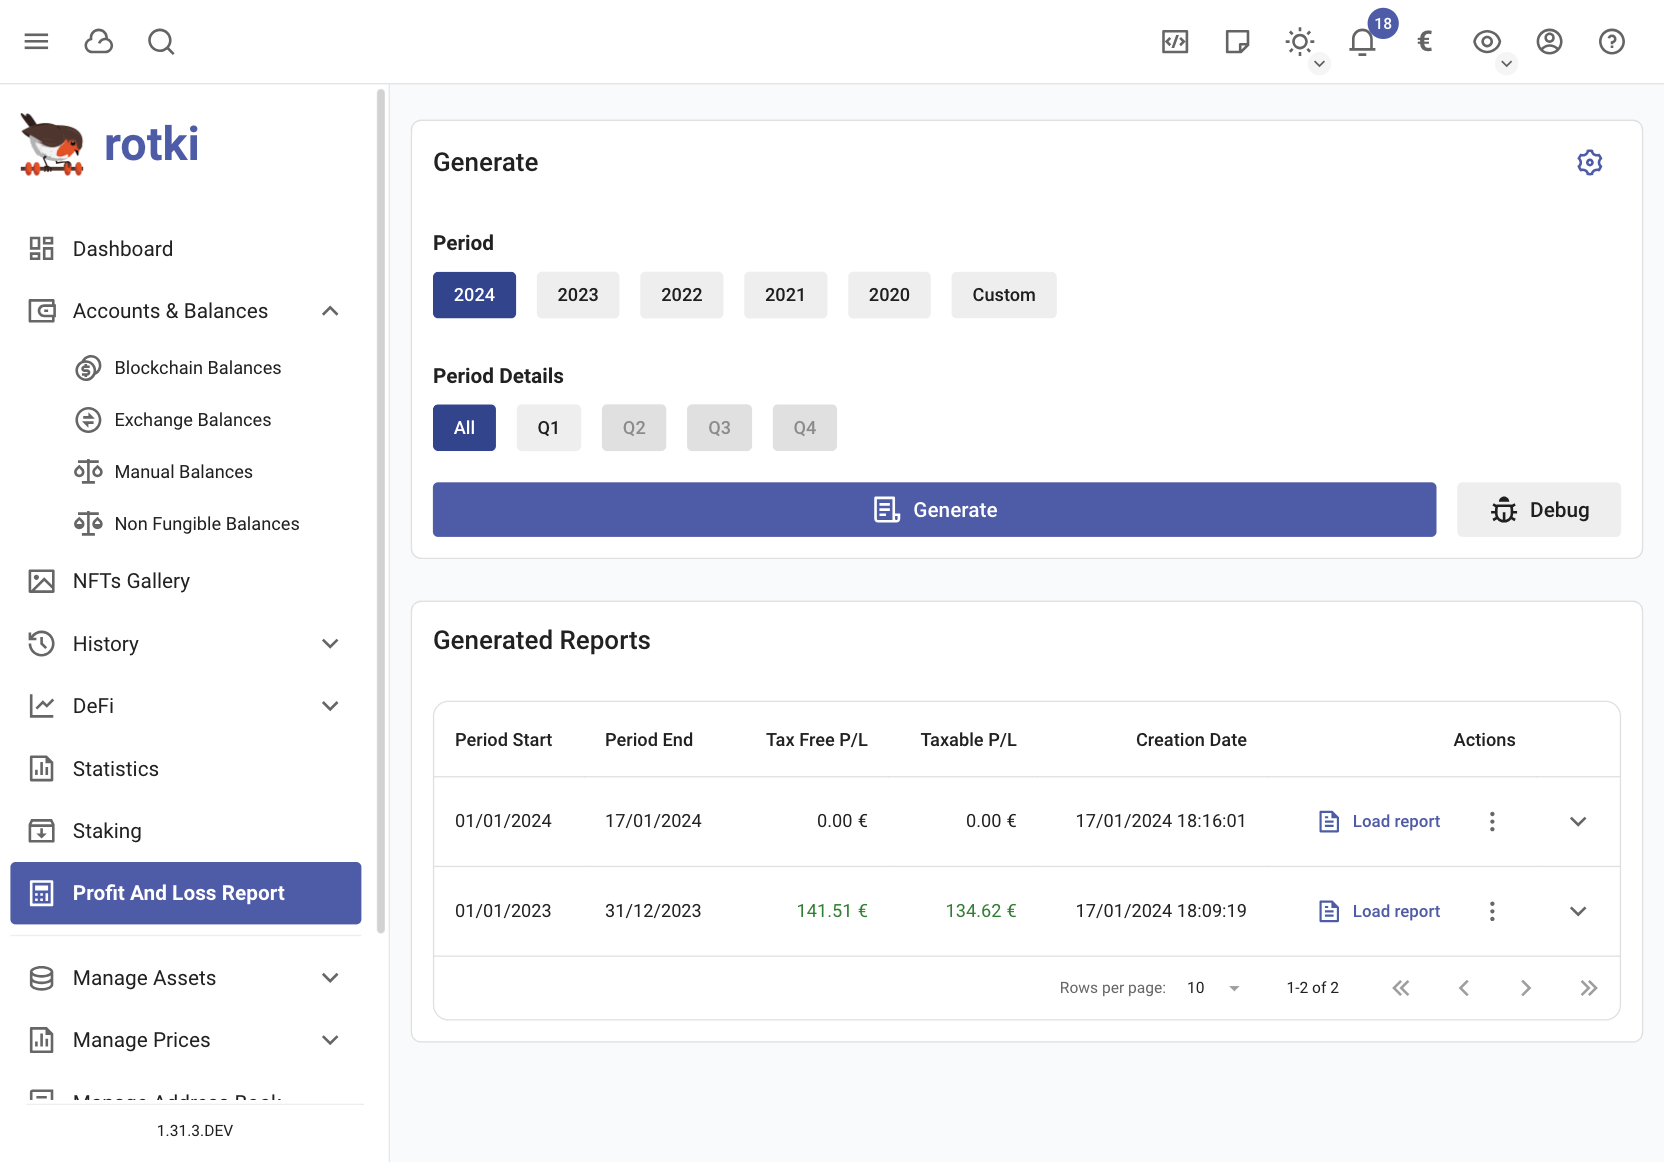
How to run the PnL report
To create a PnL report click on the “Profit and Loss Report” button from the left menu. Choose a period for the report (or click on Custom to set a custom time range) and press on “Generate” to start the report.

The calculation may take some time. You can also see a summary of the accounting setting the report is running with in the “Accounting settings” section.
If you encounter any problems during the profit/loss report check out the PnL report creation problems section.
In the report screen you can also see any previously generated profit and loss reports, and manage them. Free users are limited to 20 stored reports in total.
Results of the PnL report
Once done you have an overview of the profit/loss for the given period, how much of that is taxable, and how much each taxable event category contributes to the total.

Additionally below the overview you get a table containing all of the events that were taken into account in the calculation along with how much of the profit_currency you lost or gained through that event.
Finally you can get a CSV export by pressing the “Export CSV” button. This export is meant to be imported into Google Sheets. Press the button and then choose a directory to write the CSV files to. Once done you can import the CSV files into Google Sheets via its import menu. CSV export only works for the latest report generated in the active session.
Following are definitions for the all_event document’s columns
typeis a string describing the type of event a user engaged in, e.g. in “I buy ETH for EUR”, buy is thetype.locationis a string describing the location the event occurred at. For example “kraken” for kraken trades.assetis a string identifying the asset an event was paid in, e.g. in “I bought 1 ETH for 100 EUR”, EUR is theasset.free_amount: is a number specifying the amount ofassetthat won’t be taken into consideration for tax purposes.taxable_amount: is a number specifying the amount ofassetneeded to be taken into consideration for tax purposes according to the accounting settings, e.g. “I sold 1 ETH for 120 EUR”, 1 ETH is thetaxable_amount.timestampis a string containing the date and time an event was executed.priceisassetprice inprofit_currencyat the time the event was executed.pnl_freeis a number describing the amount ofassetconverted to the user’sprofit_currencythat won’t be taken into consideration for tax purposes.pnl_taxableis a number describing the amount ofassetconverted to the user’sprofit_currency. Note that rotki additionally subtracts an exchange’s trading fees from this number.cost_basisIf this is a spending event, this field contains information about where the amount that is spent came from according to the user’s setting. Which buys contributed to this spend. If not enough information is known then this is also stated.notesInformation about the event.
Note
To learn more about profit_currency or to adjust it, see the section Changing the Profit Currency
Results from past profit and loss reports are saved so the user can later review them without the need to run a new execution.
Cost basis
Cost basis is a really important aspect of accounting. For each sell event it lets you know what was the price at which the sold asset was acquired depending on a number of settings.
Cost basis is calculated in rotki for all trades/events we support. Trades/events that rotki recognizes are:
All trades performed in our supported centralized exchanges
All trades done in our supported AMMs. As of this writing this is uniswap, sushiswap, balancer.
All manual trades inserted by the user.
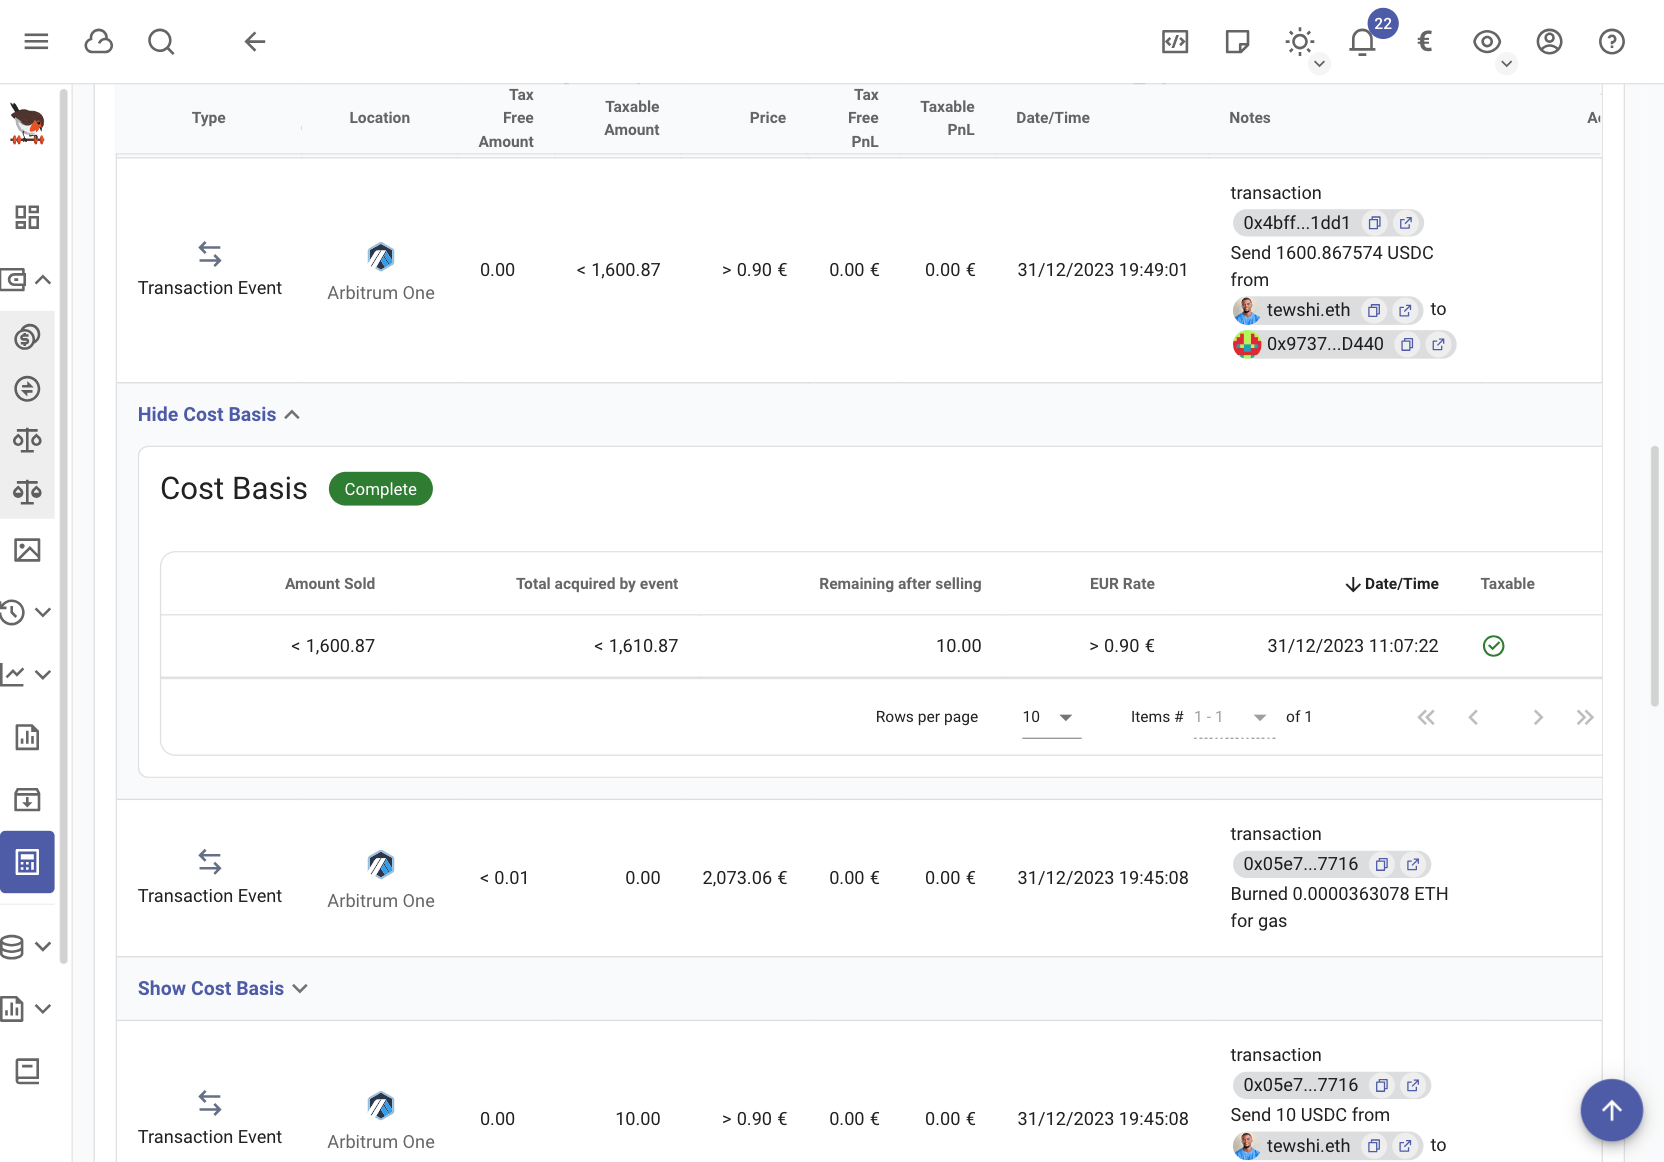
For all those trades you can see the cost basis when you create a profit loss report by:
Either navigating to the trade in the generated table after the PnL report and pressing the arrow to show more details.
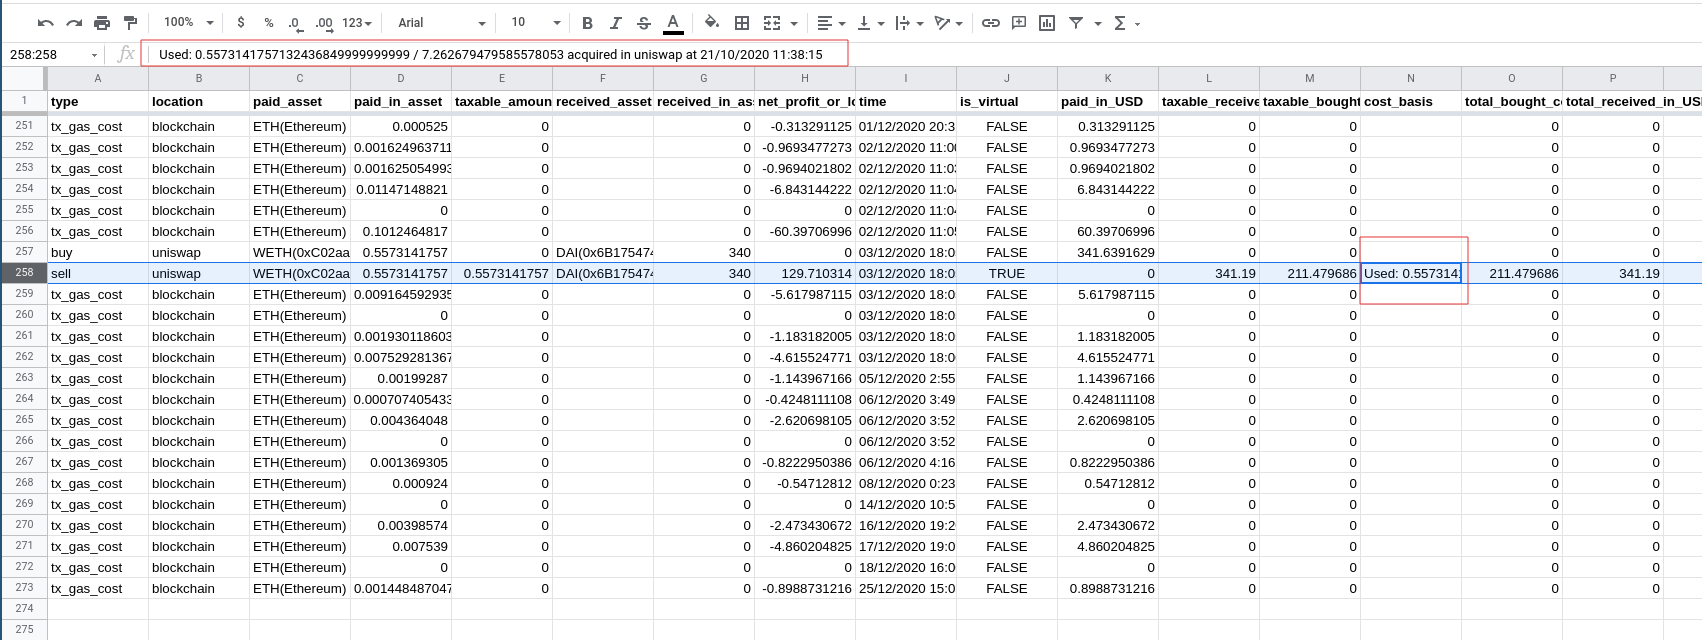
Export the report to CSV and import it in a spreadsheet tool. We have tested it works with google spreadsheets and libreoffice. The cost basis column contains the info you seek.
PnL report creation problems
No documented acquisition found
It’s possible that rotki is not able to find an acquisition event for a sale. In which case it will warn you and ask you to fix it.
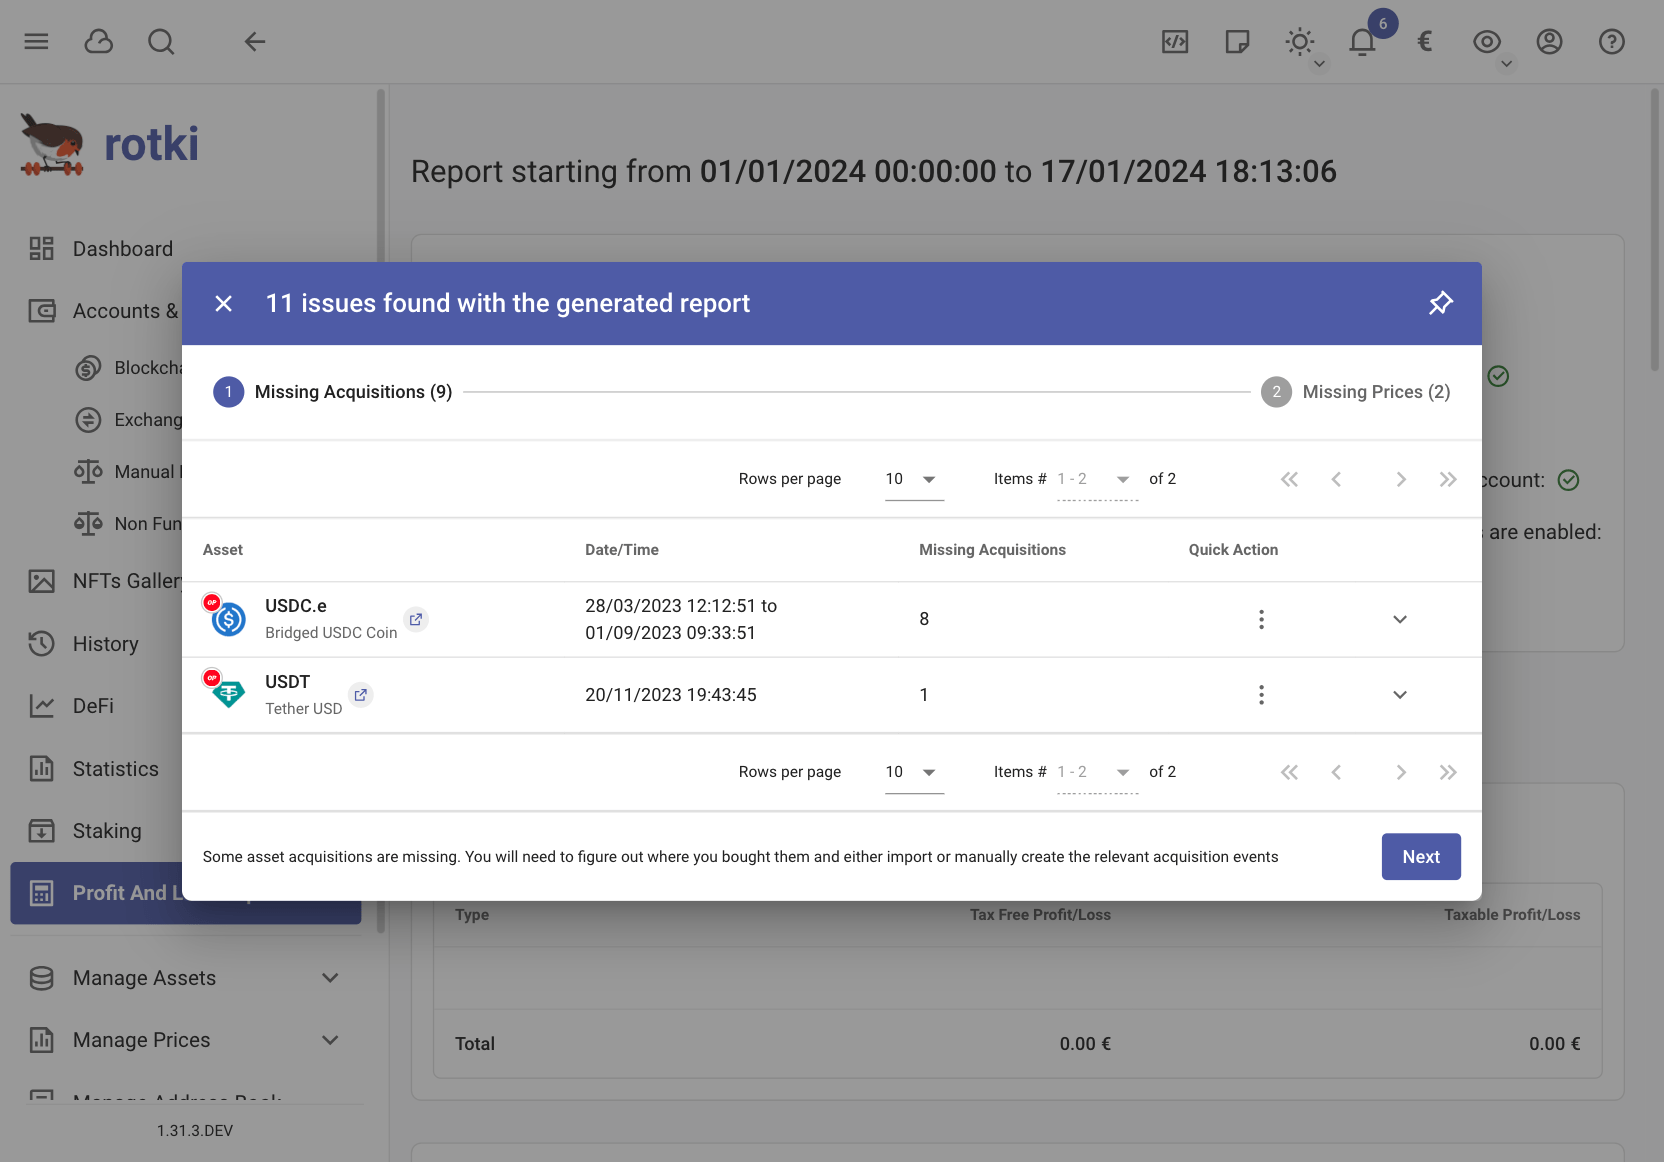
This can happen for many reasons. The asset may have been acquired in a non-supported exchange/protocol, some event not detected etc.
The way to fix it is to add either a manual trade to tell rotki how you acquired that asset or an acquisition history event.
Error when importing CSV formulas to Google Docs
This is caused by the different Google Doc language configurations. Simply change the language on Google doc to United States. This can be done in File > Spreadsheet settings > General > Locale
Timeout or price not found for timestamp
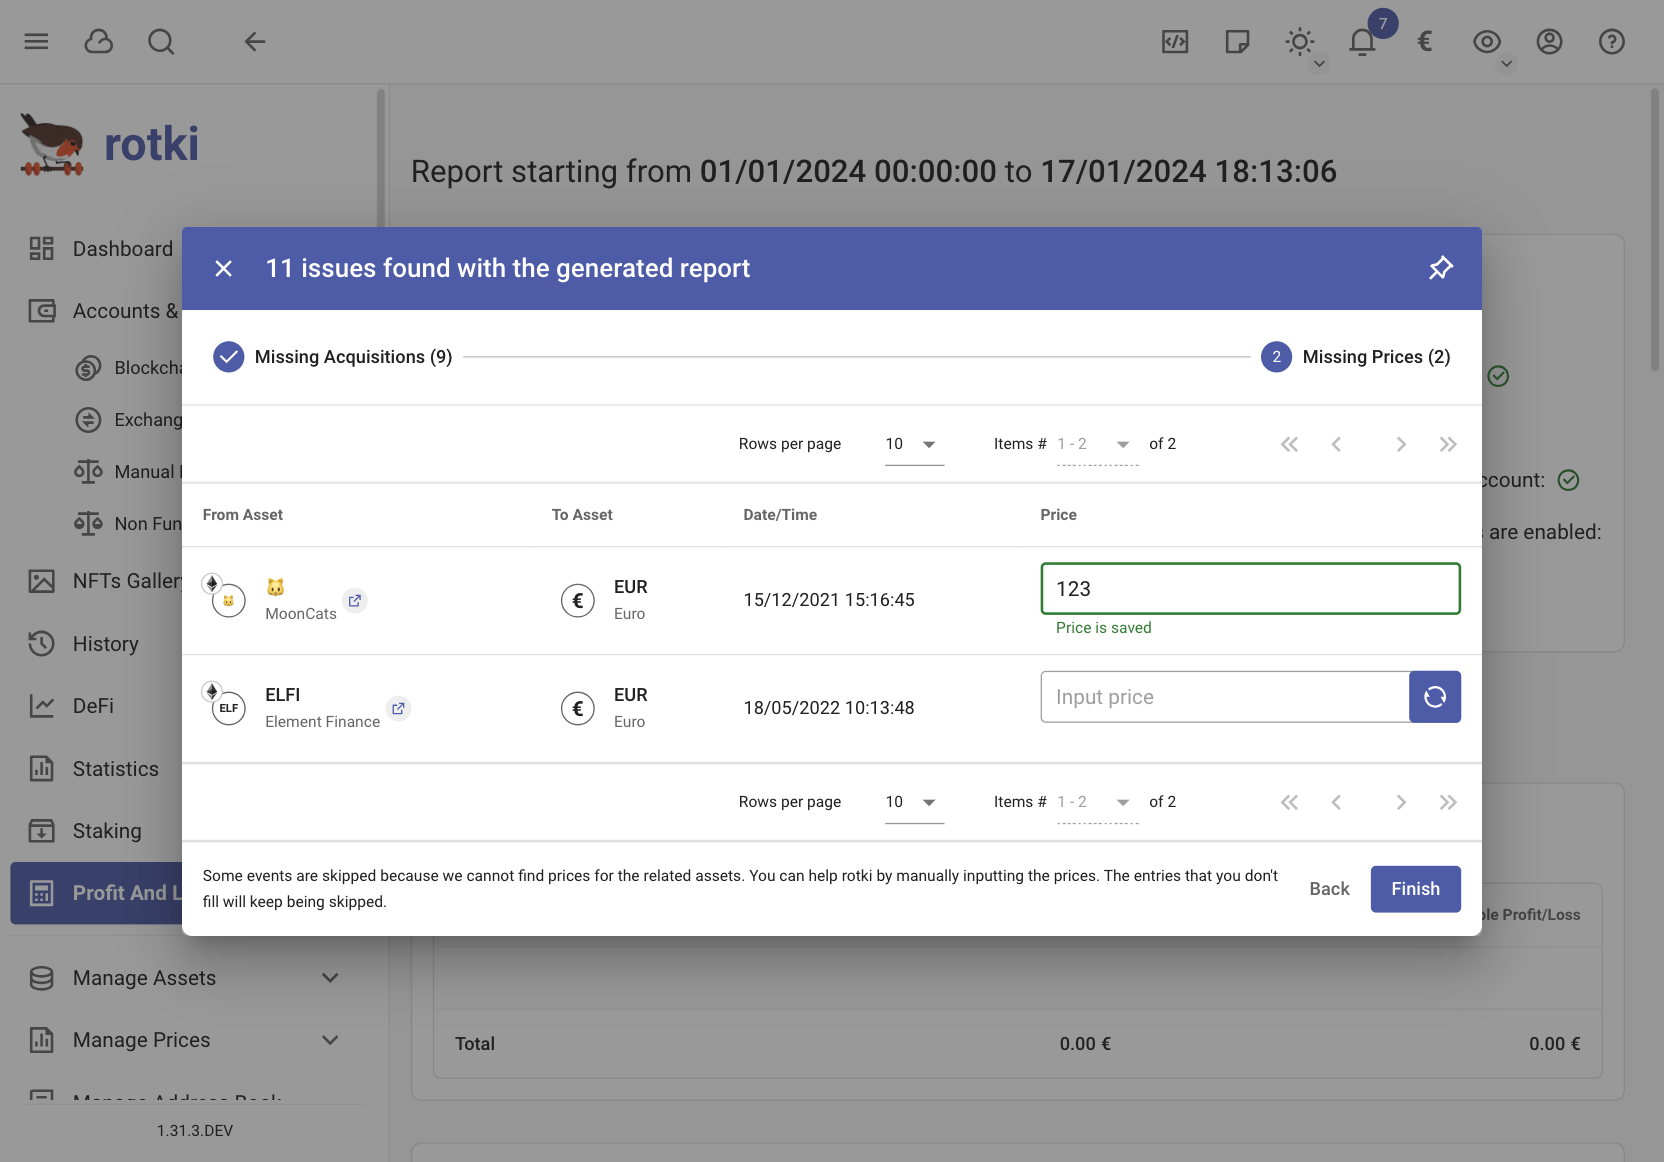
It’s possible that rotki is not able to find the price of assets. You have to input the price manually, otherwise the event will be skipped from pnl reports. For example if you are creating a GBP profit/loss report and the asset is GNO then make sure to create the GNO -> GBP historical price cache. You can add the prices on the spot, or open Manage historical price oracle cache.
The result of the generated PnL report is not what you expected.
The results of the generated PnL report can vary depending on the accounting settings. Check if any settings align with unusual treatments for your events, so you can adjust the settings to resolve the issue yourself.
If you have any question or are confused about the settings, feel free to send us a message on Discord.
Seeking help with complicated errors during PnL report generation
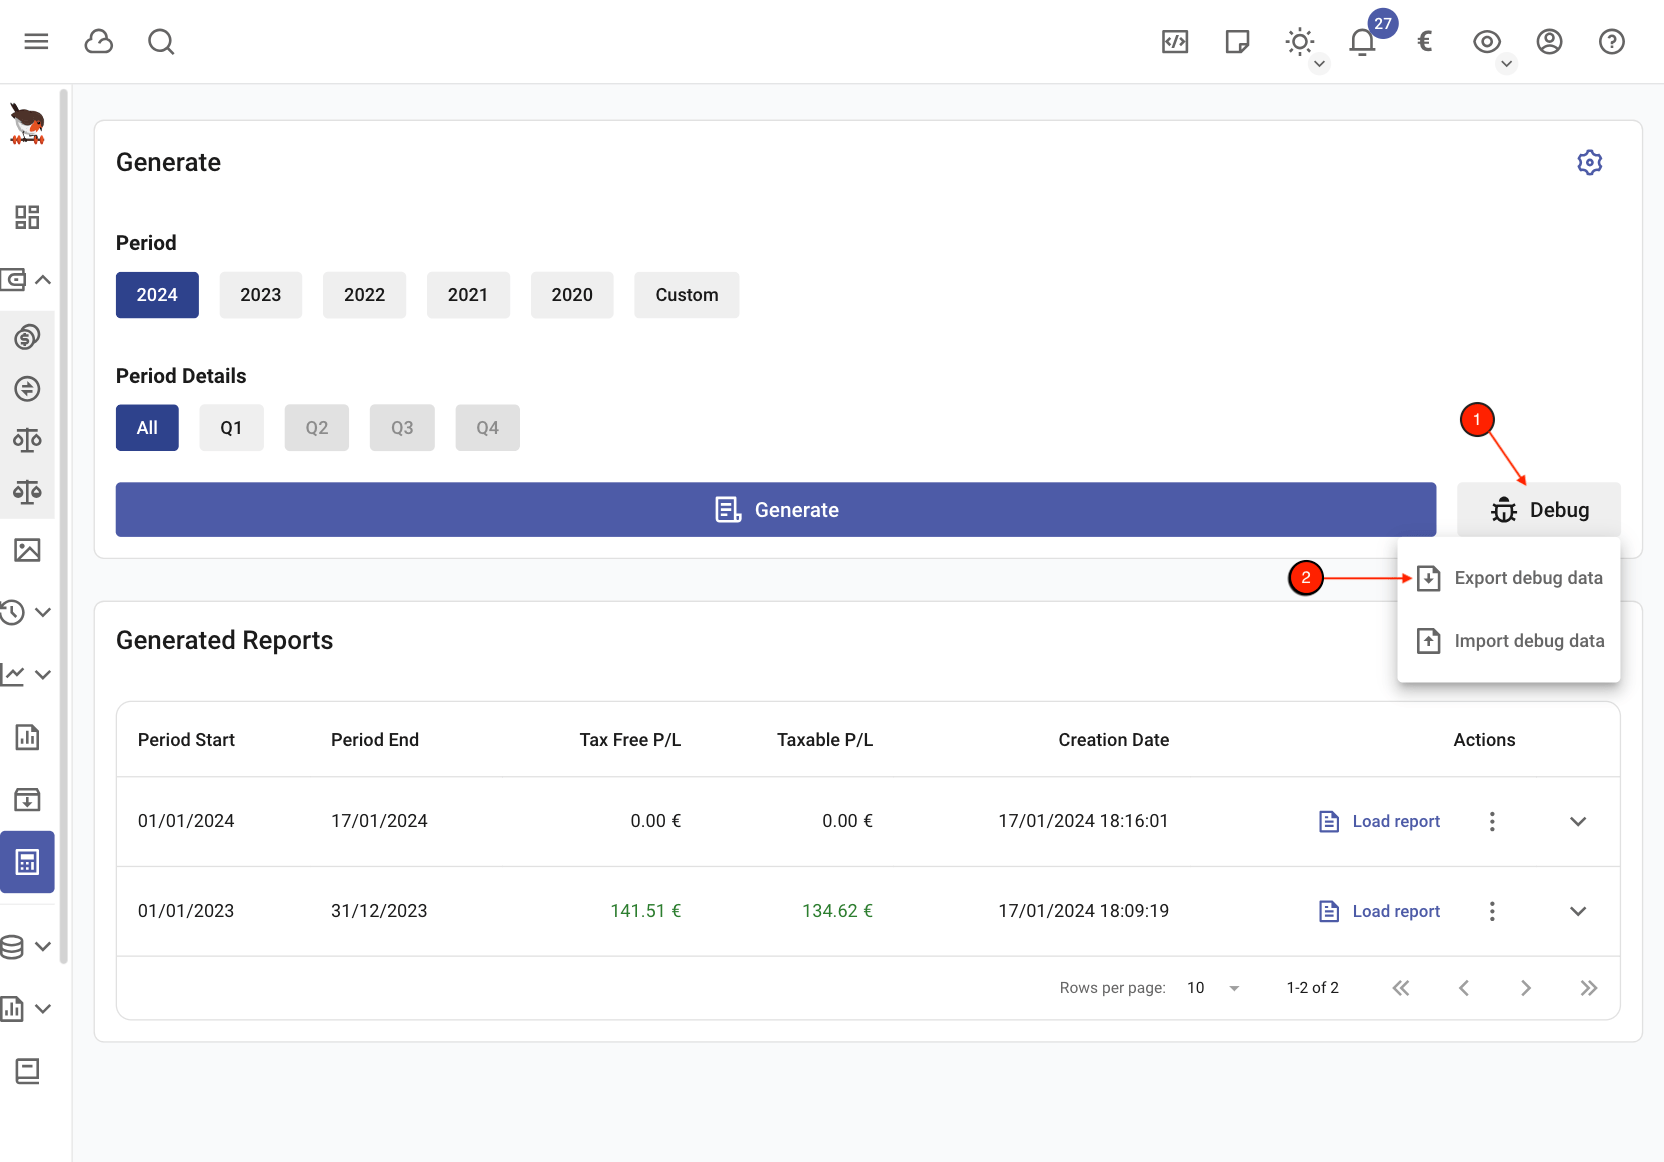
It’s possible that many errors could occur during the PnL report generation due to certain event(s) not accounted for properly. In such a scenario if all else fails, exporting the PnL debug data allows us to fully replicate the issue encountered and find a solution.
Note
Only share PnL debug data with the developers as it may contain sensitive information.
Statistics
If you have a premium subscription you can get statistics on all your assets and trades.
Note
The starting point of these statistics will be when you started using the application as rotki takes balance snapshots daily. We also plan to provide analytics on data before that in a best effort basis as detailed in this issue.
Click on the statistics page on the left sidebar to go to your statistics page.
Since rotki is tracking all your assets over time the first thing you can see is a value/time graph of your entire net value.
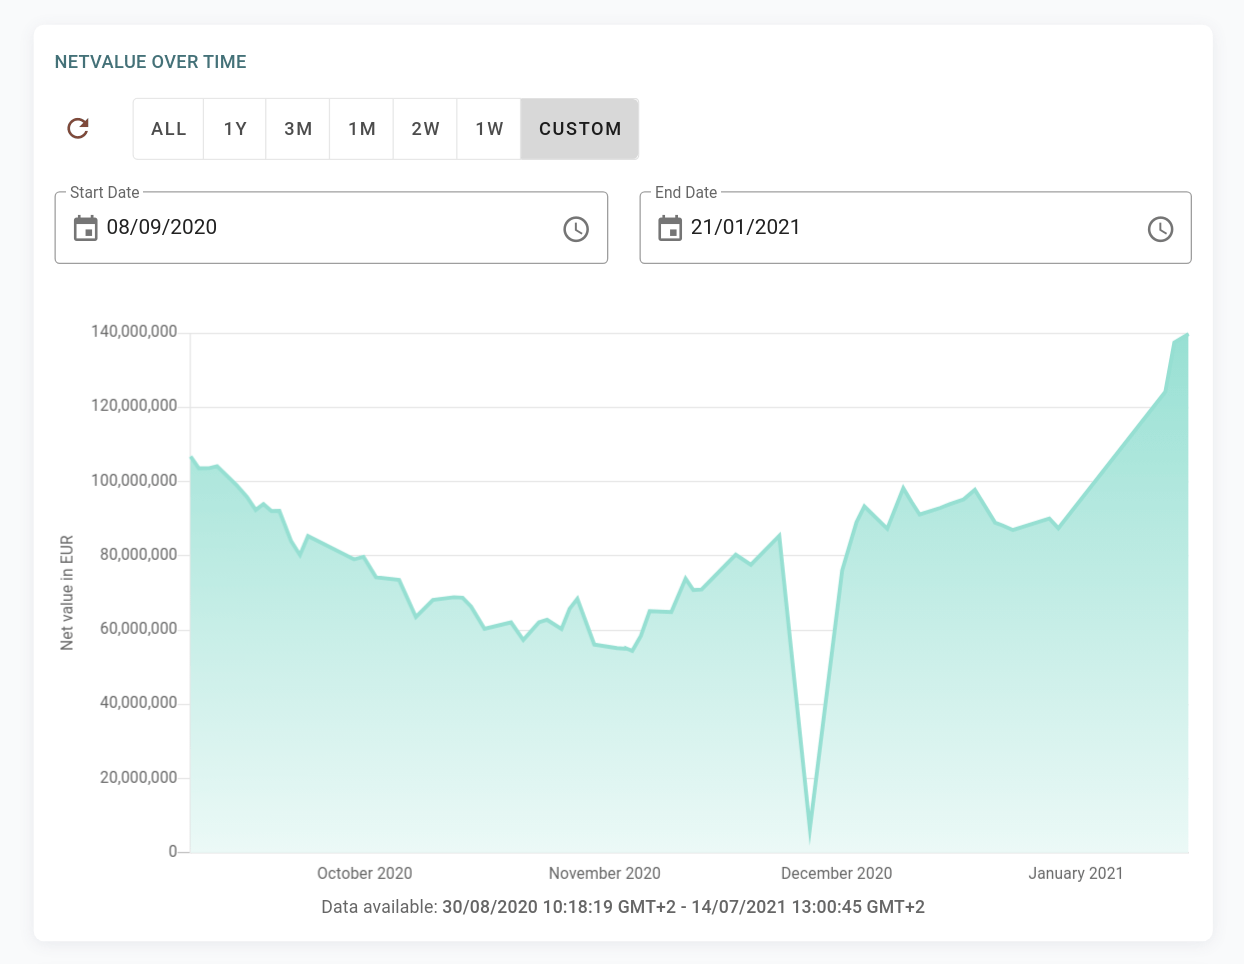
Following that you can see a graph of quantity of an asset superimposed on its USD value over time.
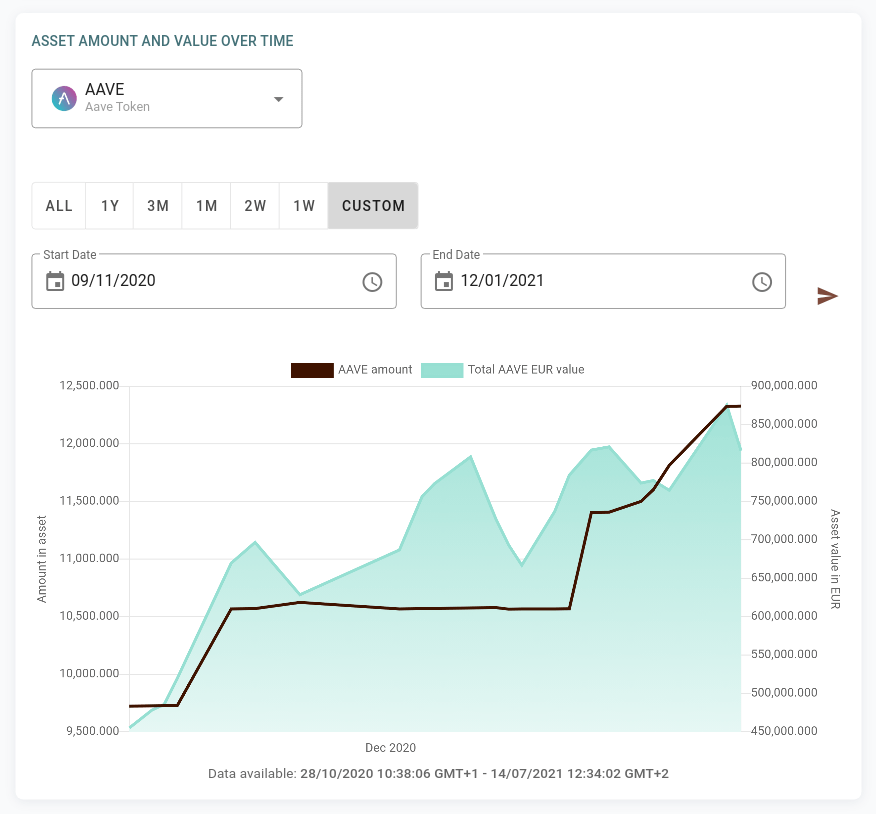
We have introduced an option in the asset graphs to select the Missing snapshot multiplier. It sets after how many hours between two snapshots the graph will display zero balances. This allows to improve graphs for periods where the balance of an asset was zero.
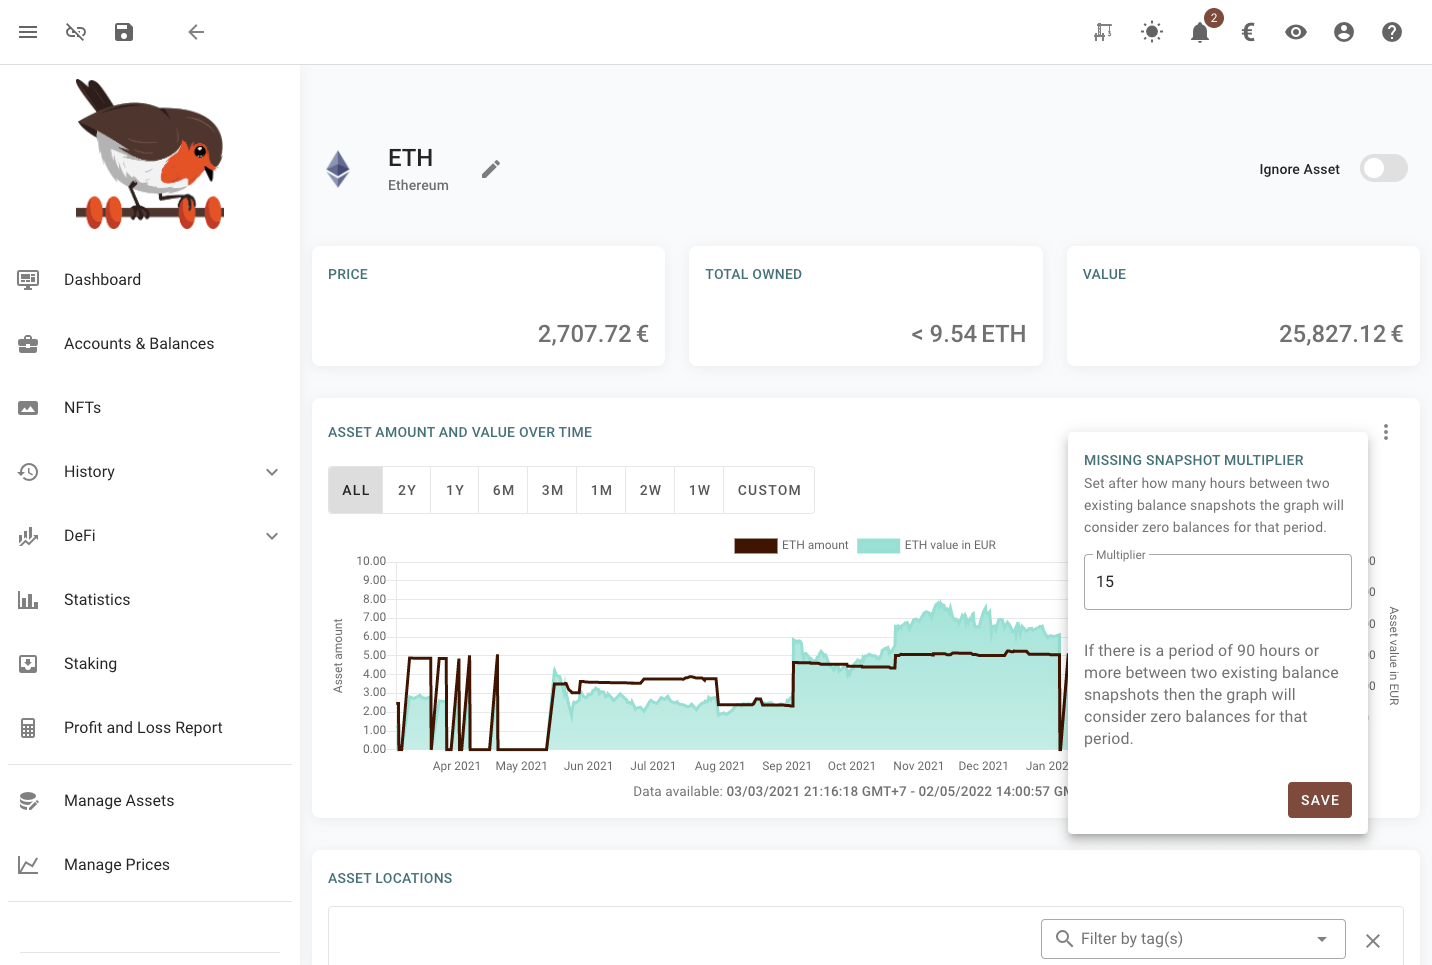
All the assets graphs as well as the dashboard graph have the possibility of selecting a range for zooming. This can be done by left clicking and dragging on the graph itself or using the selector under the graph. The graph can be zoomed out by double clicking on it.
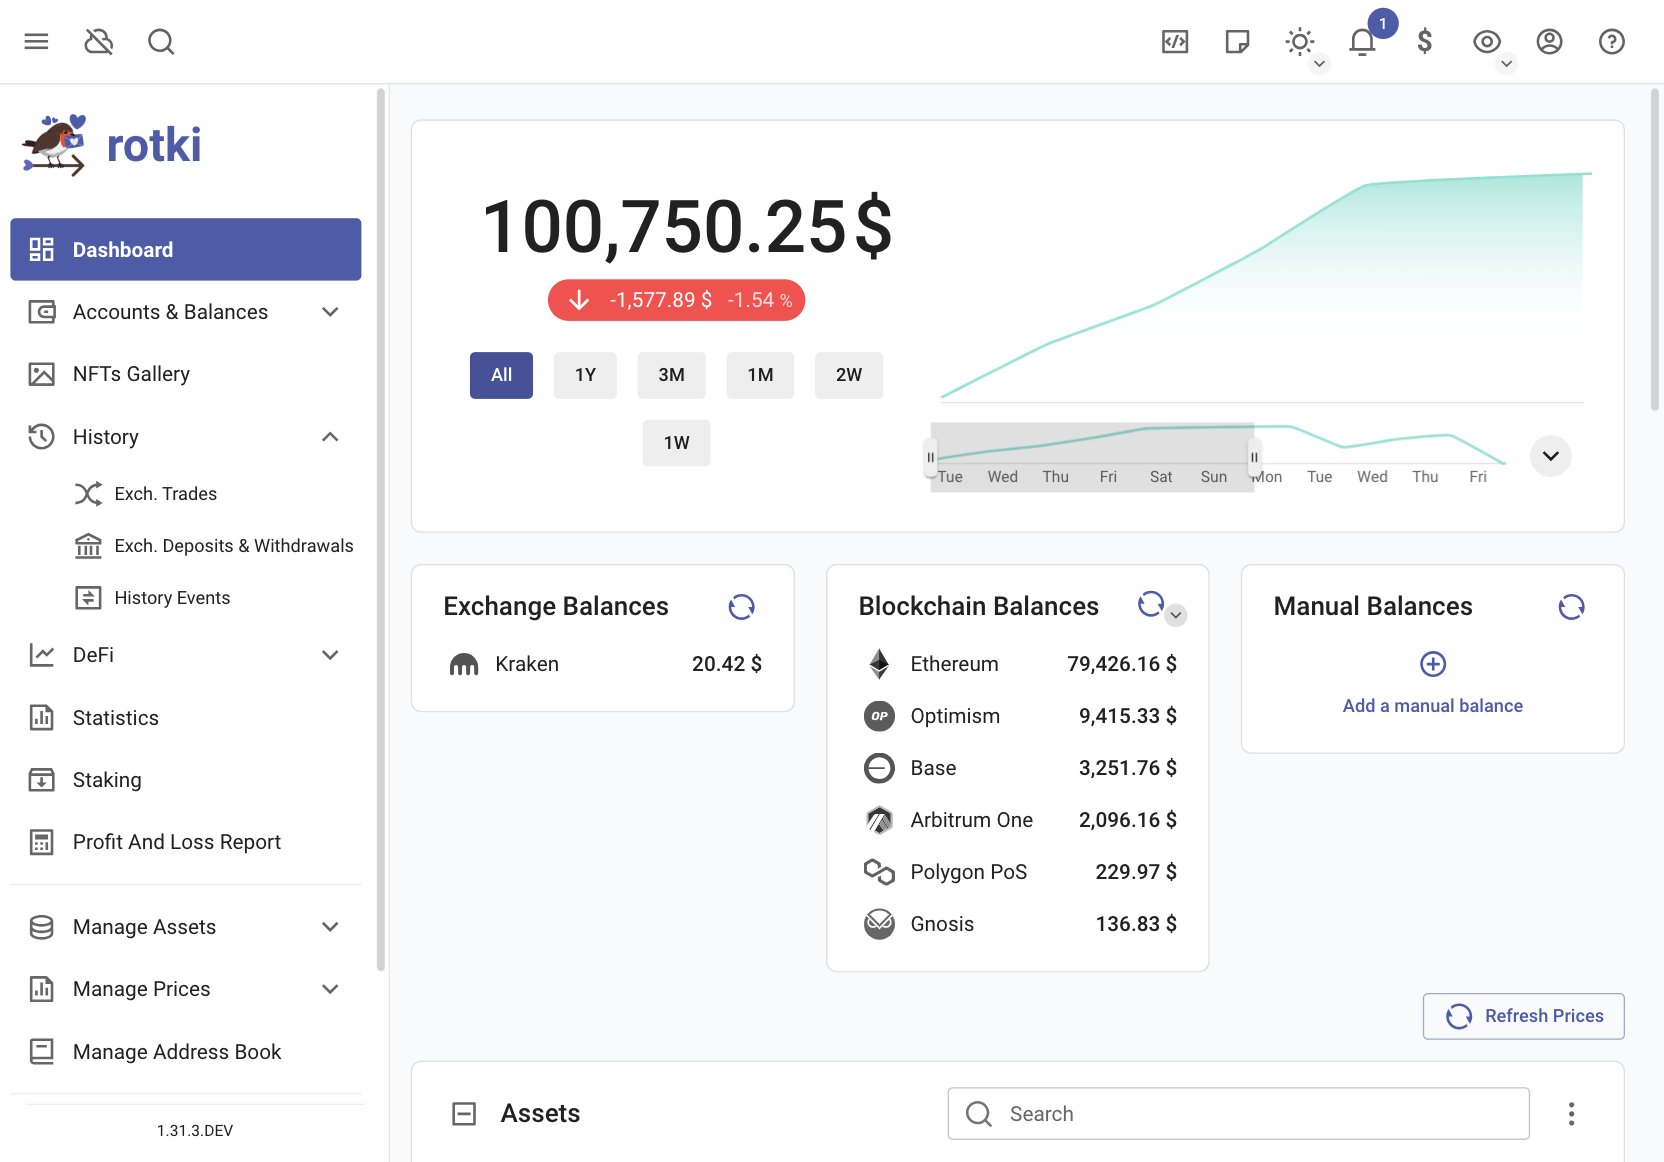
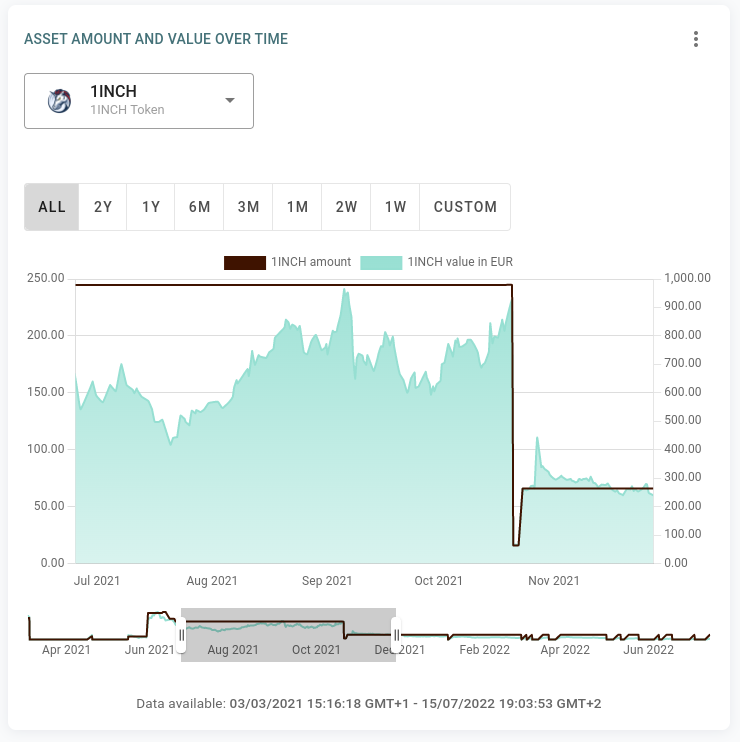
Furthermore you can see a piechart of the distribution of your netvalue across different locations. So you can determine how exposed you are to having a big part of your net value in exchanges, in banks e.t.c.

Moreover you can see a piechart of the distribution of your netvalue across all of the assets you own. This is an important analytics tool as it can help you determine your exposure on each asset and if some rebalancing of your portfolio is in order.
Global search
You can use global search provided to speed up your actions by clicking icon on top bar, or using shortcut Control-/ (Command-/ if you are using Mac).
Some actions provided by this global search:
Navigate to any page in rotki
Some basic actions such as adding a new trade.
Go to certain owned asset overview page.
Go to certain location overview page.

Taking Notes In-App
You can now take notes in various sections of the application. Note taking is categorized into two types:
General Notes: These are notes available & visible across the application.
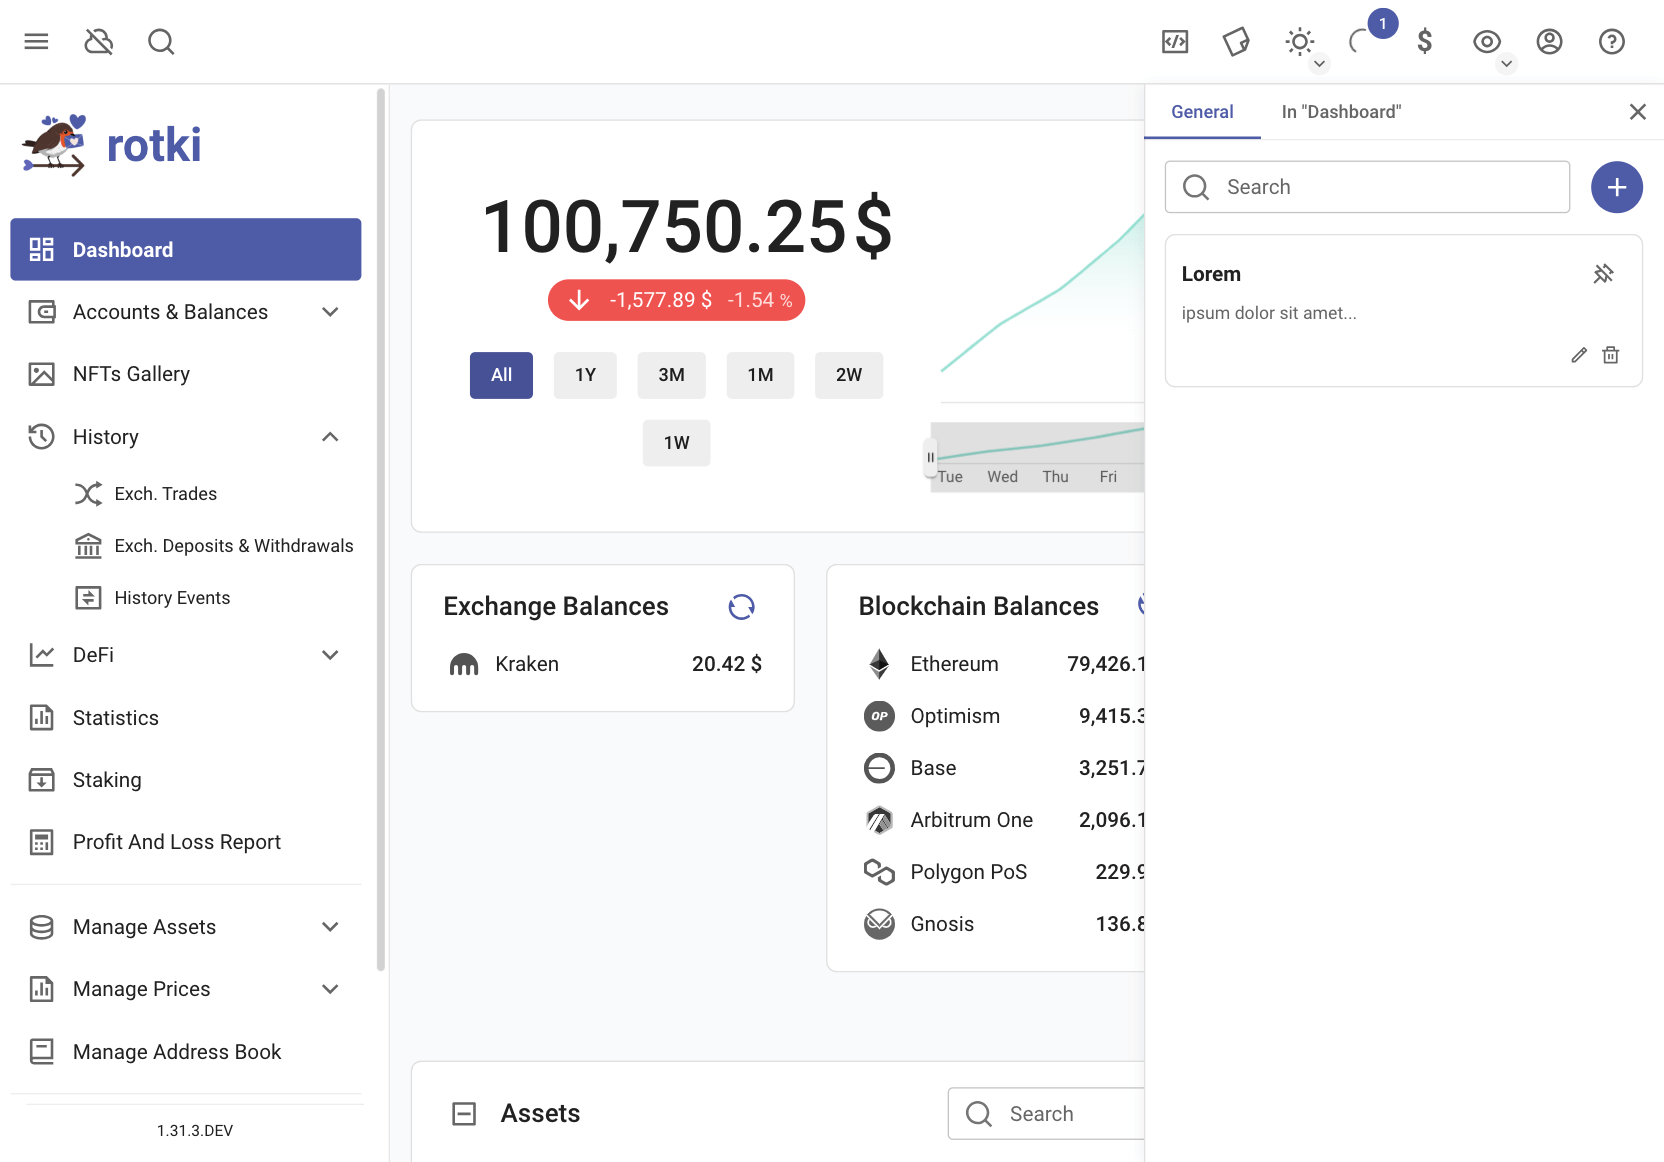
Location-specific Notes: These are notes restricted to the location in which they were created in the application.
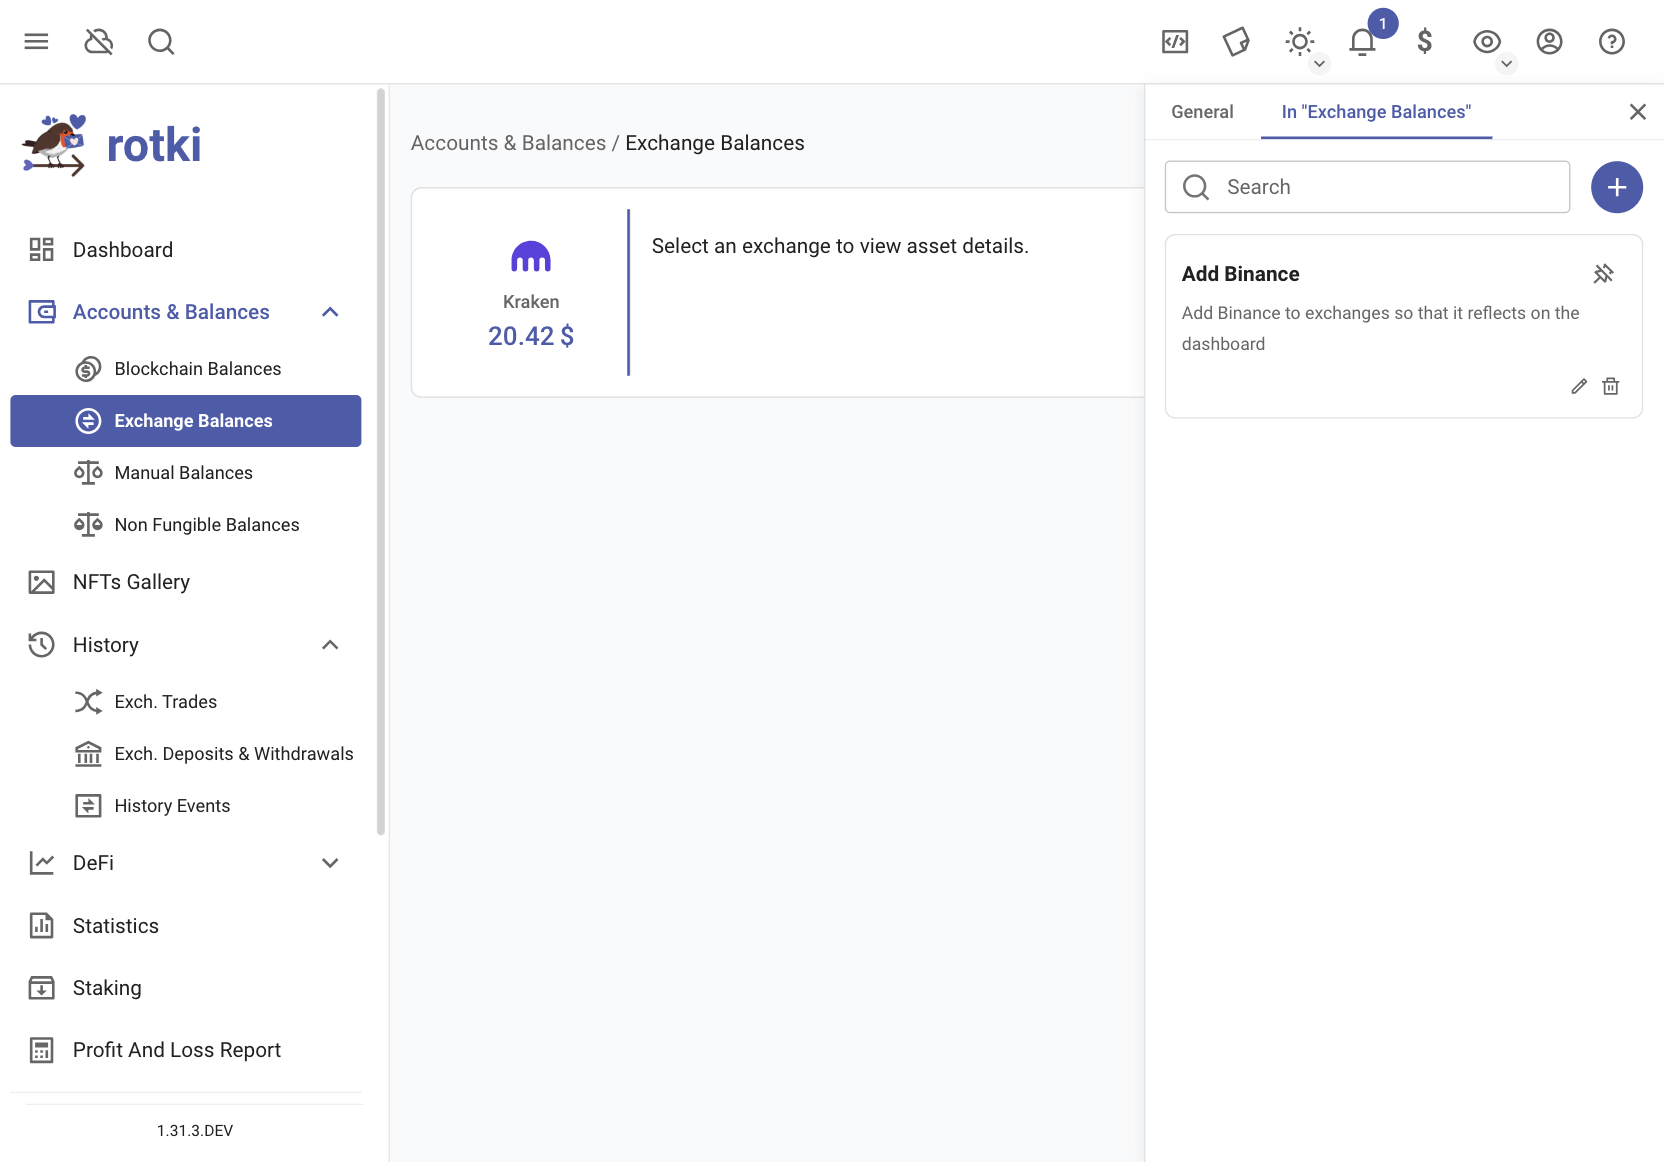
Adding/Editing a note
To create a new note, click on the note icon at the top right and proceed to click on the "+" button which will pop up a note creation form.
Editing a note follows similar process with the only exception of clicking the pen icon of the note to edit instead of "+" button.

Pinning/Deleting a note
To delete a note, click on the button labelled as 1 in the screenshot below.
To pin a note to the top, click on the button labelled as 2 in the screenshot below.

Evm Address Book
Rotki provides an addressbook for EVM blockchains. This replaces addresses with names provided by the user across the application. You can click on “Save this name for all chains” to use the name for the provided address on all chains where that address appears. Addressbook is split into two different kinds:
Global Addressbook: It replaces addresses with the names provided across the entire application irrespective of user logged in.
Private Addressbook: It replaces addresses with the names provided for the user currently logged in. It takes precedence over names found in the global addressbook.

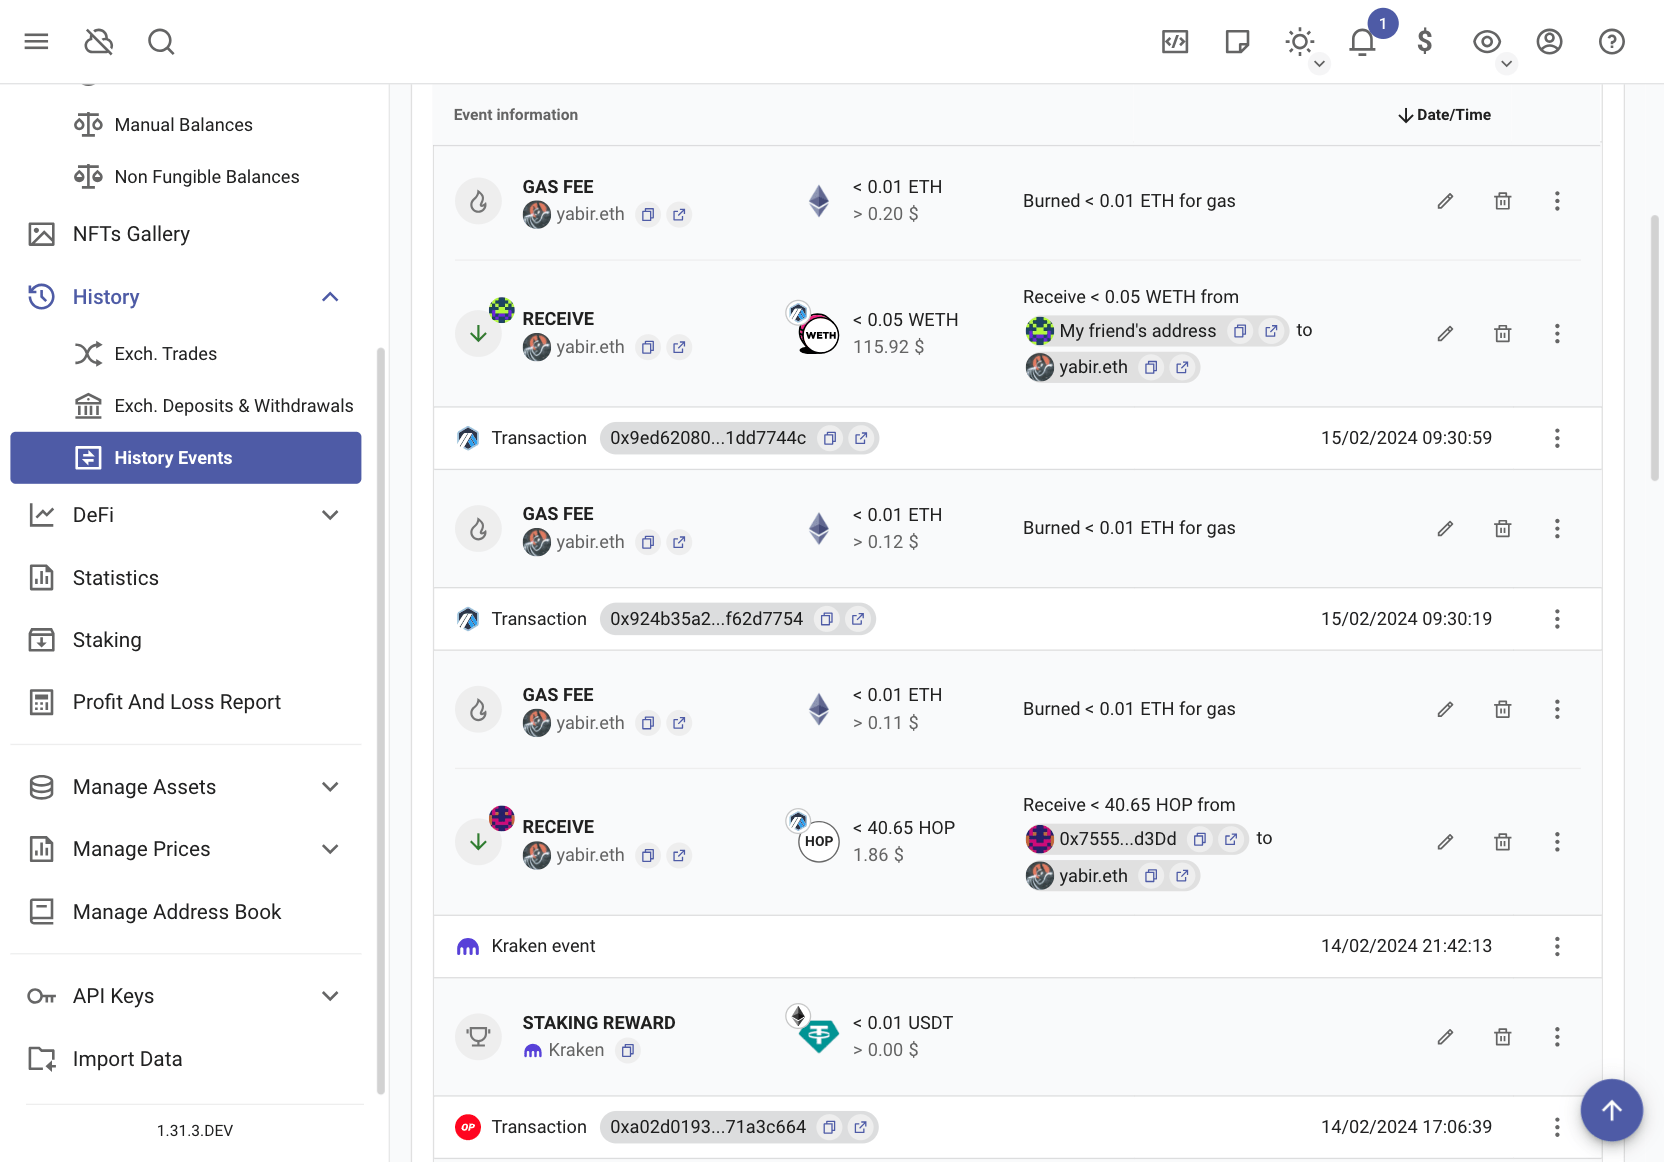
Note
The address resolution order can be configured in the general user settings. The default order is:
Private Address Book
Blockchain Account Labels
Global Address Book
Ethereum Tokens
Hardcoded Mappings
ENS names.
Set the backend’s arguments
Rotki runs a python daemon on the backend. Most times you won’t need to customize its arguments but if you need to do so, especially for debugging purposes this is how you can.
Create or edit if there exists a file with the name rotki_config.json in the same directory as the rotki executable. Add to the json object any arguments that are also arguments of rotki. Then when rotki starts these will be passed as arguments to the backend. An example rotki_config.json follows:
{
    "loglevel": "debug",
    "logfromothermodules": false,
    "log-dir": "/path/to/dir",
    "data-dir": "/path/to/dir",
    "sleep-secs": 20,
    "max_size_in_mb_all_logs": 500,
    "max_logfiles_num": 2
}
The above arguments are:
loglevel: Set the loglevel for the application. Valid values are:
'debug', 'info', 'warn', 'error', 'critical'.logfromothermodules: If this argument appears then logging will also include log entries from other dependent libraries and not only rotki. Default is
false.log-dir: The name for the log directory.
data-dir: The path to the directory where all rotki data will be saved. Default depends on the user’s OS. Check next section
sleep-secs: This is the amount of seconds that the main loop of rotki sleeps for. Default is 20.
max_size_in_mb_all_logs: This is the maximum size in megabytes all logs of a single run can have
max_logfiles_num: This is the maximum number of backup (rotated) logs a single run can have.
Rotki data directory
Rotki saves user data by default in a different directory per OS. For each OS data is stored in the respective standards compliant equivalent directory.
Linux:
~/.local/share/rotki/data/OSX:
~/Library/Application Support/rotki/data- please note this folder is hidden by defaultWindows:
%LOCALAPPDATA%/rotki/data
Before v1.6.0 rotki was saving data in $USER/.rotkehlchen. From v1.6.0 that directory got migrated to the OS equivalent standard directory and it should be safe for the users to delete the old directory as long as the new directory contains the migrated DB.
A very good idea about the rotki data directory would be to be making frequent backups of it as it contains all of the data of all of your rotki accounts and cache data for historical price queries.
Manually accessing the database
It is possible that to detect potential problems with data or modify the state of the database the user needs to manually access it. To do so we recommend the usage of DB Browser for SQLite. DB Browser for SQLite is an open source software that provides an accessible UI and brings two programs, one with the normal browser and another with the functionalities to access encrypted databases. You can download it for Windows, MacOS and Linux at the previous link.
Once installed you have to start the program with the sqlcipher functionality and after that you need to select the rotki database. This database can be found in the rotki data directory. Once you open it, the program will ask for the password of the database. The password used for the database is the same as the one you use to unlock your rotki account.
Once the database is unlocked you can browse the information in the Browse Data tab or execute custom SQL commands. Please be aware that manually modifying the information of the database can lead to inconsistent state.
So only run commands that you have double checked with our team there. Or use it without supervision only if you really know what you are doing. And always take backups of the database before you modify it.
Long running tasks
A list of processing tasks is available on the notifications tray.
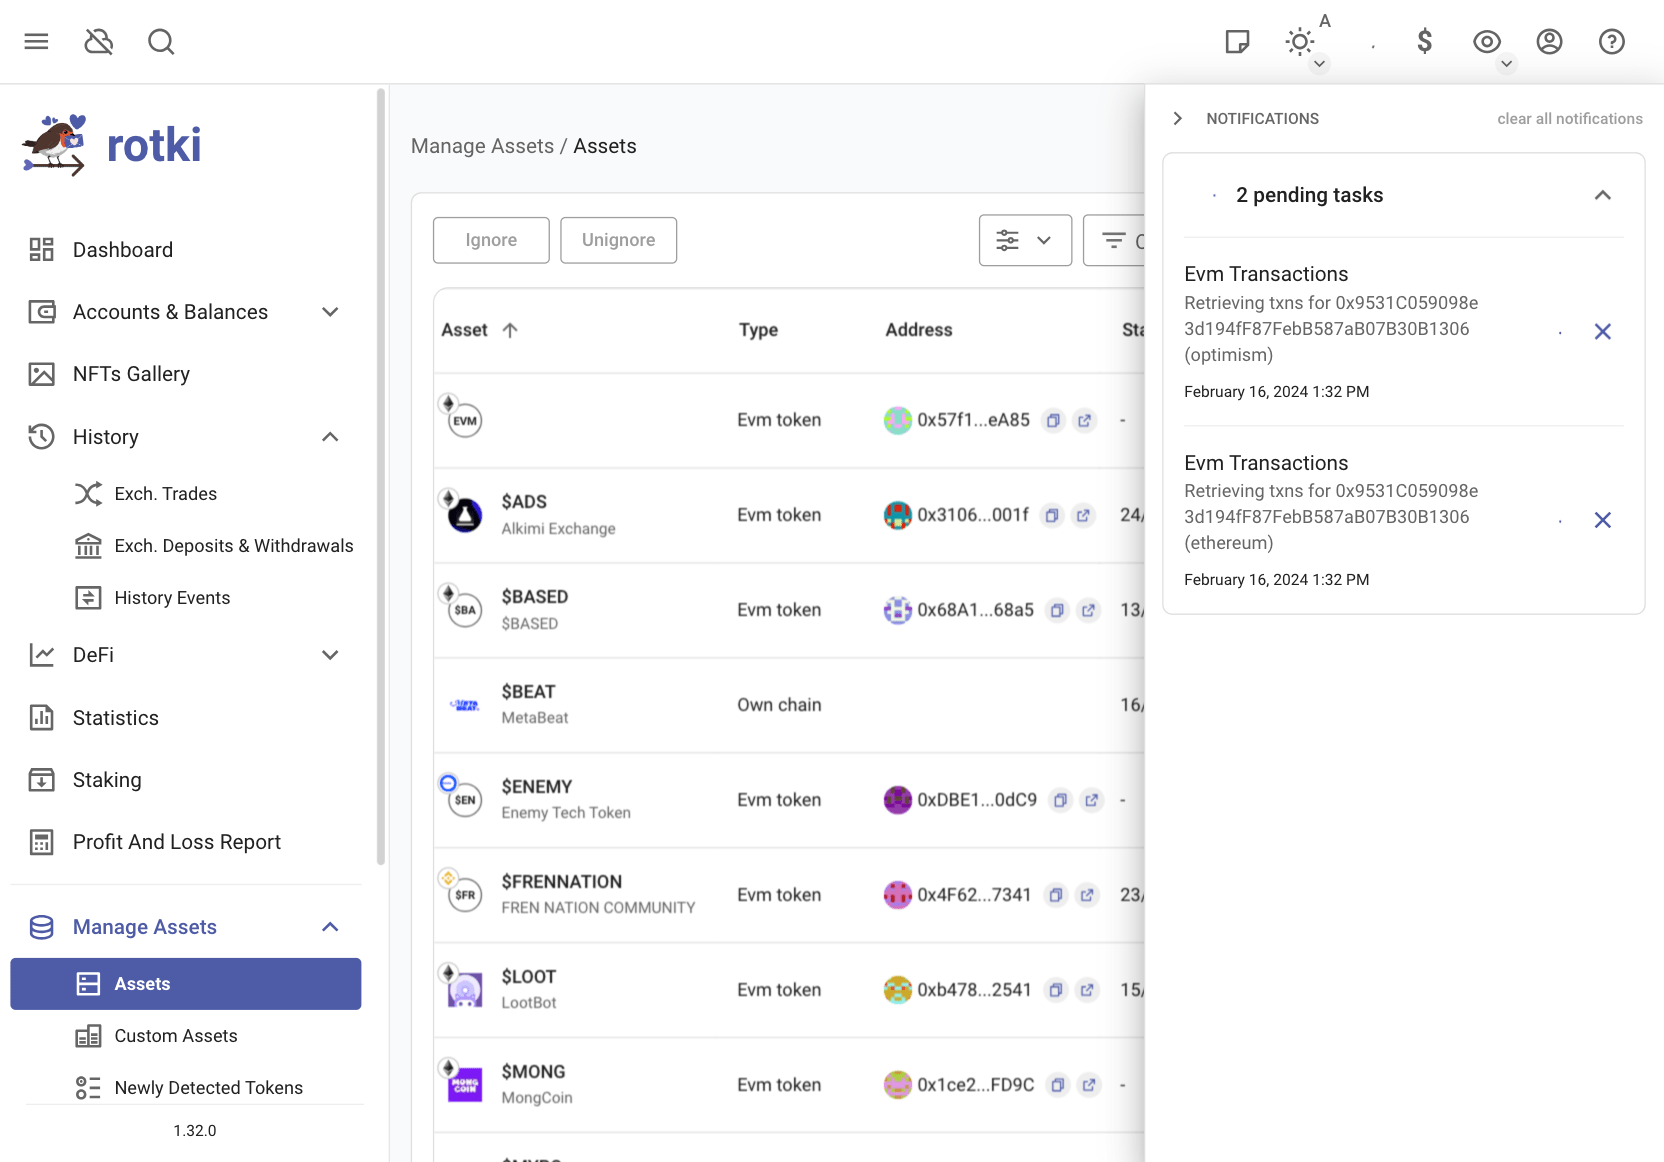
It is possible to cancel a long running task, but use this feature sparingly.

Using rotki from mobile
If you are using DAppNode or the docker image instead of the electron application it is possible to access rotki from a mobile device.
DAppNode
If you are running rotki on a DAppNode then in order to access rotki on mobile the only thing needed is to setup a VPN connection between DAppNode and your phone or tablet.
You can use either Wireguard or OpenVPN by following the guide linked above. When you are done with the configuration
you can activate the VPN connection on your device. With the VPN activated you will be able to access rotki
on http://rotki.dappnode.
This way you can get the full rotki functionality on mobile.
Docker
Accessing rotki on mobile when you run docker on your own can be a bit complicated and depends on the kind of setup you have. You have to make sure that rotki is never directly accessible from a public network.
One way to have rotki accessible on mobile over a public network is by making sure that an authenticated proxy intercepts all traffic directed to rotki. This way you can ensure that no one else can access your rotki instance.
If you followed the authenticated proxy example from above you should be able to access rotki’s interface
by going to https://rotki.example.com on your phone or tablet.
Alternatively if you already have a VPN setup to your private network or on the machine you could use this VPN connection to securely connect to the rotki instance that runs in this network machine.

For the awareness reason, if the app is run in docker, you will see this warning every time it is opened.
You can turn it off by running rotki docker image with this environment variable:
ROTKI_ACCEPT_DOCKER_RISK=1
Troubleshooting
Out of gas error during eth_call
If you see an error like the following:
[17/12/2020 18:31:29 CET] WARNING rotkehlchen.chain.ethereum.manager: Failed to query own node for <bound method EthereumManager._call_contract of <rotkehlchen.chain.ethereum.manager.EthereumManager object at 0x7f4b16b8bc90>> due to Error doing call on contract 0x06FE76B2f432fdfEcAEf1a7d4f6C3d41B5861672: {'code': -32000, 'message': 'out of gas'}
while rotki is querying your local geth node for something then it means that the query has hit the gas limit cap.
You can fix this by simply adding the --rpc.gascap 0 argument to your geth node. This will have an unlimited gascap. Be careful if it’s a node exposed to the public as this may allow a malicious eth_call to crash your node.
Local system clock is not synchronized
Your local system clock must be synchronized with certain remote servers, such as exchanges. If your clock is not synchronized, requests to these servers will fail. rotki will either display a specific error message (e.g., a 409 status code indicating a local system clock synchronization issue) or a generic 500 error message (please, report it to us).
To resolve this issue, follow the official guidelines provided by your operating system on how to synchronize your clock with an Internet Time Server. You can find detailed instructions for fixing this problem on Windows, Mac, and Linux in this link: Fixing Clock Synchronization. Once synchronized, try the request again.
Restoring backed up database at new account creation fails
Please, make sure you are using your premium subscription API keys/secret and the same password.
Data with multiple accounts/devices is not synced
Please, make sure all your accounts have the “Allow data sync with rotki Server” switched on, and that on each log-in you make the appropriate choice when prompted to replace the local database. See the section Sync data with rotki Server for more information about how to sync data with multiple accounts/devices.
ENS data not updating for newly registered name/address combination
If you just registered your ENS name and you don’t see the name and/or avatar being properly displayed in rotki then that means that the value is cached and you need to force a refresh. You can do that by going to “Blockchain&Accounts” view and pressing refresh button next to Ethereum balances.